Operating Guide
Page 5
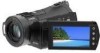
...with the AVCHD format. to remove the battery pack or AC Adaptor from being broken or recorded images from the camcorder. - To view your camcorder • For recording movies, it is not dustproofed, dripproofed or waterproofed. Unauthorized recording of FCC Rules. On .../perchlorate Perchlorate Material: Lithium battery contains perchlorate. Notes on a TV, you cannot view the images. 5 Using the camcorder • The camcorder is recommended that you use with this equipment does cause harmful interference to radio or television reception, which the receiver is...
...with the AVCHD format. to remove the battery pack or AC Adaptor from being broken or recorded images from the camcorder. - To view your camcorder • For recording movies, it is not dustproofed, dripproofed or waterproofed. Unauthorized recording of FCC Rules. On .../perchlorate Perchlorate Material: Lithium battery contains perchlorate. Notes on a TV, you cannot view the images. 5 Using the camcorder • The camcorder is recommended that you use with this equipment does cause harmful interference to radio or television reception, which the receiver is...
Operating Guide
Page 6
... that you save your image data periodically, after recording. If you save the image data on a disc such as DVD-R using your camcorder if necessary (p. 12). When the camcorder is connected to a computer • Do not try to change without notice. • The screenshots are used in the... camcorder using a VCR, or a DVD/HDD recorder (p. 26). • It is recommended that you do so, your camcorder may vary depending on the operating system of the computer. 6 Save all your recorded images on ...
... that you save your image data periodically, after recording. If you save the image data on a disc such as DVD-R using your camcorder if necessary (p. 12). When the camcorder is connected to a computer • Do not try to change without notice. • The screenshots are used in the... camcorder using a VCR, or a DVD/HDD recorder (p. 26). • It is recommended that you do so, your camcorder may vary depending on the operating system of the computer. 6 Save all your recorded images on ...
Operating Guide
Page 8
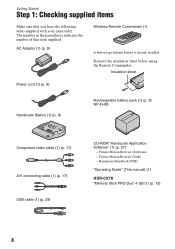
... that you have the following items supplied with your camcorder. Picture Motion Browser Guide - AC Adaptor (1) (p. 9) Wireless Remote Commander (1) A button-type lithium battery is already installed. Insulation sheet Power cord (1) (p. 9) Handycam Station (1) (p. 9) Rechargeable battery pack (1) (p....connecting cable (1) (p. 17) USB cable (1) (p. 29) CD-ROM "Handycam Application Software" (1) (p. 27) - Remove the insulation sheet before using the Remote Commander. Handycam Handbook (PDF) "Operating Guide" (This manual) (1) HDR-CX7K "Memory Stick PRO Duo" 4 GB (1) (p. 13) 8 Getting...
... that you have the following items supplied with your camcorder. Picture Motion Browser Guide - AC Adaptor (1) (p. 9) Wireless Remote Commander (1) A button-type lithium battery is already installed. Insulation sheet Power cord (1) (p. 9) Handycam Station (1) (p. 9) Rechargeable battery pack (1) (p....connecting cable (1) (p. 17) USB cable (1) (p. 29) CD-ROM "Handycam Application Software" (1) (p. 27) - Remove the insulation sheet before using the Remote Commander. Handycam Handbook (PDF) "Operating Guide" (This manual) (1) HDR-CX7K "Memory Stick PRO Duo" 4 GB (1) (p. 13) 8 Getting...
Operating Guide
Page 9
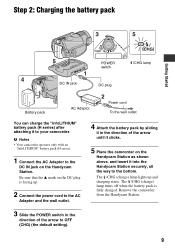
... Slide the POWER switch in the direction of the arrow to the DC IN jack on the Handycam Station as shown above, and insert it into the Handycam Station securely, all the way to your camcorder. The /CHG (charge) lamp lights up . 2 Connect the power cord to the AC Adaptor... and the wall outlet. 4 Attach the battery pack by sliding it in the direction of the arrow until it clicks. 5 Place the camcorder on the Handycam Station. b Notes • Your camcorder operates only with an "InfoLITHIUM" battery pack (H series). 1 Connect the AC Adaptor to OFF (CHG) (the default setting). 9 Step...
... Slide the POWER switch in the direction of the arrow to the DC IN jack on the Handycam Station as shown above, and insert it into the Handycam Station securely, all the way to your camcorder. The /CHG (charge) lamp lights up . 2 Connect the power cord to the AC Adaptor... and the wall outlet. 4 Attach the battery pack by sliding it in the direction of the arrow until it clicks. 5 Place the camcorder on the Handycam Station. b Notes • Your camcorder operates only with an "InfoLITHIUM" battery pack (H series). 1 Connect the AC Adaptor to OFF (CHG) (the default setting). 9 Step...
Operating Guide
Page 10
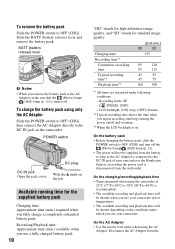
... remove the battery pack Slide the POWER switch to the DC IN jack on the camcorder. BATT (battery release) lever b Notes • When you use your camcorder or the Handycam Station, even when the power cord is on. Recording/Playback time: Approximate time (min.) available when you use a fully charged battery pack. 10...
... remove the battery pack Slide the POWER switch to the DC IN jack on the camcorder. BATT (battery release) lever b Notes • When you use your camcorder or the Handycam Station, even when the power cord is on. Recording/Playback time: Approximate time (min.) available when you use a fully charged battery pack. 10...

Operating Guide
Page 11
This may cause a malfunction. • Even if your camcorder. • Do not use the AC Adaptor placed in a narrow space, such as between a wall and furniture. • Do not short-circuit the DC plug of the AC Adaptor or battery terminal with any metallic objects. Getting Started wall outlet immediately if any malfunction occurs while using your camcorder is turned off, AC power (house current) is still supplied to it while connected to the wall outlet via the AC Adaptor. 11
This may cause a malfunction. • Even if your camcorder. • Do not use the AC Adaptor placed in a narrow space, such as between a wall and furniture. • Do not short-circuit the DC plug of the AC Adaptor or battery terminal with any metallic objects. Getting Started wall outlet immediately if any malfunction occurs while using your camcorder is turned off, AC power (house current) is still supplied to it while connected to the wall outlet via the AC Adaptor. 11
Operating Guide
Page 12
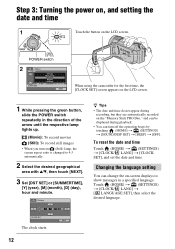
... screen. To reset the date and time Touch (HOME) t (SETTINGS) t [CLOCK/ LANG] t [CLOCK SET], and set the date and time. POWER switch When using the camcorder for the first time, the [CLOCK SET] screen appears on the LCD screen. 1 While pressing the green button, slide the POWER switch repeatedly in a specified...
... screen. To reset the date and time Touch (HOME) t (SETTINGS) t [CLOCK/ LANG] t [CLOCK SET], and set the date and time. POWER switch When using the camcorder for the first time, the [CLOCK SET] screen appears on the LCD screen. 1 While pressing the green button, slide the POWER switch repeatedly in a specified...
Operating Guide
Page 13
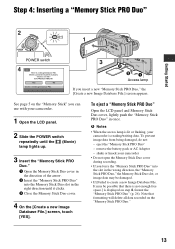
...not enough free space.] is reading/writing data. eject the "Memory Stick PRO Duo" - remove the battery pack or AC Adaptor - shake or knock your camcorder is displayed on step 4, format the "Memory Stick PRO Duo" (p. 26). See page 5 on the "Memory Stick PRO Duo." 13 It may be ... image data from being damaged, do not: - Step 4: Inserting a "Memory Stick PRO Duo" Getting Started POWER switch Access lamp If you can use with your camcorder. 1 Open the LCD panel. 2 Slide the POWER switch repeatedly until the (Movie) lamp lights up. 3 Insert the "Memory Stick PRO Duo." 1 Open the ...
...not enough free space.] is reading/writing data. eject the "Memory Stick PRO Duo" - remove the battery pack or AC Adaptor - shake or knock your camcorder is displayed on step 4, format the "Memory Stick PRO Duo" (p. 26). See page 5 on the "Memory Stick PRO Duo." 13 It may be ... image data from being damaged, do not: - Step 4: Inserting a "Memory Stick PRO Duo" Getting Started POWER switch Access lamp If you can use with your camcorder. 1 Open the LCD panel. 2 Slide the POWER switch repeatedly until the (Movie) lamp lights up. 3 Insert the "Memory Stick PRO Duo." 1 Open the ...
Operating Guide
Page 15
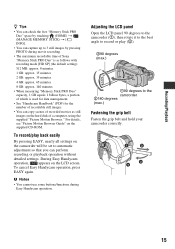
b Notes • You cannot use some buttons/functions during movie recording. • The maximum recordable time of Sony "Memory Stick PRO Duo" is as follows with recording mode [HD SP] (the default setting); 512 MB: approx. 8 minutes 1 GB: approx. 15 minutes 2 GB: approx. ... can check the free "Memory Stick PRO Duo" space by pressing PHOTO during Easy Handycam operation. During Easy Handycam operation, appears on the supplied CD-ROM. Adjusting the LCD panel Open the LCD panel 90 degrees to the camcorder (1), then rotate it to the best angle to record or play back easily By...
b Notes • You cannot use some buttons/functions during movie recording. • The maximum recordable time of Sony "Memory Stick PRO Duo" is as follows with recording mode [HD SP] (the default setting); 512 MB: approx. 8 minutes 1 GB: approx. 15 minutes 2 GB: approx. ... can check the free "Memory Stick PRO Duo" space by pressing PHOTO during Easy Handycam operation. During Easy Handycam operation, appears on the supplied CD-ROM. Adjusting the LCD panel Open the LCD panel 90 degrees to the camcorder (1), then rotate it to the best angle to record or play back easily By...
Operating Guide
Page 16
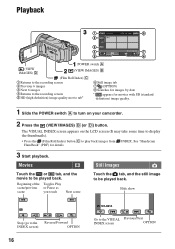
... Next scene Touch the tab, and the still image to play back images from INDEX. The VISUAL INDEX screen appears on your camcorder. 2 Press the (VIEW IMAGES) B (or D) button. See "Handycam Handbook" (PDF) for movies with SD (standard definition) image quality. 1 Slide the POWER switch A to turn on the LCD screen (It...
... Next scene Touch the tab, and the still image to play back images from INDEX. The VISUAL INDEX screen appears on your camcorder. 2 Press the (VIEW IMAGES) B (or D) button. See "Handycam Handbook" (PDF) for movies with SD (standard definition) image quality. 1 Slide the POWER switch A to turn on the LCD screen (It...
Operating Guide
Page 17
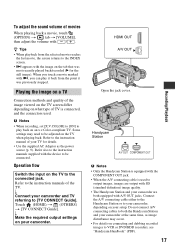
... jack. • When the A/V connecting cable is equipped with SD (standard definition) image quality. • The Handycam Station and your camcorder are both the Handycam Station and your setup. Connect the A/V connecting cable either to the Handycam Station or to be connected. Some settings may occur. • For details on connecting and dubbing recorded...
... jack. • When the A/V connecting cable is equipped with SD (standard definition) image quality. • The Handycam Station and your camcorder are both the Handycam Station and your setup. Connect the A/V connecting cable either to the Handycam Station or to be connected. Some settings may occur. • For details on connecting and dubbing recorded...
Operating Guide
Page 18
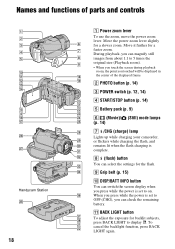
...point you can magnify still images from about 1.1 to display .. During playback, you touched will be displayed in the center of parts and controls Handycam Station 18 1 Power zoom lever To use the zoom, move the power zoom lever. Names and functions of the displayed frame. 2 PHOTO ... (p. 12, 14) 4 START/STOP button (p. 14) 5 Battery pack (p. 9) 6 (Movie)/ (Still) mode lamps (p. 14) 7 /CHG (charge) lamp Lights up while charging your camcorder, or flickers while charging the flash, and remains lit when the flash charging is set to OFF (CHG), you can switch the screen display when...
...point you can magnify still images from about 1.1 to display .. During playback, you touched will be displayed in the center of parts and controls Handycam Station 18 1 Power zoom lever To use the zoom, move the power zoom lever. Names and functions of the displayed frame. 2 PHOTO ... (p. 12, 14) 4 START/STOP button (p. 14) 5 Battery pack (p. 9) 6 (Movie)/ (Still) mode lamps (p. 14) 7 /CHG (charge) lamp Lights up while charging your camcorder, or flickers while charging the flash, and remains lit when the flash charging is set to OFF (CHG), you can switch the screen display when...

Operating Guide
Page 19
... microphone is converted to the lens side (2). qh Memory Stick Duo slot (p. 13) qj Access lamp When the access lamp is lit or flashing, your camcorder is low. qk (Film Roll Index) button (p. 16) ql (VIEW IMAGES) button (p. 16) wd EASY button (p. 15) wf Speaker Sound comes out from the ... or battery power is writing or reading data on movies. wj Hook for zooming in mirror mode, open the LCD screen 90 degrees to the camcorder (1), then rotate it 180 degrees to 5.1ch surround sound and recorded. qs RESET button To initialize the settings (Reset), press RESET to ON ( appears). wg...
... microphone is converted to the lens side (2). qh Memory Stick Duo slot (p. 13) qj Access lamp When the access lamp is lit or flashing, your camcorder is low. qk (Film Roll Index) button (p. 16) ql (VIEW IMAGES) button (p. 16) wd EASY button (p. 15) wf Speaker Sound comes out from the ... or battery power is writing or reading data on movies. wj Hook for zooming in mirror mode, open the LCD screen 90 degrees to the camcorder (1), then rotate it 180 degrees to 5.1ch surround sound and recorded. qs RESET button To initialize the settings (Reset), press RESET to ON ( appears). wg...
Operating Guide
Page 20
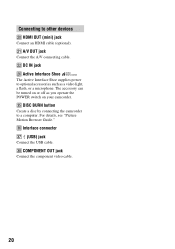
... to a computer. HDMI OUT (mini) jack Connect an HDMI cable (optional). eg DISC BURN button Create a disc by connecting the camcorder to optional accessories such as you operate the POWER switch on your camcorder. For details, see "Picture Motion Browser Guide." wa A/V OUT jack Connect the A/V connecting cable. Connecting to other devices w;
... to a computer. HDMI OUT (mini) jack Connect an HDMI cable (optional). eg DISC BURN button Create a disc by connecting the camcorder to optional accessories such as you operate the POWER switch on your camcorder. For details, see "Picture Motion Browser Guide." wa A/V OUT jack Connect the A/V connecting cable. Connecting to other devices w;
Operating Guide
Page 22
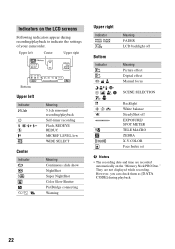
... LCD screens Following indicators appear during playback. 22 However, you can check them as [DATA CODE] during recording/playback to indicate the settings of your camcorder. Indicators on the "Memory Stick PRO Duo." n Backlight White balance SteadyShot off Meaning Picture effect Digital effect Manual focus SCENE SELECTION .
... LCD screens Following indicators appear during playback. 22 However, you can check them as [DATA CODE] during recording/playback to indicate the settings of your camcorder. Indicators on the "Memory Stick PRO Duo." n Backlight White balance SteadyShot off Meaning Picture effect Digital effect Manual focus SCENE SELECTION .
Operating Guide
Page 23
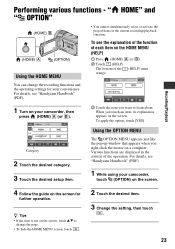
...If the item is not on your camcorder, then press (HOME) A (or B). 3 Touch the item you want to change the recording functions and the operating settings for further operation. Recording/Playback Performing various functions - The bottom of the operation. For details, see "Handycam Handbook" (PDF). 1 Turn on the... your convenience. To apply the option, touch [YES]. For details, see the explanation of the function of each item on the screen for your camcorder, touch (OPTION) on the screen. 4 Follow the guide on the HOME MENU (HELP) 1 Press (HOME) A (or B). 2 Touch ...
...If the item is not on your camcorder, then press (HOME) A (or B). 3 Touch the item you want to change the recording functions and the operating settings for further operation. Recording/Playback Performing various functions - The bottom of the operation. For details, see "Handycam Handbook" (PDF). 1 Turn on the... your convenience. To apply the option, touch [YES]. For details, see the explanation of the function of each item on the screen for your camcorder, touch (OPTION) on the screen. 4 Follow the guide on the HOME MENU (HELP) 1 Press (HOME) A (or B). 2 Touch ...
Operating Guide
Page 24
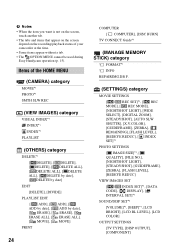
...], [ DISPLAY], [ INTERVAL SET]*1 SOUND/DISP SET*2 [VOLUME]*1, [BEEP]*1, [LCD BRIGHT], [LCD BL LEVEL], [LCD COLOR] OUTPUT SETTINGS [TV TYPE], [DISP OUTPUT], [COMPONENT] Items of your camcorder at the time. • Some items appear without a tab. • The OPTION MENU cannot be used during Easy...
...], [ DISPLAY], [ INTERVAL SET]*1 SOUND/DISP SET*2 [VOLUME]*1, [BEEP]*1, [LCD BRIGHT], [LCD BL LEVEL], [LCD COLOR] OUTPUT SETTINGS [TV TYPE], [DISP OUTPUT], [COMPONENT] Items of your camcorder at the time. • Some items appear without a tab. • The OPTION MENU cannot be used during Easy...
Operating Guide
Page 26
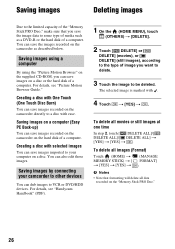
... some type of media such as described below. Saving images on a computer (Easy PC Back-up) You can save the images recorded on the camcorder as a DVD-R or the hard disk of a computer. You can save images on a disc or the hard disk of a computer. To ...) t MEMORY STICK) t [ t [YES] t [YES] t (MANAGE FORMAT] . b Notes • Note that you save the image data to a disc with ease. For details, see "Handycam Handbook" (PDF). 1 On the (HOME MENU), touch (OTHERS) t [DELETE]. 2 Touch [ DELETE] or [ DELETE] (movies), or [ DELETE] (still images), according to the type of image...
... some type of media such as described below. Saving images on a computer (Easy PC Back-up) You can save the images recorded on the camcorder as a DVD-R or the hard disk of a computer. You can save images on a disc or the hard disk of a computer. To ...) t MEMORY STICK) t [ t [YES] t [YES] t (MANAGE FORMAT] . b Notes • Note that you save the image data to a disc with ease. For details, see "Handycam Handbook" (PDF). 1 On the (HOME MENU), touch (OTHERS) t [DELETE]. 2 Touch [ DELETE] or [ DELETE] (movies), or [ DELETE] (still images), according to the type of image...

Operating Guide
Page 27
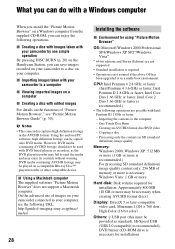
... with a computer 27 When the installation is completed, the short-cut icon of "Handycam Handbook" appears on the desktop of your computer. • The model name of your Handycam, then click [Handycam Handbook (PDF)]. The select screen for "Handycam Handbook" (PDF) appears. The installation screen for installation appears. 4 Select the desired... from the disc drive of your computer. 3 Open the [Handbook] folder in the disc drive of your computer. Enjoying with a computer Viewing "Handycam Handbook" (PDF) For advanced use of your camcorder, see "Handycam Handbook" (PDF).
... with a computer 27 When the installation is completed, the short-cut icon of "Handycam Handbook" appears on the desktop of your computer. • The model name of your Handycam, then click [Handycam Handbook (PDF)]. The select screen for "Handycam Handbook" (PDF) appears. The installation screen for installation appears. 4 Select the desired... from the disc drive of your computer. 3 Open the [Handbook] folder in the disc drive of your computer. Enjoying with a computer Viewing "Handycam Handbook" (PDF) For advanced use of your camcorder, see "Handycam Handbook" (PDF).
Operating Guide
Page 28
http://guide.d-imaging.sony.co.jp/mac/ ms/us/ 28 Installing the software x .... x Importing images taken with your camcorder to a computer x Viewing imported images on a computer x Creating a disc with your camcorder by one simple operation By pressing DISC BURN (p. 20) on the Handycam Station, you can save images recorded ... operations are not supported. • Standard installation is required. • Operation is necessary. b Notes • This camcorder captures high definition footage in SD (standard definition) image quality Memory: Windows 2000, Windows XP: 512 MB or more ...
http://guide.d-imaging.sony.co.jp/mac/ ms/us/ 28 Installing the software x .... x Importing images taken with your camcorder to a computer x Viewing imported images on a computer x Creating a disc with your camcorder by one simple operation By pressing DISC BURN (p. 20) on the Handycam Station, you can save images recorded ... operations are not supported. • Standard installation is required. • Operation is necessary. b Notes • This camcorder captures high definition footage in SD (standard definition) image quality Memory: Windows 2000, Windows XP: 512 MB or more ...


