
Operating Guide
Page 1
Digital HD Video Camera Recorder Operating Guide HDR-CX7/CX7K 3-214-660-11(1) For details on the advanced operations, please refer to "Handycam Handbook" (PDF). © 2007 Sony Corporation
Digital HD Video Camera Recorder Operating Guide HDR-CX7/CX7K 3-214-660-11(1) For details on the advanced operations, please refer to "Handycam Handbook" (PDF). © 2007 Sony Corporation
Operating Guide
Page 4
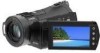
....rbrc.org/ Caution: Do not handle damaged or leaking Lithium-Ion batteries. Regulatory Information Declaration of Conformity Trade Name: SONY Model No.: HDR-CX7 Responsible Party: Sony Electronics Inc. Operation is subject to be used with the limits for future reference. This equipment generates, uses, and ...Rules. ACSerial No. 4 For customers in a residential installation. Note This equipment has been tested and found to comply with the Handycam Station Model DCRA-C191 and AC Adaptor Model AC-L200/L200B. Read this first Before operating the unit, please read this manual ...
....rbrc.org/ Caution: Do not handle damaged or leaking Lithium-Ion batteries. Regulatory Information Declaration of Conformity Trade Name: SONY Model No.: HDR-CX7 Responsible Party: Sony Electronics Inc. Operation is subject to be used with the limits for future reference. This equipment generates, uses, and ...Rules. ACSerial No. 4 For customers in a residential installation. Note This equipment has been tested and found to comply with the Handycam Station Model DCRA-C191 and AC Adaptor Model AC-L200/L200B. Read this first Before operating the unit, please read this manual ...
Operating Guide
Page 7
... controls 18 Indicators displayed during recording/playback 21 Performing various functions - " HOME" and " OPTION 23 Saving images 26 Deleting images 26 Enjoying with a computer Viewing "Handycam Handbook" (PDF 27 What you can do with a Windows computer 28 Troubleshooting Troubleshooting 32 Additional Information Precautions 35 Specifications 37 7
... controls 18 Indicators displayed during recording/playback 21 Performing various functions - " HOME" and " OPTION 23 Saving images 26 Deleting images 26 Enjoying with a computer Viewing "Handycam Handbook" (PDF 27 What you can do with a Windows computer 28 Troubleshooting Troubleshooting 32 Additional Information Precautions 35 Specifications 37 7
Operating Guide
Page 8
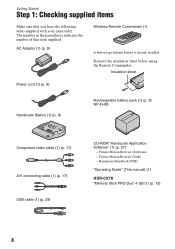
...(1) (p. 17) A/V connecting cable (1) (p. 17) USB cable (1) (p. 29) CD-ROM "Handycam Application Software" (1) (p. 27) - Handycam Handbook (PDF) "Operating Guide" (This manual) (1) HDR-CX7K "Memory Stick PRO Duo" 4 GB (1) (p. 13) 8 AC Adaptor (1) (p. 9) Wireless... Remote Commander (1) A button-type lithium battery is already installed. The number in the parentheses indicates the number of that you have the following items supplied with your camcorder...
...(1) (p. 17) A/V connecting cable (1) (p. 17) USB cable (1) (p. 29) CD-ROM "Handycam Application Software" (1) (p. 27) - Handycam Handbook (PDF) "Operating Guide" (This manual) (1) HDR-CX7K "Memory Stick PRO Duo" 4 GB (1) (p. 13) 8 AC Adaptor (1) (p. 9) Wireless... Remote Commander (1) A button-type lithium battery is already installed. The number in the parentheses indicates the number of that you have the following items supplied with your camcorder...
Operating Guide
Page 9
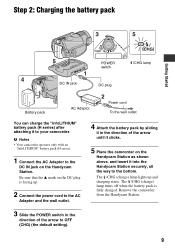
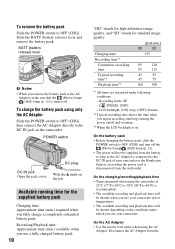
..."InfoLITHIUM" battery pack (H series) after attaching it to the DC IN jack on the Handycam Station. b Notes • Your camcorder operates only with an "InfoLITHIUM" battery pack (H series). 1 Connect the AC Adaptor to your camcorder. The /CHG (charge) lamp lights up . 2 Connect the power cord to the AC... the battery pack by sliding it in the direction of the arrow until it into the Handycam Station securely, all the way to OFF (CHG) (the default setting). 9 Remove the camcorder from the Handycam Station. 3 Slide the POWER switch in the direction of the arrow to the bottom. Be...
..."InfoLITHIUM" battery pack (H series) after attaching it to the DC IN jack on the Handycam Station. b Notes • Your camcorder operates only with an "InfoLITHIUM" battery pack (H series). 1 Connect the AC Adaptor to your camcorder. The /CHG (charge) lamp lights up . 2 Connect the power cord to the AC... the battery pack by sliding it in the direction of the arrow until it into the Handycam Station securely, all the way to OFF (CHG) (the default setting). 9 Remove the camcorder from the Handycam Station. 3 Slide the POWER switch in the direction of the arrow to the bottom. Be...
Operating Guide
Page 10
... the POWER switch to OFF (CHG), then connect the AC Adaptor directly to the DC IN jack of your camcorder. On the charging/recording/playback time • Times measured when using the camcorder at 25°C (77°F) (10°C to 30°C (50°F to 86°F) is ...recommended). • The available recording and playback time will be shorter when you use your camcorder or the Handycam Station, even when the power cord is connected to the DC IN jack on the conditions under following conditions. - Disconnect the AC Adaptor ...
... the POWER switch to OFF (CHG), then connect the AC Adaptor directly to the DC IN jack of your camcorder. On the charging/recording/playback time • Times measured when using the camcorder at 25°C (77°F) (10°C to 30°C (50°F to 86°F) is ...recommended). • The available recording and playback time will be shorter when you use your camcorder or the Handycam Station, even when the power cord is connected to the DC IN jack on the conditions under following conditions. - Disconnect the AC Adaptor ...
Operating Guide
Page 14
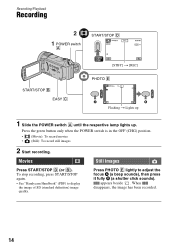
To stop recording, press START/STOP again. • See "Handycam Handbook" (PDF) to adjust the focus A (a beep sounds), then press it fully B (a shutter click sounds). appears beside . Press the green button only when the POWER ...
To stop recording, press START/STOP again. • See "Handycam Handbook" (PDF) to adjust the focus A (a beep sounds), then press it fully B (a shutter click sounds). appears beside . Press the green button only when the POWER ...
Operating Guide
Page 15
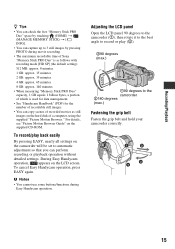
...degrees (max.) Fastening the grip belt Fasten the grip belt and hold your camcorder correctly. 15 To cancel Easy Handycam operation, press EASY again. During Easy Handycam operation, appears on the camcorder will be set to automatic adjustment so that you can copy scenes of recorded... Notes • You cannot use some buttons/functions during movie recording. • The maximum recordable time of Sony "Memory Stick PRO Duo" is used for data management. • See "Handycam Handbook" (PDF) for the number of a computer, using the supplied "Picture Motion Browser." Recording/Playback z...
...degrees (max.) Fastening the grip belt Fasten the grip belt and hold your camcorder correctly. 15 To cancel Easy Handycam operation, press EASY again. During Easy Handycam operation, appears on the camcorder will be set to automatic adjustment so that you can copy scenes of recorded... Notes • You cannot use some buttons/functions during movie recording. • The maximum recordable time of Sony "Memory Stick PRO Duo" is used for data management. • See "Handycam Handbook" (PDF) for the number of a computer, using the supplied "Picture Motion Browser." Recording/Playback z...
Operating Guide
Page 16
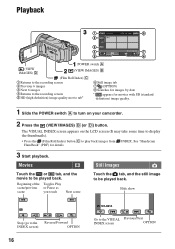
See "Handycam Handbook" (PDF) for movies with SD (standard definition) image quality. 1 Slide the POWER switch A to turn on the LCD screen (It may take some time .... Movies Still Images Touch the or tab, and the movie to the VISUAL Previous/Next INDEX screen OPTION The VISUAL INDEX screen appears on your camcorder. 2 Press the (VIEW IMAGES) B (or D) button.
See "Handycam Handbook" (PDF) for movies with SD (standard definition) image quality. 1 Slide the POWER switch A to turn on the LCD screen (It may take some time .... Movies Still Images Touch the or tab, and the movie to the VISUAL Previous/Next INDEX screen OPTION The VISUAL INDEX screen appears on your camcorder. 2 Press the (VIEW IMAGES) B (or D) button.
Operating Guide
Page 17
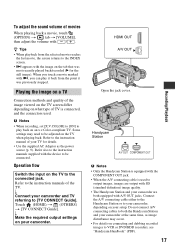
... Refer to be adjusted on connecting and dubbing recorded images to both the Handycam Station and your camcorder are output with i, you touch a movie marked with SD (standard definition) image quality. • The Handycam Station and your camcorder at the same time, as the power source (p. 9). b Notes &#... on the tab that was previously stopped. Connect the A/V connecting cable either to the Handycam Station or to the instruction manuals supplied with the image on your camcorder. To adjust the sound volume of the TV. r Make the required output settings on an x.v....
... Refer to be adjusted on connecting and dubbing recorded images to both the Handycam Station and your camcorder are output with i, you touch a movie marked with SD (standard definition) image quality. • The Handycam Station and your camcorder at the same time, as the power source (p. 9). b Notes &#... on the tab that was previously stopped. Connect the A/V connecting cable either to the Handycam Station or to the instruction manuals supplied with the image on your camcorder. To adjust the sound volume of the TV. r Make the required output settings on an x.v....

Operating Guide
Page 18
...zoom). • When you touch the screen during playback zoom, the point you touched will be displayed in the center of parts and controls Handycam Station 18 1 Power zoom lever To use the zoom, move the power zoom lever. Move the power zoom lever slightly for a faster ... POWER switch (p. 12, 14) 4 START/STOP button (p. 14) 5 Battery pack (p. 9) 6 (Movie)/ (Still) mode lamps (p. 14) 7 /CHG (charge) lamp Lights up while charging your camcorder, or flickers while charging the flash, and remains lit when the flash charging is set to display .. Move it further for a slower zoom. To cancel...
...zoom). • When you touch the screen during playback zoom, the point you touched will be displayed in the center of parts and controls Handycam Station 18 1 Power zoom lever To use the zoom, move the power zoom lever. Move the power zoom lever slightly for a faster ... POWER switch (p. 12, 14) 4 START/STOP button (p. 14) 5 Battery pack (p. 9) 6 (Movie)/ (Still) mode lamps (p. 14) 7 /CHG (charge) lamp Lights up while charging your camcorder, or flickers while charging the flash, and remains lit when the flash charging is set to display .. Move it further for a slower zoom. To cancel...
Operating Guide
Page 23
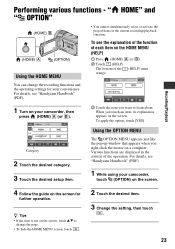
...further operation. To see the explanation of the function of each item on the screen for your convenience. For details, see "Handycam Handbook" (PDF). 1 While using your camcorder, then press (HOME) A (or B). 3 Touch the item you touch an item, its explanation appears on the screen. ...displayed in the current recording/playback situation. Category 2 Touch the desired category. 3 Touch the desired setup item. For details, see "Handycam Handbook" (PDF). 1 Turn on your camcorder, touch (OPTION) on the screen. 4 Follow the guide on the HOME MENU (HELP) 1 Press (HOME) A (or ...
...further operation. To see the explanation of the function of each item on the screen for your convenience. For details, see "Handycam Handbook" (PDF). 1 While using your camcorder, then press (HOME) A (or B). 3 Touch the item you touch an item, its explanation appears on the screen. ...displayed in the current recording/playback situation. Category 2 Touch the desired category. 3 Touch the desired setup item. For details, see "Handycam Handbook" (PDF). 1 Turn on your camcorder, touch (OPTION) on the screen. 4 Follow the guide on the HOME MENU (HELP) 1 Press (HOME) A (or ...
Operating Guide
Page 24
Items of your camcorder at the time. • Some items appear without a tab. • The OPTION MENU cannot be used during Easy Handycam operation (p. 15). b Notes • When the item you want is not on the screen, touch another tab. • The tabs and items that appear on ...
Items of your camcorder at the time. • Some items appear without a tab. • The OPTION MENU cannot be used during Easy Handycam operation (p. 15). b Notes • When the item you want is not on the screen, touch another tab. • The tabs and items that appear on ...

Operating Guide
Page 25
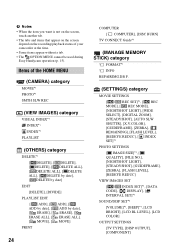
...]*1 GENERAL SET [DEMO MODE], [REC LAMP], [CALIBRATION], [A.SHUT OFF], [REMOTE CTRL] *1 You can set these items also during Easy Handycam operation (p. 15). *2 The menu name is changed to [SOUND SETTINGS] during Easy Handycam operation (p. 15). tab [FOCUS], [SPOT FOCUS], [TELE MACRO], [EXPOSURE], [SPOT METER], [SCENE SELECTION], [WHITE BAL.], [COLOR SLOW SHTR], [SUPER...
...]*1 GENERAL SET [DEMO MODE], [REC LAMP], [CALIBRATION], [A.SHUT OFF], [REMOTE CTRL] *1 You can set these items also during Easy Handycam operation (p. 15). *2 The menu name is changed to [SOUND SETTINGS] during Easy Handycam operation (p. 15). tab [FOCUS], [SPOT FOCUS], [TELE MACRO], [EXPOSURE], [SPOT METER], [SCENE SELECTION], [WHITE BAL.], [COLOR SLOW SHTR], [SUPER...
Operating Guide
Page 26
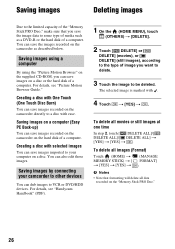
... save images recorded on the "Memory Stick PRO Duo." 26 You can save images imported to your camcorder to other devices You can dub images to VCR or DVD/HDD devices. For details, see "Handycam Handbook" (PDF). 1 On the (HOME MENU), touch (OTHERS) t [DELETE]. 2 Touch [ DELETE] or [ DELETE] (movies), or [ ... to be deleted. Saving images using a computer By using the "Picture Motion Browser" on the supplied CD-ROM, you save images recorded on the camcorder on a disc or the hard disk of a computer. Saving images on a computer (Easy PC Back-up) You can save images on the hard...
... save images recorded on the "Memory Stick PRO Duo." 26 You can save images imported to your camcorder to other devices You can dub images to VCR or DVD/HDD devices. For details, see "Handycam Handbook" (PDF). 1 On the (HOME MENU), touch (OTHERS) t [DELETE]. 2 Touch [ DELETE] or [ DELETE] (movies), or [ ... to be deleted. Saving images using a computer By using the "Picture Motion Browser" on the supplied CD-ROM, you save images recorded on the camcorder on a disc or the hard disk of a computer. Saving images on a computer (Easy PC Back-up) You can save images on the hard...

Operating Guide
Page 27
...computer. 3 Open the [Handbook] folder in the disc drive of your Handycam is printed on the computer. Installation starts. Enjoying with a computer Viewing "Handycam Handbook" (PDF) For advanced use of your computer. The select screen for "Handycam Handbook" (PDF) appears. When the installation is completed, the short-..." appears on the desktop of your computer. • The model name of your computer. For Macintosh users 1 Turn on your camcorder, see "Handycam Handbook" (PDF). For Windows users 1 Turn on the computer. 2 Place the CD-ROM (supplied) in the CD-ROM, double-click the...
...computer. 3 Open the [Handbook] folder in the disc drive of your Handycam is printed on the computer. Installation starts. Enjoying with a computer Viewing "Handycam Handbook" (PDF) For advanced use of your computer. The select screen for "Handycam Handbook" (PDF) appears. When the installation is completed, the short-..." appears on the desktop of your computer. • The model name of your computer. For Macintosh users 1 Turn on your camcorder, see "Handycam Handbook" (PDF). For Windows users 1 Turn on the computer. 2 Place the CD-ROM (supplied) in the CD-ROM, double-click the...
Operating Guide
Page 28
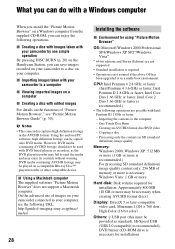
http://guide.d-imaging.sony.co.jp/mac/ ms/us/ 28 Installing the software x Environment for ...not support a Macintosh computer. Using the enclosed PC software, high definition footage can save images recorded on your camcorder to the computer - However, DVD media containing AVCHD footage should not be used with Intel Pentium III 1 ...computer from the supplied CD-ROM, you can be played on the Handycam Station, you can enjoy the following operations. Copying a disc - x Importing images taken with your camcorder by one simple operation By pressing DISC BURN (p. 20) on a...
http://guide.d-imaging.sony.co.jp/mac/ ms/us/ 28 Installing the software x Environment for ...not support a Macintosh computer. Using the enclosed PC software, high definition footage can save images recorded on your camcorder to the computer - However, DVD media containing AVCHD footage should not be used with Intel Pentium III 1 ...computer from the supplied CD-ROM, you can be played on the Handycam Station, you can enjoy the following operations. Copying a disc - x Importing images taken with your camcorder by one simple operation By pressing DISC BURN (p. 20) on a...
Operating Guide
Page 29
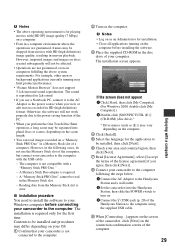
... the software. 3 Place the supplied CD-ROM in the following the steps below. 1 Connect the AC Adaptor to the Handycam Station and a wall outlet. 2 Set the camcorder onto the Handycam Station, then slide the POWER switch to turn on. 3 Connect the (USB) jack (p. 20) of the computer. 29... not connected to the computer using the supplied USB cable. 9 When [Connecting...] appears on the screen of the camcorder, click [Next] on the connection confirmation screen of the Handycam Station to the computer. 2 Turn on the computer. The installation is required. - b Notes • The above ...
... the software. 3 Place the supplied CD-ROM in the following the steps below. 1 Connect the AC Adaptor to the Handycam Station and a wall outlet. 2 Set the camcorder onto the Handycam Station, then slide the POWER switch to turn on. 3 Connect the (USB) jack (p. 20) of the computer. 29... not connected to the computer using the supplied USB cable. 9 When [Connecting...] appears on the screen of the camcorder, click [Next] on the connection confirmation screen of the Handycam Station to the computer. 2 Turn on the computer. The installation is required. - b Notes • The above ...
Operating Guide
Page 30
... required to create an AVCHD format disc - Check the screen and follow the steps below. 1 Connect the AC Adaptor to the Handycam Station and a wall outlet. 2 Set the camcorder onto the Handycam Station, then slide the POWER switch to install the required software. - Microsoft DirectX 9.0c* Software required to handle movies * Windows 2000...
... required to create an AVCHD format disc - Check the screen and follow the steps below. 1 Connect the AC Adaptor to the Handycam Station and a wall outlet. 2 Set the camcorder onto the Handycam Station, then slide the POWER switch to install the required software. - Microsoft DirectX 9.0c* Software required to handle movies * Windows 2000...
Operating Guide
Page 31
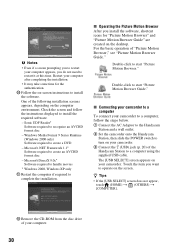
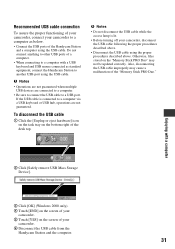
.... • Be sure to connect the USB cable to a USB port. Otherwise, files stored on the screen of your camcorder. 6 Disconnect the USB cable from the Handycam Station and the computer. 31 Also, disconnecting the USB cable improperly may cause a malfunction of a computer. • When ...using the proper procedures described above. Recommended USB cable connection To assure the proper functioning of your camcorder, connect your camcorder to a computer as standard equipment, connect the Handycam Station to another USB port using the USB cable. Do not connect anything to other USB ports ...
.... • Be sure to connect the USB cable to a USB port. Otherwise, files stored on the screen of your camcorder. 6 Disconnect the USB cable from the Handycam Station and the computer. 31 Also, disconnecting the USB cable improperly may cause a malfunction of a computer. • When ...using the proper procedures described above. Recommended USB cable connection To assure the proper functioning of your camcorder, connect your camcorder to a computer as standard equipment, connect the Handycam Station to another USB port using the USB cable. Do not connect anything to other USB ports ...


