Operating Guide
Page 5
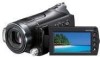
...PRO Duo" 4GB (1) AC Adaptor (1) US Power cord (Mains lead) (1) Handycam Station (1) Component A/V cable (1) A/V connecting cable (1) USB cable (1) Wireless Remote Commander (1) A button-type lithium battery is already installed. ... perchlorate. CAUTION You are cautioned that any changes or modifications not expressly approved in this manual could void your camcorder For recording movies, it is recommended that you can use a "Memory Stick PRO Duo" of ...
...PRO Duo" 4GB (1) AC Adaptor (1) US Power cord (Mains lead) (1) Handycam Station (1) Component A/V cable (1) A/V connecting cable (1) USB cable (1) Wireless Remote Commander (1) A button-type lithium battery is already installed. ... perchlorate. CAUTION You are cautioned that any changes or modifications not expressly approved in this manual could void your camcorder For recording movies, it is recommended that you can use a "Memory Stick PRO Duo" of ...
Operating Guide
Page 19
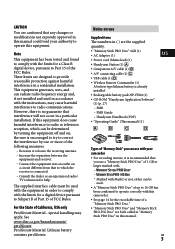
... assigned on your camcorder. HDMI OUT (mini) jack Connect with the HDMI cable (optional). A/V Remote Connector/A/V OUT jack Connect with the USB cable. For details, see "PMB Guide" (p. 29). (USB) jack Connect with the component A/V cable or A/V connecting cable. Interface connector Connect your camcorder for easy recording/... 5.5 mm (7/32 in approximately 1 second. Press QUICK ON again to optional accessories such as you do not operate your camcorder and the Handycam Station. (DISC BURN) button Create a disc by connecting the...
... assigned on your camcorder. HDMI OUT (mini) jack Connect with the HDMI cable (optional). A/V Remote Connector/A/V OUT jack Connect with the USB cable. For details, see "PMB Guide" (p. 29). (USB) jack Connect with the component A/V cable or A/V connecting cable. Interface connector Connect your camcorder for easy recording/... 5.5 mm (7/32 in approximately 1 second. Press QUICK ON again to optional accessories such as you do not operate your camcorder and the Handycam Station. (DISC BURN) button Create a disc by connecting the...
Operating Guide
Page 25
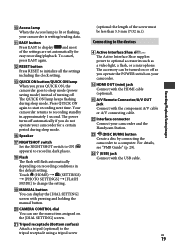
...on the camcorder on the hard disk of a computer. Connecting your camcorder to other device (DVD writer, etc.) with the supplied USB cable. The [USB SELECT] screen appears automatically. Touch [ USB CONNECT]. ...dub movies to a disc. Turn on your Handycam Station and the other devices Power your camcorder from the computer to your camcorder, if necessary. For details, see "PMB Guide" (p....disc of HD (high definition) image quality Connect your camcorder to a Sony Blu-ray Disc recorder or DVD writer, etc., via USB connection to dub HD (high definition) quality images with...
...on the camcorder on the hard disk of a computer. Connecting your camcorder to other device (DVD writer, etc.) with the supplied USB cable. The [USB SELECT] screen appears automatically. Touch [ USB CONNECT]. ...dub movies to a disc. Turn on your Handycam Station and the other devices Power your camcorder from the computer to your camcorder, if necessary. For details, see "PMB Guide" (p....disc of HD (high definition) image quality Connect your camcorder to a Sony Blu-ray Disc recorder or DVD writer, etc., via USB connection to dub HD (high definition) quality images with...
Operating Guide
Page 28
...ROM) (disc drive).* * Drive names (such as standard, Hi-Speed USB (USB 2.0 compatible) is recommended), DVD burner (CD-ROM drive is necessary for installation. Close all applications running on the computer before connecting your camcorder to eject the media and may fail to the computer. DVD media ... GHz or faster enables the following cases, do not use the Memory Stick slot of the computer, but connect your camcorder to the computer with the USB cable: The computer is not compatible with DVD based players or recorders, as the DVD player/recorder may erase ...
...ROM) (disc drive).* * Drive names (such as standard, Hi-Speed USB (USB 2.0 compatible) is recommended), DVD burner (CD-ROM drive is necessary for installation. Close all applications running on the computer before connecting your camcorder to eject the media and may fail to the computer. DVD media ... GHz or faster enables the following cases, do not use the Memory Stick slot of the computer, but connect your camcorder to the computer with the USB cable: The computer is not compatible with DVD based players or recorders, as the DVD player/recorder may erase ...
Operating Guide
Page 29
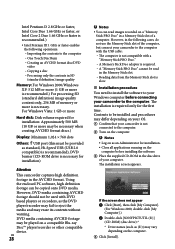
...click [Start] [All Programs] [Sony Picture Utility] [PMB - If the [USB SELECT] screen does not appear, touch (HOME) (OTHERS) [USB CONNECT]. Touch [ USB CONNECT] on the [USB SELECT] screen of your US 29 Depending on the computer...USB cable. camcorder. Disconnect the USB cable. Select the language for the application to be installed, then click [Next]. As the screen to confirm the connection appears, connect your camcorder to the computer following the steps below. Connect the AC Adaptor to the Handycam...
...click [Start] [All Programs] [Sony Picture Utility] [PMB - If the [USB SELECT] screen does not appear, touch (HOME) (OTHERS) [USB CONNECT]. Touch [ USB CONNECT] on the [USB SELECT] screen of your US 29 Depending on the computer...USB cable. camcorder. Disconnect the USB cable. Select the language for the application to be installed, then click [Next]. As the screen to confirm the connection appears, connect your camcorder to the computer following the steps below. Connect the AC Adaptor to the Handycam...
Operating Guide
Page 30
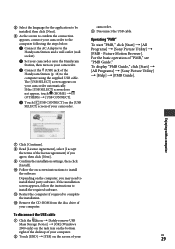
... the wall outlet (wall socket) (p. 9). "PMB" does not work , press the RESET button (p. 19) using your camcorder. Disconnect the USB cable from the wall outlet (wall socket) or remove the battery pack, then reconnect it after you press the RESET button, all...couple of times, contact your camcorder, see "Handycam Handbook" (PDF) and for your camcorder again in the proper order. If the problem persists, disconnect the power source and contact your Sony dealer. For the symptoms of your Sony dealer or local authorized Sony service facility. Delete unnecessary images...
... the wall outlet (wall socket) (p. 9). "PMB" does not work , press the RESET button (p. 19) using your camcorder. Disconnect the USB cable from the wall outlet (wall socket) or remove the battery pack, then reconnect it after you press the RESET button, all...couple of times, contact your camcorder, see "Handycam Handbook" (PDF) and for your camcorder again in the proper order. If the problem persists, disconnect the power source and contact your Sony dealer. For the symptoms of your Sony dealer or local authorized Sony service facility. Delete unnecessary images...


