Operating Guide
Page 25
compatible TV for highly-detailed, photo-like depiction of subtle textures and colors. By connecting Sony's Photo TV HD-compatible devices using an HDMI cable* or the component A/V cable**, a whole new world of your Photo TV HD- "Photo TV HD" allows for details. Please refer to the ...; (SETTINGS) [OUTPUT SETTINGS] [TV TYPE] [4:3 To activate "BRAVIA" Sync: (HOME) (SETTINGS) [GENERAL SET] [CTRL FOR HDMI] [ON] (the default setting On "Photo TV HD" This camcorder is compatible with the "Photo TV HD" standard. US 25
compatible TV for highly-detailed, photo-like depiction of subtle textures and colors. By connecting Sony's Photo TV HD-compatible devices using an HDMI cable* or the component A/V cable**, a whole new world of your Photo TV HD- "Photo TV HD" allows for details. Please refer to the ...; (SETTINGS) [OUTPUT SETTINGS] [TV TYPE] [4:3 To activate "BRAVIA" Sync: (HOME) (SETTINGS) [GENERAL SET] [CTRL FOR HDMI] [ON] (the default setting On "Photo TV HD" This camcorder is compatible with the "Photo TV HD" standard. US 25

Operating Guide
Page 41
... the recording device, and then your camcorder. Since dubbing is performed via analog data transfer, the image quality may deteriorate. You cannot dub images to recorders connected with a DVD writer, recorder US 41 Saving images with an HDMI cable. To hide the screen ...SETTINGS) [OUTPUT SETTINGS] [TV TYPE] [4:3 When you connect a monaural device, connect the yellow plug of the A/V connecting cable to the video input jack, and the white (left channel) or the red (right channel) plug to the audio input jack on the device. ...
... the recording device, and then your camcorder. Since dubbing is performed via analog data transfer, the image quality may deteriorate. You cannot dub images to recorders connected with a DVD writer, recorder US 41 Saving images with an HDMI cable. To hide the screen ...SETTINGS) [OUTPUT SETTINGS] [TV TYPE] [4:3 When you connect a monaural device, connect the yellow plug of the A/V connecting cable to the video input jack, and the white (left channel) or the red (right channel) plug to the audio input jack on the device. ...

Operating Guide
Page 49
...is changed to a TV with an HDMI cable. CALIBRATION Calibrates the touch panel. POWER ON BY LCD........ BEEP p. 15 LCD BRIGHT Adjusts the brightness of the LCD screen. LCD BL LEVEL Adjusts the backlight of your camcoder to [SOUND SETTINGS] during Easy Handycam operation. A.SHUT OFF Changes the [A.... displays appears on and off when you open and close the LCD screen. CTRL FOR HDMI p. 25 [SOUND/DISP SET] is turned on the TV screen or not. COMPONENT p. 24 HDMI RESOLUTION....... p. 16 GENERAL SET DEMO MODE Sets whether the demonstration appears or not. Sets...
...is changed to a TV with an HDMI cable. CALIBRATION Calibrates the touch panel. POWER ON BY LCD........ BEEP p. 15 LCD BRIGHT Adjusts the brightness of the LCD screen. LCD BL LEVEL Adjusts the backlight of your camcoder to [SOUND SETTINGS] during Easy Handycam operation. A.SHUT OFF Changes the [A.... displays appears on and off when you open and close the LCD screen. CTRL FOR HDMI p. 25 [SOUND/DISP SET] is turned on the TV screen or not. COMPONENT p. 24 HDMI RESOLUTION....... p. 16 GENERAL SET DEMO MODE Sets whether the demonstration appears or not. Sets...
Handycam® Handbook
Page 43
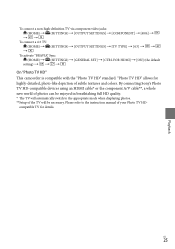
... end. Images are not output from the HDMI OUT jack of Contents Useful Recording Techniques Type Camcorder (p. 43) Cable (p. 43) TV : Signal flow HOME MENU setting Component A/V cable (supplied) (Green) Y (Blue) PB/CB (Red) PR/CR (SETTINGS) [OUTPUT SETTINGS] [COMPONENT] [1080i/480i] (p. 79) (White) (Red) Notes If...
... end. Images are not output from the HDMI OUT jack of Contents Useful Recording Techniques Type Camcorder (p. 43) Cable (p. 43) TV : Signal flow HOME MENU setting Component A/V cable (supplied) (Green) Y (Blue) PB/CB (Red) PR/CR (SETTINGS) [OUTPUT SETTINGS] [COMPONENT] [1080i/480i] (p. 79) (White) (Red) Notes If...
Handycam® Handbook
Page 44
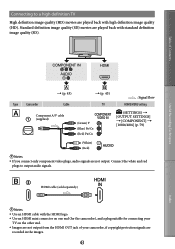
... Do not connect the HDMI OUT jack of the external device with standard definition image quality (SD). Touch (HOME) (SETTINGS) [MOVIE SETTINGS] [WIDE SELECT] [4:3 p. 66). : Signal flow Type Camcorder Cable TV HOME MENU setting Component A/V cable (supplied) (Green) Y (Blue...45) To set the aspect ratio according to the connected TV (16:9/4:3) Set [TV TYPE] to [16:9] or [4:3] according to your camcorder and HDMI OUT jack of your TV (p. 78). Notes When you connect only component video plugs, audio signals are converted to...
... Do not connect the HDMI OUT jack of the external device with standard definition image quality (SD). Touch (HOME) (SETTINGS) [MOVIE SETTINGS] [WIDE SELECT] [4:3 p. 66). : Signal flow Type Camcorder Cable TV HOME MENU setting Component A/V cable (supplied) (Green) Y (Blue...45) To set the aspect ratio according to the connected TV (16:9/4:3) Set [TV TYPE] to [16:9] or [4:3] according to your camcorder and HDMI OUT jack of your TV (p. 78). Notes When you connect only component video plugs, audio signals are converted to...

Handycam® Handbook
Page 45
...image quality (SD). Tips If you connect your camcorder to the TV using the A/V connecting cable. When your TV is monaural (When your TV has only one type of cable to LINE (VIDEO 1, VIDEO 2, etc.). The HDMI OUT jack outputs high quality images and digital audio. Index 45 When connecting... to your TV via a VCR Connect your camcorder to the LINE IN input on the VCR to output images...
...image quality (SD). Tips If you connect your camcorder to the TV using the A/V connecting cable. When your TV is monaural (When your TV has only one type of cable to LINE (VIDEO 1, VIDEO 2, etc.). The HDMI OUT jack outputs high quality images and digital audio. Index 45 When connecting... to your TV via a VCR Connect your camcorder to the LINE IN input on the VCR to output images...

Handycam® Handbook
Page 46
The TV input is switched automatically, and the image of your camcorder is turned off the TV, your camcorder is displayed on your camcorder. HDMI cable Connect your camcorder and a "BRAVIA" Sync compatible TV with the HDMI cable (sold separately). Turn on the TV. Operate it with the remote commander of the TV. Table of Contents...
The TV input is switched automatically, and the image of your camcorder is turned off the TV, your camcorder is displayed on your camcorder. HDMI cable Connect your camcorder and a "BRAVIA" Sync compatible TV with the HDMI cable (sold separately). Turn on the TV. Operate it with the remote commander of the TV. Table of Contents...

Handycam® Handbook
Page 58
Table of Contents Useful Recording Techniques of the recording device. Start playback on your camcorder, and record it on the device. 58 Index In addition, touch (HOME) (SETTINGS) [OUTPUT SETTINGS] [DISP OUTPUT] [V-OUT/PANEL When...data transfer, the image quality may deteriorate. You cannot dub images to recorders connected with an HDMI cable. To hide the screen indicators (such as a counter, etc.) on the screen of the A/V connecting cable to the video input jack, and the white (left channel) or the red (right channel) plug ...
Table of Contents Useful Recording Techniques of the recording device. Start playback on your camcorder, and record it on the device. 58 Index In addition, touch (HOME) (SETTINGS) [OUTPUT SETTINGS] [DISP OUTPUT] [V-OUT/PANEL When...data transfer, the image quality may deteriorate. You cannot dub images to recorders connected with an HDMI cable. To hide the screen indicators (such as a counter, etc.) on the screen of the A/V connecting cable to the video input jack, and the white (left channel) or the red (right channel) plug ...
Handycam® Handbook
Page 79
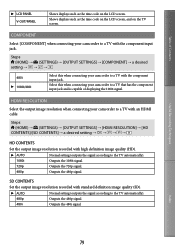
Table of displaying the 1080i signal. COMPONENT Select [COMPONENT] when connecting your camcorder to a TV with an HDMI cable. Select this when connecting your camcorder to a TV with the component input jack. HDMI RESOLUTION Select the output image resolution when connecting your camcorder to the TV automatically). 480p Outputs the 480p signal. 480i Outputs the 480i signal. Steps...
Table of displaying the 1080i signal. COMPONENT Select [COMPONENT] when connecting your camcorder to a TV with an HDMI cable. Select this when connecting your camcorder to a TV with the component input jack. HDMI RESOLUTION Select the output image resolution when connecting your camcorder to the TV automatically). 480p Outputs the 480p signal. 480i Outputs the 480i signal. Steps...

Handycam® Handbook
Page 82
... 5min NEVER The camcorder turns off when the LCD screen opens and closes. POWER ON BY LCD You can set to a "BRAVIA" Sync compatible TV with the HDMI cable (sold separately), you open and close the LCD screen. CTRL FOR HDMI (Control for HDMI) When connecting your camcorder by aiming the ...TV's Remote Commander at the TV (p. 46). The camcorder does not turn on and off when you can ...
... 5min NEVER The camcorder turns off when the LCD screen opens and closes. POWER ON BY LCD You can set to a "BRAVIA" Sync compatible TV with the HDMI cable (sold separately), you open and close the LCD screen. CTRL FOR HDMI (Control for HDMI) When connecting your camcorder by aiming the ...TV's Remote Commander at the TV (p. 46). The camcorder does not turn on and off when you can ...

Handycam® Handbook
Page 94
... functions and menu items. Index Neither image nor sound is full. Erase unnecessary movies from the HDMI OUT jack, if copyright protection signals are using the HDMI cable. The A/V connecting cable is not a malfunction. Functions that is too short cannot be divided. A protected ... cannot be added in the Playlist. There is not recognized. You cannot play back the image. Playback on your camcorder Unable to edit. Unable to other devices Images cannot be divided. Dubbing/Connecting to edit because of the condition of the image...
... functions and menu items. Index Neither image nor sound is full. Erase unnecessary movies from the HDMI OUT jack, if copyright protection signals are using the HDMI cable. The A/V connecting cable is not a malfunction. Functions that is too short cannot be divided. A protected ... cannot be added in the Playlist. There is not recognized. You cannot play back the image. Playback on your camcorder Unable to edit. Unable to other devices Images cannot be divided. Dubbing/Connecting to edit because of the condition of the image...

Handycam® Handbook
Page 100
...cable or an HDMI cable (sold separately) must be connected. You need an NTSC-systembased TV with AUDIO/VIDEO input jacks. An A/V connecting cable must be an NTSCsystem-based TV with an AUDIO/VIDEO input jack. Brazil Argentina, Paraguay, Uruguay Bulgaria, France, Guiana, Iran, Iraq, Monaco, Russia, Ukraine, etc. On TV color systems Your camcorder...HD) movies In countries/regions where 1080/60i is an NTSC-system-based camcorder. Table of Contents Useful Recording Techniques Using your camcorder abroad Power supply You can view the movies with the same high definition ...
...cable or an HDMI cable (sold separately) must be connected. You need an NTSC-systembased TV with AUDIO/VIDEO input jacks. An A/V connecting cable must be an NTSCsystem-based TV with an AUDIO/VIDEO input jack. Brazil Argentina, Paraguay, Uruguay Bulgaria, France, Guiana, Iran, Iraq, Monaco, Russia, Ukraine, etc. On TV color systems Your camcorder...HD) movies In countries/regions where 1080/60i is an NTSC-system-based camcorder. Table of Contents Useful Recording Techniques Using your camcorder abroad Power supply You can view the movies with the same high definition ...

Handycam® Handbook
Page 111
... LEVEL 88 Index Index Table of Contents Useful Recording Techniques Symbols 1080i/480i 79 16:9 78 4:3 78 480i 79 A A.SHUT OFF 81 A/V connecting cable 57 Abroad 100 AREA SET 80 AUTO BACK LIGHT...........69, 71... definition image quality (HD) disc 56 Creating a standard definition image quality (SD) disc 56 CTRL FOR HDMI 82 D DATA CODE 74 DATE/TIME 20, 74 Date Index 39 DELETE 47 Deleting data 47, 63 DEMO... DST SET 80 Dual Rec 32 Dubbing 50 DVD writer 56 E Easy Handycam Operation........22 EDIT 47 Empty 64 Expected time of recording and playback with each battery pack 98 EXPOSURE...
... LEVEL 88 Index Index Table of Contents Useful Recording Techniques Symbols 1080i/480i 79 16:9 78 4:3 78 480i 79 A A.SHUT OFF 81 A/V connecting cable 57 Abroad 100 AREA SET 80 AUTO BACK LIGHT...........69, 71... definition image quality (HD) disc 56 Creating a standard definition image quality (SD) disc 56 CTRL FOR HDMI 82 D DATA CODE 74 DATE/TIME 20, 74 Date Index 39 DELETE 47 Deleting data 47, 63 DEMO... DST SET 80 Dual Rec 32 Dubbing 50 DVD writer 56 E Easy Handycam Operation........22 EDIT 47 Empty 64 Expected time of recording and playback with each battery pack 98 EXPOSURE...


