
Operating Instructions
Page 4
... carrying it. • Do not touch the memory card while copying. • Do not place any objects on the unit. • Do not place the remote control on the floor, etc., as buttons may be pressed by mistake. • Do not place the unit upright. • Watch the screen in a bright...
... carrying it. • Do not touch the memory card while copying. • Do not place any objects on the unit. • Do not place the remote control on the floor, etc., as buttons may be pressed by mistake. • Do not place the unit upright. • Watch the screen in a bright...
Operating Instructions
Page 6
... 4 Precautions 4 Main Features 8 Guide to the Display Operations 10 Preparations Unpacking 12 Preparing the Remote 12 Controlling a TV with the remote 13 Connecting to Your TV 14 Connecting to your TV using an HDMI cord 14 Connecting to your...digital still camera 21 Importing All Photos to the Unit 22 6 Importing Selected Photos or Folders to the Unit 24 Importing a single photo to the unit 24 Importing multiple photos to the unit 25 Enjoying Photos Viewing Photos (Photo Browser 27 Viewing photos stored in a memory card or disc 30 Playing a slideshow 31 Enjoying Photo Albums...
... 4 Precautions 4 Main Features 8 Guide to the Display Operations 10 Preparations Unpacking 12 Preparing the Remote 12 Controlling a TV with the remote 13 Connecting to Your TV 14 Connecting to your TV using an HDMI cord 14 Connecting to your...digital still camera 21 Importing All Photos to the Unit 22 6 Importing Selected Photos or Folders to the Unit 24 Importing a single photo to the unit 24 Importing multiple photos to the unit 25 Enjoying Photos Viewing Photos (Photo Browser 27 Viewing photos stored in a memory card or disc 30 Playing a slideshow 31 Enjoying Photo Albums...
Operating Instructions
Page 12
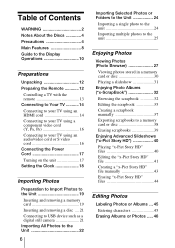
... items. Should anything be missing, contact your nearest Sony dealer or local authorized Sony service facility. • AC power cord (1) • AC adaptor (AC-LX1M) (1) • Component video cord (Y, PB, PR) (1) • Audio/video cord (1) • Remote commander (remote) (1) • Size AA (R6) batteries (2) Preparing the Remote Insert two size AA (R6) batteries, matching the...
... items. Should anything be missing, contact your nearest Sony dealer or local authorized Sony service facility. • AC power cord (1) • AC adaptor (AC-LX1M) (1) • Component video cord (Y, PB, PR) (1) • Audio/video cord (1) • Remote commander (remote) (1) • Size AA (R6) batteries (2) Preparing the Remote Insert two size AA (R6) batteries, matching the...

Operating Instructions
Page 13
If you set the remote control's signal to your TV's setting, you can set the supplied remote to control your TV's power switch, channel, or volume. Preparations Controlling a TV with the remote You can operate your TV. INPUT TV \/1 INPUT TV INFO DISPLAY RETURN OPTIONS HOME TV VOL CH TV Operating buttons MUTING M/m/
If you set the remote control's signal to your TV's setting, you can set the supplied remote to control your TV's power switch, channel, or volume. Preparations Controlling a TV with the remote You can operate your TV. INPUT TV \/1 INPUT TV INFO DISPLAY RETURN OPTIONS HOME TV VOL CH TV Operating buttons MUTING M/m/

Operating Instructions
Page 14
...into jacks firmly. • Be sure to turn on cord. Connect the unit and TV with HDMI Control function, you have a Sony TV with a suitable cord. Notes • To view High Definition images, your TV's resolution. 480i: Outputs images from all the ..., 1080i: Outputs images from the HDMI OUT and COMPONENT VIDEO OUT jacks. Connecting to Your TV You can view stored photos on the rear to [720p] or [1080i]. Using the RESOLUTION switch on resolution, refer to the TV's operating instructions... on your TV using an HDMI cord Connect the HDMI OUT jack using the remote supplied with this unit.
...into jacks firmly. • Be sure to turn on cord. Connect the unit and TV with HDMI Control function, you have a Sony TV with a suitable cord. Notes • To view High Definition images, your TV's resolution. 480i: Outputs images from all the ..., 1080i: Outputs images from the HDMI OUT and COMPONENT VIDEO OUT jacks. Connecting to Your TV You can view stored photos on the rear to [720p] or [1080i]. Using the RESOLUTION switch on resolution, refer to the TV's operating instructions... on your TV using an HDMI cord Connect the HDMI OUT jack using the remote supplied with this unit.
Operating Instructions
Page 17
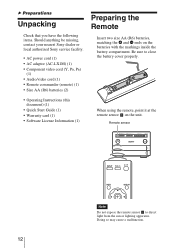
.... CF/Microdrive EXPORT IMPORT The light on the \/1 (on/standby) button changes from the DC IN terminal, check that [HDMI Control] of the unit or remote. To set to a wall outlet (supplied) Notes • Before moving the unit, turn off the power by force" (page 66). If the unit does not...
.... CF/Microdrive EXPORT IMPORT The light on the \/1 (on/standby) button changes from the DC IN terminal, check that [HDMI Control] of the unit or remote. To set to a wall outlet (supplied) Notes • Before moving the unit, turn off the power by force" (page 66). If the unit does not...
Operating Instructions
Page 66
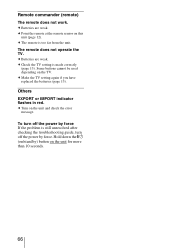
... made correctly (page 13). The remote does not operate the TV. c Check the TV setting is too far from the unit. To turn off the power by force If the problem .../standby) button on the unit and check the error message. c Turn on the unit for more than 10 seconds. 66 Remote commander (remote) The remote does not work. c Point the remote at the remote sensor on the TV. c Batteries are weak. Some buttons cannot be used depending on this unit (page 12). Others EXPORT or...
... made correctly (page 13). The remote does not operate the TV. c Check the TV setting is too far from the unit. To turn off the power by force If the problem .../standby) button on the unit and check the error message. c Turn on the unit for more than 10 seconds. 66 Remote commander (remote) The remote does not work. c Point the remote at the remote sensor on the TV. c Batteries are weak. Some buttons cannot be used depending on this unit (page 12). Others EXPORT or...
Operating Instructions
Page 73
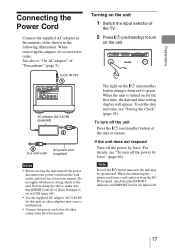
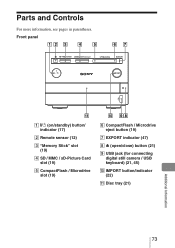
Front panel CF/Microdrive EXPORT IMPORT A "/1 (on/standby) button/ indicator (17) B Remote sensor (12) C "Memory Stick" slot (19) D SD / MMC / xD-Picture Card slot (19) E CompactFlash / Microdrive slot (19) F CompactFlash / Microdrive eject button (19) G EXPORT indicator (47) H Z (open/close) button (21) I USB jack (for connecting digital still camera / USB keyboard) (21, 45) J IMPORT button/indicator (22) K Disc tray (21) Additional Information 73 Parts and Controls For more information, see pages in parentheses.
Front panel CF/Microdrive EXPORT IMPORT A "/1 (on/standby) button/ indicator (17) B Remote sensor (12) C "Memory Stick" slot (19) D SD / MMC / xD-Picture Card slot (19) E CompactFlash / Microdrive slot (19) F CompactFlash / Microdrive eject button (19) G EXPORT indicator (47) H Z (open/close) button (21) I USB jack (for connecting digital still camera / USB keyboard) (21, 45) J IMPORT button/indicator (22) K Disc tray (21) Additional Information 73 Parts and Controls For more information, see pages in parentheses.

Operating Instructions
Page 75
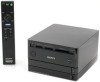
Remote INPUT TV INFO DISPLAY RETURN OPTIONS HOME TV VOL CH MUTING Additional Information A INPUT button (13) B TV "/1 (on/standby) button (13) C INFO (information) button (10) D RETURN button (10) E "/1 (on/standby) button (17) F DISPLAY button (10) G M/m/
Remote INPUT TV INFO DISPLAY RETURN OPTIONS HOME TV VOL CH MUTING Additional Information A INPUT button (13) B TV "/1 (on/standby) button (13) C INFO (information) button (10) D RETURN button (10) E "/1 (on/standby) button (17) F DISPLAY button (10) G M/m/
Operating Instructions
Page 76
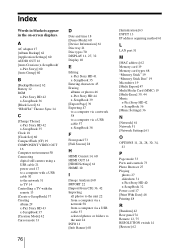
... 35 Clock 18 [Clock Set] 60 CompactFlash (CF) 19 COMPONENT VIDEO OUT 16 Computer environment 50 Connecting digital still camera using a USB cable 21 power cord 17 to a computer with a USB cable 50 to ...the network 51 to TV 14 Controlling a TV with the remote 13 [Create x-ScrapBook] 37 Creating album 29 x-Pict Story HD 43 x-ScrapBook 37 [Creation Mode] 42 Cursor mode 33 76 ... 11, 27, 32 Display 10 E Editing x-Pict Story HD 41 x-ScrapBook 35 Entering characters 45 Erasing albums or photos 46 x-Pict Story HD 44 x-ScrapBook 39 [Export Page] 39 Exporting 47 to a computer via a ...
... 35 Clock 18 [Clock Set] 60 CompactFlash (CF) 19 COMPONENT VIDEO OUT 16 Computer environment 50 Connecting digital still camera using a USB cable 21 power cord 17 to a computer with a USB cable 50 to ...the network 51 to TV 14 Controlling a TV with the remote 13 [Create x-ScrapBook] 37 Creating album 29 x-Pict Story HD 43 x-ScrapBook 37 [Creation Mode] 42 Cursor mode 33 76 ... 11, 27, 32 Display 10 E Editing x-Pict Story HD 41 x-ScrapBook 35 Entering characters 45 Erasing albums or photos 46 x-Pict Story HD 44 x-ScrapBook 39 [Export Page] 39 Exporting 47 to a computer via a ...
