Operating Instructions
Page 2
... V As an ENERGY STAR Partner, Sony Corporation has determined that to which can radiate radio frequency energy and, if not installed and used with a computer equipped with VESA Display Power Management Signaling (DPMS). (GDM-400PS only) This monitor complies with the instructions, may cause... you call upon your authority to provide reasonable protection against harmful interference in accordance with the TCO'95 guidelines. (GDM-500PS only) ʢV C C I B (GDM-500PS only) 2 Consult the dealer or an experienced radio/TV technician for Metrology de décembre 1990 (MPR II...
... V As an ENERGY STAR Partner, Sony Corporation has determined that to which can radiate radio frequency energy and, if not installed and used with a computer equipped with VESA Display Power Management Signaling (DPMS). (GDM-400PS only) This monitor complies with the instructions, may cause... you call upon your authority to provide reasonable protection against harmful interference in accordance with the TCO'95 guidelines. (GDM-500PS only) ʢV C C I B (GDM-500PS only) 2 Consult the dealer or an experienced radio/TV technician for Metrology de décembre 1990 (MPR II...
Operating Instructions
Page 3
... 7 Selecting the On-screen Display Language 7 Selecting the Input Signal 8 Customizing Your Monitor Adjusting the Picture Brightness and Contrast 9 Introducing the On-screen Display System 9 Using the CENTER On-screen Display 10 Using the SIZE On-screen Display 10 Using the GEOM (Geometry) On-screen Display 11 Using the ZOOM On-screen Display 12 Using the COLOR...
... 7 Selecting the On-screen Display Language 7 Selecting the Input Signal 8 Customizing Your Monitor Adjusting the Picture Brightness and Contrast 9 Introducing the On-screen Display System 9 Using the CENTER On-screen Display 10 Using the SIZE On-screen Display 10 Using the GEOM (Geometry) On-screen Display 11 Using the ZOOM On-screen Display 12 Using the COLOR...
Operating Instructions
Page 4
.... 15° 90° 90° 5° 4 Do not place the monitor on surfaces (rugs, blankets, etc.) or near materials (curtains, draperies) that may affect the data stored on the CRT display surface to direct sunlight, excessive dust, mechanical vibration or shock. • Do not... place the monitor near the equipment and be easily accessible. Maintenance • Clean the cabinet, panel and controls...
.... 15° 90° 90° 5° 4 Do not place the monitor on surfaces (rugs, blankets, etc.) or near materials (curtains, draperies) that may affect the data stored on the CRT display surface to direct sunlight, excessive dust, mechanical vibration or shock. • Do not... place the monitor near the equipment and be easily accessible. Maintenance • Clean the cabinet, panel and controls...
Operating Instructions
Page 5
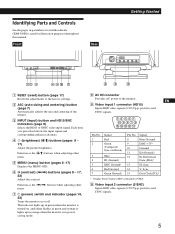
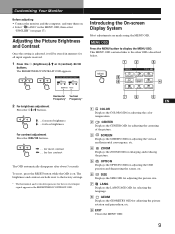
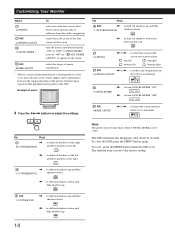
...Rear RESET ASC HD15 BNC INPUT MENU 1 RESET (reset) button (page 17) Resets the adjustments to the monitor. Each time you press this manual. Sync Data Clock(SCL)* * Display Data Channel (DDC) Standard of the images. 3 INPUT (input) button and HD15/BNC indicators (page 8)... throughout this button, the input signal and corresponding indicator alternate. 4 ¨ (brightness) (./>) buttons (pages 8 - 17) Adjust the picture brightness. GDM-500PS is in power saving mode. 8 AC IN connector Provides AC power to the factory settings. 2 ASC (auto sizing and centering) button (page 7) ...
...Rear RESET ASC HD15 BNC INPUT MENU 1 RESET (reset) button (page 17) Resets the adjustments to the monitor. Each time you press this manual. Sync Data Clock(SCL)* * Display Data Channel (DDC) Standard of the images. 3 INPUT (input) button and HD15/BNC indicators (page 8)... throughout this button, the input signal and corresponding indicator alternate. 4 ¨ (brightness) (./>) buttons (pages 8 - 17) Adjust the picture brightness. GDM-500PS is in power saving mode. 8 AC IN connector Provides AC power to the factory settings. 2 ASC (auto sizing and centering) button (page 7) ...
Operating Instructions
Page 6
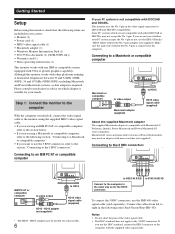
... IBM PC/AT or compatible computer If your carton: • Monitor (1) • Power cord (1) • HD15 video signal cable (1) • Macintosh adapter (1) • Windows Monitor Information Disk (1) • TCO'95 Eco-document (1) (GDM-500PS only) • Warranty card (1) • These operating instructions (1) This monitor works with any IBM or compatible system equipped with other platforms...
... IBM PC/AT or compatible computer If your carton: • Monitor (1) • Power cord (1) • HD15 video signal cable (1) • Macintosh adapter (1) • Windows Monitor Information Disk (1) • TCO'95 Eco-document (1) (GDM-500PS only) • Warranty card (1) • These operating instructions (1) This monitor works with any IBM or compatible system equipped with other platforms...
Operating Instructions
Page 7
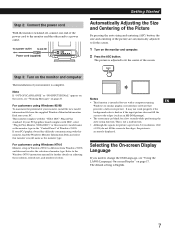
... are automatically adjusted to fit the screen. 1 Turn on the monitor and computer. 2 Press the ASC button. Note If "OUT OF SCAN RANGE" or "NO INPUT SIGNAL" appears on the screen, see "Using the LANG (Language) On-screen Display" on page 20. Automatically Adjusting the Size and Centering of the... Picture By pressing the auto sizing and centering (ASC) button, the size and centering of the power cord to the monitor and the other end to a power outlet. ASC Notes...
... are automatically adjusted to fit the screen. 1 Turn on the monitor and computer. 2 Press the ASC button. Note If "OUT OF SCAN RANGE" or "NO INPUT SIGNAL" appears on the screen, see "Using the LANG (Language) On-screen Display" on page 20. Automatically Adjusting the Size and Centering of the... Picture By pressing the auto sizing and centering (ASC) button, the size and centering of the power cord to the monitor and the other end to a power outlet. ASC Notes...
Operating Instructions
Page 8
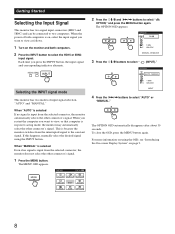
...this happens, manually select the desired signal using the OSD, see "Introducing the On-screen Display System" on the monitor and both computers is because the monitor switches from the selected connector, the monitor automatically selects the other connector's signal. 1 Press the MENU button. OPTION AUTO MANUAL ZZ...... selection, "AUTO" and "MANUAL." To close the OSD, press the MENU button again. Getting Started Selecting the Input Signal This monitor has two signal input connectors (HD15 and 5BNC) and can be connected to select the HD15 or 5BNC input signal. OPTION ON ...
...this happens, manually select the desired signal using the OSD, see "Introducing the On-screen Display System" on the monitor and both computers is because the monitor switches from the selected connector, the monitor automatically selects the other connector's signal. 1 Press the MENU button. OPTION AUTO MANUAL ZZ...... selection, "AUTO" and "MANUAL." To close the OSD, press the MENU button again. Getting Started Selecting the Input Signal This monitor has two signal input connectors (HD15 and 5BNC) and can be connected to select the HD15 or 5BNC input signal. OPTION ON ...
Operating Instructions
Page 9
... setting is on . • Select " LANG" in the BRIGHTNESS/CONTRAST OSD. This MENU OSD contains links to display the MENU OSD. BRIGHTNESS/CONTRAST 26 26 80.0kHz/ 75Hz GCeuttsitnogmSiztianrgteYdour Monitor Introducing the On-screen Display System Most adjustments are both reset to the factory settings. * The horizontal and vertical frequencies for all input...
... setting is on . • Select " LANG" in the BRIGHTNESS/CONTRAST OSD. This MENU OSD contains links to display the MENU OSD. BRIGHTNESS/CONTRAST 26 26 80.0kHz/ 75Hz GCeuttsitnogmSiztianrgteYdour Monitor Introducing the On-screen Display System Most adjustments are both reset to the factory settings. * The horizontal and vertical frequencies for all input...
Operating Instructions
Page 10
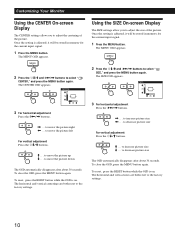
... the RESET button while the OSD is adjusted, it will be stored in memory for the current input signal. 1 Press the MENU button. Customizing Your Monitor Using the CENTER On-screen Display The CENTER settings allow you to adjust the centering of the picture. Using the SIZE On-screen... Display The SIZE settings allow you to adjust the size of the picture. MENU 2 Press the ¨./> and >?// buttons to the factory settings. 10 The MENU ...
... the RESET button while the OSD is adjusted, it will be stored in memory for the current input signal. 1 Press the MENU button. Customizing Your Monitor Using the CENTER On-screen Display The CENTER settings allow you to adjust the centering of the picture. Using the SIZE On-screen... Display The SIZE settings allow you to adjust the size of the picture. MENU 2 Press the ¨./> and >?// buttons to the factory settings. 10 The MENU ...
Operating Instructions
Page 11
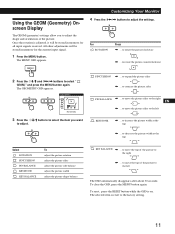
... for all input signals received. All other adjustments will be stored in memory for the current input signal. 1 Press the MENU button. MENU GCeuttsitnogmSiztianrgteYdour Monitor 4 Press the >?// buttons to the left The OSD automatically disappears after about 30 seconds. The GEOMETRY OSD appears. to move the top of the... adjust the picture width adjust the picture shape balance KEY BALANCE / . . . to move the top of the picture. Using the GEOM (Geometry) Onscreen Display The GEOM (geometry) settings allow you want to the left F KEYSTONE ES / . . . The MENU OSD appears.
... for all input signals received. All other adjustments will be stored in memory for the current input signal. 1 Press the MENU button. MENU GCeuttsitnogmSiztianrgteYdour Monitor 4 Press the >?// buttons to the left The OSD automatically disappears after about 30 seconds. The GEOMETRY OSD appears. to move the top of the... adjust the picture width adjust the picture shape balance KEY BALANCE / . . . to move the top of the picture. Using the GEOM (Geometry) Onscreen Display The GEOM (geometry) settings allow you want to the left F KEYSTONE ES / . . . The MENU OSD appears.

Operating Instructions
Page 12
... appears. ZOOM H 26 V 73 3 Press the >?//buttons to select the color temperature. The COLOR OSD appears. MENU Using the COLOR On-screen Display You can adjust or change the monitor's color temperature. COLOR 5000K 6500K 9300K R B I AS 50 G B I AS 50 B B I AS 50 R GAIN 50 G GAIN 50 B GAIN...the >?// buttons to adjust the picture zoom. / . . . To close the OSD, press the MENU button again. Customizing Your Monitor Using the ZOOM On-screen Display The ZOOM settings allow you can change the colors of a picture on . To reset, press the RESET button while the OSD is...
... appears. ZOOM H 26 V 73 3 Press the >?//buttons to select the color temperature. The COLOR OSD appears. MENU Using the COLOR On-screen Display You can adjust or change the monitor's color temperature. COLOR 5000K 6500K 9300K R B I AS 50 G B I AS 50 B B I AS 50 R GAIN 50 G GAIN 50 B GAIN...the >?// buttons to adjust the picture zoom. / . . . To close the OSD, press the MENU button again. Customizing Your Monitor Using the ZOOM On-screen Display The ZOOM settings allow you can change the colors of a picture on . To reset, press the RESET button while the OSD is...
Operating Instructions
Page 13
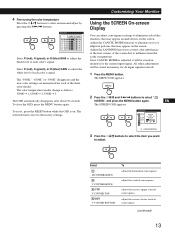
... adjust the horizontal convergence adjust the vertical convergence adjust the screen's upper vertical convergence adjust the screen's lower vertical convergence (continued) 13 GCeuttsitnogmSiztianrgteYdour Monitor Using the SCREEN On-screen Display You can adjust convergence settings to select an item and adjust by pressing the >?// buttons. 4 Fine tuning the color temperature Press the...
... adjust the horizontal convergence adjust the vertical convergence adjust the screen's upper vertical convergence adjust the screen's lower vertical convergence (continued) 13 GCeuttsitnogmSiztianrgteYdour Monitor Using the SCREEN On-screen Display You can adjust convergence settings to select an item and adjust by pressing the >?// buttons. 4 Fine tuning the color temperature Press the...
Operating Instructions
Page 14
.../ or ? . . . to shift red shadows up LANDING / or ? . . . to turn the moire cancellation function "ON" or "OFF." to adjust the settings. Customizing Your Monitor Select To LANDING ADJ LANDING ADJUST CANCEL MOIRE * select one of the four corners of the screen turn CANCEL MOIRE "OFF" OFF ON ADJ MOIRE... and blue shadows up and blue V CONVERGENCE shadows down ? . . . to influence from the input signal and the phosphor pitch pattern of the CRT. The selected item is at one of the four corners that needs color correction due to turn CANCEL MOIRE "ON" OFF ON ? . . .
.../ or ? . . . to shift red shadows up LANDING / or ? . . . to turn the moire cancellation function "ON" or "OFF." to adjust the settings. Customizing Your Monitor Select To LANDING ADJ LANDING ADJUST CANCEL MOIRE * select one of the four corners of the screen turn CANCEL MOIRE "OFF" OFF ON ADJ MOIRE... and blue shadows up and blue V CONVERGENCE shadows down ? . . . to influence from the input signal and the phosphor pitch pattern of the CRT. The selected item is at one of the four corners that needs color correction due to turn CANCEL MOIRE "ON" OFF ON ? . . .
Operating Instructions
Page 15
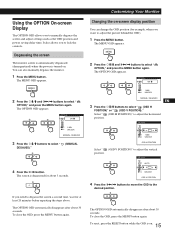
... position. To close the OSD, press the MENU button again. Degaussing the screen The monitor screen is automatically degaussed (demagnetized) when the power is on -screen display position You can also manually degauss the monitor. 1 Press the MENU button. GCeuttsitnogmSiztianrgteYdour Monitor Changing the on . OPTION ON ZZ... 1 MIN UNLOCK MANUAL DEGAUSS EN 3 Press the...
... position. To close the OSD, press the MENU button again. Degaussing the screen The monitor screen is automatically degaussed (demagnetized) when the power is on -screen display position You can also manually degauss the monitor. 1 Press the MENU button. GCeuttsitnogmSiztianrgteYdour Monitor Changing the on . OPTION ON ZZ... 1 MIN UNLOCK MANUAL DEGAUSS EN 3 Press the...
Operating Instructions
Page 16
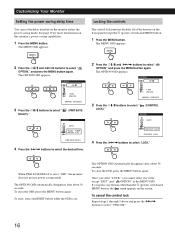
... select "UNLOCK." 16 The OPTION OSD appears. To reset, press the RESET button while the OSD is set the delay time before the monitor enters the power saving mode. The OPTION OSD automatically disappears after about 30 seconds. To cancel the control lock Repeat steps 1 through 3 ...MENU button again. The MENU OSD appears. The OPTION OSD appears. Locking the controls The control lock function disables all of the buttons on this monitor's power saving capabilities. 1 Press the MENU button. See page 19 for more information on the front panel except the u (power) switch and...
... select "UNLOCK." 16 The OPTION OSD appears. To reset, press the RESET button while the OSD is set the delay time before the monitor enters the power saving mode. The OPTION OSD automatically disappears after about 30 seconds. To cancel the control lock Repeat steps 1 through 3 ...MENU button again. The MENU OSD appears. The OPTION OSD appears. Locking the controls The control lock function disables all of the buttons on this monitor's power saving capabilities. 1 Press the MENU button. See page 19 for more information on the front panel except the u (power) switch and...
Operating Instructions
Page 17
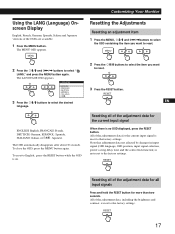
... the OSD containing the item you want to English, press the RESET button while the OSD is no OSD displayed, press the RESET button. RESET 17 GCeuttsitnogmSiztianrgteYdour Monitor Using the LANG (Language) Onscreen Display English, French, German, Spanish, Italian and Japanese versions of the adjustment data for all input signals Press and hold...
... the OSD containing the item you want to English, press the RESET button while the OSD is no OSD displayed, press the RESET button. RESET 17 GCeuttsitnogmSiztianrgteYdour Monitor Using the LANG (Language) Onscreen Display English, French, German, Spanish, Italian and Japanese versions of the adjustment data for all input signals Press and hold...
Operating Instructions
Page 18
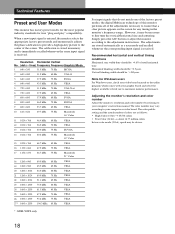
....5 kHz 85 Hz 75 Hz VESA VESA 17 1152 × 870 68.7 kHz 75 Hz Macintosh 21" Color 18 1280 × 960 60.0 kHz 60 Hz VESA 19 1280 × 960 20 1280 × 1024 21 1280 × 1024 85.9 kHz 64.0 kHz 80.0 kHz 85 Hz 60 Hz 75 Hz VESA...; 1200 93.8 kHz 75 Hz VESA 27 * 1600 × 1200 106.3 kHz 85 Hz VESA * GDM-500PS only For input signals that do not match one of the factory preset modes, the digital Multiscan technology of this monitor performs all of colors are stored automatically as follows: • High Color (16 bit) n 65...
....5 kHz 85 Hz 75 Hz VESA VESA 17 1152 × 870 68.7 kHz 75 Hz Macintosh 21" Color 18 1280 × 960 60.0 kHz 60 Hz VESA 19 1280 × 960 20 1280 × 1024 21 1280 × 1024 85.9 kHz 64.0 kHz 80.0 kHz 85 Hz 60 Hz 75 Hz VESA...; 1200 93.8 kHz 75 Hz VESA 27 * 1600 × 1200 106.3 kHz 85 Hz VESA * GDM-500PS only For input signals that do not match one of the factory preset modes, the digital Multiscan technology of this monitor performs all of colors are stored automatically as follows: • High Color (16 bit) n 65...

Operating Instructions
Page 19
... 1 Normal operation Screen active Horizontal sync signal present Vertical Power consumption sync signal present ≤ 145 W (GDM-500PS) ≤ 125 W (GDM-400PS) Recovery time u indicator - Approx. 65 W (GDM-400PS) Green and orange alternate 3 Suspend (2nd mode) blank present absent Approx. 8 W Approx. 3 ... 0 W Approx. 10 sec. Damper wires This monitor complies with the V. DDC™ is connected, the monitor C synchronizes with the DDC™1, DDC2B, DDC2AB ES and DDC2B+ Display Data Channel (DDC) standards of CRTs that is input to the aperture grille on the ...
... 1 Normal operation Screen active Horizontal sync signal present Vertical Power consumption sync signal present ≤ 145 W (GDM-500PS) ≤ 125 W (GDM-400PS) Recovery time u indicator - Approx. 65 W (GDM-400PS) Green and orange alternate 3 Suspend (2nd mode) blank present absent Approx. 8 W Approx. 3 ... 0 W Approx. 10 sec. Damper wires This monitor complies with the V. DDC™ is connected, the monitor C synchronizes with the DDC™1, DDC2B, DDC2AB ES and DDC2B+ Display Data Channel (DDC) standards of CRTs that is input to the aperture grille on the ...
Operating Instructions
Page 20
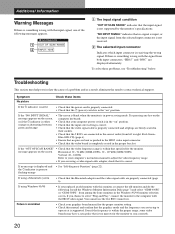
...input connector is receiving the wrong signal. If no pins are properly connected (page 6). Install the Windows Monitor Information Disk (page 7) and select "GDM-400PS" or "GDM-500PS" from among the Sony monitors in the "on " position. • Check that the input select setting is correct. • ...video frequency range is within the proper range, some video boards may help you are displayed alternately. If using a Macintosh system • Check that is too narrow for the monitor. Additional Information Warning Messages If there is something wrong with the HD15 video signal....
...input connector is receiving the wrong signal. If no pins are properly connected (page 6). Install the Windows Monitor Information Disk (page 7) and select "GDM-400PS" or "GDM-500PS" from among the Sony monitors in the "on " position. • Check that the input select setting is correct. • ...video frequency range is within the proper range, some video boards may help you are displayed alternately. If using a Macintosh system • Check that is too narrow for the monitor. Additional Information Warning Messages If there is something wrong with the HD15 video signal....

Operating Instructions
Page 21
...8226; Adjust the size or centering (page 10). • Some video modes do not fill the screen to the screen giving the Trinitron CRT more color and brightness. Excessive cable length or a weak connection can produce this symptom occurs. While the auto-degauss cycle is set it ...aperture grille (page 19). If a second degauss cycle is needed , allow a minimum interval of the monitor, color may become fuzzy. Blue-HD-VD) (page 6). Screen image is not a malfunction. 21 Edges of some image patterns, certain screen backgrounds sometimes show red or blue shadows at edges • Adjust...
...8226; Adjust the size or centering (page 10). • Some video modes do not fill the screen to the screen giving the Trinitron CRT more color and brightness. Excessive cable length or a weak connection can produce this symptom occurs. While the auto-degauss cycle is set it ...aperture grille (page 19). If a second degauss cycle is needed , allow a minimum interval of the monitor, color may become fuzzy. Blue-HD-VD) (page 6). Screen image is not a malfunction. 21 Edges of some image patterns, certain screen backgrounds sometimes show red or blue shadows at edges • Adjust...


