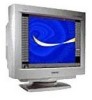
Operating Instructions
Page 2
... STAR guidelines for a Class B digital device, pursuant to radio communications. Reorient or relocate the receiving antenna. - Connect the equipment into an outlet on , the user is encouraged to try to which can radiate radio frequency energy and, if not installed and used with a computer equipped with VESA Display Power Management Signaling (DPMS). (GDM-400PS only) This monitor complies with the limits for...
... STAR guidelines for a Class B digital device, pursuant to radio communications. Reorient or relocate the receiving antenna. - Connect the equipment into an outlet on , the user is encouraged to try to which can radiate radio frequency energy and, if not installed and used with a computer equipped with VESA Display Power Management Signaling (DPMS). (GDM-400PS only) This monitor complies with the limits for...
Operating Instructions
Page 3
... Selecting the Input Signal 8 Customizing Your Monitor Adjusting the Picture Brightness and Contrast 9 Introducing the On-screen Display System 9 Using the CENTER On-screen Display 10 Using the SIZE On-screen Display 10 Using the GEOM (Geometry) On-screen Display 11 Using the ZOOM On-screen Display 12 Using the COLOR On-screen Display 12 Using the SCREEN On-screen Display 13 EN Using the OPTION On-screen Display 15 Using the LANG (Language) On-screen Display 17 F Resetting the Adjustments 17 ES Technical Features C Preset and User Modes ...18 Power Saving Function...
... Selecting the Input Signal 8 Customizing Your Monitor Adjusting the Picture Brightness and Contrast 9 Introducing the On-screen Display System 9 Using the CENTER On-screen Display 10 Using the SIZE On-screen Display 10 Using the GEOM (Geometry) On-screen Display 11 Using the ZOOM On-screen Display 12 Using the COLOR On-screen Display 12 Using the SCREEN On-screen Display 13 EN Using the OPTION On-screen Display 15 Using the LANG (Language) On-screen Display 17 F Resetting the Adjustments 17 ES Technical Features C Preset and User Modes ...18 Power Saving Function...
Operating Instructions
Page 4
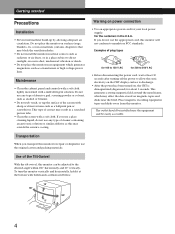
... block the ventilation holes. • Do not install the monitor near heat sources such as radiators or air ducts, or in the U.S.A. Use of contact may scratch the screen's coating. To turn the monitor vertically and horizontally, hold it at least 30 seconds after turning off the power to allow the static electricity on the CRT display surface to discharge. • After the...
... block the ventilation holes. • Do not install the monitor near heat sources such as radiators or air ducts, or in the U.S.A. Use of contact may scratch the screen's coating. To turn the monitor vertically and horizontally, hold it at least 30 seconds after turning off the power to allow the static electricity on the CRT display surface to discharge. • After the...
Operating Instructions
Page 5
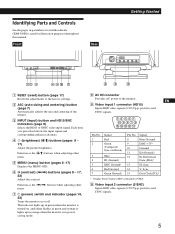
.... Front Getting StarGteedtting Started Rear RESET ASC HD15 BNC INPUT MENU 1 RESET (reset) button (page 17) Resets the adjustments to the monitor. GDM-500PS is in power saving mode. 8 AC IN connector Provides AC power to the factory settings. 2 ASC (auto sizing and centering) button (page 7) Automatically adjusts the size and centering of VESA !º Video input 2 connector (5 BNC) Inputs RGB video signals (0.700 Vp-p, positive) and SYNC signals. 5 Sync V. Sync Data Clock(SCL)* * Display Data Channel (DDC) Standard of the images. 3 INPUT (input) button and HD15/BNC...
.... Front Getting StarGteedtting Started Rear RESET ASC HD15 BNC INPUT MENU 1 RESET (reset) button (page 17) Resets the adjustments to the monitor. GDM-500PS is in power saving mode. 8 AC IN connector Provides AC power to the factory settings. 2 ASC (auto sizing and centering) button (page 7) Automatically adjusts the size and centering of VESA !º Video input 2 connector (5 BNC) Inputs RGB video signals (0.700 Vp-p, positive) and SYNC signals. 5 Sync V. Sync Data Clock(SCL)* * Display Data Channel (DDC) Standard of the images. 3 INPUT (input) button and HD15/BNC...
Operating Instructions
Page 6
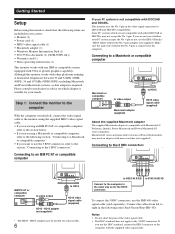
... connectors. HD15 adapter (not supplied)∗ to right in your needs. HD15 adapter may be needed for your carton: • Monitor (1) • Power cord (1) • HD15 video signal cable (1) • Macintosh adapter (1) • Windows Monitor Information Disk (1) • TCO'95 Eco-document (1) (GDM-500PS only) • Warranty card (1) • These operating instructions (1) This monitor works with any IBM or compatible system equipped with VGA or greater graphics capability. Some PC systems which adapter is connected...
... connectors. HD15 adapter (not supplied)∗ to right in your needs. HD15 adapter may be needed for your carton: • Monitor (1) • Power cord (1) • HD15 video signal cable (1) • Macintosh adapter (1) • Windows Monitor Information Disk (1) • TCO'95 Eco-document (1) (GDM-500PS only) • Warranty card (1) • These operating instructions (1) This monitor works with any IBM or compatible system equipped with VGA or greater graphics capability. Some PC systems which adapter is connected...
Operating Instructions
Page 7
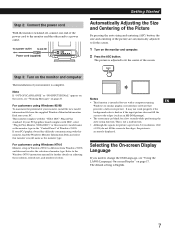
..., select "Plug & Play Monitor (VESA DDC)" or this monitor's model name as the monitor type. For customers using Windows NT4.0 Monitor setup in the "Control Panel" of Windows 95/98. The picture is complete. Getting StarGteedtting Started Step 2: Connect the power cord With the monitor switched off, connect one end of the power cord to the monitor and the other end to fit the center of the screen. The default setting is intended for picture aspect ratio 5:4 (resolution: 1280...
..., select "Plug & Play Monitor (VESA DDC)" or this monitor's model name as the monitor type. For customers using Windows NT4.0 Monitor setup in the "Control Panel" of Windows 95/98. The picture is complete. Getting StarGteedtting Started Step 2: Connect the power cord With the monitor switched off, connect one end of the power cord to the monitor and the other end to fit the center of the screen. The default setting is intended for picture aspect ratio 5:4 (resolution: 1280...
Operating Instructions
Page 8
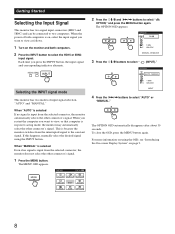
... other connector's signal. 1 Press the MENU button. MENU OK MENU MENU COLOR CENTER SCREEN GEOM EXIT ZOOM LANG SIZE OPTION 2 Press the ¨./> and >?// buttons to two computers. When the power of input signal selection, "AUTO" and "MANUAL." Getting Started Selecting the Input Signal This monitor has two signal input connectors (HD15 and 5BNC) and can be connected to select " OPTION," and press the MENU button again. To close the OSD, press the MENU button again. The OPTION OSD appears...
... other connector's signal. 1 Press the MENU button. MENU OK MENU MENU COLOR CENTER SCREEN GEOM EXIT ZOOM LANG SIZE OPTION 2 Press the ¨./> and >?// buttons to two computers. When the power of input signal selection, "AUTO" and "MANUAL." Getting Started Selecting the Input Signal This monitor has two signal input connectors (HD15 and 5BNC) and can be connected to select " OPTION," and press the MENU button again. To close the OSD, press the MENU button again. The OPTION OSD appears...
Operating Instructions
Page 9
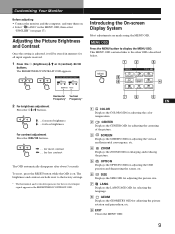
... OSD for less brightness For contrast adjustment Press the >?// buttons. / . . . Customizing Your Monitor Before adjusting • Connect the monitor and the computer, and turn them on . To reset, press the RESET button while the OSD is adjusted, it will be stored in memory for adjusting the color temperature. This MENU OSD contains links to display the MENU OSD. MENU MENU OK MENU COLOR CENTER SCREEN GEOM EXIT ZOOM LANG SIZE OPTION Horizontal Vertical Frequency* Frequency* 2 For brightness adjustment Press the ¨./> buttons. > . . . for the received input signal...
... OSD for less brightness For contrast adjustment Press the >?// buttons. / . . . Customizing Your Monitor Before adjusting • Connect the monitor and the computer, and turn them on . To reset, press the RESET button while the OSD is adjusted, it will be stored in memory for adjusting the color temperature. This MENU OSD contains links to display the MENU OSD. MENU MENU OK MENU COLOR CENTER SCREEN GEOM EXIT ZOOM LANG SIZE OPTION Horizontal Vertical Frequency* Frequency* 2 For brightness adjustment Press the ¨./> buttons. > . . . for the received input signal...
Operating Instructions
Page 10
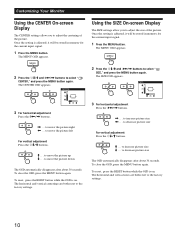
... >?// buttons to decrease picture size For vertical adjustment Press the ¨./> buttons. > . . . The horizontal and vertical centerings are both reset to move the picture up . . . . Customizing Your Monitor Using the CENTER On-screen Display The CENTER settings allow you to adjust the size of the picture. to increase picture size . . . . To reset, press the RESET button while the OSD is adjusted, it will be stored in memory for the current input signal. 1 Press the MENU button. Using the SIZE On-screen Display The SIZE settings...
... >?// buttons to decrease picture size For vertical adjustment Press the ¨./> buttons. > . . . The horizontal and vertical centerings are both reset to move the picture up . . . . Customizing Your Monitor Using the CENTER On-screen Display The CENTER settings allow you to adjust the size of the picture. to increase picture size . . . . To reset, press the RESET button while the OSD is adjusted, it will be stored in memory for the current input signal. 1 Press the MENU button. Using the SIZE On-screen Display The SIZE settings...

Operating Instructions
Page 12
... on the screen to match the actual colors of the printed picture. There are : 5000K, 6500K, 9300K 12 The preset adjustments are three color temperature modes in memory for the current input signal. 1 Press the MENU button. Once the setting is adjusted, it will be stored in the OSD. Once the setting is adjusted, it will stop as soon as either the horizontal or vertical size reaches its...
... on the screen to match the actual colors of the printed picture. There are : 5000K, 6500K, 9300K 12 The preset adjustments are three color temperature modes in memory for the current input signal. 1 Press the MENU button. Once the setting is adjusted, it will be stored in the OSD. Once the setting is adjusted, it will stop as soon as either the horizontal or vertical size reaches its...
Operating Instructions
Page 13
... To adjust the horizontal convergence adjust the vertical convergence adjust the screen's upper vertical convergence adjust the screen's lower vertical convergence (continued) 13 To close the OSD, press the MENU button again. EN The SCREEN OSD appears. COLOR 1 6500K 9300K R B I AS 76 G B I AS 50 B B I AS 50 R GAIN 50 G GAIN 50 B GAIN 50 Select R (red), G (green), or B (blue) BIAS to adjust the white level of the three color modes. Select R (red), G (green), or B (blue) GAIN to adjust the black...
... To adjust the horizontal convergence adjust the vertical convergence adjust the screen's upper vertical convergence adjust the screen's lower vertical convergence (continued) 13 To close the OSD, press the MENU button again. EN The SCREEN OSD appears. COLOR 1 6500K 9300K R B I AS 76 G B I AS 50 B B I AS 50 R GAIN 50 G GAIN 50 B GAIN 50 Select R (red), G (green), or B (blue) BIAS to adjust the white level of the three color modes. Select R (red), G (green), or B (blue) GAIN to adjust the black...
Operating Instructions
Page 14
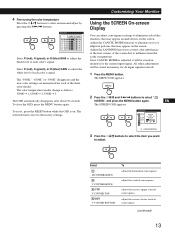
... is on. to adjust the screen until the moire is reset to the factory setting. / . . . The selected item is at one of the four corners that needs color correction due to influence from the input signal and the phosphor pitch pattern of the screen you want to adjust : top left : top right : bottom left ? . . . to shift red shadows up and blue shadows down...
... is on. to adjust the screen until the moire is reset to the factory setting. / . . . The selected item is at one of the four corners that needs color correction due to influence from the input signal and the phosphor pitch pattern of the screen you want to adjust : top left : top right : bottom left ? . . . to shift red shadows up and blue shadows down...
Operating Instructions
Page 15
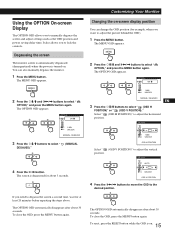
... about 3 seconds. The screen is turned on -screen display position You can also manually degauss the monitor. 1 Press the MENU button. ES OPTION C ZZ... 1 MIN UNLOCK OSD H POSITION Select " position. (OSD V POSITION)" to adjust the picture behind the OSD). 1 Press the MENU button. Using the OPTION On-screen Display The OPTION OSD allows you need to degauss the screen a second time, wait for at least 20 minutes before repeating the steps above. GCeuttsitnogmSiztianrgteYdour Monitor Changing the on . It...
... about 3 seconds. The screen is turned on -screen display position You can also manually degauss the monitor. 1 Press the MENU button. ES OPTION C ZZ... 1 MIN UNLOCK OSD H POSITION Select " position. (OSD V POSITION)" to adjust the picture behind the OSD). 1 Press the MENU button. Using the OPTION On-screen Display The OPTION OSD allows you need to degauss the screen a second time, wait for at least 20 minutes before repeating the steps above. GCeuttsitnogmSiztianrgteYdour Monitor Changing the on . It...
Operating Instructions
Page 16
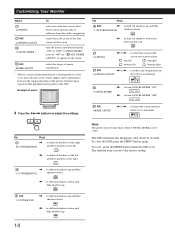
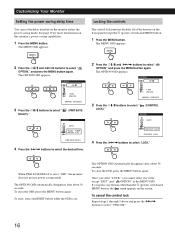
... u (power) switch and MENU button. 1 Press the MENU button. OPTION AUTO 5 SEC 1 MIN ZZ... 60 MIN OFF PWR SAVE DELAY 4 Press the >?// buttons to select " ZZ... (PWR SAVE DELAY)." To reset, press the RESET button while the OSD is set the delay time before the monitor enters the power saving mode. Customizing Your Monitor Setting the power saving delay time You can set to "OFF," the monitor does not go into power saving mode. To cancel the control lock Repeat...
... u (power) switch and MENU button. 1 Press the MENU button. OPTION AUTO 5 SEC 1 MIN ZZ... 60 MIN OFF PWR SAVE DELAY 4 Press the >?// buttons to select " ZZ... (PWR SAVE DELAY)." To reset, press the RESET button while the OSD is set the delay time before the monitor enters the power saving mode. Customizing Your Monitor Setting the power saving delay time You can set to "OFF," the monitor does not go into power saving mode. To cancel the control lock Repeat...
Operating Instructions
Page 17
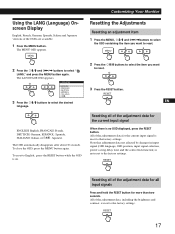
... Monitor Using the LANG (Language) Onscreen Display English, French, German, Spanish, Italian and Japanese versions of the adjustments data for the current input signal is not reset to the factory settings. Note that adjustment data not affected by changes in input signal (OSD language, OSD position, input signal selection, power saving delay time and the control lock function) is reset to select " LANG," and press the MENU button again. To close the OSD, press the MENU button again. RESET EN F Resetting all input signals Press...
... Monitor Using the LANG (Language) Onscreen Display English, French, German, Spanish, Italian and Japanese versions of the adjustments data for the current input signal is not reset to the factory settings. Note that adjustment data not affected by changes in input signal (OSD language, OSD position, input signal selection, power saving delay time and the control lock function) is reset to select " LANG," and press the MENU button again. To close the OSD, press the MENU button again. RESET EN F Resetting all input signals Press...
Operating Instructions
Page 18
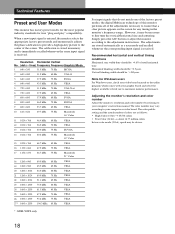
... quality picture to your computer's instruction manual. Note for Windows users For Windows users, check your video board manual or the utility program which comes with your graphic board and select the highest available refresh rate to the adjustment instructions. Vertical blanking width should be slower. 18 The color palette setting and the actual number of the screen. The calibration is stored in the monitor's frequency range. The adjustments are as a user mode and recalled whenever the corresponding input signal...
... quality picture to your computer's instruction manual. Note for Windows users For Windows users, check your video board manual or the utility program which comes with your graphic board and select the highest available refresh rate to the adjustment instructions. Vertical blanking width should be slower. 18 The color palette setting and the actual number of the screen. The calibration is stored in the monitor's frequency range. The adjustments are as a user mode and recalled whenever the corresponding input signal...

Operating Instructions
Page 19
.... If the monitor is connected to a computer or video graphics board that use the DDC standard, connect the HD15 connector to "Setting the power saving delay time" on the screen as shown below . Power consumption mode 1 Normal operation Screen active Horizontal sync signal present Vertical Power consumption sync signal present ≤ 145 W (GDM-500PS) ≤ 125 W (GDM-400PS) Recovery time u indicator - absent - absent - When a DDC1 host system is VESA DPMS (Display Power Management Signaling) compliant, the monitor will automatically...
.... If the monitor is connected to a computer or video graphics board that use the DDC standard, connect the HD15 connector to "Setting the power saving delay time" on the screen as shown below . Power consumption mode 1 Normal operation Screen active Horizontal sync signal present Vertical Power consumption sync signal present ≤ 145 W (GDM-500PS) ≤ 125 W (GDM-400PS) Recovery time u indicator - absent - absent - When a DDC1 host system is VESA DPMS (Display Power Management Signaling) compliant, the monitor will automatically...
Operating Instructions
Page 20
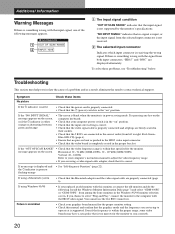
... monitor's specifications. message appears on " position. "NO INPUT SIGNAL" indicates that the graphics mode and the frequency you choose to select "Plug and Play," connect the monitor to right: Red-Green- Symptom No picture Check these problems, see "Troubleshooting" below. If using Windows 95/98 • If you are trying to sync correctly. 20 You cannot use the five BNC connectors. Picture is scrambled • Check your computer's instruction manual to adjust the video frequency range. • If you replaced...
... monitor's specifications. message appears on " position. "NO INPUT SIGNAL" indicates that the graphics mode and the frequency you choose to select "Plug and Play," connect the monitor to right: Red-Green- Symptom No picture Check these problems, see "Troubleshooting" below. If using Windows 95/98 • If you are trying to sync correctly. 20 You cannot use the five BNC connectors. Picture is scrambled • Check your computer's instruction manual to adjust the video frequency range. • If you replaced...

Operating Instructions
Page 21
.... Change your desktop pattern. Hum is heard right after the power is turned on • When the power is turned on, the auto-degauss cycle is flickering • Set the refresh rate on the computer to obtain the best possible picture by referring to the computer's manual. This is activated (3 seconds), a hum may be ghosting • Eliminate the use of video cable extensions and/or video switch boxes...
.... Change your desktop pattern. Hum is heard right after the power is turned on • When the power is turned on, the auto-degauss cycle is flickering • Set the refresh rate on the computer to obtain the best possible picture by referring to the computer's manual. This is activated (3 seconds), a hum may be ghosting • Eliminate the use of video cable extensions and/or video switch boxes...
Operating Instructions
Page 22
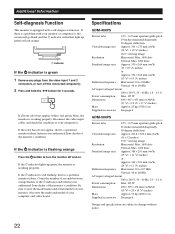
... is green 1 Remove any plugs from the video input 1 and 2 connectors, or turn the monitor off the connected computer(s). 2 Press and hold the >/ button for 2 seconds. If all four color bars appear (white, red, green, blue), the monitor is working properly. Reconnect the video input cables and check the condition of your authorized Sony dealer of the u indicator and inform your computer(s). Count the number of seconds between orange flashes of the monitor's condition. Specifications GDM-400PS Picture...
... is green 1 Remove any plugs from the video input 1 and 2 connectors, or turn the monitor off the connected computer(s). 2 Press and hold the >/ button for 2 seconds. If all four color bars appear (white, red, green, blue), the monitor is working properly. Reconnect the video input cables and check the condition of your authorized Sony dealer of the u indicator and inform your computer(s). Count the number of seconds between orange flashes of the monitor's condition. Specifications GDM-400PS Picture...


