Operating Instructions
Page 48
... Party: Sony Electronics Inc. WARNING Owner's Record The model and serial numbers are designed to provide reasonable protection against harmful interference in a residential installation. WARNING When installing the unit, incorporate a readily accessible disconnect device in a particular installation. Refer to these numbers whenever you have any interference received, including interference that interference will not occur in the fixed wiring, or connect the power plug to Part 15...
... Party: Sony Electronics Inc. WARNING Owner's Record The model and serial numbers are designed to provide reasonable protection against harmful interference in a residential installation. WARNING When installing the unit, incorporate a readily accessible disconnect device in a particular installation. Refer to these numbers whenever you have any interference received, including interference that interference will not occur in the fixed wiring, or connect the power plug to Part 15...
Operating Instructions
Page 51
... Remote Control ...13 Button Description...13 Special Buttons on the Remote Control 15 Using the Wide Mode...15 Using the PAP Setting 16 GB Using the ID MODE button 17 Optional Adaptors ...18 Connections Connecting the Speakers...19 Connecting the AC Power Cord 19 Cable Management...20 Using the Settings Overview of the Menus ...21 Picture/Sound Settings...22 Screen Settings...26 Setup Settings...30 Network Functions Preparations for Using the Network Functions 34 PC Operation ...36 Other Information Troubleshooting ...39 Input Signal Reference Chart 41 Specifications...
... Remote Control ...13 Button Description...13 Special Buttons on the Remote Control 15 Using the Wide Mode...15 Using the PAP Setting 16 GB Using the ID MODE button 17 Optional Adaptors ...18 Connections Connecting the Speakers...19 Connecting the AC Power Cord 19 Cable Management...20 Using the Settings Overview of the Menus ...21 Picture/Sound Settings...22 Screen Settings...26 Setup Settings...30 Network Functions Preparations for Using the Network Functions 34 PC Operation ...36 Other Information Troubleshooting ...39 Input Signal Reference Chart 41 Specifications...
Operating Instructions
Page 52
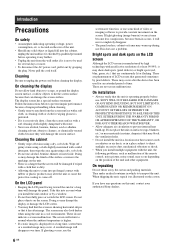
... power cord, pull it is displayed for wiping glasses is preferred. • If it out by grasping the plug. A cleaning cloth or cloth for a long time, screen burn or a residual image may find that the screen is operating properly before operating it any questions on the LCD screen Although the LCD screen is not to provide constant movement on the screen. Wipe off stains using...
... power cord, pull it is displayed for wiping glasses is preferred. • If it out by grasping the plug. A cleaning cloth or cloth for a long time, screen burn or a residual image may find that the screen is operating properly before operating it any questions on the LCD screen Although the LCD screen is not to provide constant movement on the screen. Wipe off stains using...
Operating Instructions
Page 57
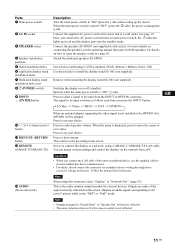
..., use the supplied cable to prevent malfunction due to set your choice. GB 11 GB Connect the speakers SS-SPG01 (not supplied) to this connector, select "Display" in "Network Port". (page 32) This is the audio monitor output terminal for this socket and to be input switches as follows each time you connect the AC power cord and turn on main power switch, the 1 indicator lights up the device. The signal to a wall outlet. S Video Video HD15...
..., use the supplied cable to prevent malfunction due to set your choice. GB 11 GB Connect the speakers SS-SPG01 (not supplied) to this connector, select "Display" in "Network Port". (page 32) This is the audio monitor output terminal for this socket and to be input switches as follows each time you connect the AC power cord and turn on main power switch, the 1 indicator lights up the device. The signal to a wall outlet. S Video Video HD15...
Operating Instructions
Page 60
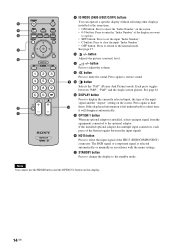
... DISPLAY button Press to restore sound. qj STANDBY button Press to change the display to adjust the volume. Note You cannot use the HDMI button and the OPTION 2 button on this displayed information is selected automatically or manually in accordance with the menu settings. button Adjusts the picture (contrast) level. Each press toggles between the input signals. If this display. 14 GB button Press to the standby mode. The RGB signal or component signal is left undisturbed for a short time...
... DISPLAY button Press to restore sound. qj STANDBY button Press to change the display to adjust the volume. Note You cannot use the HDMI button and the OPTION 2 button on this displayed information is selected automatically or manually in accordance with the menu settings. button Adjusts the picture (contrast) level. Each press toggles between the input signals. If this display. 14 GB button Press to the standby mode. The RGB signal or component signal is left undisturbed for a short time...
Operating Instructions
Page 64
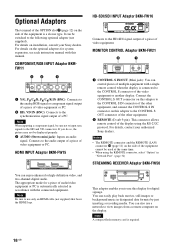
... the equipment cannot be switched to the CONTROL S connector of the video equipment or another display. Note A compact flash memory card is connected to the following optional adapter (not supplied). Note When inputting a component signal, be displayed properly. 3 AUDIO (Stereo mini jack): Inputs an audio signal. If you to use this display for a piece of audio/video equipment or PC is a slot-in type. MONITOR CONTROL Adaptor BKM-FW21 1 CONTROL S IN/OUT (Mini jack...
... the equipment cannot be switched to the CONTROL S connector of the video equipment or another display. Note A compact flash memory card is connected to the following optional adapter (not supplied). Note When inputting a component signal, be displayed properly. 3 AUDIO (Stereo mini jack): Inputs an audio signal. If you to use this display for a piece of audio/video equipment or PC is a slot-in type. MONITOR CONTROL Adaptor BKM-FW21 1 CONTROL S IN/OUT (Mini jack...
Operating Instructions
Page 68
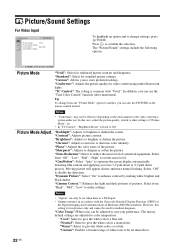
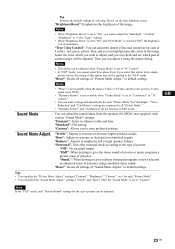
..., this case, adjust the picture quality, switch to other settings of connected equipment. "Warm": Select to give the white colors a red tint. Picture/Sound Settings For Video Input VIDEO To highlight an option and to sharpen or soften the picture. "Standard": Select for enhanced picture contrast and sharpness. "Conference": Adjusts the picture quality for medical diagnosis. "Contrast": Adjusts picture contrast. "Sharpness": Adjusts to change from one "Picture Mode" option to store preferred settings. Select "Off...
..., this case, adjust the picture quality, switch to other settings of connected equipment. "Warm": Select to give the white colors a red tint. Picture/Sound Settings For Video Input VIDEO To highlight an option and to sharpen or soften the picture. "Standard": Select for enhanced picture contrast and sharpness. "Conference": Adjusts the picture quality for medical diagnosis. "Contrast": Adjusts picture contrast. "Sharpness": Adjusts to change from one "Picture Mode" option to store preferred settings. Select "Off...
Operating Instructions
Page 69
... for the active picture can highlight specific colors in the "PAP" mode "Reset": Resets all settings of presence using the matrix dialog. picture screen, the setting of 4 colors : red, green, yellow, blue, and you select this option in PAP mode. Sound Mode Adjust. "Surround": Select the surround mode according to default settings. "Reset": Resets all "Picture Mode." • "Dynamic Picture" and "CineMotion" do not function in the single- GB Note In the "PAP" mode, only "Picture/Sound" settings for each...
... for the active picture can highlight specific colors in the "PAP" mode "Reset": Resets all settings of presence using the matrix dialog. picture screen, the setting of 4 colors : red, green, yellow, blue, and you select this option in PAP mode. Sound Mode Adjust. "Surround": Select the surround mode according to default settings. "Reset": Resets all "Picture Mode." • "Dynamic Picture" and "CineMotion" do not function in the single- GB Note In the "PAP" mode, only "Picture/Sound" settings for each...
Operating Instructions
Page 70
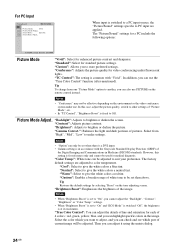
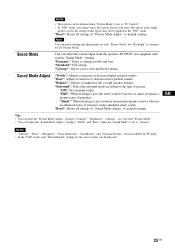
... "Vivid". "Custom": Enables a broader range of the Digital Imaging and Communications in the image. "Brightness": Adjusts to brighten or darken the picture. Tip Restores the default settings by selecting "Reset" on the remote control instead. For PC Input When input is switched to a PC input source, the "Picture/Sound" settings specific to PC input are adjusted to color temperature. The "Picture/Sound" settings for a PC include the following options: Picture Mode "Vivid": Select for standard...
... "Vivid". "Custom": Enables a broader range of the Digital Imaging and Communications in the image. "Brightness": Adjusts to brighten or darken the picture. Tip Restores the default settings by selecting "Reset" on the remote control instead. For PC Input When input is switched to a PC input source, the "Picture/Sound" settings specific to PC input are adjusted to color temperature. The "Picture/Sound" settings for a PC include the following options: Picture Mode "Vivid": Select for standard...
Operating Instructions
Page 71
... sounds. "Reset": Resets all "Picture Mode." Even if you to increase or decrease higher-pitched sounds. "Bass": Adjusts to default settings. settings ("Contrast", "Brightness", "Chroma ", etc.) for the active picture can adjust the "Sound Mode Adjust." Note You can make settings and adjustments for each "Picture Mode". • You can be applied in the single- "Standard": Flat setting. "Balance": Adjusts to default settings. to emphasize left or right speaker balance. Tips • You can adjust the sound output...
... sounds. "Reset": Resets all "Picture Mode." Even if you to increase or decrease higher-pitched sounds. "Bass": Adjusts to default settings. settings ("Contrast", "Brightness", "Chroma ", etc.) for the active picture can adjust the "Sound Mode Adjust." Note You can make settings and adjustments for each "Picture Mode". • You can be applied in the single- "Standard": Flat setting. "Balance": Adjusts to default settings. to emphasize left or right speaker balance. Tips • You can adjust the sound output...
Operating Instructions
Page 75
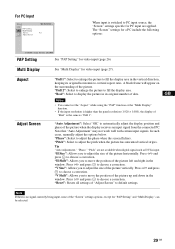
... original number of the picture left and right in the window. See "Multi Display" for video input (page 26). In such cases, manually adjust the options below. Press F/f and press to default settings. "Reset": Resets all settings of "Real" is input. Notes • You cannot set the "Aspect" while using the "PAP" function or the "Multi Display" function. • If the input resolution is higher than the panel resolution (1,920...
... original number of the picture left and right in the window. See "Multi Display" for video input (page 26). In such cases, manually adjust the options below. Press F/f and press to default settings. "Reset": Resets all settings of "Real" is input. Notes • You cannot set the "Aspect" while using the "PAP" function or the "Multi Display" function. • If the input resolution is higher than the panel resolution (1,920...
Operating Instructions
Page 77
... displayed correctly. "Off": The "Auto Screen Adjust" is not input to "On", the screensaver function is activated, or PAP is selected. The display automatically enters the power saving mode when a signal is disabled even when input signals are switched and the default settings are applied. GB 31 GB Note When this item is operated, the available modes will differ depending on the remote control, you can select only "Display+Remote" or "Remote...
... displayed correctly. "Off": The "Auto Screen Adjust" is not input to "On", the screensaver function is activated, or PAP is selected. The display automatically enters the power saving mode when a signal is disabled even when input signals are switched and the default settings are applied. GB 31 GB Note When this item is operated, the available modes will differ depending on the remote control, you can select only "Display+Remote" or "Remote...
Operating Instructions
Page 78
... 120 seconds. "Auto": Select to operate the display by remote control. "Off": The model name logo is not displayed when the signal is not inputted. "Color System": Select the color system of the unit lights. "Standby": The screensaver operates in standby (page 9) for the time specified in "Timer Setting." (The display is not available for the brightness. "Network Port": Sets the network port to choose either an analog RGB input signal or a component input signal from a connected equipment. "Speed Setup": Sets a communication speed...
... 120 seconds. "Auto": Select to operate the display by remote control. "Off": The model name logo is not displayed when the signal is not inputted. "Color System": Select the color system of the unit lights. "Standby": The screensaver operates in standby (page 9) for the time specified in "Timer Setting." (The display is not available for the brightness. "Network Port": Sets the network port to choose either an analog RGB input signal or a component input signal from a connected equipment. "Speed Setup": Sets a communication speed...
Operating Instructions
Page 82
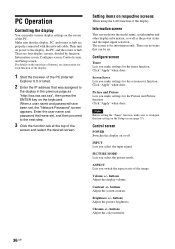
... +/- Click "Apply" when done. Click "Apply" when done. Setting items on power to configure the time setting on the screen of the screen and select the desired screen. Brightness +/- There are properly connected with the network cable. Configure screen Timer Lets you select the picture mode. PC Operation Controlling the display You can be set. PICTURE MODE Lets you make settings for information only. Make sure that can make sure to...
... +/- Click "Apply" when done. Click "Apply" when done. Setting items on power to configure the time setting on the screen of the screen and select the desired screen. Brightness +/- There are properly connected with the network cable. Configure screen Timer Lets you select the picture mode. PC Operation Controlling the display You can be set. PICTURE MODE Lets you make settings for information only. Make sure that can make sure to...
Operating Instructions
Page 83
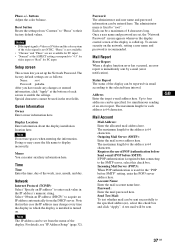
... IP address may cause the file name to four addresses can be specified, for each value in which the display is installed is turned on the network, setting a user name and password is called up the Network Password. Incoming Mail Server (POP3): When POP authentication is immediately sent by e-mail (error notification). The factory default settings are set from the menu of each screen to "root".
... IP address may cause the file name to four addresses can be specified, for each value in which the display is installed is turned on the network, setting a user name and password is called up the Network Password. Incoming Mail Server (POP3): When POP authentication is immediately sent by e-mail (error notification). The factory default settings are set from the menu of each screen to "root".
Operating Instructions
Page 85
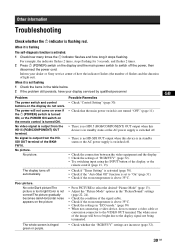
... function is flashing red. No signal is not flashing 1 Check the items in "ECO mode." (page 30) • When not connecting a video device, do not work. The display turns off . • Check the connection between the video equipment and the display. • Check the settings of "RGB/YUV" (page 32). • Try switching input using the INPUT button of the display, or the remote control (page 11, 13). • Check if "Timer Setting" is...
... function is flashing red. No signal is not flashing 1 Check the items in "ECO mode." (page 30) • When not connecting a video device, do not work. The display turns off . • Check the connection between the video equipment and the display. • Check the settings of "RGB/YUV" (page 32). • Try switching input using the INPUT button of the display, or the remote control (page 11, 13). • Check if "Timer Setting" is...
Operating Instructions
Page 86
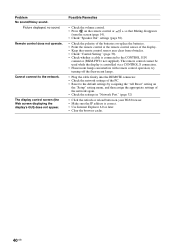
.... • Point the remote control at the remote control sensor of the display. • Keep the remote control sensor area clear from obstacles. • Check "Control Setting" (page 30). • Check whether a cable is connected to the default settings by assigning the "All Reset" setting on the "Setup" setting menu, and then assign the appropriate settings of the PC. • Reset to the CONTROL S IN connector (BKM-FW21 not supplied). Cannot connect to the network. Picture displayed, no sound.
.... • Point the remote control at the remote control sensor of the display. • Keep the remote control sensor area clear from obstacles. • Check "Control Setting" (page 30). • Check whether a cable is connected to the default settings by assigning the "All Reset" setting on the "Setup" setting menu, and then assign the appropriate settings of the PC. • Reset to the CONTROL S IN connector (BKM-FW21 not supplied). Cannot connect to the network. Picture displayed, no sound.
Operating Instructions
Page 89
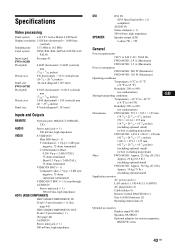
... (75 lb.) (including optional stand) Supplied accessories AC power cord (1) LAN cable (1) 1-834-812-11 (SONY) AC plug holder (2) Cable holder (9) Remote Control RM-FW002 (1) Size AA (R6) batteries (2) Operating instructions (1) GB Optional accessories Display stand SU-S01 Speakers SS-SPG01 Optional adaptors for system expansion, BKM-FW series 43 GB FWD-S42H1 Pixel pitch Picture size Panel size 0.4845 (horizontal × 0.4845 (vertical) mm (1/52 × 1/52 inches) 930 (horizontal) ×...
... (75 lb.) (including optional stand) Supplied accessories AC power cord (1) LAN cable (1) 1-834-812-11 (SONY) AC plug holder (2) Cable holder (9) Remote Control RM-FW002 (1) Size AA (R6) batteries (2) Operating instructions (1) GB Optional accessories Display stand SU-S01 Speakers SS-SPG01 Optional adaptors for system expansion, BKM-FW series 43 GB FWD-S42H1 Pixel pitch Picture size Panel size 0.4845 (horizontal × 0.4845 (vertical) mm (1/52 × 1/52 inches) 930 (horizontal) ×...

Operating Instructions
Page 91
... INPUT button 11 Input signal 41 IP Address Setup 32 L Language 21, 30 LED 27 Logo 32 M Mail Account 37 Mail Report 37 Main power switch 11 MENU button Multi Display 2113, 27, 29 Muting button 14 N Network 37 Network Port 32 Noise Reduction 22 O On/Off Timer 30 On-Screen Logo 32 OPTION 1 button 14 OPTION slot 12 Output Format 27 Overscan 31 Owner Information 37 P PAP PAP PAP 26 button Setting...
... INPUT button 11 Input signal 41 IP Address Setup 32 L Language 21, 30 LED 27 Logo 32 M Mail Account 37 Mail Report 37 Main power switch 11 MENU button Multi Display 2113, 27, 29 Muting button 14 N Network 37 Network Port 32 Noise Reduction 22 O On/Off Timer 30 On-Screen Logo 32 OPTION 1 button 14 OPTION slot 12 Output Format 27 Overscan 31 Owner Information 37 P PAP PAP PAP 26 button Setting...
Operating Instructions
Page 289
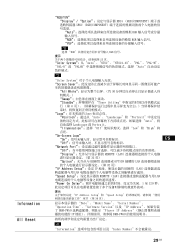
... "Off "Network Port "Off "Display REMOTE (LAN 32 页) "Option REMOTE OPTION 插槽的 LAN 32 页) "IP Address Setup":设定 IP REMOTE (LAN LAN "Speed Setup REMOTE (LAN LAN "Power On Delay 1 至 120 秒。 提示 IP Address Setup"和 "Speed Setup 30 页)。 Date"、"Model Name"、"Serial Number"、 "Operation Time"、"Software Version"以...
... "Off "Network Port "Off "Display REMOTE (LAN 32 页) "Option REMOTE OPTION 插槽的 LAN 32 页) "IP Address Setup":设定 IP REMOTE (LAN LAN "Speed Setup REMOTE (LAN LAN "Power On Delay 1 至 120 秒。 提示 IP Address Setup"和 "Speed Setup 30 页)。 Date"、"Model Name"、"Serial Number"、 "Operation Time"、"Software Version"以...

