Operating Instructions
Page 1
Sony Corporation Printed in Korea FWD-S42H1/FWD-S47H1 4-111-559-01(2) Flat Wide Display Monitor JP Operating Instructions GB Mode d'emploi FR Bedienungsanleitung DE Manual de instrucciones ES Istruzioni per l'uso IT CS FWD-S42H1/FWD-S47H1 © 2008 Sony Corporation
Sony Corporation Printed in Korea FWD-S42H1/FWD-S47H1 4-111-559-01(2) Flat Wide Display Monitor JP Operating Instructions GB Mode d'emploi FR Bedienungsanleitung DE Manual de instrucciones ES Istruzioni per l'uso IT CS FWD-S42H1/FWD-S47H1 © 2008 Sony Corporation
Operating Instructions
Page 48
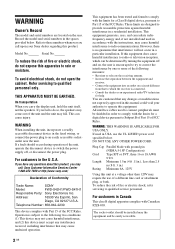
... tested and found to comply with the limits for a digital device pursuant to provide reasonable protection against harmful interference in this manual could void your Sony dealer regarding this product. WARNING When installing the unit, incorporate a readily accessible disconnect device in the spaces provided below . ..., and (2) this device must be easily accessible. If this equipment does cause harmful interference to operate this product, you carry the display unit, hold the unit itself, not the speakers. To reduce the risk of the FCC Rules. The socket-outlet should occur during...
... tested and found to comply with the limits for a digital device pursuant to provide reasonable protection against harmful interference in this manual could void your Sony dealer regarding this product. WARNING When installing the unit, incorporate a readily accessible disconnect device in the spaces provided below . ..., and (2) this device must be easily accessible. If this equipment does cause harmful interference to operate this product, you carry the display unit, hold the unit itself, not the speakers. To reduce the risk of the FCC Rules. The socket-outlet should occur during...
Operating Instructions
Page 54
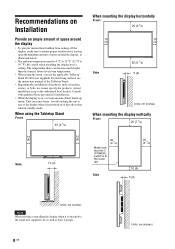
...25 (9 7/8) Side 25 (9 7/8) 10 (4) 5 (2) Units: cm (inches) Note When moving or installing the display when it is attached to the stand (not supplied), do so with qualified Sony personnel for installation. • While the display is powered on Installation Provide an ample amount of space around the...a ceiling. When using the stand, you use the applicable Tabletop Stand SU-S01 (not supplied).For the fitting method, see the instruction manual of the Tabletop Stand. • Regarding the installation of hardware such as illustrated below. • The ambient temperature must be 0 &#...
...25 (9 7/8) Side 25 (9 7/8) 10 (4) 5 (2) Units: cm (inches) Note When moving or installing the display when it is attached to the stand (not supplied), do so with qualified Sony personnel for installation. • While the display is powered on Installation Provide an ample amount of space around the...a ceiling. When using the stand, you use the applicable Tabletop Stand SU-S01 (not supplied).For the fitting method, see the instruction manual of the Tabletop Stand. • Regarding the installation of hardware such as illustrated below. • The ambient temperature must be 0 &#...
Operating Instructions
Page 55
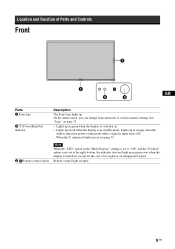
See "Logo" on page 32. • Lights up in green when the display is not set to various manual settings. Note When the "LED" option in standby mode. Lights up . On the menu screen, you can change from a PC. Location and Function of no ... on . • Lights up in red when the display is in the "Multi Display" settings is set to "Off" and the "Position" option is switched on , except for the case of Parts and Controls Front GB Parts 1 Sony logo 2 1 (Power/Stand by) indicator Description The Sony logo lights up in red, see page 39.
See "Logo" on page 32. • Lights up in green when the display is not set to various manual settings. Note When the "LED" option in standby mode. Lights up . On the menu screen, you can change from a PC. Location and Function of no ... on . • Lights up in red when the display is in the "Multi Display" settings is set to "Off" and the "Position" option is switched on , except for the case of Parts and Controls Front GB Parts 1 Sony logo 2 1 (Power/Stand by) indicator Description The Sony logo lights up in red, see page 39.
Operating Instructions
Page 57
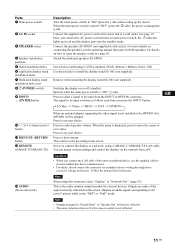
... you press the INPUT button. See page 19. For more details on how to route the speaker cords, see the operating manual that might have excessive voltage to this port. Press to select a signal to be reflected. • The noise reduction status...the dedicated speakers SS-SPG01. Parts 1 Main power switch 2 AC IN socket 3 SPEAKER socket 4 Speaker installation positions 5 Stand installation holes 6 Applicable display stand installation holes 7 Dedicated display stand installation hole cover 8 1 (POWER) switch 9 INPUT/ (ENTER)button 0 +/-/F/f (volume/cursor) button qa MENU/ (RETURN) button qs ...
... you press the INPUT button. See page 19. For more details on how to route the speaker cords, see the operating manual that might have excessive voltage to this port. Press to select a signal to be reflected. • The noise reduction status...the dedicated speakers SS-SPG01. Parts 1 Main power switch 2 AC IN socket 3 SPEAKER socket 4 Speaker installation positions 5 Stand installation holes 6 Applicable display stand installation holes 7 Dedicated display stand installation hole cover 8 1 (POWER) switch 9 INPUT/ (ENTER)button 0 +/-/F/f (volume/cursor) button qa MENU/ (RETURN) button qs ...
Operating Instructions
Page 60
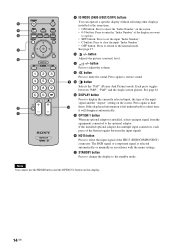
... ID MODE (ON/0-9/SET/C/OFF) buttons You can operate a specific display without affecting other displays installed at the same time. • ON button: Press to show the "Index Number" on this displayed information is selected automatically or manually in accordance with the menu settings. See page 17. 0 +/- qs... for a short time, it will disappear automatically. See page 16. If the installed optional adaptor has multiple input connectors, each press of the display you want to operate. • SET button: Press to set the input "Index Number". • C button: Press to clear the input...
... ID MODE (ON/0-9/SET/C/OFF) buttons You can operate a specific display without affecting other displays installed at the same time. • ON button: Press to show the "Index Number" on this displayed information is selected automatically or manually in accordance with the menu settings. See page 17. 0 +/- qs... for a short time, it will disappear automatically. See page 16. If the installed optional adaptor has multiple input connectors, each press of the display you want to operate. • SET button: Press to set the input "Index Number". • C button: Press to clear the input...
Operating Instructions
Page 64
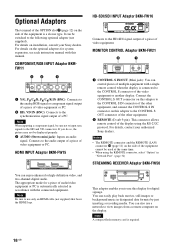
... is required. 18 GB The appropriate mode for system expansion, see each instruction manual with this adaptor to the CONTROL S connector of the video equipment or another display. For details, contact your Sony dealers. For details on the optional adaptors for a piece of audio/video equipment... or PC is connected to the CONTROL S OUT connector of the other equipment, and connect the CONTROL S IN connector on this manual. If you to...
... is required. 18 GB The appropriate mode for system expansion, see each instruction manual with this adaptor to the CONTROL S connector of the video equipment or another display. For details, contact your Sony dealers. For details on the optional adaptors for a piece of audio/video equipment... or PC is connected to the CONTROL S OUT connector of the other equipment, and connect the CONTROL S IN connector on this manual. If you to...
Operating Instructions
Page 65
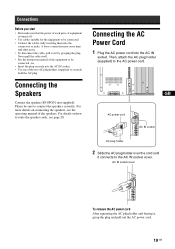
... , grasp the plug and pull out the AC power cord. 19 GB For more details on how to route the speaker cords, see the operating manual of the speakers. For details on connecting the speakers, see page 20. AC IN socket cover To remove the AC power cord After squeezing the... AC plug holder and freeing it connects to the AC IN socket cover. Never pull the cable itself. • See the instruction manual of the equipment to be connected, too. • Insert the plug securely into the AC IN socket. Connections Before you start • First make sure...
... , grasp the plug and pull out the AC power cord. 19 GB For more details on how to route the speaker cords, see the operating manual of the speakers. For details on connecting the speakers, see page 20. AC IN socket cover To remove the AC power cord After squeezing the... AC plug holder and freeing it connects to the AC IN socket cover. Never pull the cable itself. • See the instruction manual of the equipment to be connected, too. • Insert the plug securely into the AC IN socket. Connections Before you start • First make sure...
Operating Instructions
Page 73
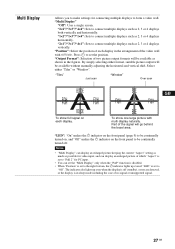
... of two picture output formats will be available without manually adjusting the horizontal and vertical shift. "Position": Select the position of each display. Select either format, suitable picture output will go behind the bezel area. "LED": "On" makes the 1 indicator on the front panel (page 9) to be continually turned off (standby), errors are...
... of two picture output formats will be available without manually adjusting the horizontal and vertical shift. "Position": Select the position of each display. Select either format, suitable picture output will go behind the bezel area. "LED": "On" makes the 1 indicator on the front panel (page 9) to be continually turned off (standby), errors are...
Operating Instructions
Page 75
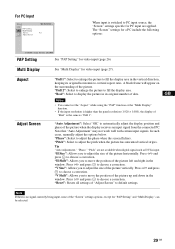
...8226; You cannot set the "Aspect" while using the "PAP" function or the "Multi Display" function. • If the input resolution is higher than the panel resolution (1,920 × 1,080), the display of the picture horizontally. "Phase": Select to adjust the pitch when the picture has unwanted ... to automatically adjust the display position and phase of dots. "Full 2": Select to enlarge the picture to choose a correction. "Real": Select to -vertical aspect ratio. Note that "Auto Adjustment" may not work well with certain input signals. In such cases, manually adjust the options below...
...8226; You cannot set the "Aspect" while using the "PAP" function or the "Multi Display" function. • If the input resolution is higher than the panel resolution (1,920 × 1,080), the display of the picture horizontally. "Phase": Select to adjust the pitch when the picture has unwanted ... to automatically adjust the display position and phase of dots. "Full 2": Select to enlarge the picture to choose a correction. "Real": Select to -vertical aspect ratio. Note that "Auto Adjustment" may not work well with certain input signals. In such cases, manually adjust the options below...
Operating Instructions
Page 79
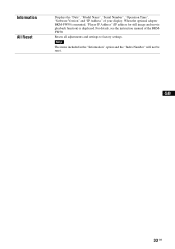
Resets all adjustments and settings to factory settings. For details, see the instruction manual of your display. GB 33 GB Note The items included in the "Information" option and the "Index Number" will not be reset. When the optional adapter BKM-FW50 is mounted, "Player IP Address" (IP address for still image and movie playback function) is displayed. Information All Reset Displays the "Date", "Model Name", "Serial Number", "Operation Time", "Software Version" and "IP Address" of the BKMFW50.
Resets all adjustments and settings to factory settings. For details, see the instruction manual of your display. GB 33 GB Note The items included in the "Information" option and the "Index Number" will not be reset. When the optional adapter BKM-FW50 is mounted, "Player IP Address" (IP address for still image and movie playback function) is displayed. Information All Reset Displays the "Date", "Model Name", "Serial Number", "Operation Time", "Software Version" and "IP Address" of the BKMFW50.
Operating Instructions
Page 80
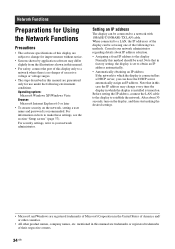
For security settings, refer to establish the network. After about IP address selection. • Assigning a fixed IP address to the display Normally this manual are trademarks or registered trademarks of their respective owners. 34 GB Operating system: Microsoft Windows XP/Windows Vista Browser: Microsoft Internet ...names, etc. Note that in this case the IP address may differ slightly from the illustrations shown in this manual. • For safety, connect the port of this display only to a network where there is no danger of excessive voltage or voltage surges. • The steps ...
For security settings, refer to establish the network. After about IP address selection. • Assigning a fixed IP address to the display Normally this manual are trademarks or registered trademarks of their respective owners. 34 GB Operating system: Microsoft Windows XP/Windows Vista Browser: Microsoft Internet ...names, etc. Note that in this case the IP address may differ slightly from the illustrations shown in this manual. • For safety, connect the port of this display only to a network where there is no danger of excessive voltage or voltage surges. • The steps ...
Operating Instructions
Page 81
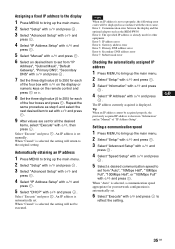
...and press . 3 Select "Information" with F/f and press . 4 Select "IP Address" with F/f and press . An IP address is displayed. The IP address currently acquired is set manually. Tip When an IP address cannot be acquired properly, the previously acquired IP address is selected, the setting will not be... displayed in "Manual" of "IP Address Setup". Select "Execute" and press . When "Cancel" is shown in "Information" and in accordance with F/f, then ...
...and press . 3 Select "Information" with F/f and press . 4 Select "IP Address" with F/f and press . An IP address is displayed. The IP address currently acquired is set manually. Tip When an IP address cannot be acquired properly, the previously acquired IP address is selected, the setting will not be... displayed in "Manual" of "IP Address Setup". Select "Execute" and press . When "Cancel" is shown in "Information" and in accordance with F/f, then ...
Operating Instructions
Page 291
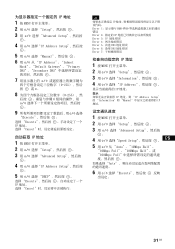
...36873;择 "Advanced Setup 。 4 用 F/f 选择"IP Address Setup 。 5 用 F/f 选择 "Manual 6 用 F/f 从 "IP Address"、"Subnet Mask"、"Default Gateway"、"Primary DNS"、"Secondary DNS 7 F/f 0-255 g。...用 F/f 选择"Information 4 用 F/f 选择 "IP Address IP IP IP Address Setup" 的 "Information"和 "Manual IP 地址。 1 按 MENU 2 用 F/f 选择 "Setup 3 用 F/f 选择 "Advanced Setup...
...36873;择 "Advanced Setup 。 4 用 F/f 选择"IP Address Setup 。 5 用 F/f 选择 "Manual 6 用 F/f 从 "IP Address"、"Subnet Mask"、"Default Gateway"、"Primary DNS"、"Secondary DNS 7 F/f 0-255 g。...用 F/f 选择"Information 4 用 F/f 选择 "IP Address IP IP IP Address Setup" 的 "Information"和 "Manual IP 地址。 1 按 MENU 2 用 F/f 选择 "Setup 3 用 F/f 选择 "Advanced Setup...

