
User Manual
Page 2
... of Conformity Trade Name: SONY Model: VPL-EW5, VPL-EX50,VPLEX5, VPL-ES5 Responsible Party: Sony Electronics Inc. Operation is connected. - For the customers in the fixed wiring, or connect the power plug to Part 15 of the FCC Rules. Reorient or relocate the receiving antenna. - Telephone Number: 858-942-2230 This device complies with the limits for a Class B digital device, pursuant to an easily...
... of Conformity Trade Name: SONY Model: VPL-EW5, VPL-EX50,VPLEX5, VPL-ES5 Responsible Party: Sony Electronics Inc. Operation is connected. - For the customers in the fixed wiring, or connect the power plug to Part 15 of the FCC Rules. Reorient or relocate the receiving antenna. - Telephone Number: 858-942-2230 This device complies with the limits for a Class B digital device, pursuant to an easily...
User Manual
Page 4
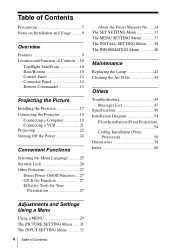
... Tools for Your Presentation 27 About the Preset Memory No. ....34 The SET SETTING Menu 35 The MENU SETTING Menu ...........37 The INSTALL SETTING Menu .......38 The INFORMATION Menu 40 Maintenance Replacing the Lamp 42 Cleaning the Air Filter 44 Others Troubleshooting 45 Messages List 47 Specifications 49 Installation Diagram 54 Floor Installation (Front Projection 54 Ceiling Installation (Front Projection 56 Dimensions 58 Index 60 Adjustments and Settings Using a Menu Using a MENU 29 The PICTURE SETTING Menu ...... 31 The INPUT SETTING Menu .......... 33 4 Table of Contents
... Tools for Your Presentation 27 About the Preset Memory No. ....34 The SET SETTING Menu 35 The MENU SETTING Menu ...........37 The INSTALL SETTING Menu .......38 The INFORMATION Menu 40 Maintenance Replacing the Lamp 42 Cleaning the Air Filter 44 Others Troubleshooting 45 Messages List 47 Specifications 49 Installation Diagram 54 Floor Installation (Front Projection 54 Ceiling Installation (Front Projection 56 Dimensions 58 Index 60 Adjustments and Settings Using a Menu Using a MENU 29 The PICTURE SETTING Menu ...... 31 The INPUT SETTING Menu .......... 33 4 Table of Contents
User Manual
Page 5
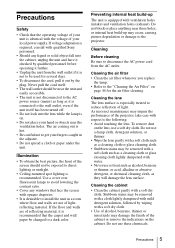
... before operating it further. • Unplug the unit from the AC outlet. Cleaning the air filter • Clean the air filter whenever you replace the lamp. • Refer to disconnect the AC power cord from the wall outlet if it checked by wiping with the voltage of your local power supply. Do not use a soft dry cloth. Cleaning Before cleaning Be sure to the "Cleaning the Air Filter" on the lens, use...
... before operating it further. • Unplug the unit from the AC outlet. Cleaning the air filter • Clean the air filter whenever you replace the lamp. • Refer to disconnect the AC power cord from the wall outlet if it checked by wiping with the voltage of your local power supply. Do not use a soft dry cloth. Cleaning Before cleaning Be sure to the "Cleaning the Air Filter" on the lens, use...
User Manual
Page 9
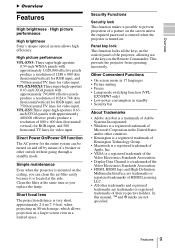
... on the control panel of the projector, allowing use of a picture on the screen unless the required password is entered when the projector is located at the same time as you can be turned on . EX50/EW5 only) • Low power consumption in standby • Security bar About Trademarks • Adobe Acrobat is a trademark of Adobe Systems Incorporated. • Windows is mounted on the Remote Commander. Simple maintenance...
... on the control panel of the projector, allowing use of a picture on the screen unless the required password is entered when the projector is located at the same time as you can be turned on . EX50/EW5 only) • Low power consumption in standby • Security bar About Trademarks • Adobe Acrobat is a trademark of Adobe Systems Incorporated. • Windows is mounted on the Remote Commander. Simple maintenance...
User Manual
Page 12
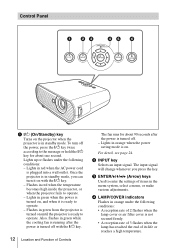
... Location and Function of Controls The fan runs for about 90 seconds after the power is in standby mode. Flashes in red when the temperature becomes high inside the projector, or when the projector fails to enter the settings of items in orange under the following conditions: • A reception rate of its life or reaches a high temperature. d LAMP/COVER indicators Flashes in the menu system, select a menu, or make various adjustments. Once the projector is turned...
... Location and Function of Controls The fan runs for about 90 seconds after the power is in standby mode. Flashes in red when the temperature becomes high inside the projector, or when the projector fails to enter the settings of items in orange under the following conditions: • A reception rate of its life or reaches a high temperature. d LAMP/COVER indicators Flashes in the menu system, select a menu, or make various adjustments. Once the projector is turned...
User Manual
Page 21
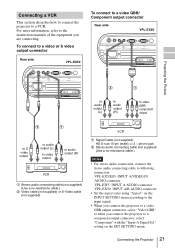
... 2 Stereo audio connecting cable (not supplied) (Use a no-resistance cable.) Notes • For stereo audio connection, connect the stereo audio connecting cable to a component output connector, select "Component" with the "Input-A Signal Sel." For more information, refer to the instruction manuals of the equipment you connect the projector to following connectors: VPL-EX5/ES5: INPUT A/VIDEO IN AUDIO connector VPL-EW5: INPUT A AUDIO connector VPL-EX50: INPUT A/B AUDIO connector • Set the aspect ratio using "Aspect" on the SET SETTING menu. Connecting the Projector 21 Connecting...
... 2 Stereo audio connecting cable (not supplied) (Use a no-resistance cable.) Notes • For stereo audio connection, connect the stereo audio connecting cable to a component output connector, select "Component" with the "Input-A Signal Sel." For more information, refer to the instruction manuals of the equipment you connect the projector to following connectors: VPL-EX5/ES5: INPUT A/VIDEO IN AUDIO connector VPL-EW5: INPUT A AUDIO connector VPL-EX50: INPUT A/B AUDIO connector • Set the aspect ratio using "Aspect" on the SET SETTING menu. Connecting the Projector 21 Connecting...
User Manual
Page 22
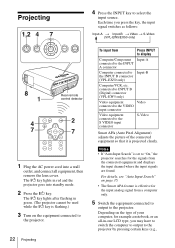
... INPUT B (Digital) connector (VPL-EW5 only) Video equipment Video connected to the VIDEO input connector Video equipment connected to select the input source. The ?/1 key lights after flashing in -one LCD type, you press the key, the input signal switches as follows: Input-A t Input-B t Video t S-Video (VPL-EW5/EX50 only) Rear remote control detector APA INPUT KEY STONE ENTER RESET PIC MUTING D ZOOM FREEZE MENU VOLUME 1 Plug the AC power cord into standby mode. 2 Press the ?/1 key. Depending on the equipment connected to the projector. 22 Projecting...
... INPUT B (Digital) connector (VPL-EW5 only) Video equipment Video connected to the VIDEO input connector Video equipment connected to select the input source. The ?/1 key lights after flashing in -one LCD type, you press the key, the input signal switches as follows: Input-A t Input-B t Video t S-Video (VPL-EW5/EX50 only) Rear remote control detector APA INPUT KEY STONE ENTER RESET PIC MUTING D ZOOM FREEZE MENU VOLUME 1 Plug the AC power cord into standby mode. 2 Press the ?/1 key. Depending on the equipment connected to the projector. 22 Projecting...
User Manual
Page 29
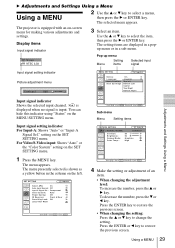
...Input signal setting indicator Picture adjustment menu MENU SETTING Input A Status: On Language: English A Menu Position: Top left . You can hide this indicator using "Status" on -screen menu for making various adjustments and settings. For Video/S-Video input: Shows "Auto" or the "Color System" setting on the left Start Up Image Bottom Left Center Top Right Bottom Right Adjustments and Settings Using a Menu Input signal indicator Shows the selected input channel. Press the ENTER or b key to change the setting. x is displayed when no signal is shown as a yellow button...
...Input signal setting indicator Picture adjustment menu MENU SETTING Input A Status: On Language: English A Menu Position: Top left . You can hide this indicator using "Status" on -screen menu for making various adjustments and settings. For Video/S-Video input: Shows "Auto" or the "Color System" setting on the left Start Up Image Bottom Left Center Top Right Bottom Right Adjustments and Settings Using a Menu Input signal indicator Shows the selected input channel. Press the ENTER or b key to change the setting. x is displayed when no signal is shown as a yellow button...
User Manual
Page 34
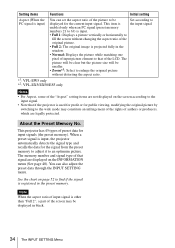
... picture. Note When the aspect ratio of input signal is other than "Full 2", a part of the screen may constitute an infringement of the rights of the LCD. This projector has 45 types of that if the projector is projected fully in the preset memory. Setting items Functions Initial setting Aspect (When the PC signal is input) You can also adjust the preset data through the INPUT SETTING menu...
... picture. Note When the aspect ratio of input signal is other than "Full 2", a part of the screen may constitute an infringement of the rights of the LCD. This projector has 45 types of that if the projector is projected fully in the preset memory. Setting items Functions Initial setting Aspect (When the PC signal is input) You can also adjust the preset data through the INPUT SETTING menu...
User Manual
Page 35
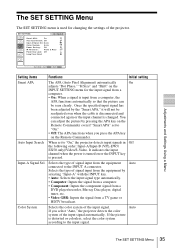
... Disc player, digital tuner, etc. • Video GBR: Inputs the signal from a TV game or HDTV broadcast. SET SETTING Input-A Smar t APA: On Auto Input Search: Off Input-A Signal Sel.: Auto Color System: Auto Power Saving: Off IR Receiver: Front & Rear Panel Key Lock: Off Lamp Timer Reset Adjustments and Settings Using a Menu Setting items Functions Initial setting Smart APA The APA (Auto Pixel Alignment) automatically On adjusts "Dot Phase," "H Size" and "Shift" on the INPUT SETTING menu for changing the settings of the input signal automatically.
... Disc player, digital tuner, etc. • Video GBR: Inputs the signal from a TV game or HDTV broadcast. SET SETTING Input-A Smar t APA: On Auto Input Search: Off Input-A Signal Sel.: Auto Color System: Auto Power Saving: Off IR Receiver: Front & Rear Panel Key Lock: Off Lamp Timer Reset Adjustments and Settings Using a Menu Setting items Functions Initial setting Smart APA The APA (Auto Pixel Alignment) automatically On adjusts "Dot Phase," "H Size" and "Shift" on the INPUT SETTING menu for changing the settings of the input signal automatically.
User Manual
Page 36
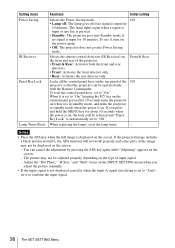
... input signal. - When replacing the lamps, reset the lamp timer. - Setting items Power Saving IR Receiver Panel Key Lock Lamp Timer Reset Functions Initial setting Selects the Power Saving mode. Adjust the "Dot Phase," "H Size," and "Shift" items on the INPUT SETTING menu when you press and hold the MENU key for 10 seconds turns the projector on the screen. - To lock the control panel keys, set it is on the screen. The picture may not be operated only with the Remote Commander. The lamp lights again when a signal...
... input signal. - When replacing the lamps, reset the lamp timer. - Setting items Power Saving IR Receiver Panel Key Lock Lamp Timer Reset Functions Initial setting Selects the Power Saving mode. Adjust the "Dot Phase," "H Size," and "Shift" items on the INPUT SETTING menu when you press and hold the MENU key for 10 seconds turns the projector on the screen. - To lock the control panel keys, set it is on the screen. The picture may not be operated only with the Remote Commander. The lamp lights again when a signal...
User Manual
Page 38
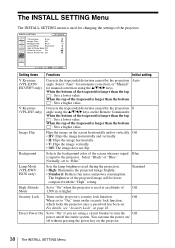
... with the "High" setting. Select "Black" or "Blue." Direct Power On Set to "On" if you are using a circuit breaker to "On," turns on the projector. 38 The INSTALL SETTING Menu INSTALL SETTING V Keystone: Auto Image Flip: Off Background: Blue Lamp Mode: Standard High Altitude Mode:Off Security Lock: Off Direct Power On: Off Input-A Setting items Functions Initial setting V Keystone (VPL-EX50/ EX5/EW5 only) Corrects the trapezoidal distortion caused by the projection 0 angle using the v/V/b/B keys on the screen horizontally and...
... with the "High" setting. Select "Black" or "Blue." Direct Power On Set to "On" if you are using a circuit breaker to "On," turns on the projector. 38 The INSTALL SETTING Menu INSTALL SETTING V Keystone: Auto Image Flip: Off Background: Blue Lamp Mode: Standard High Altitude Mode:Off Security Lock: Off Direct Power On: Off Input-A Setting items Functions Initial setting V Keystone (VPL-EX50/ EX5/EW5 only) Corrects the trapezoidal distortion caused by the projection 0 angle using the v/V/b/B keys on the screen horizontally and...
User Manual
Page 42
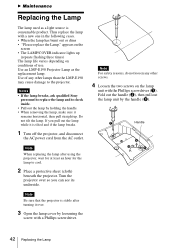
.... • When removing the lamp, make sure it over so you pull out the lamp while it is consumable product. B Maintenance Replacing the Lamp The lamp used as the replacement lamp. Use an LMP-E190 Projector Lamp as a light source is tilted and if the lamp breaks. 1 Turn off the projector, and disconnect the AC power cord from the AC outlet. appears on the lamp unit with a new one in the...
.... • When removing the lamp, make sure it over so you pull out the lamp while it is consumable product. B Maintenance Replacing the Lamp The lamp used as the replacement lamp. Use an LMP-E190 Projector Lamp as a light source is tilted and if the lamp breaks. 1 Turn off the projector, and disconnect the AC power cord from the AC outlet. appears on the lamp unit with a new one in the...
User Manual
Page 43
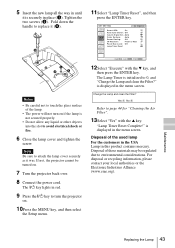
Fold down the handle to 0, and "Change the Lamp and clean the Filter?" SET SETTING Input-A Smar t APA: On Auto Input Search: Off Input-A Signal Sel.: Auto Color System: Auto Power Saving: Off IR Receiver: Front & Rear Panel Key Lock: Off Lamp Timer Reset Notes • Be careful not to touch the glass surface of the lamp. • The power will not turn the projector on if the lamp is not secured properly. • Do not...
Fold down the handle to 0, and "Change the Lamp and clean the Filter?" SET SETTING Input-A Smar t APA: On Auto Input Search: Off Input-A Signal Sel.: Auto Color System: Auto Power Saving: Off IR Receiver: Front & Rear Panel Key Lock: Off Lamp Timer Reset Notes • Be careful not to touch the glass surface of the lamp. • The power will not turn the projector on if the lamp is not secured properly. • Do not...
User Manual
Page 45
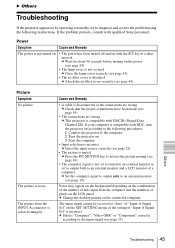
... air filter cover securely (see page 19). The picture from the computer and the numbers of dots input from the INPUT A connector is compatible with the ?/1 key at "Auto" of "Input-A Signal Sel" on the SET SETTING menu, or the setting of a computer. If your computer is colored strangely. c Select the input source correctly (see page 35). c Selects "Computer", "Video GBR" or "Component" correctly according to the following instructions. Others Troubleshooting...
... air filter cover securely (see page 19). The picture from the computer and the numbers of dots input from the INPUT A connector is compatible with the ?/1 key at "Auto" of "Input-A Signal Sel" on the SET SETTING menu, or the setting of a computer. If your computer is colored strangely. c Select the input source correctly (see page 35). c Selects "Computer", "Video GBR" or "Component" correctly according to the following instructions. Others Troubleshooting...
User Manual
Page 46
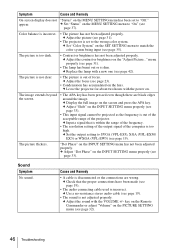
... input signal cannot be projected as the frequency is not adjusted properly. Sound Symptom No sound. c Use a no-resistance stereo audio cable (see page 19). • The sound is out of the acceptable range of the projector. c Set the output setting to SVGA (VPL-ES5), XGA (VPL-EX50/ EX5) or WXGA (VPL-EW5) (see page 42). The picture flickers. "Dot Phase" on the PICTURE SETTING menu (see page 32). 46 Troubleshooting key on the Remote Commander or adjust...
... input signal cannot be projected as the frequency is not adjusted properly. Sound Symptom No sound. c Use a no-resistance stereo audio cable (see page 19). • The sound is out of the acceptable range of the projector. c Set the output setting to SVGA (VPL-ES5), XGA (VPL-EX50/ EX5) or WXGA (VPL-EW5) (see page 42). The picture flickers. "Dot Phase" on the PICTURE SETTING menu (see page 32). 46 Troubleshooting key on the Remote Commander or adjust...
User Manual
Page 47
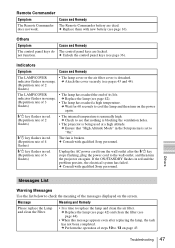
... control panel keys are dead. indicator flashes in red and the problem persists, the electrical system has failed. c Consult with qualified Sony personnel. :/1 key flashes in red. (Repetition rate of 4 flashes) The fan is being used at a high altitude. c Replace the lamp (see page 42) and clean the filter (see page 42). • The lamp has reached a high temperature. Indicators Symptom Cause and Remedy The LAMP/COVER • The lamp cover or the air filter cover is time to replace...
... control panel keys are dead. indicator flashes in red and the problem persists, the electrical system has failed. c Consult with qualified Sony personnel. :/1 key flashes in red. (Repetition rate of 4 flashes) The fan is being used at a high altitude. c Replace the lamp (see page 42) and clean the filter (see page 42). • The lamp has reached a high temperature. Indicators Symptom Cause and Remedy The LAMP/COVER • The lamp cover or the air filter cover is time to replace...

User Manual
Page 49
...; 3) Lens 1.2 times zoom lens f 18.53 to 22.18 mm/F1.65 to 1.93 Lamp 190 W Ultra high pressure lamp Projected picture size 40 to 300 inches (measured diagonally) Light output VPL-EX501): 2500 lm VPL-EW51)/EX5/ES5: 2000 lm 1) When the Lamp Mode is set to 92 Hz (Maximum input signal resolution: SXGA+ 1400 × 1050 fV: 60 Hz) 2) Set the resolution and the frequency of the signal of the connected...
...; 3) Lens 1.2 times zoom lens f 18.53 to 22.18 mm/F1.65 to 1.93 Lamp 190 W Ultra high pressure lamp Projected picture size 40 to 300 inches (measured diagonally) Light output VPL-EX501): 2500 lm VPL-EW51)/EX5/ES5: 2000 lm 1) When the Lamp Mode is set to 92 Hz (Maximum input signal resolution: SXGA+ 1400 × 1050 fV: 60 Hz) 2) Set the resolution and the frequency of the signal of the connected...

User Manual
Page 51
... female) (VPL-EW5/EX50/EX5 only) 1 R/R-Y 9 Power supply input for replacement) Some of the items may not be available in some areas. For details, please consult your nearest Sony dealer. Optional accessories Projector Lamp LMP-E190(...for DDC 2 G/Y 10 GND 3 B/B-Y 11 GND 4 RESERVE 12 DDC/SDA 5 GND 13 HD 6 GND (R) 14 VD 7 GND (G) 15 DDC/SCL 8 GND (B) 1 NC 2 RXDA 3 TXDA 4 DTR 5 GND 6 NC 7 RTS 8 CTS 9 NC Others Specifications 51 Note Always verify that the unit is operating properly before use...
... female) (VPL-EW5/EX50/EX5 only) 1 R/R-Y 9 Power supply input for replacement) Some of the items may not be available in some areas. For details, please consult your nearest Sony dealer. Optional accessories Projector Lamp LMP-E190(...for DDC 2 G/Y 10 GND 3 B/B-Y 11 GND 4 RESERVE 12 DDC/SDA 5 GND 13 HD 6 GND (R) 14 VD 7 GND (G) 15 DDC/SCL 8 GND (B) 1 NC 2 RXDA 3 TXDA 4 DTR 5 GND 6 NC 7 RTS 8 CTS 9 NC Others Specifications 51 Note Always verify that the unit is operating properly before use...
User Manual
Page 60
... Lamp Timer 40 Lamp Timer Reset 36 Language 37 selecting the menu language 25 Lens 11 Location and function of controls connector panel 14 control panel 12 rear/bottom 10 Remote Commander 15 top/right side/front 10 M Menu clearing the menu display 30 INFORMATION Menu 40 INPUT SETTING menu 33 INSTALL SETTING menu 38 MENU SETTING menu 37 PICTURE SETTING menu 31 SET SETTING menu 35 using a menu 29 Menu Position 37 Message List caution 48 warning 47 O Optional accessories 51 P Panel Key Lock 36 Picture Mode 31 Pin assignment 51 Power turn...
... Lamp Timer 40 Lamp Timer Reset 36 Language 37 selecting the menu language 25 Lens 11 Location and function of controls connector panel 14 control panel 12 rear/bottom 10 Remote Commander 15 top/right side/front 10 M Menu clearing the menu display 30 INFORMATION Menu 40 INPUT SETTING menu 33 INSTALL SETTING menu 38 MENU SETTING menu 37 PICTURE SETTING menu 31 SET SETTING menu 35 using a menu 29 Menu Position 37 Message List caution 48 warning 47 O Optional accessories 51 P Panel Key Lock 36 Picture Mode 31 Pin assignment 51 Power turn...


