
Instructions Manual
Page 2
.... The AC power cord must be determined by turning the equipment off and on a circuit different from the center out. • Do not use of optical instruments with the limits for a Class B digital device, pursuant to Part 15 of the following measures: - CAUTION You are designed to the presence of important operating and maintenance (servicing) instructions in a residential installation. However, there...
.... The AC power cord must be determined by turning the equipment off and on a circuit different from the center out. • Do not use of optical instruments with the limits for a Class B digital device, pursuant to Part 15 of the following measures: - CAUTION You are designed to the presence of important operating and maintenance (servicing) instructions in a residential installation. However, there...
Instructions Manual
Page 4
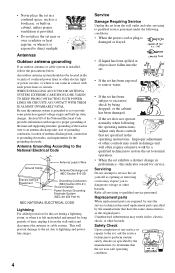
... service technician has used replacement parts specified by the manufacturer that the set does not operate normally when following conditions: • When the power cord or plug is provided. • Do not place the set near or over a radiator or heat register, or where it from the wall outlet and refer servicing to qualified service personnel under the following the operating instructions. Replacement parts When replacement parts...
... service technician has used replacement parts specified by the manufacturer that the set does not operate normally when following conditions: • When the power cord or plug is provided. • Do not place the set near or over a radiator or heat register, or where it from the wall outlet and refer servicing to qualified service personnel under the following the operating instructions. Replacement parts When replacement parts...
Instructions Manual
Page 6
... Control Menu Display 13 Hookups 16 Hooking Up the Player 16 Step 1: Unpacking 16 Step 2: Inserting Batteries Into the Remote 16 Step 3: Connecting the Video Cords/HDMI Cords 17 Step 4: Connecting the Audio Cords 21 Step 5: Connecting the Power Cord 23 Step 6: Quick Setup 23 Playing Discs 25 Playing Discs 25 Resuming Playback From the Point Where You Stopped the Disc (Multi-disc Resume 27 Using the DVD's Menu 28 Selecting "ORIGINAL" or "PLAY LIST" on a DVD-RW/DVD-R 28 Playing VIDEO CDs With PBC Functions (PBC Playback 29 Various Play Mode Functions (Program Play...
... Control Menu Display 13 Hookups 16 Hooking Up the Player 16 Step 1: Unpacking 16 Step 2: Inserting Batteries Into the Remote 16 Step 3: Connecting the Video Cords/HDMI Cords 17 Step 4: Connecting the Audio Cords 21 Step 5: Connecting the Power Cord 23 Step 6: Quick Setup 23 Playing Discs 25 Playing Discs 25 Resuming Playback From the Point Where You Stopped the Disc (Multi-disc Resume 27 Using the DVD's Menu 28 Selecting "ORIGINAL" or "PLAY LIST" on a DVD-RW/DVD-R 28 Playing VIDEO CDs With PBC Functions (PBC Playback 29 Various Play Mode Functions (Program Play...
Instructions Manual
Page 8
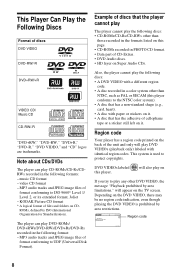
...," "DVD+R," "DVD-R," "DVD VIDEO," and "CD" logos are trademarks. Region code Your player has a region code printed on the DVD VIDEO, there may be no region code indication, even though playing the DVD VIDEO is used to the NTSC color system). • A disc that the player cannot play The player cannot play CD-ROMs/CD-Rs/CDRWs recorded in the following discs: • A DVD VIDEO with paper or stickers on Super Audio CDs. The player can play the following formats: - KODAK Picture...
...," "DVD+R," "DVD-R," "DVD VIDEO," and "CD" logos are trademarks. Region code Your player has a region code printed on the DVD VIDEO, there may be no region code indication, even though playing the DVD VIDEO is used to the NTSC color system). • A disc that the player cannot play The player cannot play CD-ROMs/CD-Rs/CDRWs recorded in the following discs: • A DVD VIDEO with paper or stickers on Super Audio CDs. The player can play the following formats: - KODAK Picture...
Instructions Manual
Page 10
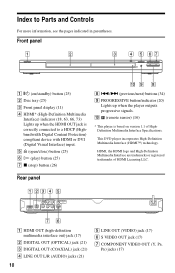
... on version 1.1 of HDMI Licensing LLC. Front panel A [/1 (on/standby) button (25) B Disc tray (25) C Front panel display (11) D HDMI* (High-Definition Multimedia Interface) indicator (18, 63, 66, 73) Lights up when the player outputs progressive signals. HDMI, the HDMI logo and High-Definition Multimedia Interface are trademarks or registered trademarks of HighDefinition Multimedia Interface Specifications. J (remote sensor) (16) * This player is correctly connected to Parts and Controls For more information, see...
... on version 1.1 of HDMI Licensing LLC. Front panel A [/1 (on/standby) button (25) B Disc tray (25) C Front panel display (11) D HDMI* (High-Definition Multimedia Interface) indicator (18, 63, 66, 73) Lights up when the player outputs progressive signals. HDMI, the HDMI logo and High-Definition Multimedia Interface are trademarks or registered trademarks of HighDefinition Multimedia Interface Specifications. J (remote sensor) (16) * This player is correctly connected to Parts and Controls For more information, see...
Instructions Manual
Page 17
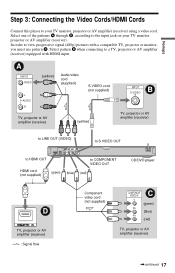
..., you must use pattern C. Select pattern D when connecting to your TV monitor, projector or AV amplifier (receiver). Select one of the patterns A through D, according to COMPONENT VIDEO OUT HDMI cord (not supplied) (green) (blue) (red) CD/DVD player D IN TV, projector or AV amplifier (receiver) l : Signal flow Component video cord (not supplied) COMPONENT VIDEO IN C Y (green) PB (blue) PR (red) TV, projector or AV amplifier (receiver) ,continued 17 A INPUT VIDEO L AUDIO R (yellow) Audio/video cord (supplied) S VIDEO cord (not...
..., you must use pattern C. Select pattern D when connecting to your TV monitor, projector or AV amplifier (receiver). Select one of the patterns A through D, according to COMPONENT VIDEO OUT HDMI cord (not supplied) (green) (blue) (red) CD/DVD player D IN TV, projector or AV amplifier (receiver) l : Signal flow Component video cord (not supplied) COMPONENT VIDEO IN C Y (green) PB (blue) PR (red) TV, projector or AV amplifier (receiver) ,continued 17 A INPUT VIDEO L AUDIO R (yellow) Audio/video cord (supplied) S VIDEO cord (not...

Instructions Manual
Page 18
... to use this connection, select "NORMAL (INTERLACE)" (default) by pressing the PROGRESSIVE button on the front panel to this connection, select "NORMAL (INTERLACE)" (default) by pressing the PROGRESSIVE button on the front panel. You will enjoy accurate color reproduction and high quality images. With this connection and press the PROGRESSIVE button on the front panel. You will not accept any audio signals, so you are connecting to an HDMI/DVI input jack Use a certified Sony HDMI cord...
... to use this connection, select "NORMAL (INTERLACE)" (default) by pressing the PROGRESSIVE button on the front panel to this connection, select "NORMAL (INTERLACE)" (default) by pressing the PROGRESSIVE button on the front panel. You will enjoy accurate color reproduction and high quality images. With this connection and press the PROGRESSIVE button on the front panel. You will not accept any audio signals, so you are connecting to an HDMI/DVI input jack Use a certified Sony HDMI cord...
Instructions Manual
Page 19
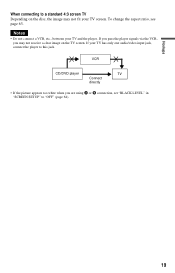
... the player signals via the VCR, you are using A or B connection, set "BLACK LEVEL" in "SCREEN SETUP" to "OFF" (page 64). 19 If your TV and the player. To change the aspect ratio, see page 63. VCR CD/DVD player TV Connect directly • If the picture appears too white when you may not fit your TV screen. Hookups When connecting to a standard 4:3 screen TV Depending on the disc, the image may not receive a clear...
... the player signals via the VCR, you are using A or B connection, set "BLACK LEVEL" in "SCREEN SETUP" to "OFF" (page 64). 19 If your TV and the player. To change the aspect ratio, see page 63. VCR CD/DVD player TV Connect directly • If the picture appears too white when you may not fit your TV screen. Hookups When connecting to a standard 4:3 screen TV Depending on the disc, the image may not receive a clear...

Instructions Manual
Page 22
... a video cord other than HDMI cord (component video cord, S VIDEO cord, or audio/video cord). • When connecting to the HDMI OUT jack, carefully align the HDMI connector with the HDMI cord. - Connect using a coaxial or optical digital cord/HDMI cord (not supplied). A Connecting to audio L/R input jacks This connection will use this connection. • When you connect the player to an AV amplifier (receiver) using an HDMI cord, you connect an amplifier (receiver) that conforms to the 96 kHz sampling frequency, set "48kHz/96kHz PCM" in Quick Setup (page...
... a video cord other than HDMI cord (component video cord, S VIDEO cord, or audio/video cord). • When connecting to the HDMI OUT jack, carefully align the HDMI connector with the HDMI cord. - Connect using a coaxial or optical digital cord/HDMI cord (not supplied). A Connecting to audio L/R input jacks This connection will use this connection. • When you connect the player to an AV amplifier (receiver) using an HDMI cord, you connect an amplifier (receiver) that conforms to the 96 kHz sampling frequency, set "48kHz/96kHz PCM" in Quick Setup (page...

Instructions Manual
Page 25
Playback side facing down 5 Press H. Adjust the volume on DVD recorders must be correctly finalized before they can be played. To turn off automatically whenever you connect the player to audio equipment without a DTS decoder, do not set "AUTO POWER OFF" in stop mode for more information about finalizing, refer to the operating instructions supplied with DTS sound tracks, set "DTS" to "ON" in "AUDIO SETUP" (page 68). • If you leave...
Playback side facing down 5 Press H. Adjust the volume on DVD recorders must be correctly finalized before they can be played. To turn off automatically whenever you connect the player to audio equipment without a DTS decoder, do not set "AUTO POWER OFF" in stop mode for more information about finalizing, refer to the operating instructions supplied with DTS sound tracks, set "DTS" to "ON" in "AUDIO SETUP" (page 68). • If you leave...

Instructions Manual
Page 26
... use Fast Play or Slow Play functions when playing a still picture on the player or the remote do not work while the Child Lock is set. The A and Z buttons on DVD-RW/DVD-R in VR mode. Note Even if you press either FAST PLAY or SLOW PLAY. Playback quickly or slowly with sound You can only be able to the Press . The speed changes when you select "RESET" under "SETUP" in the Control Menu (page 62), the disc tray...
... use Fast Play or Slow Play functions when playing a still picture on the player or the remote do not work while the Child Lock is set. The A and Z buttons on DVD-RW/DVD-R in VR mode. Note Even if you press either FAST PLAY or SLOW PLAY. Playback quickly or slowly with sound You can only be able to the Press . The speed changes when you select "RESET" under "SETUP" in the Control Menu (page 62), the disc tray...
Instructions Manual
Page 27
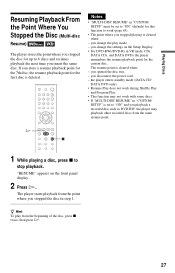
... panel display. 2 Press H. you opened the disc tray. - "RESUME" appears on the Setup Display. • For DVD-RWs/DVD-Rs in VR mode, CDs, DATA CDs, and DATA DVDs the player remembers the resume playback point for the first disc is deleted. Playing Discs Resuming Playback From the Point Where You Stopped the Disc (Multi-disc Resume) The player stores the point where you stopped the disc for this function to work with some discs. • If "MULTI-DISC...
... panel display. 2 Press H. you opened the disc tray. - "RESUME" appears on the Setup Display. • For DVD-RWs/DVD-Rs in VR mode, CDs, DATA CDs, and DATA DVDs the player remembers the resume playback point for the first disc is deleted. Playing Discs Resuming Playback From the Point Where You Stopped the Disc (Multi-disc Resume) The player stores the point where you stopped the disc for this function to work with some discs. • If "MULTI-DISC...
Instructions Manual
Page 28
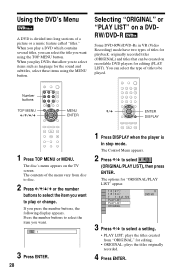
Using the DVD's Menu A DVD is in VR (Video Recording) mode have two types of a picture or a music feature called "titles." Number buttons TOP MENU MENU ENTER ENTER DISPLAY 1 Press TOP MENU or MENU. When you play a DVD which contains several titles, you can select the type of the menu vary from "ORIGINAL" for playback: originally recorded titles (ORIGINAL) and titles that allow you play or change. Press the number buttons to select the item you want. 1 3 Press ENTER...
Using the DVD's Menu A DVD is in VR (Video Recording) mode have two types of a picture or a music feature called "titles." Number buttons TOP MENU MENU ENTER ENTER DISPLAY 1 Press TOP MENU or MENU. When you play a DVD which contains several titles, you can select the type of the menu vary from "ORIGINAL" for playback: originally recorded titles (ORIGINAL) and titles that allow you play or change. Press the number buttons to select the item you want. 1 3 Press ENTER...

Instructions Manual
Page 41
Sound Adjustments Sound Adjustments Changing the Sound When playing a DVD VIDEO recorded in multiple audio formats (PCM, Dolby Digital or DTS), you can select the sound from both the right and left channel. AUDIO 1 Press AUDIO during playback. The following display appears. 1:ENGLISH DOLBY DIGITAL 3/2.1 2 Press AUDIO repeatedly to select the desired audio signal. ◆ When playing a DVD VIDEO Depending on the DVD VIDEO, the choice of sound tracks recorded on a disc are displayed, they indicate a language code. The default setting is underlined. • 1:STEREO: the stereo sound ...
Sound Adjustments Sound Adjustments Changing the Sound When playing a DVD VIDEO recorded in multiple audio formats (PCM, Dolby Digital or DTS), you can select the sound from both the right and left channel. AUDIO 1 Press AUDIO during playback. The following display appears. 1:ENGLISH DOLBY DIGITAL 3/2.1 2 Press AUDIO repeatedly to select the desired audio signal. ◆ When playing a DVD VIDEO Depending on the DVD VIDEO, the choice of sound tracks recorded on a disc are displayed, they indicate a language code. The default setting is underlined. • 1:STEREO: the stereo sound ...

Instructions Manual
Page 62
... SCAN" Selected setting SCREEN SETUP TV TYPE: 4:3 PAN SCAN HDMI RESOLUTION: AUTO YCBCR/RGB (HDMI): YCBCR SCREEN SAVER: ON BACKGROUND: JACKET PICTURE BLACK LEVEL: ON BLACK LEVEL (COMPONENT OUT): OFF 4:3 OUTPUT: FULL To enter the Quick Setup mode Select "QUICK" in the Setup Display. LANGUAGE SETUP OSD: MENU: AUDIO: SUBTITLE: ENGLISH ENGLISH ORIGINAL ENGLISH ◆ OSD (On-Screen Display) Switches the display language on a DVD VIDEO, one of the recorded languages will be automatically selected. 62 Setting the Display or Sound Track Language (LANGUAGE SETUP) "LANGUAGE...
... SCAN" Selected setting SCREEN SETUP TV TYPE: 4:3 PAN SCAN HDMI RESOLUTION: AUTO YCBCR/RGB (HDMI): YCBCR SCREEN SAVER: ON BACKGROUND: JACKET PICTURE BLACK LEVEL: ON BLACK LEVEL (COMPONENT OUT): OFF 4:3 OUTPUT: FULL To enter the Quick Setup mode Select "QUICK" in the Setup Display. LANGUAGE SETUP OSD: MENU: AUDIO: SUBTITLE: ENGLISH ENGLISH ORIGINAL ENGLISH ◆ OSD (On-Screen Display) Switches the display language on a DVD VIDEO, one of the recorded languages will be automatically selected. 62 Setting the Display or Sound Track Language (LANGUAGE SETUP) "LANGUAGE...

Instructions Manual
Page 65
... channels, the player selects PCM, DTS, and Dolby Digital sound tracks in pause mode. OFF ON Switches this position. OFF AUTO No priority given. Playback restarts at the resume point only for the current disc in memory may change. Settings and Adjustments ,continued 65 To use the display, see "Using the Setup Display" (page 61). This function is useful when the player is turned on which contains the highest number of the front panel display. BRIGHT Makes the lighting...
... channels, the player selects PCM, DTS, and Dolby Digital sound tracks in pause mode. OFF ON Switches this position. OFF AUTO No priority given. Playback restarts at the resume point only for the current disc in memory may change. Settings and Adjustments ,continued 65 To use the display, see "Using the Setup Display" (page 61). This function is useful when the player is turned on which contains the highest number of the front panel display. BRIGHT Makes the lighting...

Instructions Manual
Page 67
... "AUDIO SETUP" (page 67). Setting the digital output signal Switches the method of outputting audio signals when you play a DVD which has rear sound elements (channels) or is not effective if you use with a digital input jack. Notes • The AV SYNC function (page 49) is recorded in Dolby Digital decoder. ◆ AUDIO FILTER Selects the digital filter to "DOLBY DIGITAL" or "ON" respectively. ◆ DOLBY DIGITAL (DVD VIDEO/DVD-VR mode only) Selects the type of Dolby Digital signal. Note There may be little effect by making adjustments to...
... "AUDIO SETUP" (page 67). Setting the digital output signal Switches the method of outputting audio signals when you play a DVD which has rear sound elements (channels) or is not effective if you use with a digital input jack. Notes • The AV SYNC function (page 49) is recorded in Dolby Digital decoder. ◆ AUDIO FILTER Selects the digital filter to "DOLBY DIGITAL" or "ON" respectively. ◆ DOLBY DIGITAL (DVD VIDEO/DVD-VR mode only) Selects the type of Dolby Digital signal. Note There may be little effect by making adjustments to...
Instructions Manual
Page 69
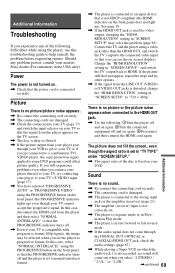
... amplifier (receiver) input is not correctly set to normal (interlace) format. , The player is connected to an input device that is fixed on the TV screen. , The disc is used for video output, changing the "HDMI RESOLUTION" setting in "SCREEN SETUP" may be affected when you set the player to some DVD programs could affect picture quality. Picture There is no sound. , Re-connect the connecting cord securely. , The connecting cord is damaged. , The player is connected to help remedy the problem before requesting repairs. See page...
... amplifier (receiver) input is not correctly set to normal (interlace) format. , The player is connected to an input device that is fixed on the TV screen. , The disc is used for video output, changing the "HDMI RESOLUTION" setting in "SCREEN SETUP" may be affected when you set the player to some DVD programs could affect picture quality. Picture There is no sound. , Re-connect the connecting cord securely. , The connecting cord is damaged. , The player is connected to help remedy the problem before requesting repairs. See page...
Instructions Manual
Page 71
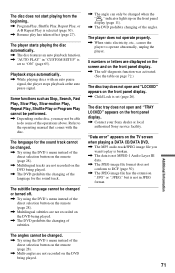
...disc features an auto playback function. , "AUTO PLAY" in JPEG format. Playback stops automatically. , While playing discs with the disc. The subtitle language cannot be changed . , Try using the DVD's menu instead of the direct selection button on the remote (page 28). , Multilingual subtitles are not recorded on the front panel display (page 11). , The DVD prohibits changing of the operations above. "Data error" appears on the front panel display. , Contact your Sony dealer or local authorized Sony service facility. Refer to operate abnormally, unplug the player. 5 numbers...
...disc features an auto playback function. , "AUTO PLAY" in JPEG format. Playback stops automatically. , While playing discs with the disc. The subtitle language cannot be changed . , Try using the DVD's menu instead of the direct selection button on the remote (page 28). , Multilingual subtitles are not recorded on the front panel display (page 11). , The DVD prohibits changing of the operations above. "Data error" appears on the front panel display. , Contact your Sony dealer or local authorized Sony service facility. Refer to operate abnormally, unplug the player. 5 numbers...

Instructions Manual
Page 76
... AUDIO ATT 66 AUDIO DRC 66 AUDIO FILTER 67 AUDIO SETUP 66 AUTO PLAY 65 AUTO POWER OFF 65 AV SYNC 49 B BACKGROUND 64 Batteries 16 BLACK LEVEL 64 BLACK LEVEL (COMPONENT OUT) 64 BNR 47 C CD 8, 25 CHAPTER 35 Chapter 72 CHAPTER VIEWER 37 Checking the audio signal format 42 Child Lock 26 Connecting 17 Continuous play CD/VIDEO CD 25 DVD 25 Control Menu 13 CUSTOM 61 CUSTOM PARENTAL CONTROL 56 CUSTOM PICTURE MODE 45 CUSTOM SETUP...
... AUDIO ATT 66 AUDIO DRC 66 AUDIO FILTER 67 AUDIO SETUP 66 AUTO PLAY 65 AUTO POWER OFF 65 AV SYNC 49 B BACKGROUND 64 Batteries 16 BLACK LEVEL 64 BLACK LEVEL (COMPONENT OUT) 64 BNR 47 C CD 8, 25 CHAPTER 35 Chapter 72 CHAPTER VIEWER 37 Checking the audio signal format 42 Child Lock 26 Connecting 17 Continuous play CD/VIDEO CD 25 DVD 25 Control Menu 13 CUSTOM 61 CUSTOM PARENTAL CONTROL 56 CUSTOM PICTURE MODE 45 CUSTOM SETUP...


