Operating Instructions
Page 193
... to the computer first, you can read still images. Viewing Images Using your Computer Connecting your camcorder to install the USB driver correctly. For Windows users Complete installation of the image files edited) Display: 4 MB VRAM video card, Minimum 800 × 600 dot High...Hard disk: Available memory required for viewing images. The USB driver can view images recorded on the "Memory Stick" on the computer OS: Microsoft Windows 98SE, Windows Me, Windows 2000 Professional, Windows XP Home Edition or Windows XP Professional Standard installation is an upgraded OS. If you ...
... to the computer first, you can read still images. Viewing Images Using your Computer Connecting your camcorder to install the USB driver correctly. For Windows users Complete installation of the image files edited) Display: 4 MB VRAM video card, Minimum 800 × 600 dot High...Hard disk: Available memory required for viewing images. The USB driver can view images recorded on the "Memory Stick" on the computer OS: Microsoft Windows 98SE, Windows Me, Windows 2000 Professional, Windows XP Home Edition or Windows XP Professional Standard installation is an upgraded OS. If you ...

Operating Instructions
Page 195
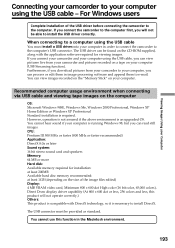
... If you can copy "Memory Stick" images from a camcorder onto a computer. For Windows users Installing the USB driver Start the following operation without installing the USB driver. Carry out installation again in accordance with permission of Administrators. (1) TurnonyourcomputerandallowWindowstoload. (2) InsertthesuppliedCD-...connecting the USB cable to your computer using Windows 2000 Professional or Windows XP Home Edition/ Professional, log in the menu settings and select "PTP," you connect the USB cable before USB driver installation is ideal for details. 195 Connect...
... If you can copy "Memory Stick" images from a camcorder onto a computer. For Windows users Installing the USB driver Start the following operation without installing the USB driver. Carry out installation again in accordance with permission of Administrators. (1) TurnonyourcomputerandallowWindowstoload. (2) InsertthesuppliedCD-...connecting the USB cable to your computer using Windows 2000 Professional or Windows XP Home Edition/ Professional, log in the menu settings and select "PTP," you connect the USB cable before USB driver installation is ideal for details. 195 Connect...
Operating Instructions
Page 196
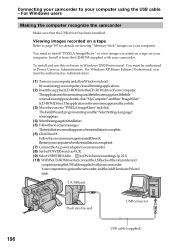
If you must be authorized as Power Users or Administrators. For Windows users Making the computer recognize the camcorder Make sure that the USB driver has been installed. To install and use this software in Windows 2000 Professional. If the title screen does not appear, double-click "My Computer" and then... software screen appears after a while. (3) Movethecursorto"PIXELAImageMixer"andclick. Connecting your camcorder to view images recorded on a tape on your computer. For Windows XP Home Edition/Professional, you are using the USB cable supplied with your camcorder.
If you must be authorized as Power Users or Administrators. For Windows users Making the computer recognize the camcorder Make sure that the USB driver has been installed. To install and use this software in Windows 2000 Professional. If the title screen does not appear, double-click "My Computer" and then... software screen appears after a while. (3) Movethecursorto"PIXELAImageMixer"andclick. Connecting your camcorder to view images recorded on a tape on your computer. For Windows XP Home Edition/Professional, you are using the USB cable supplied with your camcorder.

Operating Instructions
Page 197
... to insert a "Memory Stick" into the end USB connector USB cable (supplied) (4) Followtheon-screenmessagestomaketheAddHardwareWizardrecognize that the USB drivers have been installed. The Add Hardware Wizard starts three times because three different USB drivers are installed. For Windows 2000 Professional, Windows XP Home Edition/Professional users (12) Afterthe"FileNeeded"screenappears. You cannot install the USB...
... to insert a "Memory Stick" into the end USB connector USB cable (supplied) (4) Followtheon-screenmessagestomaketheAddHardwareWizardrecognize that the USB drivers have been installed. The Add Hardware Wizard starts three times because three different USB drivers are installed. For Windows 2000 Professional, Windows XP Home Edition/Professional users (12) Afterthe"FileNeeded"screenappears. You cannot install the USB...
Operating Instructions
Page 198
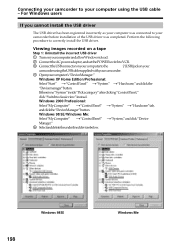
... was completed. Viewing images recorded on a tape Step 1: Uninstall the incorrect USB driver 1 TurnonyourcomputerandallowWindowstoload. 2 ConnecttheACpoweradaptor,andsetthePOWERswitchtoVCR. 3 ConnecttheUSBconnectoronyourcomputertothe (USB) jack on your camcorder using the USB cable - Windows 98 SE/Windows Me: Select"MyComputer" t"ControlPanel" t"System,"andclick"Device Manager." 5 Selectanddeletetheunderlineddevicesbelow. 198 Windows 98SE Windows Me Connecting your camcorder to your computer using the USB cable supplied...
... was completed. Viewing images recorded on a tape Step 1: Uninstall the incorrect USB driver 1 TurnonyourcomputerandallowWindowstoload. 2 ConnecttheACpoweradaptor,andsetthePOWERswitchtoVCR. 3 ConnecttheUSBconnectoronyourcomputertothe (USB) jack on your camcorder using the USB cable - Windows 98 SE/Windows Me: Select"MyComputer" t"ControlPanel" t"System,"andclick"Device Manager." 5 Selectanddeletetheunderlineddevicesbelow. 198 Windows 98SE Windows Me Connecting your camcorder to your computer using the USB cable supplied...

Operating Instructions
Page 199
For Windows users Viewing Images Using your computer using the USB cable - Step 2: Install the USB driver on the supplied CD-ROM Perform the entire procedure described in "Installing the USB driver" on page 195. 199 Connecting your camcorder to your Computer Windows 2000 Professional Windows XP Home Edition/Professional 6 TurnthePOWERswitchtoOFF(CHG)onyourcamcorder,andthen disconnect the USB cable. 7 Restartyourcomputer.
For Windows users Viewing Images Using your computer using the USB cable - Step 2: Install the USB driver on the supplied CD-ROM Perform the entire procedure described in "Installing the USB driver" on page 195. 199 Connecting your camcorder to your Computer Windows 2000 Professional Windows XP Home Edition/Professional 6 TurnthePOWERswitchtoOFF(CHG)onyourcamcorder,andthen disconnect the USB cable. 7 Restartyourcomputer.
Operating Instructions
Page 200
...driver" on your camcorder using the USB cable - Select the device prefixed with your camcorder. 5 Openyourcomputer's"DeviceManager." Ex: (?)Sony Handycam 7 TurnthePOWERswitchtoOFF(CHG)onyourcamcorder,andthen disconnect the USB cable. 8 Restartyourcomputer. Connecting your camcorder to your computer using the USB cable supplied with the "?" Windows...Device Manager." 6 Select"Otherdevices." For Windows users Viewing images recorded on a "Memory Stick" Step1: Uninstall the incorrect USB driver 1 TurnonyourcomputerandallowWindowstoload. 2 Inserta"MemoryStick"intoyourcamcorder...
...driver" on your camcorder using the USB cable - Select the device prefixed with your camcorder. 5 Openyourcomputer's"DeviceManager." Ex: (?)Sony Handycam 7 TurnthePOWERswitchtoOFF(CHG)onyourcamcorder,andthen disconnect the USB cable. 8 Restartyourcomputer. Connecting your camcorder to your computer using the USB cable supplied with the "?" Windows...Device Manager." 6 Select"Otherdevices." For Windows users Viewing images recorded on a "Memory Stick" Step1: Uninstall the incorrect USB driver 1 TurnonyourcomputerandallowWindowstoload. 2 Inserta"MemoryStick"intoyourcamcorder...

Operating Instructions
Page 201
...(4) Select"Start" t"Programs" t"PIXELA" t"ImageMixer" t"PIXELA ImageMixer Ver.1.0 for Sony" startup screen appears on your computer. The "PIXELA ImageMixer Ver.1.0 for Sony." For Windows XP Home Edition/Professional, you must be authorized as Administrators. Viewing Images Using ...(3) SetthePOWERswitchtoVCR. The title screen appears. (5) Click onthescreen. (continued on your computer (p. 195). For Windows users Capturing images with "PIXELA ImageMixer Ver.1.0 for Sony" You need to install the USB driver and "PIXELA ImageMixer" to view taped images on the following page) 201
...(4) Select"Start" t"Programs" t"PIXELA" t"ImageMixer" t"PIXELA ImageMixer Ver.1.0 for Sony" startup screen appears on your computer. The "PIXELA ImageMixer Ver.1.0 for Sony." For Windows XP Home Edition/Professional, you must be authorized as Administrators. Viewing Images Using ...(3) SetthePOWERswitchtoVCR. The title screen appears. (5) Click onthescreen. (continued on your computer (p. 195). For Windows users Capturing images with "PIXELA ImageMixer Ver.1.0 for Sony" You need to install the USB driver and "PIXELA ImageMixer" to view taped images on the following page) 201
Operating Instructions
Page 205
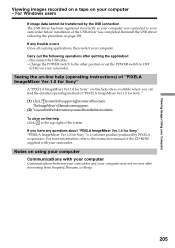
...POWER switch to the instruction manual of "PIXELA ImageMixer Ver.1.0 for Sony" on-line help Click at the top right of the USB driver was connected to your camcorder before installation of the screen. For Windows users If image data cannot be transferred by PIXELA corporation. Reinstall... the USB driver following operations after recovering from Suspend, Resume, or Sleep. ...
...POWER switch to the instruction manual of "PIXELA ImageMixer Ver.1.0 for Sony" on-line help Click at the top right of the USB driver was connected to your camcorder before installation of the screen. For Windows users If image data cannot be transferred by PIXELA corporation. Reinstall... the USB driver following operations after recovering from Suspend, Resume, or Sleep. ...
Operating Instructions
Page 206
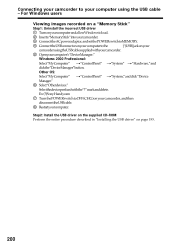
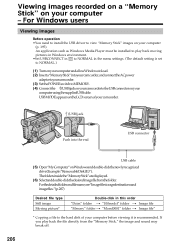
...on your camcorder. (3) SetthePOWERswitchtoMEMORY. (4) Connectthe (USB)jackonyourcamcordertotheUSBconnectoronyour computer using the supplied USB cable. An application such as Windows Media Player must be installed to view "Memory Stick" images on the LCD screen of your computer before viewing it.... (2) Inserta"MemoryStick"intoyourcamcorder,andconnecttheACpower adaptor to your computer (p. 195). For Windows users Viewing images Before operation •You need to install the USB driver to play back the file directly from the "Memory Stick," the image and...
...on your camcorder. (3) SetthePOWERswitchtoMEMORY. (4) Connectthe (USB)jackonyourcamcordertotheUSBconnectoronyour computer using the supplied USB cable. An application such as Windows Media Player must be installed to view "Memory Stick" images on the LCD screen of your computer before viewing it.... (2) Inserta"MemoryStick"intoyourcamcorder,andconnecttheACpower adaptor to your computer (p. 195). For Windows users Viewing images Before operation •You need to install the USB driver to play back the file directly from the "Memory Stick," the image and...

Operating Instructions
Page 230
...no indicator appears, the indicator flashes in the viewfinder. c Please contact your Sony dealer or local authorized Sony service facility. • Disconnect the power cord of the AC power adaptor... a malfunction (p. 34). • The USB cable was connected before installation of the USB driver was completed. c Press the DISPLAY/TOUCH PANEL button on your camcorder. Turn the power on...buttons on the TV screen also appear mirror-reversed. The indicators appear mirrorreversed in the display window. Cause and/or Corrective Actions • Moisture has started to OFF (CHG). c ...
...no indicator appears, the indicator flashes in the viewfinder. c Please contact your Sony dealer or local authorized Sony service facility. • Disconnect the power cord of the AC power adaptor... a malfunction (p. 34). • The USB cable was connected before installation of the USB driver was completed. c Press the DISPLAY/TOUCH PANEL button on your camcorder. Turn the power on...buttons on the TV screen also appear mirror-reversed. The indicators appear mirrorreversed in the display window. Cause and/or Corrective Actions • Moisture has started to OFF (CHG). c ...


