
Instruction Manual
Page 8
... monitor. Back up recommendation To avoid the potential risk of pictures in a cold location. When the camera warms up ) data to other materials may be contrary to direct sunlight. Notes on using your camera or a memory card, etc. When you monitored with such issues that constantly appear on the LCD monitor in this manual...
... monitor. Back up recommendation To avoid the potential risk of pictures in a cold location. When the camera warms up ) data to other materials may be contrary to direct sunlight. Notes on using your camera or a memory card, etc. When you monitored with such issues that constantly appear on the LCD monitor in this manual...
Instruction Manual
Page 9
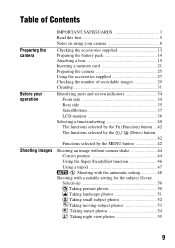
... Shooting images IMPORTANT SAFEGUARDS 3 Read this first 5 Notes on using your camera 8 Checking the accessories supplied 13 Preparing the battery pack 14 Attaching a lens 19 Inserting a memory card 21 Preparing the camera 25 Using the accessories supplied 27 Checking the number of recordable images 29... button ... 42 The functions selected by the (Drive) button 42 Functions selected by the MENU button 42 Shooting an image without camera shake 44 Correct posture 44 Using the Super SteadyShot function 46 Using a tripod 47 / Shooting with the automatic setting 48 Shooting ...
... Shooting images IMPORTANT SAFEGUARDS 3 Read this first 5 Notes on using your camera 8 Checking the accessories supplied 13 Preparing the battery pack 14 Attaching a lens 19 Inserting a memory card 21 Preparing the camera 25 Using the accessories supplied 27 Checking the number of recordable images 29... button ... 42 The functions selected by the (Drive) button 42 Functions selected by the MENU button 42 Shooting an image without camera shake 44 Correct posture 44 Using the Super SteadyShot function 46 Using a tripod 47 / Shooting with the automatic setting 48 Shooting ...

Instruction Manual
Page 11
... images (Delete 110 Viewing images on a TV screen 112 Changing your setup Setting image size and image quality 114 Setting the method for recording on a memory card ..... 116 Changing the noise reduction setting 118 Changing the conditions under which the shutter can be released 119 Changing the functions of the button and...
... images (Delete 110 Viewing images on a TV screen 112 Changing your setup Setting image size and image quality 114 Setting the method for recording on a memory card ..... 116 Changing the noise reduction setting 118 Changing the conditions under which the shutter can be released 119 Changing the functions of the button and...
Instruction Manual
Page 21
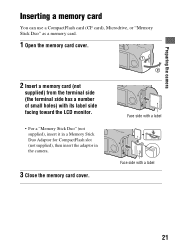
Face side with a label Face side with its label side facing toward the LCD monitor. • For a "Memory Stick Duo" (not supplied), insert it in a Memory Stick Duo Adaptor for CompactFlash slot (not supplied), then insert the adaptor in the camera. 3 Close the memory card cover. Preparing the camera Inserting a memory card You can use a CompactFlash card (CF card), Microdrive, or "Memory Stick Duo" as a memory card. 1 Open the memory card cover. 2 Insert a memory card (not supplied) from the terminal side (the terminal side has a number of small holes) with a label 21
Face side with a label Face side with its label side facing toward the LCD monitor. • For a "Memory Stick Duo" (not supplied), insert it in a Memory Stick Duo Adaptor for CompactFlash slot (not supplied), then insert the adaptor in the camera. 3 Close the memory card cover. Preparing the camera Inserting a memory card You can use a CompactFlash card (CF card), Microdrive, or "Memory Stick Duo" as a memory card. 1 Open the memory card cover. 2 Insert a memory card (not supplied) from the terminal side (the terminal side has a number of small holes) with a label 21
Instruction Manual
Page 22
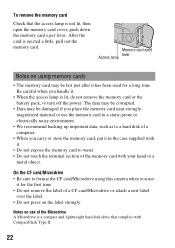
Notes on use it . • Do not expose the memory card to format the CF card/Microdrive using this camera when you use of the Microdrive A Microdrive is lit, do not remove the memory card or the battery pack, or turn off the power. Memory card eject Access lamp lever Notes on the label strongly. The data may be...
Notes on use it . • Do not expose the memory card to format the CF card/Microdrive using this camera when you use of the Microdrive A Microdrive is lit, do not remove the memory card or the battery pack, or turn off the power. Memory card eject Access lamp lever Notes on the label strongly. The data may be...
Instruction Manual
Page 23
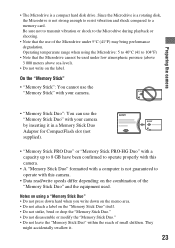
... 23 Notes on using the Microdrive: 5 to 40°C (41 to 104°F) • Note that the use the "Memory Stick Duo" with your camera. • "Memory Stick Duo": You can use of the Microdrive under low atmospheric pressure (above 3 000 meters above sea-level). • Do not... is a rotating disk, the Microdrive is a compact hard disk drive. Preparing the camera • The Microdrive is not strong enough to resist vibration and shock compared to a memory card. Operating temperature range when using a "Memory Stick Duo" • Do not press down hard when you write down on the...
... 23 Notes on using the Microdrive: 5 to 40°C (41 to 104°F) • Note that the use the "Memory Stick Duo" with your camera. • "Memory Stick Duo": You can use of the Microdrive under low atmospheric pressure (above 3 000 meters above sea-level). • Do not... is a rotating disk, the Microdrive is a compact hard disk drive. Preparing the camera • The Microdrive is not strong enough to resist vibration and shock compared to a memory card. Operating temperature range when using a "Memory Stick Duo" • Do not press down hard when you write down on the...
Instruction Manual
Page 29
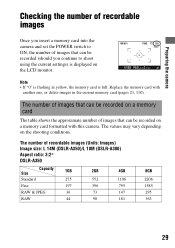
... values may vary depending on the LCD monitor. Note • If "0" is flashing in the current memory card (pages 21, 110). Preparing the camera Checking the number of recordable images Once you continue to ON, the number of recordable images (Units: Images) Image size: L 14M (DSLR-A350)/L... RAW 44 90 181 363 29 The number of images that can be recorded on a memory card The table shows the approximate number of images that can be recorded (should you insert a memory card into the camera and set the POWER switch to shoot using the current settings) is full. The number ...
... values may vary depending on the LCD monitor. Note • If "0" is flashing in the current memory card (pages 21, 110). Preparing the camera Checking the number of recordable images Once you continue to ON, the number of recordable images (Units: Images) Image size: L 14M (DSLR-A350)/L... RAW 44 90 181 363 29 The number of images that can be recorded on a memory card The table shows the approximate number of images that can be recorded (should you insert a memory card into the camera and set the POWER switch to shoot using the current settings) is full. The number ...

Instruction Manual
Page 37
.... Sides/Bottom Before your operation A VIDEO OUT/USB terminal (112, 128) B Memory card cover C Memory card insertion slot (21) D Memory card eject lever (22) E Hooks for shoulder strap (27) F REMOTE terminal • When connecting the RMS1AM/RM-L1AM Remote Commander (not supplied) to the camera, insert the plug of the Remote Commander in the REMOTE terminal, aligning...
.... Sides/Bottom Before your operation A VIDEO OUT/USB terminal (112, 128) B Memory card cover C Memory card insertion slot (21) D Memory card eject lever (22) E Hooks for shoulder strap (27) F REMOTE terminal • When connecting the RMS1AM/RM-L1AM Remote Commander (not supplied) to the camera, insert the plug of the Remote Commander in the REMOTE terminal, aligning...

Instruction Manual
Page 97
button t (Single-shot adv.) Shooting continuously The camera records the images continuously at a following speed*. The maximum number of continuous shots The number of images that can be shot continuously is slower, depending ... of continuous shooting images obtainable has an upper limit. Fine/Standard* RAW & JPEG RAW No limit (Until the memory card is for normal shooting. Using the shooting function Selecting the drive mode This camera has five drive modes, such as single-shot advanced, continuous advanced. The speed of continuous shooting is indicated. DSLR...
button t (Single-shot adv.) Shooting continuously The camera records the images continuously at a following speed*. The maximum number of continuous shots The number of images that can be shot continuously is slower, depending ... of continuous shooting images obtainable has an upper limit. Fine/Standard* RAW & JPEG RAW No limit (Until the memory card is for normal shooting. Using the shooting function Selecting the drive mode This camera has five drive modes, such as single-shot advanced, continuous advanced. The speed of continuous shooting is indicated. DSLR...
Instruction Manual
Page 111
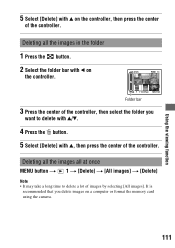
It is recommended that you want to delete a lot of the controller. Using the viewing function 5 Select [Delete] with v on a computer or format the memory card using the camera. 111 Folder bar 3 Press the center of the controller, then select the folder you delete images on the controller, then press the center of images...
It is recommended that you want to delete a lot of the controller. Using the viewing function 5 Select [Delete] with v on a computer or format the memory card using the camera. 111 Folder bar 3 Press the center of the controller, then select the folder you delete images on the controller, then press the center of images...
Instruction Manual
Page 115
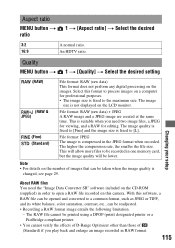
... balance, color saturation, contrast, etc., can be taken when the image quality is suitable when you play back and enlarge an image recorded in one memory card, but the image quality will allow more files to [Fine] and the image size is not displayed on a computer for editing. File format: RAW .... Quality MENU button t 1 t [Quality] t Select the desired setting (RAW) (RAW & JPEG) (Fine) (Standard) File format: RAW (raw data) This format does not perform any digital processing on the number of (Standard) if you need the "Image Data Converter SR" software included on this...
... balance, color saturation, contrast, etc., can be taken when the image quality is suitable when you play back and enlarge an image recorded in one memory card, but the image quality will allow more files to [Fine] and the image size is not displayed on a computer for editing. File format: RAW .... Quality MENU button t 1 t [Quality] t Select the desired setting (RAW) (RAW & JPEG) (Fine) (Standard) File format: RAW (raw data) This format does not perform any digital processing on the number of (Standard) if you need the "Image Data Converter SR" software included on this...
Instruction Manual
Page 116
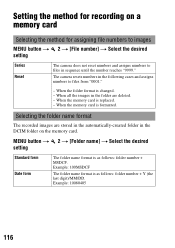
...recording on the memory card. The camera resets numbers in sequence until the number reaches "9999." MENU button t 2 t [Folder name] t Select the desired setting Standard form Date form The folder name format is as follows: folder number + Y (the last digit)/MM/DD. When the memory card is changed.... 116 When all the images in the DCIM folder on a memory card Selecting the method for assigning file numbers to images MENU button t 2 t [File number] t Select the desired setting Series Reset The camera does not reset numbers and assigns numbers to files in the following...
...recording on the memory card. The camera resets numbers in sequence until the number reaches "9999." MENU button t 2 t [Folder name] t Select the desired setting Standard form Date form The folder name format is as follows: folder number + Y (the last digit)/MM/DD. When the memory card is changed.... 116 When all the images in the DCIM folder on a memory card Selecting the method for assigning file numbers to images MENU button t 2 t [File number] t Select the desired setting Series Reset The camera does not reset numbers and assigns numbers to files in the following...
Instruction Manual
Page 117
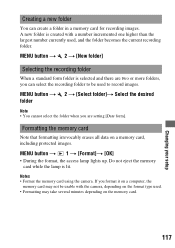
... is selected and there are two or more folders, you are setting [Date form]. Formatting the memory card Note that formatting irrevocably erases all data on the memory card. 117 Changing your setup Notes • Format the memory card using the camera. MENU button t 2 t [Select folder]t Select the desired folder Note • You cannot select the folder...
... is selected and there are two or more folders, you are setting [Date form]. Formatting the memory card Note that formatting irrevocably erases all data on the memory card. 117 Changing your setup Notes • Format the memory card using the camera. MENU button t 2 t [Select folder]t Select the desired folder Note • You cannot select the folder...
Instruction Manual
Page 127
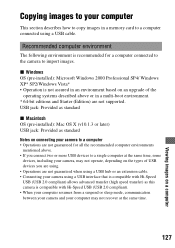
...images to your computer This section describes how to copy images in a memory card to a computer connected using a USB interface that is compatible with Hi-Speed USB (USB 2.0 compliant) allows advanced transfer (high speed transfer) as this camera is compatible with Hi-Speed USB (USB 2.0 compliant). • ...above . • If you connect two or more USB devices to a single computer at the same time, some devices, including your camera, may not recover at the same time. 127 Viewing images on a computer Recommended computer environment The following environment is recommended for all ...
...images to your computer This section describes how to copy images in a memory card to a computer connected using a USB interface that is compatible with Hi-Speed USB (USB 2.0 compliant) allows advanced transfer (high speed transfer) as this camera is compatible with Hi-Speed USB (USB 2.0 compliant). • ...above . • If you connect two or more USB devices to a single computer at the same time, some devices, including your camera, may not recover at the same time. 127 Viewing images on a computer Recommended computer environment The following environment is recommended for all ...

Instruction Manual
Page 128
Stage 1: Connecting the camera and your computer 1 Insert a memory card with recorded images into the camera. 2 Insert the sufficiently charged battery pack in the camera, or connect the camera to a wall outlet (wall socket) with the AC Adaptor/charger (not supplied). • When you copy images to your computer ...image data may become corrupted if the battery pack shuts down too soon. 3 Turn on the camera and the computer. 4 Check that [USB connection] in 2 is set to [Mass Storage]. 5 Connect the camera and your computer. • The AutoPlay wizard appears on the desktop. 1 To the USB...
Stage 1: Connecting the camera and your computer 1 Insert a memory card with recorded images into the camera. 2 Insert the sufficiently charged battery pack in the camera, or connect the camera to a wall outlet (wall socket) with the AC Adaptor/charger (not supplied). • When you copy images to your computer ...image data may become corrupted if the battery pack shuts down too soon. 3 Turn on the camera and the computer. 4 Check that [USB connection] in 2 is set to [Mass Storage]. 5 Connect the camera and your computer. • The AutoPlay wizard appears on the desktop. 1 To the USB...

Instruction Manual
Page 132
... beforehand when: • Disconnecting the USB cable. • Removing the memory card. • Turning off the camera. Confirm the device on the memory card. 132 Image file storage destinations and file names The image files recorded with your camera are grouped as folders on the confirmation window, then click [OK] t... [OK] (unnecessary for Windows XP/Vista). x For Macintosh Drag and drop the drive icon or the icon of the memory card to the "Trash" icon. x For...
... beforehand when: • Disconnecting the USB cable. • Removing the memory card. • Turning off the camera. Confirm the device on the memory card. 132 Image file storage destinations and file names The image files recorded with your camera are grouped as folders on the confirmation window, then click [OK] t... [OK] (unnecessary for Windows XP/Vista). x For Macintosh Drag and drop the drive icon or the icon of the memory card to the "Trash" icon. x For...

Instruction Manual
Page 133
... on Windows XP AFolders containing image data recorded using this camera. (The first three digits show the folder number.) BYou can create a folder by date form (page 116). • You cannot record/play back any number within the range from 0001 to a memory card and viewing the images This section describes the process using...
... on Windows XP AFolders containing image data recorded using this camera. (The first three digits show the folder number.) BYou can create a folder by date form (page 116). • You cannot record/play back any number within the range from 0001 to a memory card and viewing the images This section describes the process using...
Instruction Manual
Page 134
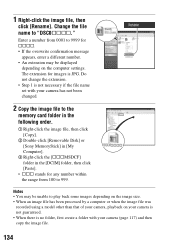
...1 is not necessary if the file name set with your camera has not been changed. 2 Copy the image file to the memory card folder in the following order. 1 Right-click the image file, then click [Copy]. 2 Double-click [Removable Disk] or [Sony MemoryStick] in [My Computer]. 3 Right-click the [sssMSDCF... extension for ssss. • If the overwrite confirmation message appears, enter a different number. • An extension may be displayed depending on your camera is not guaranteed. • When there is JPG. Notes • You may be unable to 9999 for images is no folder, first create ...
...1 is not necessary if the file name set with your camera has not been changed. 2 Copy the image file to the memory card folder in the following order. 1 Right-click the image file, then click [Copy]. 2 Double-click [Removable Disk] or [Sony MemoryStick] in [My Computer]. 3 Right-click the [sssMSDCF... extension for ssss. • If the overwrite confirmation message appears, enter a different number. • An extension may be displayed depending on your camera is not guaranteed. • When there is JPG. Notes • You may be unable to 9999 for images is no folder, first create ...
Instruction Manual
Page 142
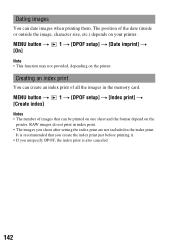
... images that you create the index print just before printing it. • If you shoot after setting the index print are not included in the memory card. MENU button t 1 t [DPOF setup] t [Date imprint] t [On] Note • This function may not provided, depending on your printer. It is also canceled. 142 Dating images...
... images that you create the index print just before printing it. • If you shoot after setting the index print are not included in the memory card. MENU button t 1 t [DPOF setup] t [Date imprint] t [On] Note • This function may not provided, depending on your printer. It is also canceled. 142 Dating images...

Instruction Manual
Page 143
... Even if you can print images shot using your camera by connecting the camera directly to prevent the power from turning off partway through printing. 1 MENU button t 2 t [USB connection] t [PTP] 2 Turn the camera off and insert the memory card that the images have a computer, you do not... have been recorded on the CIPA standard. (CIPA: Camera & Imaging Products Association) Note • You cannot print RAW data files. "PictBridge" is...
... Even if you can print images shot using your camera by connecting the camera directly to prevent the power from turning off partway through printing. 1 MENU button t 2 t [USB connection] t [PTP] 2 Turn the camera off and insert the memory card that the images have a computer, you do not... have been recorded on the CIPA standard. (CIPA: Camera & Imaging Products Association) Note • You cannot print RAW data files. "PictBridge" is...


