Instruction Manual
Page 1
Printed on a computer Printing images Digital Single Lens Reflex Camera Instruction Manual DSLR-A300/A350 © 2008 Sony Corporation Preparing the camera Before your operation Shooting images Using the shooting function Using the viewing function Changing your setup Viewing images on 70% or more recycled paper using VOC (Volatile Organic Compound)-free vegetable oil based ink. Additional information on this product and answers to frequently asked questions can be found at our Customer Support Website.
Printed on a computer Printing images Digital Single Lens Reflex Camera Instruction Manual DSLR-A300/A350 © 2008 Sony Corporation Preparing the camera Before your operation Shooting images Using the shooting function Using the viewing function Changing your setup Viewing images on 70% or more recycled paper using VOC (Volatile Organic Compound)-free vegetable oil based ink. Additional information on this product and answers to frequently asked questions can be found at our Customer Support Website.
Instruction Manual
Page 3
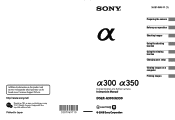
... particular attention to them. Use Power Sources This set . Overloading Do not overload wall outlets, extension cords or convenience receptacles beyond their capacity, since this manual for necessary ventilation. Do not use power-line operated sets near a swimming pool, etc. for cleaning the exterior of the set from the type of...
... particular attention to them. Use Power Sources This set . Overloading Do not overload wall outlets, extension cords or convenience receptacles beyond their capacity, since this manual for necessary ventilation. Do not use power-line operated sets near a swimming pool, etc. for cleaning the exterior of the set from the type of...
Instruction Manual
Page 6
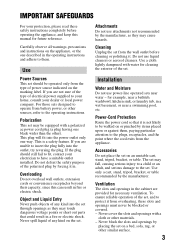
... household waste. CAUTION You are designed to provide reasonable protection against harmful interference in order to comply with the limits for a digital device pursuant to Subpart B of Part 15 of FCC Rules. Reorient or relocate the receiving antenna. - Attention The electromagnetic fields... cables shorter than 3 meters (9.8 feet). These limits are cautioned that any changes or modifications not expressly approved in this manual could void your household waste disposal service or the shop where you will help prevent potential negative consequences for the recycling of...
... household waste. CAUTION You are designed to provide reasonable protection against harmful interference in order to comply with the limits for a digital device pursuant to Subpart B of Part 15 of FCC Rules. Reorient or relocate the receiving antenna. - Attention The electromagnetic fields... cables shorter than 3 meters (9.8 feet). These limits are cautioned that any changes or modifications not expressly approved in this manual could void your household waste disposal service or the shop where you will help prevent potential negative consequences for the recycling of...

Instruction Manual
Page 8
... process and do not affect the images in this manual are reproduced images, and are not actual images shot using extremely high-precision technology so over 99.99% of the LCD monitor. • Do not expose the camera to other materials may become temporarily dark. When turning... on the LCD monitor and lens • The LCD monitor is too large. - When the difference of the intensity of a subject is manufactured using this manual The photographs used of metering or ...
... process and do not affect the images in this manual are reproduced images, and are not actual images shot using extremely high-precision technology so over 99.99% of the LCD monitor. • Do not expose the camera to other materials may become temporarily dark. When turning... on the LCD monitor and lens • The LCD monitor is too large. - When the difference of the intensity of a subject is manufactured using this manual The photographs used of metering or ...
Instruction Manual
Page 10
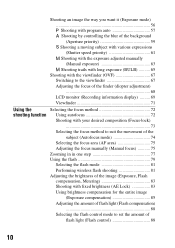
... of the background (Aperture priority 59 Shooting a moving subject with various expressions (Shutter speed priority 61 Shooting with the exposure adjusted manually (Manual exposure 63 Shooting trails with long exposure (BULB 65 Shooting with the viewfinder (OVF 67 Switching to the viewfinder 67 Adjusting the ... method to suit the movement of the subject (Autofocus mode 74 Selecting the focus area (AF area 75 Adjusting the focus manually (Manual focus 75 Zooming in in one step 77 Using the flash 79 Selecting the flash mode 81 Performing wireless flash shooting 81 ...
... of the background (Aperture priority 59 Shooting a moving subject with various expressions (Shutter speed priority 61 Shooting with the exposure adjusted manually (Manual exposure 63 Shooting trails with long exposure (BULB 65 Shooting with the viewfinder (OVF 67 Switching to the viewfinder 67 Adjusting the ... method to suit the movement of the subject (Autofocus mode 74 Selecting the focus area (AF area 75 Adjusting the focus manually (Manual focus 75 Zooming in in one step 77 Using the flash 79 Selecting the flash mode 81 Performing wireless flash shooting 81 ...

Instruction Manual
Page 13
Preparing the camera Preparing the camera Checking the accessories supplied The number in parentheses indicates the number of pieces. • BC-VM10 Battery charger (1)/ Power cord (mains lead) (1) • Rechargeable battery pack NPFM500H (1) • Eyecup (1) (Attached on the camera) • CD-ROM (Application Software for α camera) (1) • Quick Start Guide (1) • Instruction Manual (This manual) (1) • USB cable (1) • Video cable (1) • Shoulder strap (1) • Eyepiece cover (1) • Body cap (1) (Attached on the camera) 13
Preparing the camera Preparing the camera Checking the accessories supplied The number in parentheses indicates the number of pieces. • BC-VM10 Battery charger (1)/ Power cord (mains lead) (1) • Rechargeable battery pack NPFM500H (1) • Eyecup (1) (Attached on the camera) • CD-ROM (Application Software for α camera) (1) • Quick Start Guide (1) • Instruction Manual (This manual) (1) • USB cable (1) • Video cable (1) • Shoulder strap (1) • Eyepiece cover (1) • Body cap (1) (Attached on the camera) 13
Instruction Manual
Page 40
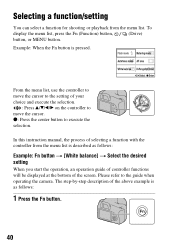
... be displayed at the bottom of the screen. Please refer to the guide when operating the camera. To display the menu list, press the Fn (Function) button, (Drive) button, or MENU button. In this instruction manual, the process of selecting a function with the controller from the menu list. Selecting a function/setting You...
... be displayed at the bottom of the screen. Please refer to the guide when operating the camera. To display the menu list, press the Fn (Function) button, (Drive) button, or MENU button. In this instruction manual, the process of selecting a function with the controller from the menu list. Selecting a function/setting You...

Instruction Manual
Page 63
Shooting images 1 Set the mode dial to M. 2 Rotate the control dial to adjust the shutter speed, and while pressing the button, rotate the control dial to adjust the aperture. • You can assign a function to z Shoot with [Ctrl dial setup] (page 120). button Aperture (F-number) Shutter speed 63 Shooting with the exposure adjusted manually (Manual exposure) This mode is suitable to the control dial with the desired exposure setting by adjusting both the shutter speed and aperture. z Use an exposure meter.
Shooting images 1 Set the mode dial to M. 2 Rotate the control dial to adjust the shutter speed, and while pressing the button, rotate the control dial to adjust the aperture. • You can assign a function to z Shoot with [Ctrl dial setup] (page 120). button Aperture (F-number) Shutter speed 63 Shooting with the exposure adjusted manually (Manual exposure) This mode is suitable to the control dial with the desired exposure setting by adjusting both the shutter speed and aperture. z Use an exposure meter.
Instruction Manual
Page 64
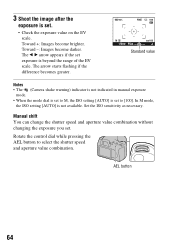
... the exposure is set to [100]. The arrow starts flashing if the difference becomes greater. Standard value Notes • The (Camera shake warning) indicator is not indicated in manual exposure mode. • When the mode dial is set to select the shutter speed and aperture value combination. AEL button 64... Manual shift You can change the shutter speed and aperture value combination without changing the exposure you set exposure is not available. Toward +: Images ...
... the exposure is set to [100]. The arrow starts flashing if the difference becomes greater. Standard value Notes • The (Camera shake warning) indicator is not indicated in manual exposure mode. • When the mode dial is set to select the shutter speed and aperture value combination. AEL button 64... Manual shift You can change the shutter speed and aperture value combination without changing the exposure you set exposure is not available. Toward +: Images ...
Instruction Manual
Page 66
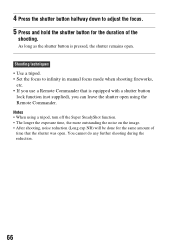
... adjust the focus. 5 Press and hold the shutter button for the same amount of the shooting. 4 Press the shutter button halfway down to infinity in manual focus mode when shooting fireworks, etc. • If you can leave the shutter open using a tripod, turn off the Super SteadyShot function. • The longer...
... adjust the focus. 5 Press and hold the shutter button for the same amount of the shooting. 4 Press the shutter button halfway down to infinity in manual focus mode when shooting fireworks, etc. • If you can leave the shutter open using a tripod, turn off the Super SteadyShot function. • The longer...
Instruction Manual
Page 71
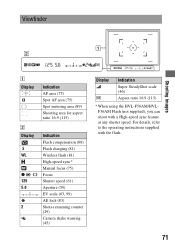
... 16:9 (115) Indication Flash compensation (88) Flash charging (81) Wireless flash (81) High-speed sync* Manual focus (75) Focus Shutter speed (61) Aperture (59) EV scale (63, 99) AE lock (83) Shots-remaining counter (29) Camera shake warning (45) Display Indication Super SteadyShot scale (46) Aspect ratio 16:9 (115) * When using the...
... 16:9 (115) Indication Flash compensation (88) Flash charging (81) Wireless flash (81) High-speed sync* Manual focus (75) Focus Shutter speed (61) Aperture (59) EV scale (63, 99) AE lock (83) Shots-remaining counter (29) Camera shake warning (45) Display Indication Super SteadyShot scale (46) Aspect ratio 16:9 (115) * When using the...
Instruction Manual
Page 72
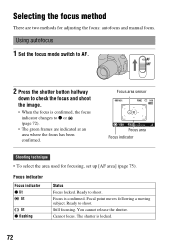
.... Focus is locked. 72 Focus area sensor Focus area Focus indicator Shooting technique • To select the area used for adjusting the focus: autofocus and manual focus. Cannot focus. Ready to shoot. Using the shooting function Selecting the focus method There are indicated at an area where the focus has been...
.... Focus is locked. 72 Focus area sensor Focus area Focus indicator Shooting technique • To select the area used for adjusting the focus: autofocus and manual focus. Cannot focus. Ready to shoot. Using the shooting function Selecting the focus method There are indicated at an area where the focus has been...

Instruction Manual
Page 73
In such cases, use the focus lock shooting feature (page 73) or manual focus (page 75). • A subject that is low in contrast, such as blue ...halfway down. 73 Make sure you measure the exact distance between the subject and the camera. When you put enough distance between the camera and the subject, refer to the position of the horizontal line. * The image sensor...Subjects that may require special focusing: Using the autofocus, it is hard to focus on the top of the camera shows the location of the image sensor*. To measure the exact distance to the subject The mark located on ...
In such cases, use the focus lock shooting feature (page 73) or manual focus (page 75). • A subject that is low in contrast, such as blue ...halfway down. 73 Make sure you measure the exact distance between the subject and the camera. When you put enough distance between the camera and the subject, refer to the position of the horizontal line. * The image sensor...Subjects that may require special focusing: Using the autofocus, it is hard to focus on the top of the camera shows the location of the image sensor*. To measure the exact distance to the subject The mark located on ...
Instruction Manual
Page 75
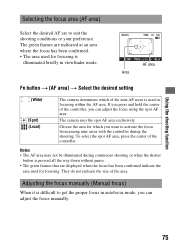
The camera uses the spot AF area exclusively. To select the spot AF area, press the center of the area. Adjusting the focus manually (Manual focus) When it is illuminated briefly in viewfinder mode. They do not indicate the size of the controller. Using the shooting function Selecting the focus ... focus has been confirmed. • The area used for focusing. AF area Area Fn button t [AF area] t Select the desired setting (Wide) (Spot) (Local) The camera determines which you can adjust the focus manually. 75
The camera uses the spot AF area exclusively. To select the spot AF area, press the center of the area. Adjusting the focus manually (Manual focus) When it is illuminated briefly in viewfinder mode. They do not indicate the size of the controller. Using the shooting function Selecting the focus ... focus has been confirmed. • The area used for focusing. AF area Area Fn button t [AF area] t Select the desired setting (Wide) (Spot) (Local) The camera determines which you can adjust the focus manually. 75
Instruction Manual
Page 102
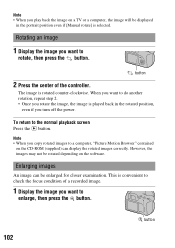
... you want to do another rotation, repeat step 2. • Once you rotate the image, the image is played back in the portrait position even if [Manual rotate] is selected. This is rotated counter-clockwise.
... you want to do another rotation, repeat step 2. • Once you rotate the image, the image is played back in the portrait position even if [Manual rotate] is selected. This is rotated counter-clockwise.

Instruction Manual
Page 120
Be careful not to that you can set the camera to reset the setting. • The "Hold" and "Toggle" settings affect the manual shift (page 64) in the viewfinder. It is convenient that the adjustable item (the shutter speed or the aperture value) can be selected using... MENU button t 1 t [AEL button] t Select the desired setting Notes • While the exposure value is locked, appears on the LCD monitor and in the manual mode. Holding the locked exposure value by pressing the AEL button while the button is pressed again ([AEL toggle]). MENU button t 1 t [Ctrl dial setup] t ...
Be careful not to that you can set the camera to reset the setting. • The "Hold" and "Toggle" settings affect the manual shift (page 64) in the viewfinder. It is convenient that the adjustable item (the shutter speed or the aperture value) can be selected using... MENU button t 1 t [AEL button] t Select the desired setting Notes • While the exposure value is locked, appears on the LCD monitor and in the manual mode. Holding the locked exposure value by pressing the AEL button while the button is pressed again ([AEL toggle]). MENU button t 1 t [Ctrl dial setup] t ...
Instruction Manual
Page 150
... Stick PRO," , "Memory Stick Duo," , "Memory Stick PRO Duo," , "Memory Stick PRO-HG Duo," , "Memory Stick Micro," "MagicGate," and are trademarks of Sony Corporation. • "InfoLITHIUM" is a trademark of Sony Corporation. • Microsoft, Windows, and Windows Vista are either registered trademarks or trademarks of Microsoft Corporation in the United States and/or... used in all cases in general, trademarks or registered trademarks of their respective developers or manufacturers. However, the ™ or ® marks are , in this manual are not used in this...
... Stick PRO," , "Memory Stick Duo," , "Memory Stick PRO Duo," , "Memory Stick PRO-HG Duo," , "Memory Stick Micro," "MagicGate," and are trademarks of Sony Corporation. • "InfoLITHIUM" is a trademark of Sony Corporation. • Microsoft, Windows, and Windows Vista are either registered trademarks or trademarks of Microsoft Corporation in the United States and/or... used in all cases in general, trademarks or registered trademarks of their respective developers or manufacturers. However, the ™ or ® marks are , in this manual are not used in this...

Instruction Manual
Page 153
When the flash has been fired in succession, the recharging process may take longer than usual to avoid overheating of the camera. Use the focus-lock or manual focus function (pages 73, 75). The flash does not work . • Set [Eye-Start AF] to [Fill-flash] (page 81). The date and ... image is too close. Check the minimum focal distance of focus. • The subject is out of the lens. • You are shooting in manual focus mode, set the focus mode lever to [Autoflash]. Others A picture taken with it (page 80). Since the RAW data file is set the ...
When the flash has been fired in succession, the recharging process may take longer than usual to avoid overheating of the camera. Use the focus-lock or manual focus function (pages 73, 75). The flash does not work . • Set [Eye-Start AF] to [Fill-flash] (page 81). The date and ... image is too close. Check the minimum focal distance of focus. • The subject is out of the lens. • You are shooting in manual focus mode, set the focus mode lever to [Autoflash]. Others A picture taken with it (page 80). Since the RAW data file is set the ...


