Instruction Manual
Page 11
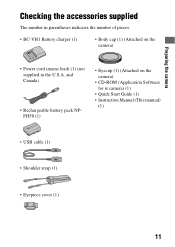
... the camera) • Power cord (mains lead) (1) (not supplied in parentheses indicates the number of pieces. • BC-VH1 Battery charger (1) • Body cap (1) (Attached on the camera) • CD-ROM (Application Software for α camera) (1) • Quick Start Guide (1) • Instruction Manual (This manual) (1) • USB cable (1) • Shoulder strap (1) • Eyepiece cover (1) 11...
... the camera) • Power cord (mains lead) (1) (not supplied in parentheses indicates the number of pieces. • BC-VH1 Battery charger (1) • Body cap (1) (Attached on the camera) • CD-ROM (Application Software for α camera) (1) • Quick Start Guide (1) • Instruction Manual (This manual) (1) • USB cable (1) • Shoulder strap (1) • Eyepiece cover (1) 11...

Instruction Manual
Page 25
The other accessories are described in the following pages. • Rechargeable battery pack (page 12) • Battery charger (page 12) • Power cord (mains lead) (not supplied in the U.S.A. Preparing the camera Using the accessories supplied This section describes how to use the shoulder strap, the eyepiece cover, and eyecup. and Canada) (page 12) • USB cable (pages 122, 138) • CD-ROM (page 130) Attaching the shoulder strap Attach both ends of the strap onto the camera. • You can also attach the eyepiece cover (page 26) on the strap. Eyepiece cover 25
The other accessories are described in the following pages. • Rechargeable battery pack (page 12) • Battery charger (page 12) • Power cord (mains lead) (not supplied in the U.S.A. Preparing the camera Using the accessories supplied This section describes how to use the shoulder strap, the eyepiece cover, and eyecup. and Canada) (page 12) • USB cable (pages 122, 138) • CD-ROM (page 130) Attaching the shoulder strap Attach both ends of the strap onto the camera. • You can also attach the eyepiece cover (page 26) on the strap. Eyepiece cover 25

Instruction Manual
Page 26
... be adjusted or the LCD monitor may be activated depending on each side of the viewfinder, as in shooting with the self-timer, attach the eyepiece cover. 1 Carefully slide the eyecup off w/ VF] (page 117). 26 In such cases, turn off both [Eye-Start AF] (page 71) and [Auto off by ...flash. When the shutter is released without the use of the eyecup. • Put your fingers under the eyecup, and slide it upward. 2 Slide the eyepiece cover over the viewfinder. Using the eyepiece cover and eyecup You can prevent light from entering through the viewfinder and affecting the exposure.
... be adjusted or the LCD monitor may be activated depending on each side of the viewfinder, as in shooting with the self-timer, attach the eyepiece cover. 1 Carefully slide the eyecup off w/ VF] (page 117). 26 In such cases, turn off both [Eye-Start AF] (page 71) and [Auto off by ...flash. When the shutter is released without the use of the eyecup. • Put your fingers under the eyecup, and slide it upward. 2 Slide the eyepiece cover over the viewfinder. Using the eyepiece cover and eyecup You can prevent light from entering through the viewfinder and affecting the exposure.

Instruction Manual
Page 91
... shutter button shot by a selected step. direction + direction Bracket shooting allows you press the shutter button without looking into the viewfinder, use the eyepiece cover (page 26). Press and hold the shutter button until the recording stops. Note • When you to shift the amount of deviation (steps...) from the base exposure, and the camera shoots while automatically shifting the exposure. When the flash is the step currently selected. 91 You can choose an image that has the ...
... shutter button shot by a selected step. direction + direction Bracket shooting allows you press the shutter button without looking into the viewfinder, use the eyepiece cover (page 26). Press and hold the shutter button until the recording stops. Note • When you to shift the amount of deviation (steps...) from the base exposure, and the camera shoots while automatically shifting the exposure. When the flash is the step currently selected. 91 You can choose an image that has the ...

Instruction Manual
Page 93
Also, refer to the operating instructions supplied with the Remote Commander You can shoot using the SHUTTER and 2SEC (the shutter is released after 2 seconds) buttons on the subject, point the transmitter of the Remote Commander to the remote sensor, and shoot the image. Note • Use the eyepiece cover (page 26). Using the shooting function 93 Shooting with the Wireless Remote Commander. 1 on the control button t (Remote Commander) 2 Focus on the RMT-DSLR1 Wireless Remote Commander (sold separately).
Also, refer to the operating instructions supplied with the Remote Commander You can shoot using the SHUTTER and 2SEC (the shutter is released after 2 seconds) buttons on the subject, point the transmitter of the Remote Commander to the remote sensor, and shoot the image. Note • Use the eyepiece cover (page 26). Using the shooting function 93 Shooting with the Wireless Remote Commander. 1 on the control button t (Remote Commander) 2 Focus on the RMT-DSLR1 Wireless Remote Commander (sold separately).


