
Instruction Manual
Page 9
...Shooting images IMPORTANT SAFEGUARDS 3 Read this first 5 Notes on using your camera 8 Checking the accessories supplied 13 Preparing the battery pack 14 Attaching a lens 19 Inserting a memory card 21 Preparing the camera 25 Using the accessories supplied 27 Checking the number of recordable images ... button ... 43 The functions selected by the (Drive) button 43 Functions selected by the MENU button 43 Shooting an image without camera shake 45 Correct posture 45 Using the Super SteadyShot function 46 Using a tripod 47 / Shooting with the automatic setting 48 Shooting with...
...Shooting images IMPORTANT SAFEGUARDS 3 Read this first 5 Notes on using your camera 8 Checking the accessories supplied 13 Preparing the battery pack 14 Attaching a lens 19 Inserting a memory card 21 Preparing the camera 25 Using the accessories supplied 27 Checking the number of recordable images ... button ... 43 The functions selected by the (Drive) button 43 Functions selected by the MENU button 43 Shooting an image without camera shake 45 Correct posture 45 Using the Super SteadyShot function 46 Using a tripod 47 / Shooting with the automatic setting 48 Shooting with...
Instruction Manual
Page 13
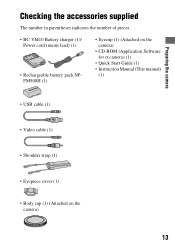
Preparing the camera Preparing the camera Checking the accessories supplied The number in parentheses indicates the number of pieces. • BC-VM10 Battery charger (1)/ Power cord (mains lead) (1) • Rechargeable battery pack NPFM500H (1) • Eyecup (1) (Attached on the camera) • CD-ROM (Application Software for α camera) (1) • Quick Start Guide (1) • Instruction Manual (This manual) (1) • USB cable (1) • Video cable (1) • Shoulder strap (1) • Eyepiece cover (1) • Body cap (1) (Attached on the camera) 13
Preparing the camera Preparing the camera Checking the accessories supplied The number in parentheses indicates the number of pieces. • BC-VM10 Battery charger (1)/ Power cord (mains lead) (1) • Rechargeable battery pack NPFM500H (1) • Eyecup (1) (Attached on the camera) • CD-ROM (Application Software for α camera) (1) • Quick Start Guide (1) • Instruction Manual (This manual) (1) • USB cable (1) • Video cable (1) • Shoulder strap (1) • Eyepiece cover (1) • Body cap (1) (Attached on the camera) 13
Instruction Manual
Page 14
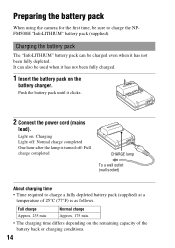
Preparing the battery pack When using the camera for the first time, be sure to charge a fully depleted battery pack (supplied) at a temperature of the battery back or charging conditions. 14 Charging the battery pack The "InfoLITHIUM" battery pack can also be charged even when it has not been fully depleted. Full charge Normal charge Approx. 235...
Preparing the battery pack When using the camera for the first time, be sure to charge a fully depleted battery pack (supplied) at a temperature of the battery back or charging conditions. 14 Charging the battery pack The "InfoLITHIUM" battery pack can also be charged even when it has not been fully depleted. Full charge Normal charge Approx. 235...
Instruction Manual
Page 15
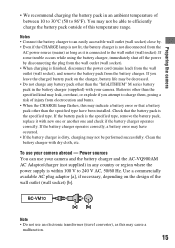
... if you leave the charged battery pack on the design of the wall outlet (wall socket) [b]. Batteries other than the "InfoLITHIUM" M series battery pack in the battery charger (supplied) with your camera abroad - Power sources You can use your camera. Check that a battery pack other than the specified ... charging is the specified type. Clean the battery charger with new one or another one and check if the battery charger operates correctly. If the battery pack is within 100 V to 86°F). To use your camera and the battery charger and the AC-VQ900AM AC Adaptor/charger...
... if you leave the charged battery pack on the design of the wall outlet (wall socket) [b]. Batteries other than the "InfoLITHIUM" M series battery pack in the battery charger (supplied) with your camera abroad - Power sources You can use your camera. Check that a battery pack other than the specified ... charging is the specified type. Clean the battery charger with new one or another one and check if the battery charger operates correctly. If the battery pack is within 100 V to 86°F). To use your camera and the battery charger and the AC-VQ900AM AC Adaptor/charger...
Instruction Manual
Page 16
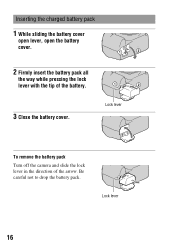
Be careful not to drop the battery pack. Lock lever To remove the battery pack Turn off the camera and slide the lock lever in the direction of the battery. 3 Close the battery cover. Inserting the charged battery pack 1 While sliding the battery cover open lever, open the battery cover. 2 Firmly insert the battery pack all the way while pressing the lock lever with the tip of the arrow. Lock lever 16
Be careful not to drop the battery pack. Lock lever To remove the battery pack Turn off the camera and slide the lock lever in the direction of the battery. 3 Close the battery cover. Inserting the charged battery pack 1 While sliding the battery cover open lever, open the battery cover. 2 Firmly insert the battery pack all the way while pressing the lock lever with the tip of the arrow. Lock lever 16
Instruction Manual
Page 17
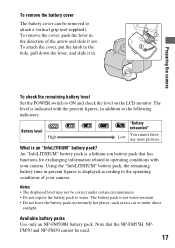
... that the NP-FM55H, NPFM50 and NP-FM30 cannot be used. 17 An "InfoLITHIUM" battery pack is indicated with your camera. What is not water-resistant. • Do not leave the battery pack in extremely hot places, such as in addition to the operating conditions of the arrow and slide it out. Notes... can be removed to ON and check the level on the LCD monitor. To remove the cover, push the lever in . Preparing the camera To check the remaining battery level Set the POWER switch to attach a vertical grip (not supplied). To attach the cover, put the knob in the hole, pull down...
... that the NP-FM55H, NPFM50 and NP-FM30 cannot be used. 17 An "InfoLITHIUM" battery pack is indicated with your camera. What is not water-resistant. • Do not leave the battery pack in extremely hot places, such as in addition to the operating conditions of the arrow and slide it out. Notes... can be removed to ON and check the level on the LCD monitor. To remove the cover, push the lever in . Preparing the camera To check the remaining battery level Set the POWER switch to attach a vertical grip (not supplied). To attach the cover, put the knob in the hole, pull down...

Instruction Manual
Page 18
... it in your camera before you start shooting. • The battery pack will run out quickly if you use : put the battery pack in a pocket close to your body to ensure longer battery pack use it up once a year on your camera immediately before storing the battery pack in low temperature... surroundings. We recommend the following to warm it more and more, and as time passes. If the battery operating time seems shortened considerably, a...
... it in your camera before you start shooting. • The battery pack will run out quickly if you use : put the battery pack in a pocket close to your body to ensure longer battery pack use it up once a year on your camera immediately before storing the battery pack in low temperature... surroundings. We recommend the following to warm it more and more, and as time passes. If the battery operating time seems shortened considerably, a...
Instruction Manual
Page 22
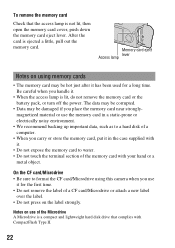
... terminal section of a CF card/Microdrive or attach a new label over the label. • Do not press on the label strongly. Notes on using this camera when you use it . • Do not expose the memory card to a hard disk of a computer. • When you handle it has been used for... if you place the memory card near stronglymagnetized material or use of the Microdrive A Microdrive is lit, do not remove the memory card or the battery pack, or turn off the power.
... terminal section of a CF card/Microdrive or attach a new label over the label. • Do not press on the label strongly. Notes on using this camera when you use it . • Do not expose the memory card to a hard disk of a computer. • When you handle it has been used for... if you place the memory card near stronglymagnetized material or use of the Microdrive A Microdrive is lit, do not remove the memory card or the battery pack, or turn off the power.

Instruction Manual
Page 27
...shutter is released without the use the shoulder strap and the eyepiece cover. Preparing the camera Using the accessories supplied This section describes how to use of the strap on the camera. • You can prevent light from entering through the viewfinder and affecting the ...exposure. The other accessories are described in the following pages. • Rechargeable battery pack (page 14) • Battery charger, Power cord (mains lead) (page 14...
...shutter is released without the use the shoulder strap and the eyepiece cover. Preparing the camera Using the accessories supplied This section describes how to use of the strap on the camera. • You can prevent light from entering through the viewfinder and affecting the ...exposure. The other accessories are described in the following pages. • Rechargeable battery pack (page 14) • Battery charger, Power cord (mains lead) (page 14...
Instruction Manual
Page 30
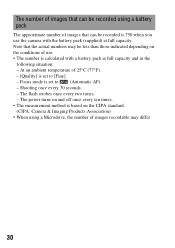
... AF). - The power turns on and off once every ten times. • The measurement method is based on the conditions of use the camera with a battery pack at full capacity. At an ambient temperature of 25°C (77°F). - [Quality] is set to [Fine]. - The number ...of images that can be less than those indicated depending on the CIPA standard. (CIPA: Camera & Imaging Products Association) • When using a battery pack The approximate number of images that the actual numbers may differ. 30 Shooting once every 30 seconds. - The flash strobes...
... AF). - The power turns on and off once every ten times. • The measurement method is based on the conditions of use the camera with a battery pack at full capacity. At an ambient temperature of 25°C (77°F). - [Quality] is set to [Fine]. - The number ...of images that can be less than those indicated depending on the CIPA standard. (CIPA: Camera & Imaging Products Association) • When using a battery pack The approximate number of images that the actual numbers may differ. 30 Shooting once every 30 seconds. - The flash strobes...
Instruction Manual
Page 32
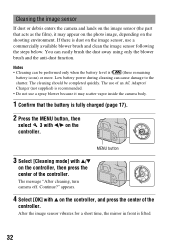
...is recommended. • Do not use a commercially available blower brush and clean the image sensor following the steps below. The message "After cleaning, turn camera off. Notes • Cleaning can be completed quickly. MENU button 3 Select [Cleaning mode] with v on the controller, and press the center of ... is dust on the image sensor, use a spray blower because it may scatter vapor inside the camera body. 1 Confirm that the battery is fully charged (page 17). 2 Press the MENU button, then select 3 with b/B on the controller. Continue?" After the image sensor vibrates for ...
...is recommended. • Do not use a commercially available blower brush and clean the image sensor following the steps below. The message "After cleaning, turn camera off. Notes • Cleaning can be completed quickly. MENU button 3 Select [Cleaning mode] with v on the controller, and press the center of ... is dust on the image sensor, use a spray blower because it may scatter vapor inside the camera body. 1 Confirm that the battery is fully charged (page 17). 2 Press the MENU button, then select 3 with b/B on the controller. Continue?" After the image sensor vibrates for ...

Instruction Manual
Page 33
Note • The camera starts beeping if the battery pack becomes low during cleaning. Stop the cleaning immediately and set the POWER switch to OFF. Complete the cleaning quickly. • Hold the camera's face downward to prevent the dust from resettling in the camera. • When cleaning the image sensor, do not put the tip... to clean the image sensor surface and the surrounding area. • Do not touch the image sensor with the tip of the brush. Preparing the camera 5 Detach the lens (page 20). 6 Use the blower brush to OFF. 33
Note • The camera starts beeping if the battery pack becomes low during cleaning. Stop the cleaning immediately and set the POWER switch to OFF. Complete the cleaning quickly. • Hold the camera's face downward to prevent the dust from resettling in the camera. • When cleaning the image sensor, do not put the tip... to clean the image sensor surface and the surrounding area. • Do not touch the image sensor with the tip of the brush. Preparing the camera 5 Detach the lens (page 20). 6 Use the blower brush to OFF. 33
Instruction Manual
Page 36
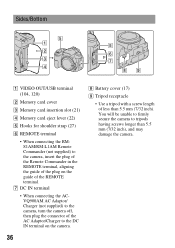
... REMOTE terminal • When connecting the RMS1AM/RM-L1AM Remote Commander (not supplied) to the camera, insert the plug of the Remote Commander in the REMOTE terminal, aligning the guide of the plug on the camera. 36 H Battery cover (17) I Tripod receptacle • Use a tripod with a screw length of the ...REMOTE terminal. You will be unable to firmly secure the camera to the DC IN terminal on the guide of less than 5.5 ...
... REMOTE terminal • When connecting the RMS1AM/RM-L1AM Remote Commander (not supplied) to the camera, insert the plug of the Remote Commander in the REMOTE terminal, aligning the guide of the plug on the camera. 36 H Battery cover (17) I Tripod receptacle • Use a tripod with a screw length of the ...REMOTE terminal. You will be unable to firmly secure the camera to the DC IN terminal on the guide of less than 5.5 ...
Instruction Manual
Page 120
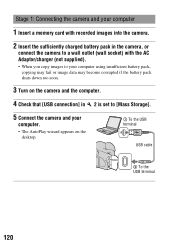
...memory card with recorded images into the camera. 2 Insert the sufficiently charged battery pack in the camera, or connect the camera to a wall outlet (wall socket) with the AC Adaptor/charger (not supplied). • When you copy images to your computer using insufficient battery pack, copying may fail or image ...data may become corrupted if the battery pack shuts down too soon. 3 Turn on the camera and the computer. 4 Check that [USB connection] in 2 is set to [...
...memory card with recorded images into the camera. 2 Insert the sufficiently charged battery pack in the camera, or connect the camera to a wall outlet (wall socket) with the AC Adaptor/charger (not supplied). • When you copy images to your computer using insufficient battery pack, copying may fail or image ...data may become corrupted if the battery pack shuts down too soon. 3 Turn on the camera and the computer. 4 Check that [USB connection] in 2 is set to [...
Instruction Manual
Page 141
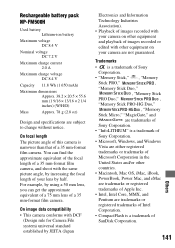
...Industries Association). • Playback of images recorded with DCF (Design rule for Camera File system) universal standard established by half. Rechargeable battery pack NP-FM500H Used battery Lithium-ion battery Maximum voltage DC 8.4 V Nominal voltage DC 7.2 V Maximum charge current 2.0... are trademarks or registered trademarks of Intel Corporation. • CompactFlash is a trademark of SanDisk Corporation. Trademarks • is a trademark of Sony Corporation. • "Memory Stick," , "Memory Stick PRO," , "Memory Stick Duo," , "Memory Stick PRO Duo," , "Memory Stick...
...Industries Association). • Playback of images recorded with DCF (Design rule for Camera File system) universal standard established by half. Rechargeable battery pack NP-FM500H Used battery Lithium-ion battery Maximum voltage DC 8.4 V Nominal voltage DC 7.2 V Maximum charge current 2.0... are trademarks or registered trademarks of Intel Corporation. • CompactFlash is a trademark of SanDisk Corporation. Trademarks • is a trademark of Sony Corporation. • "Memory Stick," , "Memory Stick PRO," , "Memory Stick Duo," , "Memory Stick PRO Duo," , "Memory Stick...
Instruction Manual
Page 143
... insert the battery pack, use the camera in an extremely hot or cold location (page 154). • The displayed battery remaining differs from the current one . Replace it with new one . Cannot turn on the power. 3 Reset the settings (page 116). 4 Consult your Sony dealer or local authorized Sony service facility. Install a charged battery pack (page...
... insert the battery pack, use the camera in an extremely hot or cold location (page 154). • The displayed battery remaining differs from the current one . Replace it with new one . Cannot turn on the power. 3 Reset the settings (page 116). 4 Consult your Sony dealer or local authorized Sony service facility. Install a charged battery pack (page...

Instruction Manual
Page 144
...turned on. • In the default setting, the LCD monitor will turn the LCD monitor on (page 110). To cancel the power save, operate the camera, such as pressing the shutter button halfway down . Delete unnecessary images (page 102). - Recording takes a long time. • The noise reduction function ... (page 72). • The shutter cannot be released when the subject is out of the following: - Press the DISP button to minimize the battery consumption. The power turns off . You can change the time that may require special focusing (page 68). Use the focus-lock or manual focus ...
...turned on. • In the default setting, the LCD monitor will turn the LCD monitor on (page 110). To cancel the power save, operate the camera, such as pressing the shutter button halfway down . Delete unnecessary images (page 102). - Recording takes a long time. • The noise reduction function ... (page 72). • The shutter cannot be released when the subject is out of the following: - Press the DISP button to minimize the battery consumption. The power turns off . You can change the time that may require special focusing (page 68). Use the focus-lock or manual focus ...
Instruction Manual
Page 147
We recommend that you protect images that the camera is turned on. • When the battery level is compatible with the camera. • Check "Recommended computer environment" (pages 119, 127). Your computer does not recognize your camera. • Check that you cannot restore it again firmly. • Set [USB connection] to your TV (page 105...
We recommend that you protect images that the camera is turned on. • When the battery level is compatible with the camera. • Check "Recommended computer environment" (pages 119, 127). Your computer does not recognize your camera. • Check that you cannot restore it again firmly. • Set [USB connection] to your TV (page 105...
Instruction Manual
Page 151
..., make sure the POWER switch is set to ON. Remove the battery pack and insert it to flash, consult your Sony dealer or local authorized Sony service facility. Turn the camera off the camera. If the Super SteadyShot scale continues to cool down before using it (page 154). appears when you shoot a JPEG image (page...
..., make sure the POWER switch is set to ON. Remove the battery pack and insert it to flash, consult your Sony dealer or local authorized Sony service facility. Turn the camera off the camera. If the Super SteadyShot scale continues to cool down before using it (page 154). appears when you shoot a JPEG image (page...
Instruction Manual
Page 152
... is insufficient. When attaching the camera to an astronomical telescope or something similar, set the recording mode to perform [Cleaning mode] when the battery level is dirty. If the message appears frequently, the internal backup battery is not attached. Replace the battery (pages 25, 154). If... the message still appears, change the memory card. Unable to display. • Images recorded with other cameras or images modified with a computer may take a some ...
... is insufficient. When attaching the camera to an astronomical telescope or something similar, set the recording mode to perform [Cleaning mode] when the battery level is dirty. If the message appears frequently, the internal backup battery is not attached. Replace the battery (pages 25, 154). If... the message still appears, change the memory card. Unable to display. • Images recorded with other cameras or images modified with a computer may take a some ...


