Operating Instructions
Page 6
... your computer Copying still images to your computer ...44 1 Installing the USB driver 45 2 Preparing your camera 46 3 Connecting your camera to scene conditions (SCENE SELECTION 34 Viewing still images Viewing images on your camera 36 Viewing single images 36 Viewing Index (nine- Table of contents Before using...your camera 20 How to use the control button 20 Setting the date and time 21 Shooting still images Inserting and removing a "Memory Stick 23 Deciding the still image size and quality 24 Basic still image shooting (using auto adjustment mode 26 Checking the last shot image...
... your computer Copying still images to your computer ...44 1 Installing the USB driver 45 2 Preparing your camera 46 3 Connecting your camera to scene conditions (SCENE SELECTION 34 Viewing still images Viewing images on your camera 36 Viewing single images 36 Viewing Index (nine- Table of contents Before using...your camera 20 How to use the control button 20 Setting the date and time 21 Shooting still images Inserting and removing a "Memory Stick 23 Deciding the still image size and quality 24 Basic still image shooting (using auto adjustment mode 26 Checking the last shot image...
Operating Instructions
Page 44
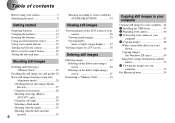
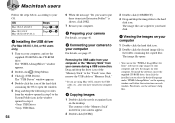
...Macintosh environment OS: Mac OS 8.5.1, 8.6, 9.0, 9.1, 9.2, or Mac OS X(v10.0/v10.1) An OS installed at one time, some devices, including your camera, may not work, depending on the type of the USB driver, step 1 is required for correct operations. When a USB connector is not provided on your OS. • After you can copy...[NORMAL] mode. The factory setting is required for operating systems not listed above . USB mode There are not guaranteed for Windows users only) If you shot to Mac OS 9.0 or 9.1. - See the Sony Website for a USB connection, [NORMAL] and [PTP] modes.
...Macintosh environment OS: Mac OS 8.5.1, 8.6, 9.0, 9.1, 9.2, or Mac OS X(v10.0/v10.1) An OS installed at one time, some devices, including your camera, may not work, depending on the type of the USB driver, step 1 is required for correct operations. When a USB connector is not provided on your OS. • After you can copy...[NORMAL] mode. The factory setting is required for operating systems not listed above . USB mode There are not guaranteed for Windows users only) If you shot to Mac OS 9.0 or 9.1. - See the Sony Website for a USB connection, [NORMAL] and [PTP] modes.

Operating Instructions
Page 45
The opening window. The "InstallShield wizard" window appears. 3 Click here , Click [Next]. Do not connect your camera to establish a USB connection using Windows 2000, log on as an example. If it does not appear, double-click (My Computer) t (ImageMixer) in order. • ...; When you of completion. 45 When the installation is completed, the window informs you are using Windows Me as Administrators. 2 , Click [USB Driver] on your computer, and insert the supplied CD-ROM into the CD-ROM drive. When the [Information] window appears, click [Next], and eject the CDROM. 1 ...
The opening window. The "InstallShield wizard" window appears. 3 Click here , Click [Next]. Do not connect your camera to establish a USB connection using Windows 2000, log on as an example. If it does not appear, double-click (My Computer) t (ImageMixer) in order. • ...; When you of completion. 45 When the installation is completed, the window informs you are using Windows Me as Administrators. 2 , Click [USB Driver] on your computer, and insert the supplied CD-ROM into the CD-ROM drive. When the [Information] window appears, click [Next], and eject the CDROM. 1 ...
Operating Instructions
Page 49
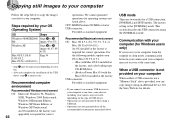
...if there is not shown 1 Right-click [My Computer], then click [Property]. Try the USB driver installation again using Microsoft Scanner and Camera Wizard] window, then click [OK]. The "Scanner and Camera Wizard" window appears. • When following the steps on page 47, the copy wizard appears on...pictures to a folder on the desktop of the devices above, follow the steps below to your computer When a removable disk icon is a " Sony DSC" or " Sony Handycam" with a mark. 3 If you find either of your computer. 2 Click here , Click [Next]. Copying still images to delete them. 1 Click...
...if there is not shown 1 Right-click [My Computer], then click [Property]. Try the USB driver installation again using Microsoft Scanner and Camera Wizard] window, then click [OK]. The "Scanner and Camera Wizard" window appears. • When following the steps on page 47, the copy wizard appears on...pictures to a folder on the desktop of the devices above, follow the steps below to your computer When a removable disk icon is a " Sony DSC" or " Sony Handycam" with a mark. 3 If you find either of your computer. 2 Click here , Click [Next]. Copying still images to delete them. 1 Click...
Operating Instructions
Page 54
... computer or the "Memory Stick" from the window opened in step 3 to the System Folder icon in the window opened in step 4. • Sony USB Driver • Sony USB Shim 54 6 When the message "Do you are copied to your hard disk. 5 Viewing the images on your computer 1 Double-click the ...the drive icon of the "Memory Stick" inserted in the folder containing the copied files. is shown, click [OK]. 7 Restart your computer. 2 Preparing your camera For details, see the software's help files. The contents of the "Memory Stick" to the "Trash" icon, then remove the USB cable or "Memory Stick...
... computer or the "Memory Stick" from the window opened in step 3 to the System Folder icon in the window opened in step 4. • Sony USB Driver • Sony USB Shim 54 6 When the message "Do you are copied to your hard disk. 5 Viewing the images on your computer 1 Double-click the ...the drive icon of the "Memory Stick" inserted in the folder containing the copied files. is shown, click [OK]. 7 Restart your computer. 2 Preparing your camera For details, see the software's help files. The contents of the "Memory Stick" to the "Trash" icon, then remove the USB cable or "Memory Stick...

Operating Instructions
Page 80
..." folder. 80 All of copying movies into your movies starts. Use the Microsoft Scanner and Camera Wizard], then click [OK]. c Click to remove the checkmark from any movies you shot to your camera. Copying movies to your computer Follow the steps below to copy movies you do not want ...to copy to the computer, then click [Next]. Before starting 1 Install the USB driver. 2 Insert the "Memory Stick" on the camera. 3 Connect the camera to your computer. •...
..." folder. 80 All of copying movies into your movies starts. Use the Microsoft Scanner and Camera Wizard], then click [OK]. c Click to remove the checkmark from any movies you shot to your camera. Copying movies to your computer Follow the steps below to copy movies you do not want ...to copy to the computer, then click [Next]. Before starting 1 Install the USB driver. 2 Insert the "Memory Stick" on the camera. 3 Connect the camera to your computer. •...
Operating Instructions
Page 86
... does not recognize your computer. p Connect the camera and your computer correctly using the "PIXELA ImageMixer for Sony" software, click on your personal computer are using the "PIXELA ImageMixer for those connected to other equipment besides the keyboard, the mouse, and your camera. • The USB driver is not installed. • Your computer does...
... does not recognize your computer. p Connect the camera and your computer correctly using the "PIXELA ImageMixer for Sony" software, click on your personal computer are using the "PIXELA ImageMixer for those connected to other equipment besides the keyboard, the mouse, and your camera. • The USB driver is not installed. • Your computer does...
Operating Instructions
Page 102
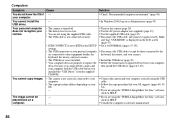
...(W/H/D, protruding portions not included) DSC-P71 284 g (10 oz) (camera, two batteries, "Memory Stick" and wrist strap included) DSC-P51 275 g (10 oz) (camera, two batteries, "Memory Stick" and wrist strap included) DSC-P31 231 g (8 oz) (camera, two batteries, "Memory Stick" and wrist strap included) BC-CS1 Ni... cable (1) • Wrist strap • "Memory Stick" (8MB for DSC-P31, 16MB for DSC-P71/P51) (1) • CD-ROM (USB driver: SPVD-008) (1) • Operating Instructions (1) Design and specifications are subject to change without notice. LCD screen LCD panel used DSC-P71 3.8 cm (1.5...
...(W/H/D, protruding portions not included) DSC-P71 284 g (10 oz) (camera, two batteries, "Memory Stick" and wrist strap included) DSC-P51 275 g (10 oz) (camera, two batteries, "Memory Stick" and wrist strap included) DSC-P31 231 g (8 oz) (camera, two batteries, "Memory Stick" and wrist strap included) BC-CS1 Ni... cable (1) • Wrist strap • "Memory Stick" (8MB for DSC-P31, 16MB for DSC-P71/P51) (1) • CD-ROM (USB driver: SPVD-008) (1) • Operating Instructions (1) Design and specifications are subject to change without notice. LCD screen LCD panel used DSC-P71 3.8 cm (1.5...
Operating Instructions
Page 106
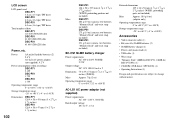
...-ROM 45 Charging Charging the batteries 14 Charging time 15 Computer Copying images 48, 54 Copying movies to your computer 80 USB cable 47 USB driver 45 Control button 20 Copying images 48, 54 106 D DC plug 19 Deleting images 39 DIVIDE 78 E Editing still images Print mark 72 ... 52 I Image Copying images 48 File names 51 Image file storage destinations 51 Image quality 24 Image size 24, 25, 91 Index 36 Installation USB driver 45 ISO 92 J JPG 52 L LCD screen display DISPLAY/LCD ON/OFF 32 LCD brightness 98 M Memory Stick Formatting a "Memory Stick 43 Inserting a "Memory...
...-ROM 45 Charging Charging the batteries 14 Charging time 15 Computer Copying images 48, 54 Copying movies to your computer 80 USB cable 47 USB driver 45 Control button 20 Copying images 48, 54 106 D DC plug 19 Deleting images 39 DIVIDE 78 E Editing still images Print mark 72 ... 52 I Image Copying images 48 File names 51 Image file storage destinations 51 Image quality 24 Image size 24, 25, 91 Index 36 Installation USB driver 45 ISO 92 J JPG 52 L LCD screen display DISPLAY/LCD ON/OFF 32 LCD brightness 98 M Memory Stick Formatting a "Memory Stick 43 Inserting a "Memory...


