Operating Instructions
Page 1
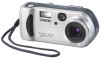
... Serial No. Owner's Record The model and serial numbers are located on the bottom. Refer to your Sony dealer regarding this manual thoroughly, and retain it for future reference. Digital Still Camera Operating Instructions Before operating the unit, please read this product. DSC-P71/P51/P31 © 2002 Sony Corporation 3-074-351-13(1) Getting started Shooting still images Viewing still images Deleting still images Copying still images to these numbers whenever you call...
... Serial No. Owner's Record The model and serial numbers are located on the bottom. Refer to your Sony dealer regarding this manual thoroughly, and retain it for future reference. Digital Still Camera Operating Instructions Before operating the unit, please read this product. DSC-P71/P51/P31 © 2002 Sony Corporation 3-074-351-13(1) Getting started Shooting still images Viewing still images Deleting still images Copying still images to these numbers whenever you call...
Operating Instructions
Page 4
... compliant with the limits sets out on the EMC Directive for using connection cables shorter than 3 meters. Trademarks • "Memory Stick," , "MagicGate Memory Stick," and , are trademarks of Sony Corporation. • "MagicGate" and are trademarks of Sony Corporation. • Microsoft and Windows are , in general,...used in all cases in this manual are registered trademarks of this manual. However, the ™ or ® marks are not used in this camera. and Canada THIS CLASS B DIGITAL DEVICE COMPLIES WITH PART 15 OF THE FCC RULES AND THE CANADIAN ICES-003 OPERATION...
... compliant with the limits sets out on the EMC Directive for using connection cables shorter than 3 meters. Trademarks • "Memory Stick," , "MagicGate Memory Stick," and , are trademarks of Sony Corporation. • "MagicGate" and are trademarks of Sony Corporation. • Microsoft and Windows are , in general,...used in all cases in this manual are registered trademarks of this manual. However, the ™ or ® marks are not used in this camera. and Canada THIS CLASS B DIGITAL DEVICE COMPLIES WITH PART 15 OF THE FCC RULES AND THE CANADIAN ICES-003 OPERATION...
Operating Instructions
Page 5
... camera wet When taking pictures outdoors in this manual are not actual images shot using this may render the "Memory Stick" unusable or image data breakdown, damage or loss may occur. If moisture condensation occurs, see page 99 and follow the instructions on image data compatibility • This camera conforms with the Design Rules for contents of the recording Contents of data loss, always copy (back up) data to remove...
... camera wet When taking pictures outdoors in this manual are not actual images shot using this may render the "Memory Stick" unusable or image data breakdown, damage or loss may occur. If moisture condensation occurs, see page 99 and follow the instructions on image data compatibility • This camera conforms with the Design Rules for contents of the recording Contents of data loss, always copy (back up) data to remove...
Operating Instructions
Page 6
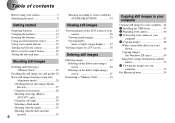
... removing a "Memory Stick 23 Deciding the still image size and quality 24 Basic still image shooting (using auto adjustment mode 26 Checking the last shot image (Quick Review 27 Using the zoom feature 28 Shooting close-ups (Macro) (DSC-P71 only 28 Using the self-timer 29 Selecting a flash mode 30 Shooting with the finder 32 Shooting with the date and time inserted 32 6 Shooting according to your computer 47 4 Copying images 48 When a removable disk icon is not shown 49 Copying images (for Windows XP users 49 Image file...
... removing a "Memory Stick 23 Deciding the still image size and quality 24 Basic still image shooting (using auto adjustment mode 26 Checking the last shot image (Quick Review 27 Using the zoom feature 28 Shooting close-ups (Macro) (DSC-P71 only 28 Using the self-timer 29 Selecting a flash mode 30 Shooting with the finder 32 Shooting with the date and time inserted 32 6 Shooting according to your computer 47 4 Copying images 48 When a removable disk icon is not shown 49 Copying images (for Windows XP users 49 Image file...
Operating Instructions
Page 7
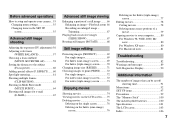
... and messages 89 Self-Diagnostics Display 90 Additional information The number of a still image ........ 66 Enlarging an image - EFFECT).......60 Spot light-metering 61 Shooting multiple frames (CLIP MOTION 62 Shooting in the SET UP screen 55 Advanced still image shooting Adjusting the exposure (EV adjustment) 56 Adjusting color tones (WHITE BALANCE 57 Choosing a focus method (MULTI AF/CENTER AF 58 Setting the distance to the subject (Focus preset 60 Adding special effects (P. Playback zoom 66 Recording...
... and messages 89 Self-Diagnostics Display 90 Additional information The number of a still image ........ 66 Enlarging an image - EFFECT).......60 Spot light-metering 61 Shooting multiple frames (CLIP MOTION 62 Shooting in the SET UP screen 55 Advanced still image shooting Adjusting the exposure (EV adjustment) 56 Adjusting color tones (WHITE BALANCE 57 Choosing a focus method (MULTI AF/CENTER AF 58 Setting the distance to the subject (Focus preset 60 Adding special effects (P. Playback zoom 66 Recording...
Operating Instructions
Page 16
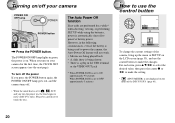
... the DISPLAY/ LCD ON/OFF button to turn off the LCD screen and use , the Battery remaining indicator displays the amount of the charge, or on , the Flash mode is normally set to (No flash). • When the flash is charging ( the Flash charge lamp blinks), the LCD screen turns off. • In shooting still images, the focus only focuses when the shutter is displayed. The factory setting of time. When the POWER SAVE function is ON • The LCD screen will stop soon. You cannot change the settings...
... the DISPLAY/ LCD ON/OFF button to turn off the LCD screen and use , the Battery remaining indicator displays the amount of the charge, or on , the Flash mode is normally set to (No flash). • When the flash is charging ( the Flash charge lamp blinks), the LCD screen turns off. • In shooting still images, the focus only focuses when the shutter is displayed. The factory setting of time. When the POWER SAVE function is ON • The LCD screen will stop soon. You cannot change the settings...
Operating Instructions
Page 20
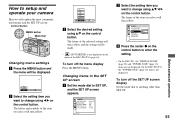
... the camera turns off. • When the mode dial is not displayed on the menu of the camera, bring up the menu or SET UP on the LCD screen (page 55), and use the control button to use the control button 0EV 0EV EV WB ISO AUTO WHITE BAL ISO To change the current settings of the DSC-P51/P31 (page 61). 20 However, in the USB terminal or the VIDEO OUT jack * When POWER SAVE is set...
... the camera turns off. • When the mode dial is not displayed on the menu of the camera, bring up the menu or SET UP on the LCD screen (page 55), and use the control button to use the control button 0EV 0EV EV WB ISO AUTO WHITE BAL ISO To change the current settings of the DSC-P51/P31 (page 61). 20 However, in the USB terminal or the VIDEO OUT jack * When POWER SAVE is set...
Operating Instructions
Page 32
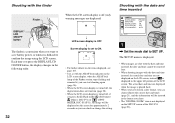
.../AF lock lamp of the Finder section stops flashing and remains lit, you can start shooting again (page 26). • When the LCD screen display is turned off, the digital zoom does not function (page 28). • When the LCD screen display is displayed in the format you chose. • The "DIGITAL ZOOM" item is not displayed on the LCD screen, instead, is turned off (only warning messages are displayed when the image is played back...
.../AF lock lamp of the Finder section stops flashing and remains lit, you can start shooting again (page 26). • When the LCD screen display is turned off, the digital zoom does not function (page 28). • When the LCD screen display is displayed in the format you chose. • The "DIGITAL ZOOM" item is not displayed on the LCD screen, instead, is turned off (only warning messages are displayed when the image is played back...
Operating Instructions
Page 44
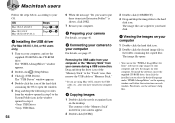
... CD-ROM drive - Communication with Mac OS 8.6 installed at the factory (not upgraded) is the [NORMAL] mode. For the following models, update your computer may be unnecessary depending on the type of USB device. • Operations are not guaranteed when using a USB hub. • Operations are two modes for Windows users only) If you complete the installation of the USB driver, step 1 is provided, you shot to your computer.
... CD-ROM drive - Communication with Mac OS 8.6 installed at the factory (not upgraded) is the [NORMAL] mode. For the following models, update your computer may be unnecessary depending on the type of USB device. • Operations are not guaranteed when using a USB hub. • Operations are two modes for Windows users only) If you complete the installation of the USB driver, step 1 is provided, you shot to your computer.
Operating Instructions
Page 48
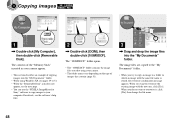
...], then change the file name. 48 When you shot using Windows XP, see pages 49 to your camera. • The folder names vary depending on the type of copying images into the "My Documents" folder. For details, see the next page. • You can use the "PIXELA ImageMixer for Sony" software to copy images to 51. • When the "Removable Disk" icon does not appear, see the software's help files. 2 , Double...
...], then change the file name. 48 When you shot using Windows XP, see pages 49 to your camera. • The folder names vary depending on the type of copying images into the "My Documents" folder. For details, see the next page. • You can use the "PIXELA ImageMixer for Sony" software to copy images to 51. • When the "Removable Disk" icon does not appear, see the software's help files. 2 , Double...
Operating Instructions
Page 54
... the opening window and follow the instructions on your camera during a USB connection. The image files are using Mac OS X, remove the USB cable, etc., after you want to put these items into Extension Folder?" For details, see page 46. 3 Connecting your camera to your computer. is shown, click [OK]. 7 Restart your computer. 2 Preparing your camera For details, see the software's help files. The "PIXELA ImageMixer" window appears. 2 Double-click (Setup Menu). 3 Click (USB Driver). The...
... the opening window and follow the instructions on your camera during a USB connection. The image files are using Mac OS X, remove the USB cable, etc., after you want to put these items into Extension Folder?" For details, see page 46. 3 Connecting your camera to your computer. is shown, click [OK]. 7 Restart your computer. 2 Preparing your camera For details, see the software's help files. The "PIXELA ImageMixer" window appears. 2 Double-click (Setup Menu). 3 Click (USB Driver). The...
Operating Instructions
Page 55
... DSC-P31, the "DIGITAL ZOOM" (page 28) and "POWER SAVE" (page 16) items are not displayed. On the DSC-P51/P31, the "POWER SAVE" (page 16) item is not displayed on the menu of the item you select will be displayed. 0EV 0EV EV WB ISO b Select the setting item you want to change using b/B on the control button. The frame of the DSC-P51/P31 (page 61). CAMERA MOVING IMAGE : DATE/TIME : DIGITAL ZOOM : RED EYE...
... DSC-P31, the "DIGITAL ZOOM" (page 28) and "POWER SAVE" (page 16) items are not displayed. On the DSC-P51/P31, the "POWER SAVE" (page 16) item is not displayed on the menu of the item you select will be displayed. 0EV 0EV EV WB ISO b Select the setting item you want to change using b/B on the control button. The frame of the DSC-P51/P31 (page 61). CAMERA MOVING IMAGE : DATE/TIME : DIGITAL ZOOM : RED EYE...
Operating Instructions
Page 82
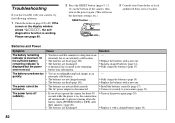
.... p Connect it with your camera, try the following solutions. 1 Check the items on the power again. (This will erase the date/time settings, etc.) RESET button Troubleshooting 3 Consult your camera (page 19). p Fully charge the batteries (page 15). The power turns off automatically to your Sony dealer or local authorized Sony service facility. Troubleshooting If you do not operate the camera for a long time in an quickly. Batteries and Power Symptom Cause Solution The battery remaining indicator is incorrect. p Replace...
.... p Connect it with your camera, try the following solutions. 1 Check the items on the power again. (This will erase the date/time settings, etc.) RESET button Troubleshooting 3 Consult your camera (page 19). p Fully charge the batteries (page 15). The power turns off automatically to your Sony dealer or local authorized Sony service facility. Troubleshooting If you do not operate the camera for a long time in an quickly. Batteries and Power Symptom Cause Solution The battery remaining indicator is incorrect. p Replace...

Operating Instructions
Page 83
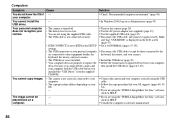
... last time the camera was turned off with the LCD screen light when the power is set to or SCN, or . p Set the macro recording mode (DSC-P71 only) when you shoot a subject that is not set to [B&W] mode. The image is • [P. p Adjust the exposure (page 56). Troubleshooting 83 on . p Choose a focus method (page 58). p Turn the POWER SAVE to [ON] (pages 55, 97). p Cancel [B&W] mode (page 60). Digital zoom does not function. Make sure to zoom. p Turn it to...
... last time the camera was turned off with the LCD screen light when the power is set to or SCN, or . p Set the macro recording mode (DSC-P71 only) when you shoot a subject that is not set to [B&W] mode. The image is • [P. p Adjust the exposure (page 56). Troubleshooting 83 on . p Choose a focus method (page 58). p Turn the POWER SAVE to [ON] (pages 55, 97). p Cancel [B&W] mode (page 60). Digital zoom does not function. Make sure to zoom. p Turn it to...
Operating Instructions
Page 86
.... Make sure that your camera. Computers Symptom Cause Solution You do not know the OS of - p Check "Recommended computer environment" (page 44). p Disconnect the USB cables except for Sony" software, click on HELP. - The image cannot be played back on your OS. - p Set it again securely. p Install the USB driver (page 45). p Follow the copy procedure that "USB MODE" is displayed on the camera (page 20). You cannot copy images. p Connect the camera...
.... Make sure that your camera. Computers Symptom Cause Solution You do not know the OS of - p Check "Recommended computer environment" (page 44). p Disconnect the USB cables except for Sony" software, click on HELP. - The image cannot be played back on your OS. - p Set it again securely. p Install the USB driver (page 45). p Follow the copy procedure that "USB MODE" is displayed on the camera (page 20). You cannot copy images. p Connect the camera...
Operating Instructions
Page 89
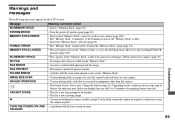
... "Memory Stick" format failed. CAN NOT DIVIDE • The battery level is protected against erasure. Troubleshooting 89 Delete unnecessary images (page 39). • No images have been recorded on the LCD screen. FILE PROTECT • The image is low or zero. FOLDER ERROR IMAGE SIZE OVER INVALID OPERATION • A folder with the lens caused an error. Move it to the recording/UNLOCK position (page 100). • The capacity of remaining battery time left. • The file...
... "Memory Stick" format failed. CAN NOT DIVIDE • The battery level is protected against erasure. Troubleshooting 89 Delete unnecessary images (page 39). • No images have been recorded on the LCD screen. FILE PROTECT • The image is low or zero. FOLDER ERROR IMAGE SIZE OVER INVALID OPERATION • A folder with the lens caused an error. Move it to the recording/UNLOCK position (page 100). • The capacity of remaining battery time left. • The file...

Operating Instructions
Page 97
... protected images (page 43). - Factory settings are indicated with x. The date and time will not be inserted in the image. DIGITAL ZOOM (DSC- Displays the menu items, warnings and messages in the dark. Assigns numbers to insert the date and time into the image (page 32). When shooting movies/Clip Motion/Multi Burst, the date and time cannot be displayed when shooting. SETUP 1 Item FORMAT Setting OK / CANCEL FILE NUMBER x SERIES RESET / LANGUAGE x ENGLISH / JPN CLOCK SET OK / CANCEL Description Formats the "Memory Stick". Displays the menu...
... protected images (page 43). - Factory settings are indicated with x. The date and time will not be inserted in the image. DIGITAL ZOOM (DSC- Displays the menu items, warnings and messages in the dark. Assigns numbers to insert the date and time into the image (page 32). When shooting movies/Clip Motion/Multi Burst, the date and time cannot be displayed when shooting. SETUP 1 Item FORMAT Setting OK / CANCEL FILE NUMBER x SERIES RESET / LANGUAGE x ENGLISH / JPN CLOCK SET OK / CANCEL Description Formats the "Memory Stick". Displays the menu...
Operating Instructions
Page 99
... date and time. Remove the plastic bag when the camera has adapted to remove fingerprints, dust, etc. Note that exceed this rechargeable button battery before using the AC power adapter or install a charged battery pack, and leave the camera for about one month it discharges gradually, and if you attempt to shoot with a dry cloth. Charging the battery Connect the camera to a wall outlet (mains) using the camera. Precautions Cleaning Cleaning the LCD screen...
... date and time. Remove the plastic bag when the camera has adapted to remove fingerprints, dust, etc. Note that exceed this rechargeable button battery before using the AC power adapter or install a charged battery pack, and leave the camera for about one month it discharges gradually, and if you attempt to shoot with a dry cloth. Charging the battery Connect the camera to a wall outlet (mains) using the camera. Precautions Cleaning Cleaning the LCD screen...
Operating Instructions
Page 106
... RED EYE REDUCTION 31 Selecting a flash mode 30 Focus AE/AF lock lamp 9 AF lock 59 Focus preset 60 Shooting (using auto adjustment mode) ..... 26 FORMAT 43 G GIF 52 I Image Copying images 48 File names 51 Image file storage destinations 51 Image quality 24 Image size 24, 25, 91 Index 36 Installation USB driver 45 ISO 92 J JPG 52 L LCD screen display DISPLAY/LCD ON/OFF 32 LCD brightness 98 M Memory Stick Formatting a "Memory Stick 43 Inserting a "Memory Stick 23 Number of shooting images 25 The number of images that can be saved/ shooting time...
... RED EYE REDUCTION 31 Selecting a flash mode 30 Focus AE/AF lock lamp 9 AF lock 59 Focus preset 60 Shooting (using auto adjustment mode) ..... 26 FORMAT 43 G GIF 52 I Image Copying images 48 File names 51 Image file storage destinations 51 Image quality 24 Image size 24, 25, 91 Index 36 Installation USB driver 45 ISO 92 J JPG 52 L LCD screen display DISPLAY/LCD ON/OFF 32 LCD brightness 98 M Memory Stick Formatting a "Memory Stick 43 Inserting a "Memory Stick 23 Number of shooting images 25 The number of images that can be saved/ shooting time...
Operating Instructions
Page 107
... Selecting a flash mode 30 Shooting close-ups (Macro 28 Shooting with the date and time inserted .... 32 Spot light-metering 61 The number of images that can be saved .... 91 The number of images that can be shot ...... 18 Using auto adjustment mode 26 Using the self-timer 29 WHITE BALANCE 57 Zoom 28 T Trimming 67 TV set 38 U USB 45, 47 Using your camera abroad 19 V Video connecting cable 38 Viewing single images 36 W Warnings and messages 89 Z Zoom Digital zoom 28 Playback zoom 66 Using the zoom feature 28...
... Selecting a flash mode 30 Shooting close-ups (Macro 28 Shooting with the date and time inserted .... 32 Spot light-metering 61 The number of images that can be saved .... 91 The number of images that can be shot ...... 18 Using auto adjustment mode 26 Using the self-timer 29 WHITE BALANCE 57 Zoom 28 T Trimming 67 TV set 38 U USB 45, 47 Using your camera abroad 19 V Video connecting cable 38 Viewing single images 36 W Warnings and messages 89 Z Zoom Digital zoom 28 Playback zoom 66 Using the zoom feature 28...


