Operating Instructions
Page 1
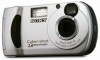
...started Shooting still images Viewing still images Deleting still images Copying still images to these numbers whenever you call upon your computer _________ Before advanced operations Advanced still image shooting Advanced still image viewing Still image editting Enjoying movies Troubleshooting Additional information Index Owner's Record The model and serial numbers are located on the bottom. Record the serial number in the space provided below. Refer to your Sony dealer regarding this manual thoroughly, and retain it for future reference. DSC-P31/P71 Serial No. Digital...
...started Shooting still images Viewing still images Deleting still images Copying still images to these numbers whenever you call upon your computer _________ Before advanced operations Advanced still image shooting Advanced still image viewing Still image editting Enjoying movies Troubleshooting Additional information Index Owner's Record The model and serial numbers are located on the bottom. Record the serial number in the space provided below. Refer to your Sony dealer regarding this manual thoroughly, and retain it for future reference. DSC-P31/P71 Serial No. Digital...
Operating Instructions
Page 3
...by returning your nearest Sony service station. NOTICE FOR THE CUSTOMERS IN THE UNITED KINGDOM A moulded plug complying with this equipment has a detachable fuse cover, be determined by turning the equipment off and on, the user is encouraged to try...use only USA/UL Certified power supply cord set, cord is connected. -Consult the dealer or an experienced radio/TV technician for a Class B digital device, pursuant to Part 15 of the FCC Rules. marked with the instructions, may cause harmful interference to radio communications. For the Customers in Germany Directive:EMC Directive...
...by returning your nearest Sony service station. NOTICE FOR THE CUSTOMERS IN THE UNITED KINGDOM A moulded plug complying with this equipment has a detachable fuse cover, be determined by turning the equipment off and on, the user is encouraged to try...use only USA/UL Certified power supply cord set, cord is connected. -Consult the dealer or an experienced radio/TV technician for a Class B digital device, pursuant to Part 15 of the FCC Rules. marked with the instructions, may cause harmful interference to radio communications. For the Customers in Germany Directive:EMC Directive...
Operating Instructions
Page 8
... batteries 14 Charging the batteries 14 Inserting the batteries 17 Using an external power source 19 Using your camera abroad 19 Turning on/off your camera 20 How to use the control button 20 Setting the date and time 21 Shooting still images Inserting and removing a "Memory Stick 23 Deciding the still image size and image quality 24 Basic still image shooting (using auto adjustment mode 26 Checking the last shot image (Quick Review 27 Using the zoom feature 28 Shooting close-ups (Macro) (DSC-P71 only 28 Using the self-timer 29 Selecting a flash mode...
... batteries 14 Charging the batteries 14 Inserting the batteries 17 Using an external power source 19 Using your camera abroad 19 Turning on/off your camera 20 How to use the control button 20 Setting the date and time 21 Shooting still images Inserting and removing a "Memory Stick 23 Deciding the still image size and image quality 24 Basic still image shooting (using auto adjustment mode 26 Checking the last shot image (Quick Review 27 Using the zoom feature 28 Shooting close-ups (Macro) (DSC-P71 only 28 Using the self-timer 29 Selecting a flash mode...
Operating Instructions
Page 9
... Advanced still image shooting Adjusting the exposure (EV adjustment) 56 Adjusting color tones (WHITE BALANCE 57 Choosing a focus method (MULTI AF/CENTER AF 58 Setting the distance to the subject (Focus preset 60 Adding special effects (P. Playback zoom 66 Recording an enlarged image - Trimming 67 Playing back successive images (SLIDE 67 Rotating still images (ROTATE 68 Still image editting Protecting images (PROTECT 69 For single images 69 For Index (9 images) screen 69 For Index (3 images) screen 70 Changing image size (RESIZE 71 Choosing images to print (PRINT...
... Advanced still image shooting Adjusting the exposure (EV adjustment) 56 Adjusting color tones (WHITE BALANCE 57 Choosing a focus method (MULTI AF/CENTER AF 58 Setting the distance to the subject (Focus preset 60 Adding special effects (P. Playback zoom 66 Recording an enlarged image - Trimming 67 Playing back successive images (SLIDE 67 Rotating still images (ROTATE 68 Still image editting Protecting images (PROTECT 69 For single images 69 For Index (9 images) screen 69 For Index (3 images) screen 70 Changing image size (RESIZE 71 Choosing images to print (PRINT...
Operating Instructions
Page 16
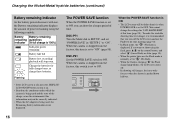
.... Flashing • If the LCD screen is off, press the DISPLAY/ LCD ON/OFF button to turn off . • In shooting still images, the focus only focuses when the shutter is set to shoot using the following symbols. When the camera is shipped from the factory, this time (page 98). You cannot change the settings for fully charged ones, or charge these batteries. To make the available shooting time even longer, it is when POWER SAVE is set "POWER SAVE" in "SETUP 2" to...
.... Flashing • If the LCD screen is off, press the DISPLAY/ LCD ON/OFF button to turn off . • In shooting still images, the focus only focuses when the shutter is set to shoot using the following symbols. When the camera is shipped from the factory, this time (page 98). You cannot change the settings for fully charged ones, or charge these batteries. To make the available shooting time even longer, it is when POWER SAVE is set "POWER SAVE" in "SETUP 2" to...
Operating Instructions
Page 32
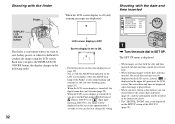
... not displayed on the SET UP screen of the DSC-P31 (page 28). The SET UP menu is displayed. • When images are displayed) r LCD screen display is OFF r Screen display is set to confirm the image using the LCD screen. Each time you press the DISPLAY/LCD ON/OFF button, the display changes in the upper left portion of the LCD screen. metering, DSC-P31), the image will be removed later. • When shooting images with the date and time inserted CAMERA MOVING IMAGE : DATE/TIME : DIGITAL ZOOM : RED EYE REDUCTION...
... not displayed on the SET UP screen of the DSC-P31 (page 28). The SET UP menu is displayed. • When images are displayed) r LCD screen display is OFF r Screen display is set to confirm the image using the LCD screen. Each time you press the DISPLAY/LCD ON/OFF button, the display changes in the upper left portion of the LCD screen. metering, DSC-P31), the image will be removed later. • When shooting images with the date and time inserted CAMERA MOVING IMAGE : DATE/TIME : DIGITAL ZOOM : RED EYE REDUCTION...

Operating Instructions
Page 39
...color system of the TV must be deleted. DELETE PROTECT PRINT OK SLIDE MENU button 2 , Press the MENU button, press b/B on the control button to be the same as that of your digital still camera. Press b/B on the control button to select an image to select "DELETE... FILE BACK/NEXT 1 , Turn the Mode dial to view the playback picture on a TV, you want to and turn on the camera. Deleting images Deleting still images Deleting still images Watching the playback picture on TV If you need a TV having a video input jack and a video connecting cable. The image has not yet been deleted...
...color system of the TV must be deleted. DELETE PROTECT PRINT OK SLIDE MENU button 2 , Press the MENU button, press b/B on the control button to be the same as that of your digital still camera. Press b/B on the control button to select an image to select "DELETE... FILE BACK/NEXT 1 , Turn the Mode dial to view the playback picture on a TV, you want to and turn on the camera. Deleting images Deleting still images Deleting still images Watching the playback picture on TV If you need a TV having a video input jack and a video connecting cable. The image has not yet been deleted...
Operating Instructions
Page 43
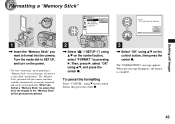
... the formatting Select "CANCEL" using V on the control button, then press the center z. 3 , Select "OK" using v/V on the power. • The term "formatting" means preparing a "Memory Stick" to format into the camera. O K CANCEL OK 1 , Insert the "Memory Stick" you format a "Memory Stick," be aware that all of the images in the "Memory Stick" will be used immediately. Deleting still images Formatting a "Memory Stick" SETUP 1 FORMAT : FILE NUMBER : /LANGUAGE : CLOCK SET : OK CANCEL OK FORMAT ALL DATA WILL BE ERASED READY...
... the formatting Select "CANCEL" using V on the control button, then press the center z. 3 , Select "OK" using v/V on the power. • The term "formatting" means preparing a "Memory Stick" to format into the camera. O K CANCEL OK 1 , Insert the "Memory Stick" you format a "Memory Stick," be aware that all of the images in the "Memory Stick" will be used immediately. Deleting still images Formatting a "Memory Stick" SETUP 1 FORMAT : FILE NUMBER : /LANGUAGE : CLOCK SET : OK CANCEL OK FORMAT ALL DATA WILL BE ERASED READY...
Operating Instructions
Page 44
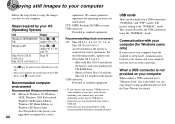
... environments mentioned above . iBook or Power Mac G4 with the Mac OS 8.6 installed at the factory USB connector: Provided as standard equipment Recommended Macintosh environment OS: Mac OS 8.5.1, 8.6, 9.0, 9.1, 9.2, or Mac OS X(v10.0/v10.1) An OS installed at the factory (not upgraded) is required for Windows users only) If you can copy images using the "NORMAL" mode. Communication with Mac OS 8.6 installed at the same time. CPU: MMX Pentium 200 MHz...
... environments mentioned above . iBook or Power Mac G4 with the Mac OS 8.6 installed at the factory USB connector: Provided as standard equipment Recommended Macintosh environment OS: Mac OS 8.5.1, 8.6, 9.0, 9.1, 9.2, or Mac OS X(v10.0/v10.1) An OS installed at the factory (not upgraded) is required for Windows users only) If you can copy images using the "NORMAL" mode. Communication with Mac OS 8.6 installed at the same time. CPU: MMX Pentium 200 MHz...

Operating Instructions
Page 48
... the "Removable Disk" icon is stored, the overwrite confirmation message appears. When you shot using your camera appear. • This section describes an example of images they contain (page 51). 3 , Drag and drop the image files into the "My Documents" folder. • When using Windows XP, see the software's help files. 2 , Double-click "DCIM," then double-click "100MSDCF." The "100MSDCF" folder opens. • The "100MSDCF" folder contains the image files you...
... the "Removable Disk" icon is stored, the overwrite confirmation message appears. When you shot using your camera appear. • This section describes an example of images they contain (page 51). 3 , Drag and drop the image files into the "My Documents" folder. • When using Windows XP, see the software's help files. 2 , Double-click "DCIM," then double-click "100MSDCF." The "100MSDCF" folder opens. • The "100MSDCF" folder contains the image files you...
Operating Instructions
Page 53
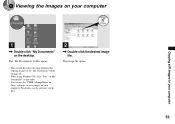
The "My Documents" folder opens. • This section describes the steps followed for copying images to the "My Documents" folder on the desktop. The image file opens. 53 For details, see the software's help files. 2 , Double-click the desired image file. 5 Viewing the images on your computer Copying still images to view images on your computer 1 , Double-click "My Documents" on page 48. • When using Windows XP, click "Start"t"My Documents" in that order. • You can use the "PIXELA ImageMixer for Sony" software to your computer.
The "My Documents" folder opens. • This section describes the steps followed for copying images to the "My Documents" folder on the desktop. The image file opens. 53 For details, see the software's help files. 2 , Double-click the desired image file. 5 Viewing the images on your computer Copying still images to view images on your computer 1 , Double-click "My Documents" on page 48. • When using Windows XP, click "Start"t"My Documents" in that order. • You can use the "PIXELA ImageMixer for Sony" software to your computer.

Operating Instructions
Page 54
... the message "Do you have turned your computer off. 4 Copying images 1 Double-click the newly recognized icon on your computer 1 Double-click the hard disk icon. 2 Double-click the desired image file in your camera during a USB connection. To install the software, insert the supplied CD-ROM drive, then click "PIXELA ImageMixer" on the opening window and follow the instructions on your computer. The image files are using Mac OS X, remove the USB cable...
... the message "Do you have turned your computer off. 4 Copying images 1 Double-click the newly recognized icon on your computer 1 Double-click the hard disk icon. 2 Double-click the desired image file in your camera during a USB connection. To install the software, insert the supplied CD-ROM drive, then click "PIXELA ImageMixer" on the opening window and follow the instructions on your computer. The image files are using Mac OS X, remove the USB cable...
Operating Instructions
Page 55
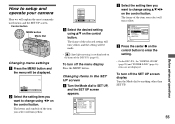
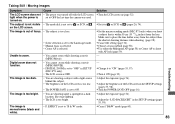
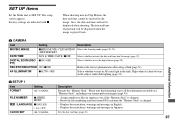
... control button. SETUP 2 LCD BRIGHTNESS : LCD BACKLIGHT : BEEP : VIDEO OUT : USB CONNECT : POWER SAVE : SHUTTER ON OFF SELECT c Press the center z on the control button. Changing items in the SET UP screen a Turn the Mode dial to enter the setting. • On the DSC-P31, the "DIGITAL ZOOM" (page 28) and "POWER SAVE" (page 16) items are not displayed. To turn off the menu display Press the MENU button. How to setup and operate your camera Here we will be made. • (Spot light...
... control button. SETUP 2 LCD BRIGHTNESS : LCD BACKLIGHT : BEEP : VIDEO OUT : USB CONNECT : POWER SAVE : SHUTTER ON OFF SELECT c Press the center z on the control button. Changing items in the SET UP screen a Turn the Mode dial to enter the setting. • On the DSC-P31, the "DIGITAL ZOOM" (page 28) and "POWER SAVE" (page 16) items are not displayed. To turn off the menu display Press the MENU button. How to setup and operate your camera Here we will be made. • (Spot light...
Operating Instructions
Page 65
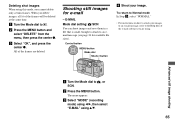
... instructions on how to attach your image. b Press the MENU button. Shooting still images for available file sizes). E-MAIL Mode dial setting: /SCN You can shoot images and save them in a file that is small enough to attach to the Help files of the frames will be deleted at the same time. Advanced still image shooting a Turn the Mode dial to . All of the frames are using. The menu appears. a Turn the Mode dial to , or SCN. Control button MENU button Mode dial Shutter button d Shoot...
... instructions on how to attach your image. b Press the MENU button. Shooting still images for available file sizes). E-MAIL Mode dial setting: /SCN You can shoot images and save them in a file that is small enough to attach to the Help files of the frames will be deleted at the same time. Advanced still image shooting a Turn the Mode dial to . All of the frames are using. The menu appears. a Turn the Mode dial to , or SCN. Control button MENU button Mode dial Shutter button d Shoot...
Operating Instructions
Page 82
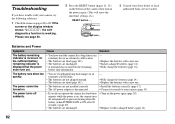
... screen or the display window shows "C:ss:ss", the selfdiagnostics function is working. The battery runs down the battery (when POWER SAVE is displayed but the power soon runs out. • You have trouble with a new one . p Replace the batteries with your camera, try the following solutions. 1 Check the items on pages 82 to prevent wearing down too • You are recording/playing back images in the remaining battery time information. - Troubleshooting...
... screen or the display window shows "C:ss:ss", the selfdiagnostics function is working. The battery runs down the battery (when POWER SAVE is displayed but the power soon runs out. • You have trouble with a new one . p Replace the batteries with your camera, try the following solutions. 1 Check the items on pages 82 to prevent wearing down too • You are recording/playing back images in the remaining battery time information. - Troubleshooting...
Operating Instructions
Page 83
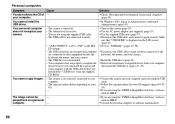
... mode dial is not set to "B & W" mode. Digital zoom does not function. The image is too dark. Make sure to place the lens farther away from the lens. p Adjust the exposure (page 56). p Adjust the brightness of focus. • The subject is too close. • Scene selection is set to OFF the last time the camera was turned off with the LCD screen light when the power is set to the Landscape mode. • Manual focus...
... mode dial is not set to "B & W" mode. Digital zoom does not function. The image is too dark. Make sure to place the lens farther away from the lens. p Adjust the exposure (page 56). p Adjust the brightness of focus. • The subject is too close. • Scene selection is set to OFF the last time the camera was turned off with the LCD screen light when the power is set to the Landscape mode. • Manual focus...
Operating Instructions
Page 86
... Sony" software, click on the camera (page 20). You cannot copy images. • The camera is displayed on a personal computer. - p Follow the copy procedure that "USB MODE" is not correctly connected to "NORMAL" (pages 55, 98). Personal computers Symptom Cause Solution You do not know the OS of - played back on the LCD screen (page 47). p Set it again securely. p Use the supplied USB cable (page 47). p Use the AC power...
... Sony" software, click on the camera (page 20). You cannot copy images. • The camera is displayed on a personal computer. - p Follow the copy procedure that "USB MODE" is not correctly connected to "NORMAL" (pages 55, 98). Personal computers Symptom Cause Solution You do not know the OS of - played back on the LCD screen (page 47). p Set it again securely. p Use the supplied USB cable (page 47). p Use the AC power...
Operating Instructions
Page 89
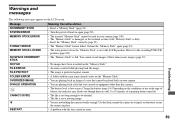
.... NO FILE FILE ERROR FILE PROTECT FOLDER ERROR OVERSIZED IMAGE INVALID OPERATION • No images have been recorded on the "Memory Stick." • An error occurred while playing back the image. • The image is protected against erasure. • A folder with the lens caused an error. FORMAT ERROR • The "Memory Stick" format failed. Delete unnecessary images (page 39). Warnings and messages The following messages appear on the conditions of use or the type of battery, the indicator may flash even though...
.... NO FILE FILE ERROR FILE PROTECT FOLDER ERROR OVERSIZED IMAGE INVALID OPERATION • No images have been recorded on the "Memory Stick." • An error occurred while playing back the image. • The image is protected against erasure. • A folder with the lens caused an error. FORMAT ERROR • The "Memory Stick" format failed. Delete unnecessary images (page 39). Warnings and messages The following messages appear on the conditions of use or the type of battery, the indicator may flash even though...
Operating Instructions
Page 97
... that formatting erases all the information recorded on the subject under dark lighting (page 31). When shooting movies/Clip Motion, the date and time cannot be inserted in the dark. Displays the menu items, warnings and messages in sequence even if the "Memory Stick" is changed . - Assigns numbers to emit an AF assist light in the image. Factory settings are indicated with x. Displays the menu items, warnings and messages in English. - DIGITAL ZOOM (DSC- Sets the date and time (page...
... that formatting erases all the information recorded on the subject under dark lighting (page 31). When shooting movies/Clip Motion, the date and time cannot be inserted in the dark. Displays the menu items, warnings and messages in sequence even if the "Memory Stick" is changed . - Assigns numbers to emit an AF assist light in the image. Factory settings are indicated with x. Displays the menu items, warnings and messages in English. - DIGITAL ZOOM (DSC- Sets the date and time (page...
Operating Instructions
Page 99
... outside the camera. The internal rechargeable button battery This camera has an internal rechargeable button battery for maintaining the date and time and other settings regardless of 0° - 40° (32°F and 104°F). Charging the battery Connect the camera to a wall outlet (mains) using the AC power adapter or install a charged battery pack, and leave the camera for use within a temperature range of whether the power is on operating temperature The camera is continually charged as...
... outside the camera. The internal rechargeable button battery This camera has an internal rechargeable button battery for maintaining the date and time and other settings regardless of 0° - 40° (32°F and 104°F). Charging the battery Connect the camera to a wall outlet (mains) using the AC power adapter or install a charged battery pack, and leave the camera for use within a temperature range of whether the power is on operating temperature The camera is continually charged as...


