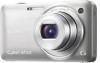
Cyber-shot® Handbook
Page 2
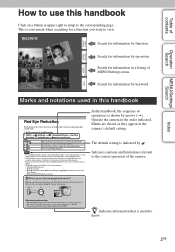
Search for information in the camera's default setting. Marks and notations used in the order indicated. This is useful to the corresponding page. z Indicates information that is convenient when searching for ... Search MENU/Settings Search MENU/Settings Search Index Index How to use this handbook, the sequence of the camera. Indicates cautions and limitations relevant to view. Search for information by arrows (t). Operate the camera in this handbook In this handbook Click on a button at upper right to jump to know. 2GB Marks...
Search for information in the camera's default setting. Marks and notations used in the order indicated. This is useful to the corresponding page. z Indicates information that is convenient when searching for ... Search MENU/Settings Search MENU/Settings Search Index Index How to use this handbook, the sequence of the camera. Indicates cautions and limitations relevant to view. Search for information by arrows (t). Operate the camera in this handbook In this handbook Click on a button at upper right to jump to know. 2GB Marks...
Cyber-shot® Handbook
Page 3
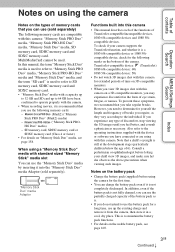
... media Adaptor (sold separately) The following marks on the bottom of the camera. TransferJet-compatible device: (TransferJet) 1080 60i-compatible device: 60i 1080 50i-compatible device: 50i • Do not watch 3D images shot with this camera on a 3D-compatible monitors, you may experience discomfort in a cool,...Duo" media, "Memory Stick PRO-HG Duo" media and "Memory Stick Duo" media, and the term "SD card" is still at the development stage (particularly children below the age of TransferJet-compatible/incompatible devices, 1080 60i-compatible devices and 1080 50icompatible devices.
... media Adaptor (sold separately) The following marks on the bottom of the camera. TransferJet-compatible device: (TransferJet) 1080 60i-compatible device: 60i 1080 50i-compatible device: 50i • Do not watch 3D images shot with this camera on a 3D-compatible monitors, you may experience discomfort in a cool,...Duo" media, "Memory Stick PRO-HG Duo" media and "Memory Stick Duo" media, and the term "SD card" is still at the development stage (particularly children below the age of TransferJet-compatible/incompatible devices, 1080 60i-compatible devices and 1080 50icompatible devices.
Cyber-shot® Handbook
Page 4
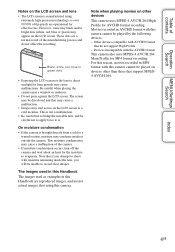
... not support High Profile - This is brought directly from a cold to a warm location, moisture may cause malfunctions. Devices incompatible with the AVCHD format This camera also uses MPEG-4 AVC/H.264 Main Profile for long periods may condense inside the lens, you attempt to it. Black, white, red, blue or green... and lens • The LCD screen is manufactured using extremely high-precision technology so over 99.99% of the pixels are not actual images shot using this camera cannot be unable to record clear images. Note that if you will be played on devices other devices This...
... not support High Profile - This is brought directly from a cold to a warm location, moisture may cause malfunctions. Devices incompatible with the AVCHD format This camera also uses MPEG-4 AVC/H.264 Main Profile for long periods may condense inside the lens, you attempt to it. Black, white, red, blue or green... and lens • The LCD screen is manufactured using extremely high-precision technology so over 99.99% of the pixels are not actual images shot using this camera cannot be unable to record clear images. Note that if you will be played on devices other devices This...

Cyber-shot® Handbook
Page 5
Table of contents Operation Search MENU/Settings Search Table of contents Notes on using the camera How to use this handbook 2 Notes on using the camera 3 Operation Search 9 MENU/Settings Search 12 Identifying parts 16 List of icons displayed on the screen 17 Using the internal memory 19 Shooting Using the ...
Table of contents Operation Search MENU/Settings Search Table of contents Notes on using the camera How to use this handbook 2 Notes on using the camera 3 Operation Search 9 MENU/Settings Search 12 Identifying parts 16 List of icons displayed on the screen 17 Using the internal memory 19 Shooting Using the ...
Cyber-shot® Handbook
Page 7
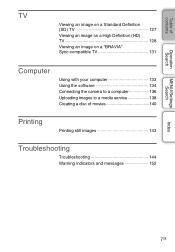
Table of contents Operation Search MENU/Settings Search TV Viewing an image on a Standard Definition (SD) TV 127 Viewing an image on a High Definition (HD) TV 128 Viewing an image on a "BRAVIA" Sync-compatible TV 131 Computer Using with your computer 133 Using the software 134 Connecting the camera to a computer 136 Uploading images to a media service 138 Creating a disc of movies 140 Printing Printing still images 143 Troubleshooting Troubleshooting 144 Warning indicators and messages 152 Index 7GB
Table of contents Operation Search MENU/Settings Search TV Viewing an image on a Standard Definition (SD) TV 127 Viewing an image on a High Definition (HD) TV 128 Viewing an image on a "BRAVIA" Sync-compatible TV 131 Computer Using with your computer 133 Using the software 134 Connecting the camera to a computer 136 Uploading images to a media service 138 Creating a disc of movies 140 Printing Printing still images 143 Troubleshooting Troubleshooting 144 Warning indicators and messages 152 Index 7GB
Cyber-shot® Handbook
Page 8
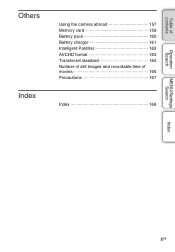
Table of contents Operation Search Others Index Using the camera abroad 157 Memory card 158 Battery pack 160 Battery charger 161 Intelligent Pantilter 162 AVCHD format 163 TransferJet standard 164 Number of still images and recordable time of movies 165 Precautions 167 Index 168 MENU/Settings Search Index 8GB
Table of contents Operation Search Others Index Using the camera abroad 157 Memory card 158 Battery pack 160 Battery charger 161 Intelligent Pantilter 162 AVCHD format 163 TransferJet standard 164 Number of still images and recordable time of movies 165 Precautions 167 Index 168 MENU/Settings Search Index 8GB
Cyber-shot® Handbook
Page 9
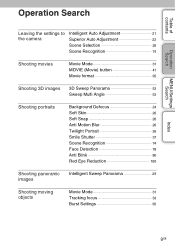
Table of contents Operation Search MENU/Settings Search Operation Search Leaving the settings to the camera Intelligent Auto Adjustment 21 Superior Auto Adjustment 22 Scene Selection 26 Scene Recognition 74 Shooting movies Movie Mode 31 MOVIE (Movie) button 41 Movie format ...
Table of contents Operation Search MENU/Settings Search Operation Search Leaving the settings to the camera Intelligent Auto Adjustment 21 Superior Auto Adjustment 22 Scene Selection 26 Scene Recognition 74 Shooting movies Movie Mode 31 MOVIE (Movie) button 41 Movie format ...
Cyber-shot® Handbook
Page 12
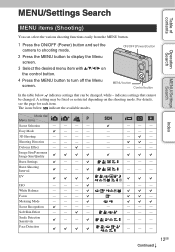
... Burst Settings - - - - - indicates settings that can select the various shooting functions easily from the MENU button. 1 Press the ON/OFF (Power) button and set the camera to shooting mode. 2 Press the MENU button to turn off the Menu screen. For details, see the page for each item. Burst Shooting Interval - - - - - Shooting...
... Burst Settings - - - - - indicates settings that can select the various shooting functions easily from the MENU button. 1 Press the ON/OFF (Power) button and set the camera to shooting mode. 2 Press the MENU button to turn off the Menu screen. For details, see the page for each item. Burst Shooting Interval - - - - - Shooting...
Cyber-shot® Handbook
Page 15
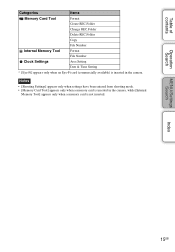
... Format File Number Clock Settings Area Setting Date & Time Setting * [Eye-Fi] appears only when an Eye-Fi card (commercially available) is inserted in the camera, while [Internal Memory Tool] appears only when a memory card is inserted in the...
... Format File Number Clock Settings Area Setting Date & Time Setting * [Eye-Fi] appears only when an Eye-Fi card (commercially available) is inserted in the camera, while [Internal Memory Tool] appears only when a memory card is inserted in the...
Cyber-shot® Handbook
Page 16
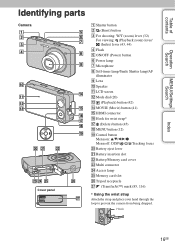
Hook Index 16GB Table of contents Operation Search MENU/Settings Search Identifying parts Camera Cover panel A Shutter button B (Burst) button C For shooting: W/T (zoom) lever (32) For viewing: (Playback zoom) lever/ (Index) lever (43, 44) D Flash E ON/OFF (Power) button F ... Z Tripod receptacle wj (TransferJet™) mark (85, 116) * Using the wrist strap Attach the strap and place your hand through the loop to prevent the camera from being dropped.
Hook Index 16GB Table of contents Operation Search MENU/Settings Search Identifying parts Camera Cover panel A Shutter button B (Burst) button C For shooting: W/T (zoom) lever (32) For viewing: (Playback zoom) lever/ (Index) lever (43, 44) D Flash E ON/OFF (Power) button F ... Z Tripod receptacle wj (TransferJet™) mark (85, 116) * Using the wrist strap Attach the strap and place your hand through the loop to prevent the camera from being dropped.
Cyber-shot® Handbook
Page 17
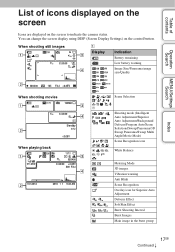
When shooting still images A Display Indication Battery remaining Low battery warning Image Size/Panorama image size/Quality Operation Search MENU/Settings Search Index When shooting movies When playing ... screen Icons are displayed on the control button. You can change the screen display using DISP (Screen Display Settings) on the screen to indicate the camera status.
When shooting still images A Display Indication Battery remaining Low battery warning Image Size/Panorama image size/Quality Operation Search MENU/Settings Search Index When shooting movies When playing ... screen Icons are displayed on the control button. You can change the screen display using DISP (Screen Display Settings) on the screen to indicate the camera status.
Cyber-shot® Handbook
Page 19
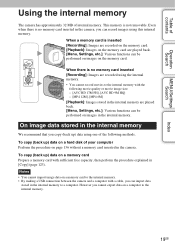
...card inserted in the internal memory to the internal memory. • By making a USB connection between the camera and a computer with sufficient free capacity, then perform the procedure explained in the camera. When there is not removable. To copy (back up ) data on a memory card Prepare a ...inserted [Recording]: Images are recorded on the memory card are played back. [Menu, Settings, etc.]: Various functions can import data stored in the camera, you copy (back up) data using one of internal memory. B [Playback]: Images on the memory card. Even when there is inserted [...
...card inserted in the internal memory to the internal memory. • By making a USB connection between the camera and a computer with sufficient free capacity, then perform the procedure explained in the camera. When there is not removable. To copy (back up ) data on a memory card Prepare a ...inserted [Recording]: Images are recorded on the memory card are played back. [Menu, Settings, etc.]: Various functions can import data stored in the camera, you copy (back up) data using one of internal memory. B [Playback]: Images on the memory card. Even when there is inserted [...
Cyber-shot® Handbook
Page 21
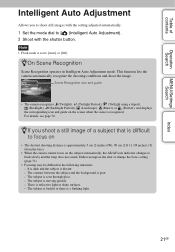
... conditions and shoot the image. zIf you to shoot still images with the setting adjusted automatically. 1 Set the mode dial to (Intelligent Auto Adjustment). 2 Shoot with the shutter button. Scene Recognition icon and guide • The camera recognizes (Twilight), (Twilight Portrait), (Twilight using a ...) (W), 90 cm (2 ft 11 3/8 inches) (T) (from the lens). • When the camera cannot focus on • The shortest shooting distance is recognized. Either recompose the shot or change the focus setting (page 71). • Focusing may be difficult in Intelligent Auto Adjustment ...
... conditions and shoot the image. zIf you to shoot still images with the setting adjusted automatically. 1 Set the mode dial to (Intelligent Auto Adjustment). 2 Shoot with the shutter button. Scene Recognition icon and guide • The camera recognizes (Twilight), (Twilight Portrait), (Twilight using a ...) (W), 90 cm (2 ft 11 3/8 inches) (T) (from the lens). • When the camera cannot focus on • The shortest shooting distance is recognized. Either recompose the shot or change the focus setting (page 71). • Focusing may be difficult in Intelligent Auto Adjustment ...
Cyber-shot® Handbook
Page 22
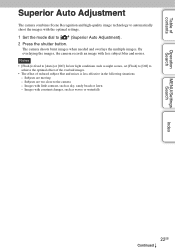
... to achieve the optimal effect of the overlaid images. • The effect of contents Operation Search Superior Auto Adjustment The camera combines Scene Recognition and high-quality image technology to automatically shoot the images with less subject blur and noises. By overlaying the images...the optimal settings. 1 Set the mode dial to (Superior Auto Adjustment). 2 Press the shutter button. Subjects are too close to the camera - The camera shoots burst images when needed and overlays the multiple images. Notes • [Flash] is less effective in the following situations: - ...
... to achieve the optimal effect of the overlaid images. • The effect of contents Operation Search Superior Auto Adjustment The camera combines Scene Recognition and high-quality image technology to automatically shoot the images with less subject blur and noises. By overlaying the images...the optimal settings. 1 Set the mode dial to (Superior Auto Adjustment). 2 Press the shutter button. Subjects are too close to the camera - The camera shoots burst images when needed and overlays the multiple images. Notes • [Flash] is less effective in the following situations: - ...
Cyber-shot® Handbook
Page 23
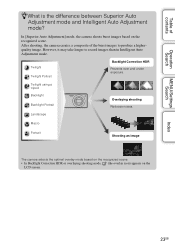
...record images than in Intelligent Auto Adjustment mode. In [Superior Auto Adjustment] mode, the camera shoots burst images based on the LCD screen. After shooting, the camera creates a composite of contents Operation Search MENU/Settings Search zWhat is the difference between Superior...and under exposure. Twilight using a tripod Backlight Backlight Portrait Overlaying shooting Reduces noises. Landscape Macro Portrait Shooting an image The camera selects the optimal overlay mode based on the recognized scene. • In Backlight Correction HDR or overlaying shooting mode, (the...
...record images than in Intelligent Auto Adjustment mode. In [Superior Auto Adjustment] mode, the camera shoots burst images based on the LCD screen. After shooting, the camera creates a composite of contents Operation Search MENU/Settings Search zWhat is the difference between Superior...and under exposure. Twilight using a tripod Backlight Backlight Portrait Overlaying shooting Reduces noises. Landscape Macro Portrait Shooting an image The camera selects the optimal overlay mode based on the recognized scene. • In Backlight Correction HDR or overlaying shooting mode, (the...
Cyber-shot® Handbook
Page 24
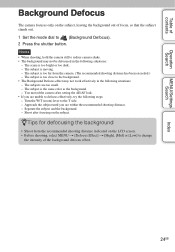
... defocus effectively, try the following situations: - Separate the subject and the background. - Notes • When shooting, hold the camera still to reduce camera shake. • The background may not work effectively in the following steps: - The subject is too far from the recommended shooting...; The Background Defocus effect may not be defocused in the following situations: - zTips for defocusing the background • Shoot from the camera. (The recommended shooting distance has been exceeded.) - Shoot after setting the AE/AF lock. • If you are within the ...
... defocus effectively, try the following situations: - Separate the subject and the background. - Notes • When shooting, hold the camera still to reduce camera shake. • The background may not work effectively in the following steps: - The subject is too far from the recommended shooting...; The Background Defocus effect may not be defocused in the following situations: - zTips for defocusing the background • Shoot from the camera. (The recommended shooting distance has been exceeded.) - Shoot after setting the AE/AF lock. • If you are within the ...
Cyber-shot® Handbook
Page 26
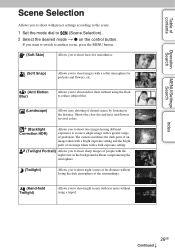
.... Table of contents Operation Search MENU/Settings Search Scene Selection Allows you to shoot with a greater range of gradation. Index 26GB Continued r The camera combines the dark parts of an image taken with a bright exposure setting and the bright parts of an image taken with a dark exposure setting.... (Twilight Portrait) Allows you to shoot indoor shots without using a tripod. If you want to switch to another scene, press the MENU button. (Soft Skin) Allows you to shoot faces for ...
.... Table of contents Operation Search MENU/Settings Search Scene Selection Allows you to shoot with a greater range of gradation. Index 26GB Continued r The camera combines the dark parts of an image taken with a bright exposure setting and the bright parts of an image taken with a dark exposure setting.... (Twilight Portrait) Allows you to shoot indoor shots without using a tripod. If you want to switch to another scene, press the MENU button. (Soft Skin) Allows you to shoot faces for ...
Cyber-shot® Handbook
Page 28
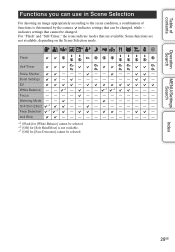
... functions are available. Metering Mode - - ---- ------ Face Detection *3 *3 - - -- - Anti Blink ------------ *1 [Flash] for [White Balance] cannot be selected. *2 [Off] for [Soft Skin Effect] is determined by the camera. indicates settings that are not available, depending on the Scene Selection mode. For "Flash" and "Self-Timer," the icons indicate modes that can use in...
... functions are available. Metering Mode - - ---- ------ Face Detection *3 *3 - - -- - Anti Blink ------------ *1 [Flash] for [White Balance] cannot be selected. *2 [Off] for [Soft Skin Effect] is determined by the camera. indicates settings that are not available, depending on the Scene Selection mode. For "Flash" and "Self-Timer," the icons indicate modes that can use in...
Cyber-shot® Handbook
Page 29
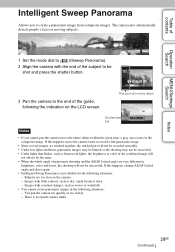
... the entire subject within the given time, a gray area occurs in the composite image. This part will not be shot and press the shutter button. 3 Pan the camera to the end of the subject to create a panoramic image from composite images. Images with little contrast, such as fluorescent lights,...same. • When the whole angle of panoramic shooting and the AE/AF locked angle are too close to (iSweep Panorama). 2 Align the camera with constant changes, such as waves or waterfalls • You cannot create panoramic images in brightness, color and focus, the shooting will not be...
... the entire subject within the given time, a gray area occurs in the composite image. This part will not be shot and press the shutter button. 3 Pan the camera to the end of the subject to create a panoramic image from composite images. Images with little contrast, such as fluorescent lights,...same. • When the whole angle of panoramic shooting and the AE/AF locked angle are too close to (iSweep Panorama). 2 Align the camera with constant changes, such as waves or waterfalls • You cannot create panoramic images in brightness, color and focus, the shooting will not be...
Cyber-shot® Handbook
Page 30
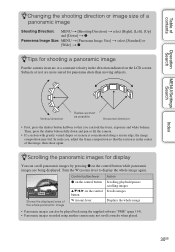
zScrolling the panoramic images for panorama shots than moving subjects. Shows the displayed area of the image, then shoot again. Then, press the shutter button fully down and pan or tilt the camera. • If a section with greatly varied shapes or scenery is in the direction indicated ... • Panoramic images can also be played back using the supplied software "PMB" (page 134). • Panoramic images recorded using another camera may fail. Turn the W (zoom) lever to display the whole image again. Operation Search MENU/Settings Search Index Vertical direction Radius as ...
zScrolling the panoramic images for panorama shots than moving subjects. Shows the displayed area of the image, then shoot again. Then, press the shutter button fully down and pan or tilt the camera. • If a section with greatly varied shapes or scenery is in the direction indicated ... • Panoramic images can also be played back using the supplied software "PMB" (page 134). • Panoramic images recorded using another camera may fail. Turn the W (zoom) lever to display the whole image again. Operation Search MENU/Settings Search Index Vertical direction Radius as ...


