
Operating Instructions (primary manual)
Page 1
... manual thoroughly, and retain it for future reference. Digital Still Camera Operating Instructions Before operating the unit, please read this product. Owner's Record The model and serial numbers are located on the bottom. DSC-U10 Serial No. Record the serial number in the space provided below. DSC-U10 © 2002 Sony Corporation 3-076-559-14(1) Getting started Shooting...
... manual thoroughly, and retain it for future reference. Digital Still Camera Operating Instructions Before operating the unit, please read this product. Owner's Record The model and serial numbers are located on the bottom. DSC-U10 Serial No. Record the serial number in the space provided below. DSC-U10 © 2002 Sony Corporation 3-076-559-14(1) Getting started Shooting...

Operating Instructions (primary manual)
Page 5
... CONDITIONS: (1) THIS DEVICE MAY NOT CAUSE HARMFUL INTERFERENCE, AND (2) THIS DEVICE MUST ACCEPT ANY INTERFERENCE RECEIVED, INCLUDING INTERFERENCE THAT MAY CAUSE UNDESIRED OPERATION. THIS CLASS B DIGITAL APPARATUS COMPLIES WITH CANADIAN ICES-003. "Memory Stick" For the Customers in Europe This product has been tested and found compliant with the limits sets... on the EMC Directive for the Customers in the U.S.A. Attention The electromagnetic fields at the specific frequencies may influence the picture and sound of this camera.
... CONDITIONS: (1) THIS DEVICE MAY NOT CAUSE HARMFUL INTERFERENCE, AND (2) THIS DEVICE MUST ACCEPT ANY INTERFERENCE RECEIVED, INCLUDING INTERFERENCE THAT MAY CAUSE UNDESIRED OPERATION. THIS CLASS B DIGITAL APPARATUS COMPLIES WITH CANADIAN ICES-003. "Memory Stick" For the Customers in Europe This product has been tested and found compliant with the limits sets... on the EMC Directive for the Customers in the U.S.A. Attention The electromagnetic fields at the specific frequencies may influence the picture and sound of this camera.

Operating Instructions (primary manual)
Page 6
... direct sunlight for if recording or playback is not possible due to a malfunction of the copyright laws. 6 Do not shake or strike the camera In addition to malfunctions and inability to make a trial recording to record images, this may render the "Memory Stick" unusable or image data ...on copyright Television programs, films, video tapes, and other equipment on the LCD screen and the LCD finder. Precaution on "Memory Stick" This camera turns off whenever you may be contrary to a disk. LCD screen, LCD finder (only models with other materials may want to make sure ...
... direct sunlight for if recording or playback is not possible due to a malfunction of the copyright laws. 6 Do not shake or strike the camera In addition to malfunctions and inability to make a trial recording to record images, this may render the "Memory Stick" unusable or image data ...on copyright Television programs, films, video tapes, and other equipment on the LCD screen and the LCD finder. Precaution on "Memory Stick" This camera turns off whenever you may be contrary to a disk. LCD screen, LCD finder (only models with other materials may want to make sure ...
Operating Instructions (primary manual)
Page 7
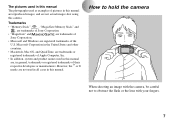
How to hold the camera When shooting an image with the camera, be careful not to obstruct the flash or the lens with your fingers. 7 Microsoft Corporation in the United States and other countries. &#...the ™ or ® marks are , in general, trademarks or registered trademarks of Sony Corporation. • Microsoft and Windows are not actual images shot using this camera. Trademarks • "Memory Stick," , "MagicGate Memory Stick," and , are trademarks of Sony Corporation. • "MagicGate" and are trademarks of their respective developers or manufacturers. The ...
How to hold the camera When shooting an image with the camera, be careful not to obstruct the flash or the lens with your fingers. 7 Microsoft Corporation in the United States and other countries. &#...the ™ or ® marks are , in general, trademarks or registered trademarks of Sony Corporation. • Microsoft and Windows are not actual images shot using this camera. Trademarks • "Memory Stick," , "MagicGate Memory Stick," and , are trademarks of Sony Corporation. • "MagicGate" and are trademarks of their respective developers or manufacturers. The ...
Operating Instructions (primary manual)
Page 8
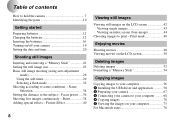
... USB driver and application .......... 58 2 Preparing your camera 67 3 Connecting your camera to your computer ........ 68 4 Copying images 70 5 Viewing the images on your camera 19 Setting the date and time 20 Shooting still images Inserting and removing a "Memory Stick 22 Setting the still image size 23 Basic still image shooting (using auto adjustment mode 26...
... USB driver and application .......... 58 2 Preparing your camera 67 3 Connecting your camera to your computer ........ 68 4 Copying images 70 5 Viewing the images on your camera 19 Setting the date and time 20 Shooting still images Inserting and removing a "Memory Stick 22 Setting the still image size 23 Basic still image shooting (using auto adjustment mode 26...

Operating Instructions (primary manual)
Page 9
Troubleshooting Troubleshooting 78 Warnings and messages 85 Self-diagnostics display 86 Additional information Menu items 87 Using your camera abroad 90 Precautions 90 On "Memory Stick 92 On Nickel Metal Hydride batteries 93 Specifications 94 LCD screen displays 96 Index 99 9
Troubleshooting Troubleshooting 78 Warnings and messages 85 Self-diagnostics display 86 Additional information Menu items 87 Using your camera abroad 90 Precautions 90 On "Memory Stick 92 On Nickel Metal Hydride batteries 93 Specifications 94 LCD screen displays 96 Index 99 9

Operating Instructions (primary manual)
Page 11
... (68) K USB jack cover 9 L RESET button (bottom surface) (78) 3 0 How to use the control button and EXEC button To change the current settings of the camera, 4 qa bring up the menu, and use the control button to make the changes. 5 qs For each item, press MENU and press v/V on the control...
... (68) K USB jack cover 9 L RESET button (bottom surface) (78) 3 0 How to use the control button and EXEC button To change the current settings of the camera, 4 qa bring up the menu, and use the control button to make the changes. 5 qs For each item, press MENU and press v/V on the control...

Operating Instructions (primary manual)
Page 12
... Nickel Metal Hydride batteries into the charger (supplied). 12 Acceptable batteries Size AAA Nickel Metal Hydride batteries (2) - Preparing batteries Use the following batteries in this camera. In addition, the battery remaining indicator is not guaranteed due to possible voltage drops or other characteristics of the batteries. NH-AAA-2DI twin-pack...
... Nickel Metal Hydride batteries into the charger (supplied). 12 Acceptable batteries Size AAA Nickel Metal Hydride batteries (2) - Preparing batteries Use the following batteries in this camera. In addition, the battery remaining indicator is not guaranteed due to possible voltage drops or other characteristics of the batteries. NH-AAA-2DI twin-pack...

Operating Instructions (primary manual)
Page 13
If some trouble occurs while using the power cord (mains lead). If the positive and negative terminals come into contact with your camera before using them. • We recommend charging the batteries in an environment where the temperature is outside that the battery charger is completed. To the ...
If some trouble occurs while using the power cord (mains lead). If the positive and negative terminals come into contact with your camera before using them. • We recommend charging the batteries in an environment where the temperature is outside that the battery charger is completed. To the ...

Operating Instructions (primary manual)
Page 14
Occasionally clean the poles of the batteries and the terminals of the charger by wiping them with your camera. It is recommended that have been split in the charger supplied with a dry cloth. • At the time of purchase, or when the Nickel Metal ... the batteries are charged, use them . • If you try to be observed when charging the batteries • Do not charge any other batteries except Sony Nickel Metal Hydride batteries in any other type of battery (e.g., manganese batteries, alkaline dry cells, or one-time lithium batteries) than expected. Precautions to charge...
Occasionally clean the poles of the batteries and the terminals of the charger by wiping them with your camera. It is recommended that have been split in the charger supplied with a dry cloth. • At the time of purchase, or when the Nickel Metal ... the batteries are charged, use them . • If you try to be observed when charging the batteries • Do not charge any other batteries except Sony Nickel Metal Hydride batteries in any other type of battery (e.g., manganese batteries, alkaline dry cells, or one-time lithium batteries) than expected. Precautions to charge...

Operating Instructions (primary manual)
Page 15
...be correctly indicated. • The battery remaining indicator is not displayed in USB connecting. 15 Getting started If you remove the batteries while charging is still in progress and then re-insert the batteries, the charging process will start over from the beginning. • If you use , the battery ... is 25°C (77°F). • It takes about 13 hours to turn it on. • Based on the conditions under which the camera is being used and the state of the charge, or on the control button to completely charge the batteries. Charging time Nickel Metal Hydride battery...
...be correctly indicated. • The battery remaining indicator is not displayed in USB connecting. 15 Getting started If you remove the batteries while charging is still in progress and then re-insert the batteries, the charging process will start over from the beginning. • If you use , the battery ... is 25°C (77°F). • It takes about 13 hours to turn it on. • Based on the conditions under which the camera is being used and the state of the charge, or on the control button to completely charge the batteries. Charging time Nickel Metal Hydride battery...

Operating Instructions (primary manual)
Page 17
To remove the batteries Hold the camera with a fully charged batteries at a temperature of Super eXtended Graphics Array; The numbers of images that can be less than indicated depending on and off ... be recorded/viewed with the battery/"Memory Stick" cover facing upward, open the cover, and remove the batteries. • Be careful not to [ON] - Shooting still images Under the average conditions*1) NH-AAA-DI (2) (supplied) Image size No. indicates an image size of use. Close the battery/"Memory Stick" cover while...
To remove the batteries Hold the camera with a fully charged batteries at a temperature of Super eXtended Graphics Array; The numbers of images that can be less than indicated depending on and off ... be recorded/viewed with the battery/"Memory Stick" cover facing upward, open the cover, and remove the batteries. • Be careful not to [ON] - Shooting still images Under the average conditions*1) NH-AAA-DI (2) (supplied) Image size No. indicates an image size of use. Close the battery/"Memory Stick" cover while...

Operating Instructions (primary manual)
Page 18
... Approx. 1800 Approx. 70 *2) Shooting in the following situations: - The flash is set to [ON] - The camera has been turned on and off many times - [LCD LIGHT] is used - of 640×480 Viewing still images*3) Image size NH-AAA-DI (2) (supplied) No. The surrounding temperature is 15 seconds The remaining indicator...
... Approx. 1800 Approx. 70 *2) Shooting in the following situations: - The flash is set to [ON] - The camera has been turned on and off many times - [LCD LIGHT] is used - of 640×480 Viewing still images*3) Image size NH-AAA-DI (2) (supplied) No. The surrounding temperature is 15 seconds The remaining indicator...

Operating Instructions (primary manual)
Page 19
... cover in the direction of the arrow or press the POWER button again. The POWER lamp (green) lights up. When you do not operate the camera for the first time, the DATE NOTATION screen appears on the LCD screen (page 20). If this happens, close the cover and then open the... is plugged into the USB jack. The auto power-off function also will not operate when a connector is automatically on. Turning on/off your camera POWER POWER lamp POWER button Auto power-off function If you turn on your camera for about 3 minutes during shooting or viewing or when performing setup, the...
... cover in the direction of the arrow or press the POWER button again. The POWER lamp (green) lights up. When you do not operate the camera for the first time, the DATE NOTATION screen appears on the LCD screen (page 20). If this happens, close the cover and then open the... is plugged into the USB jack. The auto power-off function also will not operate when a connector is automatically on. Turning on/off your camera POWER POWER lamp POWER button Auto power-off function If you turn on your camera for about 3 minutes during shooting or viewing or when performing setup, the...

Operating Instructions (primary manual)
Page 25
You can be saved in postcard size 640×480 Attaching to shoot. Images viewed on the LCD screen of the camera all appear the same size. • The actual number of images may differ depending on a personal computer. Image size Usage 1280×960 Printing in a "... images on the shooting conditions. • The image size value (e.g., 1280×960) indicates the number of images you can record in a "Memory Stick." Shooting still images Image size You can choose the image size (number of pixels) according to the kind of images you want to e-mail Number of images...
You can be saved in postcard size 640×480 Attaching to shoot. Images viewed on the LCD screen of the camera all appear the same size. • The actual number of images may differ depending on a personal computer. Image size Usage 1280×960 Printing in a "... images on the shooting conditions. • The image size value (e.g., 1280×960) indicates the number of images you can record in a "Memory Stick." Shooting still images Image size You can choose the image size (number of pixels) according to the kind of images you want to e-mail Number of images...

Operating Instructions (primary manual)
Page 26
... with a soft cloth if it is dirty (page 90). 2 , Hold the camera steadily with your hand or other intense light, undesired light (ghosting) may enter the screen. Basic still image shooting (using auto adjustment mode) STILL 1 , Set the mode switch to STILL, and slide the lens cover to the center of the LCD screen... or flash with both hands and position the subject in JPEG format. • The exposure and focus are adjusted to turn on the power. • Still images are recorded in the center of the LCD screen. 26
... with a soft cloth if it is dirty (page 90). 2 , Hold the camera steadily with your hand or other intense light, undesired light (ghosting) may enter the screen. Basic still image shooting (using auto adjustment mode) STILL 1 , Set the mode switch to STILL, and slide the lens cover to the center of the LCD screen... or flash with both hands and position the subject in JPEG format. • The exposure and focus are adjusted to turn on the power. • Still images are recorded in the center of the LCD screen. 26

Operating Instructions (primary manual)
Page 27
When "RECORDING" disappears, you can shoot the next image. • When operating the camera using batteries, if you release the shutter button, the recording will be canceled. • The minimum focal distance to the subject is not yet recorded. "... hold the shutter button halfway down. The beep sounds. Shooting still images 1280 23 1280 RECORDING Flashes green t Lights up , the camera is ready for shooting. • If you do not operate the camera for about 3 minutes during recording or playback, the camera turns off automatically to prevent wearing down the batteries (page 19...
When "RECORDING" disappears, you can shoot the next image. • When operating the camera using batteries, if you release the shutter button, the recording will be canceled. • The minimum focal distance to the subject is not yet recorded. "... hold the shutter button halfway down. The beep sounds. Shooting still images 1280 23 1280 RECORDING Flashes green t Lights up , the camera is ready for shooting. • If you do not operate the camera for about 3 minutes during recording or playback, the camera turns off automatically to prevent wearing down the batteries (page 19...

Operating Instructions (primary manual)
Page 28
...the control button to turn on and off. This is useful for extending the battery life. • This camera is turned off, as long as a mirror or a luminous body. • A flashing subject. When ...Auto Focus function can use the Focus Preset function (page 36). • The subject is distant from the camera and dark. • The contrast between the subject and its background is poor. • The subject is ... cases, release the shutter button, then recompose the shot and focus again. LCD light You can still not bring the subject into focus, use [LCD LIGHT] under the following conditions...
...the control button to turn on and off. This is useful for extending the battery life. • This camera is turned off, as long as a mirror or a luminous body. • A flashing subject. When ...Auto Focus function can use the Focus Preset function (page 36). • The subject is distant from the camera and dark. • The contrast between the subject and its background is poor. • The subject is ... cases, release the shutter button, then recompose the shot and focus again. LCD light You can still not bring the subject into focus, use [LCD LIGHT] under the following conditions...

Operating Instructions (primary manual)
Page 31
The image will be correctly set. 31 To cancel the self-timer in the middle of the camera, the focus and the exposure may not be shot after approximately 10 seconds. 1280 23 1280 23 Shooting still images 4 , Center the subject in front of the operation Close the lens cover and turn off the power. • If you press the shutter button while standing in the LCD screen, and press and hold the shutter button halfway down. 5 Self-timer lamp , Press the shutter button fully down. The self-timer lamp (page 10) flashes in red and the beep sounds.
The image will be correctly set. 31 To cancel the self-timer in the middle of the camera, the focus and the exposure may not be shot after approximately 10 seconds. 1280 23 1280 23 Shooting still images 4 , Center the subject in front of the operation Close the lens cover and turn off the power. • If you press the shutter button while standing in the LCD screen, and press and hold the shutter button halfway down. 5 Self-timer lamp , Press the shutter button fully down. The self-timer lamp (page 10) flashes in red and the beep sounds.

Operating Instructions (primary manual)
Page 32
r (No flash): The flash does not strobe. 32 Selecting a flash mode 1280 23 , Set the mode switch to STILL, and press v ( ) on the lighting conditions, the camera will use the flash accordingly (factory setting). Each time you press v ( ), the indicator changes as follows: No indicator (Auto): Based on the control button repeatedly ...
r (No flash): The flash does not strobe. 32 Selecting a flash mode 1280 23 , Set the mode switch to STILL, and press v ( ) on the lighting conditions, the camera will use the flash accordingly (factory setting). Each time you press v ( ), the indicator changes as follows: No indicator (Auto): Based on the control button repeatedly ...


