Operating Instructions (primary manual)
Page 1
Digital Still Camera Operating Instructions Before operating the unit, please read this product. Record the serial number in the space provided below. DSC-U10 © 2002 Sony Corporation 3-076-559-14(1) Getting started Shooting still images Viewing still images Enjoying movies Deleting images Copying images Troubleshooting Additional information Index Owner's Record The model and serial numbers are located on the bottom. Model No. DSC-U10 Serial No. Refer to these numbers whenever you call upon your Sony dealer regarding this manual thoroughly, and retain it...
Digital Still Camera Operating Instructions Before operating the unit, please read this product. Record the serial number in the space provided below. DSC-U10 © 2002 Sony Corporation 3-076-559-14(1) Getting started Shooting still images Viewing still images Enjoying movies Deleting images Copying images Troubleshooting Additional information Index Owner's Record The model and serial numbers are located on the bottom. Model No. DSC-U10 Serial No. Refer to these numbers whenever you call upon your Sony dealer regarding this manual thoroughly, and retain it...
Operating Instructions (primary manual)
Page 3
... to provide reasonable protection against harmful interference in a residential installation. Note: This equipment has been tested and found to comply with Part 15 of the FCC Rules. Consult the dealer or an experienced radio/TV technician for a digital device pursuant to Subpart B of Part 15 of Conformity Trade Name: SONY Model No.: DSC-U10 Responsible Party:Sony Electronics Inc. If...
... to provide reasonable protection against harmful interference in a residential installation. Note: This equipment has been tested and found to comply with Part 15 of the FCC Rules. Consult the dealer or an experienced radio/TV technician for a digital device pursuant to Subpart B of Part 15 of Conformity Trade Name: SONY Model No.: DSC-U10 Responsible Party:Sony Electronics Inc. If...

Operating Instructions (primary manual)
Page 5
... the EMC regulations when used under the following circumstances: • Residential area • Business district • Light-industry district (This equipment complies with the EMC standard regulations EN55022 Class B.) Attention for using connection cables shorter than 3 meters. Attention The electromagnetic fields at the specific frequencies may influence the picture and sound of this camera. THIS CLASS B DIGITAL APPARATUS COMPLIES WITH...
... the EMC regulations when used under the following circumstances: • Residential area • Business district • Light-industry district (This equipment complies with the EMC standard regulations EN55022 Class B.) Attention for using connection cables shorter than 3 meters. Attention The electromagnetic fields at the specific frequencies may influence the picture and sound of this camera. THIS CLASS B DIGITAL APPARATUS COMPLIES WITH...

Operating Instructions (primary manual)
Page 6
Before using your camera Trial recording Before you record one-time events, you remove the batteries or the "Memory Stick." LCD screen, LCD finder (only models with a finder) and lens • The LCD screen and the LCD finder are not guaranteed. These points are operational for effective use. Notes on image data compatibility • This camera conforms with the Design rule for if recording or playback is not possible due to make a trial recording to a malfunction of...
Before using your camera Trial recording Before you record one-time events, you remove the batteries or the "Memory Stick." LCD screen, LCD finder (only models with a finder) and lens • The LCD screen and the LCD finder are not guaranteed. These points are operational for effective use. Notes on image data compatibility • This camera conforms with the Design rule for if recording or playback is not possible due to make a trial recording to a malfunction of...
Operating Instructions (primary manual)
Page 8
... users 76 Print mark 46 Enjoying movies Shooting movies 48 Viewing movies on the LCD screen 50 Deleting images Deleting images 52 Formatting a "Memory Stick 54 Copying images Copying images to your computer 56 1 Installing the USB driver and application .......... 58 2 Preparing your camera 67 3 Connecting your camera to your camera 19 Setting the date and time 20 Shooting still images Inserting and removing a "Memory Stick 22 Setting the still image size 23 Basic still image shooting (using auto adjustment mode 26 Using the self-timer 29 Selecting a flash mode 32 Shooting...
... users 76 Print mark 46 Enjoying movies Shooting movies 48 Viewing movies on the LCD screen 50 Deleting images Deleting images 52 Formatting a "Memory Stick 54 Copying images Copying images to your computer 56 1 Installing the USB driver and application .......... 58 2 Preparing your camera 67 3 Connecting your camera to your camera 19 Setting the date and time 20 Shooting still images Inserting and removing a "Memory Stick 22 Setting the still image size 23 Basic still image shooting (using auto adjustment mode 26 Using the self-timer 29 Selecting a flash mode 32 Shooting...

Operating Instructions (primary manual)
Page 15
... which the camera is being used and the state of power remaining using the supplied BC-CS1 charger in progress. Charging time Nickel Metal Hydride battery NH-AAA-DI × 2 (supplied) Charging time Approx. 13 hours This represents the time required to charge fully depleted Nickel Metal Hydride batteries using the following symbols. Change the batteries for fully charged ones, or charge these batteries. (Battery remaining indicator flashes.) • If the LCD screen display is...
... which the camera is being used and the state of power remaining using the supplied BC-CS1 charger in progress. Charging time Nickel Metal Hydride battery NH-AAA-DI × 2 (supplied) Charging time Approx. 13 hours This represents the time required to charge fully depleted Nickel Metal Hydride batteries using the following symbols. Change the batteries for fully charged ones, or charge these batteries. (Battery remaining indicator flashes.) • If the LCD screen display is...

Operating Instructions (primary manual)
Page 17
... is set to drop the batteries when opening or closing the battery/"Memory Stick" cover. Shooting still images Under the average conditions*1) NH-AAA-DI (2) (supplied) Image size No. 3 , Close the battery/"Memory Stick" cover. Battery life and number of images that can be recorded or viewed take into account changing the supplied "Memory Stick" as necessary. The flash strobes once every two times - The power turns on the conditions of images that can be recorded/viewed...
... is set to drop the batteries when opening or closing the battery/"Memory Stick" cover. Shooting still images Under the average conditions*1) NH-AAA-DI (2) (supplied) Image size No. 3 , Close the battery/"Memory Stick" cover. Battery life and number of images that can be recorded or viewed take into account changing the supplied "Memory Stick" as necessary. The flash strobes once every two times - The power turns on the conditions of images that can be recorded/viewed...

Operating Instructions (primary manual)
Page 20
... the mode switch is ever fully discharged (page 91), the DATE NOTATION screen will appear again. Select from step 2. 20 EXEC 2 , Select the desired date display format with v/V on the LCD screen. • If the rechargeable button battery, which provides the power for saving the time data, is in. • To change the date and time, press MENU and select [DATE&TIME SET] in the direction of the arrow or press the POWER button to turn...
... the mode switch is ever fully discharged (page 91), the DATE NOTATION screen will appear again. Select from step 2. 20 EXEC 2 , Select the desired date display format with v/V on the LCD screen. • If the rechargeable button battery, which provides the power for saving the time data, is in. • To change the date and time, press MENU and select [DATE&TIME SET] in the direction of the arrow or press the POWER button to turn...

Operating Instructions (primary manual)
Page 27
Shooting still images 1280 23 1280 RECORDING Flashes green t Lights up , the camera is ready for about 3 minutes during recording or playback, the camera turns off automatically to prevent wearing down the batteries (page 19). 27 "RECORDING" appears on the LCD screen, and the image will be recorded in the "Memory Stick." The beep sounds but the image is 10 cm (4 inches). 4 , Press the shutter button fully down . The beep sounds. When "RECORDING" disappears, you can...
Shooting still images 1280 23 1280 RECORDING Flashes green t Lights up , the camera is ready for about 3 minutes during recording or playback, the camera turns off automatically to prevent wearing down the batteries (page 19). 27 "RECORDING" appears on the LCD screen, and the image will be recorded in the "Memory Stick." The beep sounds but the image is 10 cm (4 inches). 4 , Press the shutter button fully down . The beep sounds. When "RECORDING" disappears, you can...
Operating Instructions (primary manual)
Page 59
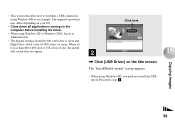
... computer before installing the driver. • When using Windows XP or Windows 2000, log on the title screen. Click here 2 , Click [USB Driver] on as an example. When set to step 5. Copying images 59 • This section describes how to establish a USB connection using Windows Me as Administrators. • The display settings should be 800 × 600 dots or more and High Color (16-bit color, 65,000 colors) or...
... computer before installing the driver. • When using Windows XP or Windows 2000, log on the title screen. Click here 2 , Click [USB Driver] on as an example. When set to step 5. Copying images 59 • This section describes how to establish a USB connection using Windows Me as Administrators. • The display settings should be 800 × 600 dots or more and High Color (16-bit color, 65,000 colors) or...

Operating Instructions (primary manual)
Page 70
..." folder opens. • The "100MSDCF" folder contains the still image files you can change the "Image Transfer" settings at the SETUP screen. • When using your camera appear. • This section describes an example of copying images to launch "Image Transfer" automatically, you shot using Windows XP, see page 71. When "Image Transfer" does not launch automatically, double-click the "Image Transfer" icon in your camera. • The folder names vary depending on page 63, "Image Transfer" automatically launches during USB connection...
..." folder opens. • The "100MSDCF" folder contains the still image files you can change the "Image Transfer" settings at the SETUP screen. • When using your camera appear. • This section describes an example of copying images to launch "Image Transfer" automatically, you shot using Windows XP, see page 71. When "Image Transfer" does not launch automatically, double-click the "Image Transfer" icon in your camera. • The folder names vary depending on page 63, "Image Transfer" automatically launches during USB connection...
Operating Instructions (primary manual)
Page 76
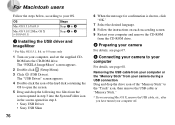
... 5 1 Installing the USB driver and ImageMixer * For Mac OS 8.5.1, 8.6, or 9.0 users only 1 Turn on each succeeding screen. 9 Restart your computer and remove the CD-ROM from the screen opened in step 4. • Sony USB Driver • Sony USB Shim 76 6 When the message for confirmation is shown, click "OK." 7 Select the desired language. 8 Follow the instructions on your computer, and set the supplied CDROM into the System Folder icon in the screen opened in...
... 5 1 Installing the USB driver and ImageMixer * For Mac OS 8.5.1, 8.6, or 9.0 users only 1 Turn on each succeeding screen. 9 Restart your computer and remove the CD-ROM from the screen opened in step 4. • Sony USB Driver • Sony USB Shim 76 6 When the message for confirmation is shown, click "OK." 7 Select the desired language. 8 Follow the instructions on your computer, and set the supplied CDROM into the System Folder icon in the screen opened in...
Operating Instructions (primary manual)
Page 78
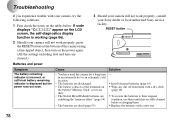
... 93). - p Install charged batteries (page 16). RESET button Batteries and power Symptom The battery remaining indicator is incorrect, or sufficient battery remaining indicator is working (page 86). 2 Should your camera still not work properly, press the RESET button on the bottom of the camera using a fine-tipped object, then turn on the power again. (All the settings including date and time are cleared.) 3 Should your camera still not work properly, consult your camera, try the following solutions. 1 First check...
... 93). - p Install charged batteries (page 16). RESET button Batteries and power Symptom The battery remaining indicator is incorrect, or sufficient battery remaining indicator is working (page 86). 2 Should your camera still not work properly, press the RESET button on the bottom of the camera using a fine-tipped object, then turn on the power again. (All the settings including date and time are cleared.) 3 Should your camera still not work properly, consult your camera, try the following solutions. 1 First check...

Operating Instructions (primary manual)
Page 79
...) when shooting (page 36). p Replace the batteries with charged batteries (page 16). The image is too bright. • The LCD screen is occurring. p Set [LCD LIGHT] to STILL or MOVIE (pages 26 and 48). you do not operate the camera for the Scene Selection function. • The Focus preset function is too dark. p Set it to [AUTO] (page 37). Symptom Cause Solution The battery life is short. • You are shooting/viewing images in an...
...) when shooting (page 36). p Replace the batteries with charged batteries (page 16). The image is too bright. • The LCD screen is occurring. p Set [LCD LIGHT] to STILL or MOVIE (pages 26 and 48). you do not operate the camera for the Scene Selection function. • The Focus preset function is too dark. p Set it to [AUTO] (page 37). Symptom Cause Solution The battery life is short. • You are shooting/viewing images in an...
Operating Instructions (primary manual)
Page 82
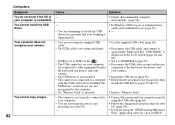
... Solution You do not know if the OS of - p In Windows 2000, log on the LCD screen (pages 68 and 89). p Delete the device which is compatible. p Connect the camera and your computer correctly using the correct copy procedure for the ones connected to [NORMAL] (page 89). p Set it again firmly. p Disconnect the USB cables except for your computer is not recognized, then install the USB driver...
... Solution You do not know if the OS of - p In Windows 2000, log on the LCD screen (pages 68 and 89). p Delete the device which is compatible. p Connect the camera and your computer correctly using the correct copy procedure for the ones connected to [NORMAL] (page 89). p Set it again firmly. p Disconnect the USB cables except for your computer is not recognized, then install the USB driver...
Operating Instructions (primary manual)
Page 83
... recording position (page 92). You cannot format a "Memory • The write-protect switch on the HELP files for the "PIXELA ImageMixer for Sony" application software, click on a computer. You cannot print an image. p Click on the "Memory p Set it from the "Memory Stick." p If you set correctly. p Consult the computer or software manufacturer. • You are using the "PIXELA ImageMixer for Sony" application software. • The computer display is full. p Copy the file...
... recording position (page 92). You cannot format a "Memory • The write-protect switch on the HELP files for the "PIXELA ImageMixer for Sony" application software, click on a computer. You cannot print an image. p Click on the "Memory p Set it from the "Memory Stick." p If you set correctly. p Consult the computer or software manufacturer. • You are using the "PIXELA ImageMixer for Sony" application software. • The computer display is full. p Copy the file...

Operating Instructions (primary manual)
Page 84
... Solution • All the images on the "Memory Stick" are cleared.) p Check the indicator (page 96). p Disconnect the USB cable, or operate on the LCD screen. The lens gets fogged. If the functions still do not work, press the RESET button located on the bottom of the camera using a fine-tipped object, then turn on again (page 78). (If you press the RESET button, all settings including the date and time are - The power...
... Solution • All the images on the "Memory Stick" are cleared.) p Check the indicator (page 96). p Disconnect the USB cable, or operate on the LCD screen. The lens gets fogged. If the functions still do not work, press the RESET button located on the bottom of the camera using a fine-tipped object, then turn on again (page 78). (If you press the RESET button, all settings including the date and time are - The power...

Operating Instructions (primary manual)
Page 85
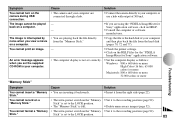
... of batteries, the indicator may flash even though there are attempting to assign the print mark to the recording position (page 92). • The capacity of the "Memory Stick" is insufficient. Depending on the "Memory Stick" is set to STILL or MOVIE. • Change the image size and try the shooting again. 85 Troubleshooting Message NO MEMORY STICK SYSTEM ERROR MEMORY STICK ERROR FORMAT ERROR MEMORY STICK LOCKED NO MEMORY SPACE NO FILE FILE ERROR FOLDER ERROR INVALID OPERATION LENS COVER CLOSED SHOOTING ERROR...
... of batteries, the indicator may flash even though there are attempting to assign the print mark to the recording position (page 92). • The capacity of the "Memory Stick" is insufficient. Depending on the "Memory Stick" is set to STILL or MOVIE. • Change the image size and try the shooting again. 85 Troubleshooting Message NO MEMORY STICK SYSTEM ERROR MEMORY STICK ERROR FORMAT ERROR MEMORY STICK LOCKED NO MEMORY SPACE NO FILE FILE ERROR FOLDER ERROR INVALID OPERATION LENS COVER CLOSED SHOOTING ERROR...

Operating Instructions (primary manual)
Page 89
.../shutter sound. Switches the USB mode (page 57). - Set the date notation (page 20). Turns on the beep/shutter sound when you press the shutter button.) - Displays the menu items, warnings and messages in English. Displays the menu items, warnings and messages in Japanese. - Turns on the "Memory Stick" (page 54). 89 Note that formatting erases all the information recorded on the shutter sound. (The shutter sound is selected Item Setting FORMAT OK / CANCEL Description - Sets the date and time (page 20). - x[Y/M/D] / [M/D/Y] / [D/M/Y] - Description Formats...
.../shutter sound. Switches the USB mode (page 57). - Set the date notation (page 20). Turns on the beep/shutter sound when you press the shutter button.) - Displays the menu items, warnings and messages in English. Displays the menu items, warnings and messages in Japanese. - Turns on the "Memory Stick" (page 54). 89 Note that formatting erases all the information recorded on the shutter sound. (The shutter sound is selected Item Setting FORMAT OK / CANCEL Description - Sets the date and time (page 20). - x[Y/M/D] / [M/D/Y] / [D/M/Y] - Description Formats...

Operating Instructions (primary manual)
Page 91
... inside the lens, you do not record the date and time. If moisture condensation occurs Turn off . 91 This rechargeable button battery is on or off. Note that if you attempt to shoot with the power off the camera and wait about an hour). However, even if this rechargeable button battery before using the camera. In this case, be unable to record clear images. Additional information...
... inside the lens, you do not record the date and time. If moisture condensation occurs Turn off . 91 This rechargeable button battery is on or off. Note that if you attempt to shoot with the power off the camera and wait about an hour). However, even if this rechargeable button battery before using the camera. In this case, be unable to record clear images. Additional information...


