Instruction Manual
Page 4
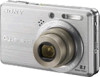
... against harmful interference in your country, use an attachment plug adapter of the proper configuration for the power outlet. For more of the following measures: - Battery charger This power unit is intended to be correctly orientated in the U.S.A. For Customers in a vertical or floor mount...- Consult the dealer or an experienced radio/TV technician for help preserve our environment by turning the equipment off and on a circuit different from that may cause undesired operation. This Class B digital apparatus complies with Part 15 of the FCC Rules. For connection to a supply not ...
... against harmful interference in your country, use an attachment plug adapter of the proper configuration for the power outlet. For more of the following measures: - Battery charger This power unit is intended to be correctly orientated in the U.S.A. For Customers in a vertical or floor mount...- Consult the dealer or an experienced radio/TV technician for help preserve our environment by turning the equipment off and on a circuit different from that may cause undesired operation. This Class B digital apparatus complies with Part 15 of the FCC Rules. For connection to a supply not ...
Instruction Manual
Page 7
...24 Viewing "Cyber-shot Handbook 25 Battery life and memory capacity 26 Battery life and number of images you can record/view 26 Number of still images and recording time of contents IMPORTANT SAFETY INSTRUCTIONS -SAVE THESE INSTRUCTIONS 2 Read this first 4 Notes on using your camera 8 Getting ... Turning the camera on/setting the clock 13 Shooting images easily 14 Mode dial/Zoom/Flash/Macro/Self-timer/Display/Image size 15 Viewing/deleting images 17 Indicators on the screen 19 Changing the settings - Table of movies 27 Troubleshooting 29 Battery pack and power 29 Shooting still ...
...24 Viewing "Cyber-shot Handbook 25 Battery life and memory capacity 26 Battery life and number of images you can record/view 26 Number of still images and recording time of contents IMPORTANT SAFETY INSTRUCTIONS -SAVE THESE INSTRUCTIONS 2 Read this first 4 Notes on using your camera 8 Getting ... Turning the camera on/setting the clock 13 Shooting images easily 14 Mode dial/Zoom/Flash/Macro/Self-timer/Display/Image size 15 Viewing/deleting images 17 Indicators on the screen 19 Changing the settings - Table of movies 27 Troubleshooting 29 Battery pack and power 29 Shooting still ...
Instruction Manual
Page 10
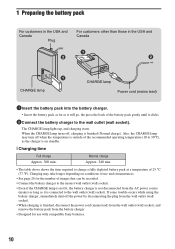
... the CHARGE lamp may take longer depending on standby. [ Charging time Full charge Approx. 300 min. When the CHARGE lamp turns off, charging is finished, disconnect the power cord (mains lead) from the wall outlet (wall socket), and remove the battery pack from the battery charger. • ... of use with compatible Sony batteries. 10 If some trouble occurs while using the battery charger, immediately shut off when the temperature is outside of 25 °C (77 °F). The CHARGE lamp lights up, and charging starts. Charging may turn off the power by disconnecting the plug ...
... the CHARGE lamp may take longer depending on standby. [ Charging time Full charge Approx. 300 min. When the CHARGE lamp turns off, charging is finished, disconnect the power cord (mains lead) from the wall outlet (wall socket), and remove the battery pack from the battery charger. • ... of use with compatible Sony batteries. 10 If some trouble occurs while using the battery charger, immediately shut off when the temperature is outside of 25 °C (77 °F). The CHARGE lamp lights up, and charging starts. Charging may turn off the power by disconnecting the plug ...
Instruction Manual
Page 11
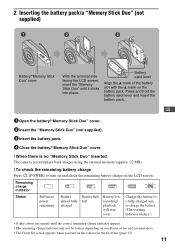
.../"Memory Stick Duo" cover. [ When there is no "Memory Stick Duo" inserted The camera records/plays back images using the internal memory (approx. 22 MB). [ To check the remaining battery charge Press (POWER) to a fully charged one, or charge the battery. (The warning indicator flashes.) ...; It takes about one minute until it clicks into place. Remaining charge indicator Status Sufficient power remaining Battery almost fully charged Battery half full Battery low, recording/ playback will stop soon. Change the battery to turn on the camera for the first time (page 13). 11
.../"Memory Stick Duo" cover. [ When there is no "Memory Stick Duo" inserted The camera records/plays back images using the internal memory (approx. 22 MB). [ To check the remaining battery charge Press (POWER) to a fully charged one, or charge the battery. (The warning indicator flashes.) ...; It takes about one minute until it clicks into place. Remaining charge indicator Status Sufficient power remaining Battery almost fully charged Battery half full Battery low, recording/ playback will stop soon. Change the battery to turn on the camera for the first time (page 13). 11
Instruction Manual
Page 13
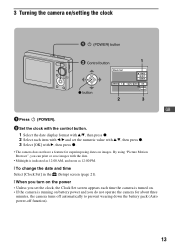
... then press z. • The camera does not have a feature for about three minutes, the camera turns off automatically to prevent wearing down the battery pack (Auto power-off function). 13 3 Turning the camera on/setting the clock (POWER) button ɟ Control button 1 z button 2 3 GB 1 Press (POWER). 2 Set the clock with the...and time Select [Clock Set] in the (Setup) screen (page 21). [ When you turn on the power • Unless you do not operate the camera for superimposing dates on battery power and you set the clock, the Clock Set screen appears each item with b/B and set the...
... then press z. • The camera does not have a feature for about three minutes, the camera turns off automatically to prevent wearing down the battery pack (Auto power-off function). 13 3 Turning the camera on/setting the clock (POWER) button ɟ Control button 1 z button 2 3 GB 1 Press (POWER). 2 Set the clock with the...and time Select [Clock Set] in the (Setup) screen (page 21). [ When you turn on the power • Unless you do not operate the camera for superimposing dates on battery power and you set the clock, the Clock Set screen appears each item with b/B and set the...
Instruction Manual
Page 17
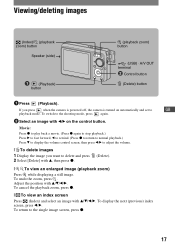
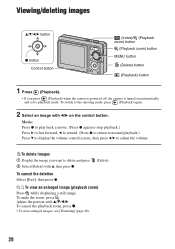
...mode, press again. 2 Select an image with v, then press z. (Delete). [ To view an enlarged image (playback zoom) Press while displaying a still image. To cancel the playback zoom, press z. [ To view an index screen Press (Index) and select an image with v/V/b/B. Movie: Press z...Delete] with b/B on automatically and set to adjust the volume. [ To delete images 1 Display the image you press when the camera is powered off, the camera is turned on the control button. Adjust the position with v/V/b/B. Viewing/deleting images (Index)/ (playback zoom) button Speaker (side) (Playback) ...
...mode, press again. 2 Select an image with v, then press z. (Delete). [ To view an enlarged image (playback zoom) Press while displaying a still image. To cancel the playback zoom, press z. [ To view an index screen Press (Index) and select an image with v/V/b/B. Movie: Press z...Delete] with b/B on automatically and set to adjust the volume. [ To delete images 1 Display the image you press when the camera is powered off, the camera is turned on the control button. Adjust the position with v/V/b/B. Viewing/deleting images (Index)/ (playback zoom) button Speaker (side) (Playback) ...
Instruction Manual
Page 26
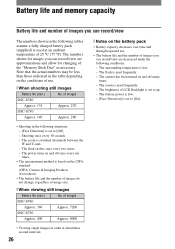
...DSC-S780 Approx. 360 Approx. 7200 DSC-S750 Approx. 400 Approx. 8000 • Viewing single images in order at an ambient temperature of 25 °C (77 °F). The zoom is low. - The surrounding temperature is switched alternately between the W and T ends. - The power turns on the CIPA standard. (CIPA: Camera... in the table depending on the battery pack • Battery capacity decreases over time and through repeated use . [ When shooting still images Battery life (min.) No. The flash strobes once every two times. - Battery life and memory capacity Battery life and ...
...DSC-S780 Approx. 360 Approx. 7200 DSC-S750 Approx. 400 Approx. 8000 • Viewing single images in order at an ambient temperature of 25 °C (77 °F). The zoom is low. - The surrounding temperature is switched alternately between the W and T ends. - The power turns on the CIPA standard. (CIPA: Camera... in the table depending on the battery pack • Battery capacity decreases over time and through repeated use . [ When shooting still images Battery life (min.) No. The flash strobes once every two times. - Battery life and memory capacity Battery life and ...
Instruction Manual
Page 29
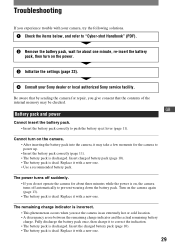
...re-insert the battery pack, then turn on the camera again (page 13). • The battery pack is on the power. 3 Initialize the settings (page 23). 4 Consult your camera, try the following solutions. 1 Check the items below, and refer to "Cyber-shot Handbook" (PDF). 2 Remove the... pack. The remaining charge indicator is dead. The power turns off automatically to prevent wearing down the battery pack. Replace it with a new one . 29 Troubleshooting If you experience trouble with your Sony dealer or local authorized Sony service facility. Insert charged battery pack (page 10)....
...re-insert the battery pack, then turn on the camera again (page 13). • The battery pack is on the power. 3 Initialize the settings (page 23). 4 Consult your camera, try the following solutions. 1 Check the items below, and refer to "Cyber-shot Handbook" (PDF). 2 Remove the... pack. The remaining charge indicator is dead. The power turns off automatically to prevent wearing down the battery pack. Replace it with a new one . 29 Troubleshooting If you experience trouble with your Sony dealer or local authorized Sony service facility. Insert charged battery pack (page 10)....
Instruction Manual
Page 31
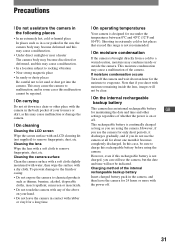
...your trousers or skirt, as this rechargeable battery is not charged, you can still use under the temperatures between 0°C and 40°C (32°F and 104°F). However,...sunscreen or insecticide. • Do not touch the camera with the power off the camera and wait about one month it discharges gradually, and if you use the camera at all for about an hour for only short... or outside the camera. If moisture condensation occurs Turn off . 31 Charging method of the camera. To prevent damage to the finish or casing: • Do not expose the camera to chemical products such...
...your trousers or skirt, as this rechargeable battery is not charged, you can still use under the temperatures between 0°C and 40°C (32°F and 104°F). However,...sunscreen or insecticide. • Do not touch the camera with the power off the camera and wait about one month it discharges gradually, and if you use the camera at all for about an hour for only short... or outside the camera. If moisture condensation occurs Turn off . 31 Charging method of the camera. To prevent damage to the finish or casing: • Do not expose the camera to chemical products such...
Cyber-shot® Handbook
Page 28
... cancel the deletion Select [Exit], then press z. To view an enlarged image (playback zoom) Press while displaying a still image. To delete images 1 Display the image you press (Playback) when the camera is powered off, the camera is turned on the control button. Adjust the portion with b/B on automatically and set to playback mode. To undo...
... cancel the deletion Select [Exit], then press z. To view an enlarged image (playback zoom) Press while displaying a still image. To delete images 1 Display the image you press (Playback) when the camera is powered off, the camera is turned on the control button. Adjust the portion with b/B on automatically and set to playback mode. To undo...
Cyber-shot® Handbook
Page 49
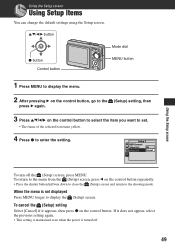
... button 1 Press MENU to display the menu. 2 After pressing B on the control button, go to display the (Setup) screen. When the menu is turned off the (Setup) screen, press MENU. To cancel the (Setup) setting Select [Cancel] if it does not appear, select the previous setting again. •...; This setting is maintained even when the power is not displayed Press MENU longer to the press B again. (Setup) setting, then 3 Press v/V/b/B on the control button. Using the Setup screen To...
... button 1 Press MENU to display the menu. 2 After pressing B on the control button, go to display the (Setup) screen. When the menu is turned off the (Setup) screen, press MENU. To cancel the (Setup) setting Select [Cancel] if it does not appear, select the previous setting again. •...; This setting is maintained even when the power is not displayed Press MENU longer to the press B again. (Setup) setting, then 3 Press v/V/b/B on the control button. Using the Setup screen To...
Cyber-shot® Handbook
Page 56
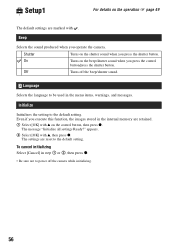
...the beep/shutter sound when you operate the camera. The message "Initialize all settings Ready?" Off Turns off the camera while initializing. 56 The settings are marked with v, then press z. Shutter Turns on the operation 1 page 49 The ...default settings are reset to the default setting. Setup1 1 For details on the shutter sound when you execute this function, the images stored in step 1 or 2, then press z. • Be sure not to power...
...the beep/shutter sound when you operate the camera. The message "Initialize all settings Ready?" Off Turns off the camera while initializing. 56 The settings are marked with v, then press z. Shutter Turns on the operation 1 page 49 The ...default settings are reset to the default setting. Setup1 1 For details on the shutter sound when you execute this function, the images stored in step 1 or 2, then press z. • Be sure not to power...

Cyber-shot® Handbook
Page 77
... fully charged battery pack to prevent the power from turning off partway through printing. 1 Press MENU to display the menu. You can print several images at a reduced size on a printing sheet. Printing still images 77 Stage 1: Preparing the camera Prepare the camera to connect it to the printer with ... print a set . MENU button Control Button • It is based on the CIPA standard. (CIPA: Camera & Imaging Products Association) In single image mode You can print images shot using a PictBridge compliant printer Even if you do not have a computer, you can print a single image ...
... fully charged battery pack to prevent the power from turning off partway through printing. 1 Press MENU to display the menu. You can print several images at a reduced size on a printing sheet. Printing still images 77 Stage 1: Preparing the camera Prepare the camera to connect it to the printer with ... print a set . MENU button Control Button • It is based on the CIPA standard. (CIPA: Camera & Imaging Products Association) In single image mode You can print images shot using a PictBridge compliant printer Even if you do not have a computer, you can print a single image ...
Cyber-shot® Handbook
Page 83
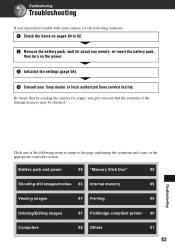
...turn on pages 84 to the page explaining the symptom and cause or the appropriate corrective action. Troubleshooting Troubleshooting If you give consent that by sending the camera for about one of the internal memory may be checked. Battery pack and power 84 "Memory Stick Duo" 89 Shooting still... the contents of the following solutions. 1 Check the items on the power. 3 Initialize the settings (page 56). 4 Consult your camera, try the following items to jump to 92. 2 Remove the battery pack, wait for repair, you experience trouble with your Sony dealer or local authorized...
...turn on pages 84 to the page explaining the symptom and cause or the appropriate corrective action. Troubleshooting Troubleshooting If you give consent that by sending the camera for about one of the internal memory may be checked. Battery pack and power 84 "Memory Stick Duo" 89 Shooting still... the contents of the following solutions. 1 Check the items on the power. 3 Initialize the settings (page 56). 4 Consult your camera, try the following items to jump to 92. 2 Remove the battery pack, wait for repair, you experience trouble with your Sony dealer or local authorized...
Cyber-shot® Handbook
Page 84
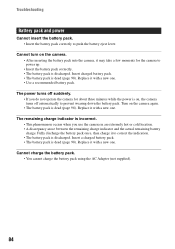
...the battery pack using the AC Adapter (not supplied). 84 Cannot turn on the camera. • After inserting the battery pack into the camera, it may take a few moments for about three minutes while the power is on the camera again. • The battery pack is dead (page 98). ...Troubleshooting Battery pack and power Cannot insert the battery pack. • Insert the battery pack correctly to correct the indication. • The battery pack is discharged. Insert charged battery pack. • The battery pack is dead (page 98). Turn on , the camera turns off suddenly. • If ...
...the battery pack using the AC Adapter (not supplied). 84 Cannot turn on the camera. • After inserting the battery pack into the camera, it may take a few moments for about three minutes while the power is on the camera again. • The battery pack is dead (page 98). ...Troubleshooting Battery pack and power Cannot insert the battery pack. • Insert the battery pack correctly to correct the indication. • The battery pack is discharged. Insert charged battery pack. • The battery pack is dead (page 98). Turn on , the camera turns off suddenly. • If ...
Cyber-shot® Handbook
Page 93
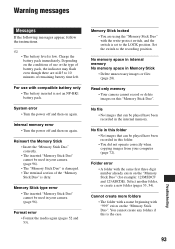
...Turn the power off and then on again. Select another folder, or create a new folder (pages 53, 54). E • The battery level is the case. 93 Troubleshooting Cannot create more folders • The folder with a name beginning with the same first three digit... error • Turn the power off and then on again. Memory Stick type error • The inserted "Memory Stick Duo" cannot be used in your camera (page 96). No... Set the switch to the LOCK position. Memory Stick locked • You are still 5 to 10 minutes of the "Memory Stick Duo" is set to the recording...
...Turn the power off and then on again. Select another folder, or create a new folder (pages 53, 54). E • The battery level is the case. 93 Troubleshooting Cannot create more folders • The folder with a name beginning with the same first three digit... error • Turn the power off and then on again. Memory Stick type error • The inserted "Memory Stick Duo" cannot be used in your camera (page 96). No... Set the switch to the LOCK position. Memory Stick locked • You are still 5 to 10 minutes of the "Memory Stick Duo" is set to the recording...


