Instruction Manual
Page 10
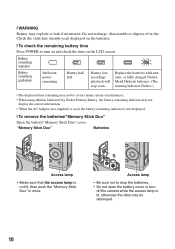
.../"Memory Stick Duo" cover. Replace the batteries with new ones, or fully charged NickelMetal Hydride batteries. (The warning indicator flashes.) • The displayed time remaining may not be destroyed. 10 "Memory Stick Duo" Batteries Access lamp • Make sure that the access lamp is lit, otherwise the...battery cover or turn on and check the time on the LCD screen. Access lamp • Be sure not to turn off the camera while the access lamp is not lit, then push the "Memory Stick Duo" in fire. Battery remaining indicator Battery remaining guidelines Sufficient power...
.../"Memory Stick Duo" cover. Replace the batteries with new ones, or fully charged NickelMetal Hydride batteries. (The warning indicator flashes.) • The displayed time remaining may not be destroyed. 10 "Memory Stick Duo" Batteries Access lamp • Make sure that the access lamp is lit, otherwise the...battery cover or turn on and check the time on the LCD screen. Access lamp • Be sure not to turn off the camera while the access lamp is not lit, then push the "Memory Stick Duo" in fire. Battery remaining indicator Battery remaining guidelines Sufficient power...
Instruction Manual
Page 11
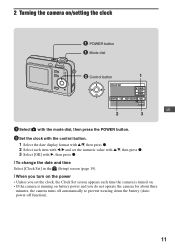
2 Turning the camera on/setting the clock POWER button Mode dial ɟ Control button 1 GB 2 3 1 Select with the mode dial, then press the POWER button. 2 Set the clock with the control button. 1 Select the date display format with v/V, then press z. 2 Select each item with b/B and set the numeric value with ...you set the clock, the Clock Set screen appears each time the camera is turned on. • If the camera is running on battery power and you do not operate the camera for about three minutes, the camera turns off automatically to prevent wearing down the battery (Auto power-off ...
2 Turning the camera on/setting the clock POWER button Mode dial ɟ Control button 1 GB 2 3 1 Select with the mode dial, then press the POWER button. 2 Set the clock with the control button. 1 Select the date display format with v/V, then press z. 2 Select each item with b/B and set the numeric value with ...you set the clock, the Clock Set screen appears each time the camera is turned on. • If the camera is running on battery power and you do not operate the camera for about three minutes, the camera turns off automatically to prevent wearing down the battery (Auto power-off ...
Instruction Manual
Page 14
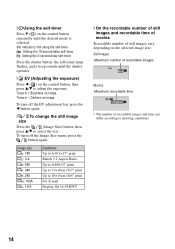
... Match 3:2 Aspect Ratio Up to A4/8×10" print Up to 13×18cm /5×7" print Up to 10×15cm /4×6" print For E-mail Display On 16:9 HDTV [ On the recordable number of still images and recordable time of movies Recordable number of recordable images and time can differ according...
... Match 3:2 Aspect Ratio Up to A4/8×10" print Up to 13×18cm /5×7" print Up to 10×15cm /4×6" print For E-mail Display On 16:9 HDTV [ On the recordable number of still images and recordable time of movies Recordable number of recordable images and time can differ according...
Instruction Manual
Page 15
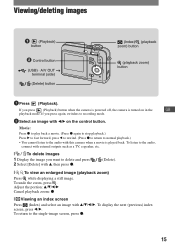
... GB playback mode. To listen to the audio with external outputs such as a TV, a speaker, etc. [ To delete images 1 Display the image you press (Playback) button when the camera is powered off, the camera is played back. Adjust the portion: v/V/b/B Cancel playback zoom: z [ Viewing an index screen Press (Index) and select an image...
... GB playback mode. To listen to the audio with external outputs such as a TV, a speaker, etc. [ To delete images 1 Display the image you press (Playback) button when the camera is powered off, the camera is played back. Adjust the portion: v/V/b/B Cancel playback zoom: z [ Viewing an index screen Press (Index) and select an image...
Instruction Manual
Page 16
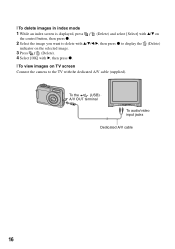
To the (USB) · A/V OUT terminal To audio/video input jacks Dedicated A/V cable 16 [ To delete images in index mode 1 While an index screen is displayed, press (Delete) and select [Select] with v/V on the control button, then press z. 2 Select the image you want to delete with v/V/b/B, then press z to display the (Delete) indicator on the selected image. 3 Press (Delete). 4 Select [OK] with B, then press z. [ To view images on TV screen Connect the camera to the TV with the dedicated A/V cable (supplied).
To the (USB) · A/V OUT terminal To audio/video input jacks Dedicated A/V cable 16 [ To delete images in index mode 1 While an index screen is displayed, press (Delete) and select [Select] with v/V on the control button, then press z. 2 Select the image you want to delete with v/V/b/B, then press z to display the (Delete) indicator on the selected image. 3 Press (Delete). 4 Select [OK] with B, then press z. [ To view images on TV screen Connect the camera to the TV with the dedicated A/V cable (supplied).
Instruction Manual
Page 17
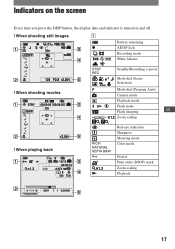
N Red-eye reduction Sharpness Metering mode Color mode Protect Print order (DPOF) mark Zoom scaling Playback 17 Indicators on the screen Every time you press the DISP button, the display data and indicator is turned on and off. [ When shooting still images A Battery remaining z AE/AF lock Recording mode White balance [ When shooting movies STBY REC Standby/Recording a movie Mode dial (Scene Selection) Mode dial (Program Auto) Camera mode Playback mode Flash mode Flash charging GB 1.3 Zoom scaling [ When playing back RICH NATURAL SEPIA B&W -
N Red-eye reduction Sharpness Metering mode Color mode Protect Print order (DPOF) mark Zoom scaling Playback 17 Indicators on the screen Every time you press the DISP button, the display data and indicator is turned on and off. [ When shooting still images A Battery remaining z AE/AF lock Recording mode White balance [ When shooting movies STBY REC Standby/Recording a movie Mode dial (Scene Selection) Mode dial (Program Auto) Camera mode Playback mode Flash mode Flash charging GB 1.3 Zoom scaling [ When playing back RICH NATURAL SEPIA B&W -
Instruction Manual
Page 19
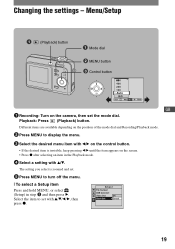
... press B. Different items are available depending on the position of the mode dial and Recording/Playback mode. 2 Press MENU to display the menu. 3 Select the desired menu item with b/B on the camera, then set with v/V. Menu/Setup (Playback) button Mode dial ɟ MENU button ɠ Control button GB 1 Recording: Turn on the...
... press B. Different items are available depending on the position of the mode dial and Recording/Playback mode. 2 Press MENU to display the menu. 3 Select the desired menu item with b/B on the camera, then set with v/V. Menu/Setup (Playback) button Mode dial ɟ MENU button ɠ Control button GB 1 Recording: Turn on the...

Instruction Manual
Page 20
...) (Rotate) (Setup) Selects the folder for shooting COLOR (Color Mode) Changes the vividness of a recorded image. Changes Setup items. 20 Only the available items are displayed on the mode dial position and settings. WB (White Bal) Adjusts the color tones. Adds a Print order mark. ISO Selects a luminous sensitivity. (P.Quality) Selects the...
...) (Rotate) (Setup) Selects the folder for shooting COLOR (Color Mode) Changes the vividness of a recorded image. Changes Setup items. 20 Only the available items are displayed on the mode dial position and settings. WB (White Bal) Adjusts the color tones. Adds a Print order mark. ISO Selects a luminous sensitivity. (P.Quality) Selects the...
Instruction Manual
Page 21
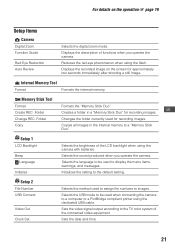
... seconds immediately after shooting a still image. Reduces the red-eye phenomenon when using the camera with batteries. Displays the recorded image on the operation 1 page 19 Setup items Camera Digital Zoom Function Guide Red Eye Reduction Auto Review Selects the digital zoom mode. Folder Formats the "Memory Stick Duo". Change REC. Copy Copies all images...
... seconds immediately after shooting a still image. Reduces the red-eye phenomenon when using the camera with batteries. Displays the recorded image on the operation 1 page 19 Setup items Camera Digital Zoom Function Guide Red Eye Reduction Auto Review Selects the digital zoom mode. Folder Formats the "Memory Stick Duo". Change REC. Copy Copies all images...
Instruction Manual
Page 22
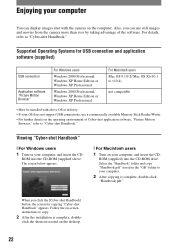
... not support USB connections, use still images and movies from the camera more than ever by taking advantage of Cyber-shot application software, "Picture Motion Browser," refer to copy. 2 After the installation is complete, double-click "Handbook.pdf." When you can display images shot with above OS at delivery. • If your computer You can...
... not support USB connections, use still images and movies from the camera more than ever by taking advantage of Cyber-shot application software, "Picture Motion Browser," refer to copy. 2 After the installation is complete, double-click "Handbook.pdf." When you can display images shot with above OS at delivery. • If your computer You can...
Instruction Manual
Page 26
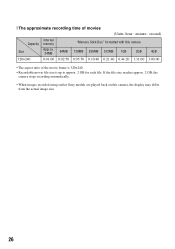
... size is up to approx. 2 GB for each file. If the file size reaches approx. 2 GB, the camera stops recording automatically. • When images recorded using earlier Sony models are played back on this camera Size Approx. 24MB 64MB 128MB 256MB 512MB 1GB 2GB 4GB 320×240 0:01:00 0:02:50 0:05... 0:44:20 1:31:00 3:00:00 • The aspect ratio of movies (Units: hour : minute : second) Internal Capacity memory "Memory Stick Duo" formatted with this camera, the display may differ from the actual image size. 26
... size is up to approx. 2 GB for each file. If the file size reaches approx. 2 GB, the camera stops recording automatically. • When images recorded using earlier Sony models are played back on this camera Size Approx. 24MB 64MB 128MB 256MB 512MB 1GB 2GB 4GB 320×240 0:01:00 0:02:50 0:05... 0:44:20 1:31:00 3:00:00 • The aspect ratio of movies (Units: hour : minute : second) Internal Capacity memory "Memory Stick Duo" formatted with this camera, the display may differ from the actual image size. 26
Instruction Manual
Page 27
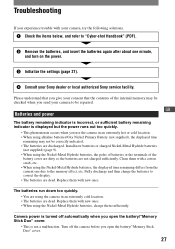
...page 9). • When using the camera in an extremely hot or cold location. • When using alkaline batteries/Oxy Nickel Primary Battery (not supplied), the displayed time remaining may be checked when you send your Sony dealer or local authorized Sony service facility. The batteries run down... Turn off automatically when you give your camera, try the following solutions. 1 Check the items below, and refer to "Cyber-shot Handbook" (PDF). 2 Remove the batteries, and insert the batteries again after about one due to correct the display. • The batteries are dead. ...
...page 9). • When using the camera in an extremely hot or cold location. • When using alkaline batteries/Oxy Nickel Primary Battery (not supplied), the displayed time remaining may be checked when you send your Sony dealer or local authorized Sony service facility. The batteries run down... Turn off automatically when you give your camera, try the following solutions. 1 Check the items below, and refer to "Cyber-shot Handbook" (PDF). 2 Remove the batteries, and insert the batteries again after about one due to correct the display. • The batteries are dead. ...

Service Manual
Page 18
.... 3. [Description of main button functions on toolbar of the Adobe Acrobat Reader Ver5.0 (for the voltage check. Application to select the display magnification. Application of printing: To set . Note: The find function may click ing in the zoom control box to the Service Manual...selection tool , or graphic selection tool . 2. "Rotate" • Click rotate tool , and the page then rotates 90 degrees each. Reversing the screens displayed once • To reverse the previous screens (operation) one by one, click the . • To advance the reversed screens (operation) one by one...
.... 3. [Description of main button functions on toolbar of the Adobe Acrobat Reader Ver5.0 (for the voltage check. Application to select the display magnification. Application of printing: To set . Note: The find function may click ing in the zoom control box to the Service Manual...selection tool , or graphic selection tool . 2. "Rotate" • Click rotate tool , and the page then rotates 90 degrees each. Reversing the screens displayed once • To reverse the previous screens (operation) one by one, click the . • To advance the reversed screens (operation) one by one...


