
Operating Instructions
Page 2
... Trade Name: SONY Model No.: DSC-S70 Responsible Party:Sony Electronics Inc. These limits are cautioned that may cause undesired operation. Increase the separation between the equipment and receiver. - Never expose the battery pack to persons. Connect the equipment into an outlet on , the user is intended to alert the user to the presence of important operating and maintenance (servicing) instructions in the literature...
... Trade Name: SONY Model No.: DSC-S70 Responsible Party:Sony Electronics Inc. These limits are cautioned that may cause undesired operation. Increase the separation between the equipment and receiver. - Never expose the battery pack to persons. Connect the equipment into an outlet on , the user is intended to alert the user to the presence of important operating and maintenance (servicing) instructions in the literature...
Operating Instructions
Page 4
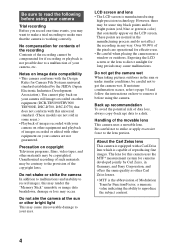
... taking pictures outdoors in any way. The lens for this camera uses the MTF* measurement system for Camera File Systems universal standard established by Carl Zeiss, in color) that the camera is manufactured using your camera Trial recording Before you record one-time events, you may cause malfunctions. LCD screen and lens • The LCD screen is working correctly. Back up ) data to your camera on other equipment on the LCD screen. You cannot play...
... taking pictures outdoors in any way. The lens for this camera uses the MTF* measurement system for Camera File Systems universal standard established by Carl Zeiss, in color) that the camera is manufactured using your camera Trial recording Before you record one-time events, you may cause malfunctions. LCD screen and lens • The LCD screen is working correctly. Back up ) data to your camera on other equipment on the LCD screen. You cannot play...
Operating Instructions
Page 5
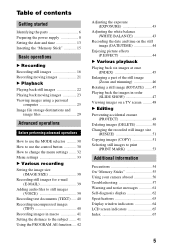
... control button 30 How to change the menu settings ....... 32 Menu settings 33 B Various recording Setting the image size (IMAGE SIZE 38 Recording still images for e-mail (E-MAIL 39 Adding audio files to still images (VOICE 39 Recording text documents (TEXT) ..... 40 Recording uncompressed images (TIFF 40 Recording images in macro 41 Setting the distance to the subject ....... 41 Using the PROGRAM AE function .... 42 Adjusting the exposure (EXPOSURE 43 Adjusting the white balance (WHITE BALANCE 43 Recording the date and time on the still image (DATE/TIME 44 Enjoying picture...
... control button 30 How to change the menu settings ....... 32 Menu settings 33 B Various recording Setting the image size (IMAGE SIZE 38 Recording still images for e-mail (E-MAIL 39 Adding audio files to still images (VOICE 39 Recording text documents (TEXT) ..... 40 Recording uncompressed images (TIFF 40 Recording images in macro 41 Setting the distance to the subject ....... 41 Using the PROGRAM AE function .... 42 Adjusting the exposure (EXPOSURE 43 Adjusting the white balance (WHITE BALANCE 43 Recording the date and time on the still image (DATE/TIME 44 Enjoying picture...

Operating Instructions
Page 8
... the battery compartment as battery consumption with compatible video equipment. To remove the battery pack Open the battery/"Memory Stick" cover. This unit is a trademark of the arrow. 2 Install the battery pack. "InfoLITHIUM" M series battery packs have the mark. "InfoLITHIUM" is compatible with the "InfoLITHIUM" NP-FM50 battery pack* (M series). Battery eject lever 1 Open the battery/"Memory Stick" cover. Open the cover while sliding the OPEN switch in the direction of Sony Corporation...
... the battery compartment as battery consumption with compatible video equipment. To remove the battery pack Open the battery/"Memory Stick" cover. This unit is a trademark of the arrow. 2 Install the battery pack. "InfoLITHIUM" M series battery packs have the mark. "InfoLITHIUM" is compatible with the "InfoLITHIUM" NP-FM50 battery pack* (M series). Battery eject lever 1 Open the battery/"Memory Stick" cover. Open the cover while sliding the OPEN switch in the direction of Sony Corporation...
Operating Instructions
Page 11
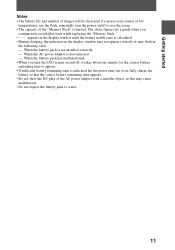
... battery life and number of images will be decreased if you use your camera at low temperatures, use the flash, repeatedly turn the LCD screen on /off , it takes about one minute for the correct battery remaining time to water. 11 When the battery pack is disconnected. - The above figures are a guide when you continuously record/play back while replacing the "Memory Stick appears in the display window until the battery usable time is...
... battery life and number of images will be decreased if you use your camera at low temperatures, use the flash, repeatedly turn the LCD screen on /off , it takes about one minute for the correct battery remaining time to water. 11 When the battery pack is disconnected. - The above figures are a guide when you continuously record/play back while replacing the "Memory Stick appears in the display window until the battery usable time is...
Operating Instructions
Page 15
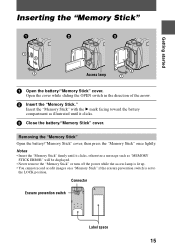
... toward the battery compartment as "MEMORY STICK ERROR" will be displayed. • Never remove the "Memory Stick" or turn off the power while the access lamp is lit up. • You cannot record or edit images on a "Memory Stick" if the erasure prevention switch is set to the LOCK position. Getting started Inserting the "Memory Stick" Access lamp 1 Open the battery/"Memory Stick" cover. Connector Erasure prevention switch Label space...
... toward the battery compartment as "MEMORY STICK ERROR" will be displayed. • Never remove the "Memory Stick" or turn off the power while the access lamp is lit up. • You cannot record or edit images on a "Memory Stick" if the erasure prevention switch is set to the LOCK position. Getting started Inserting the "Memory Stick" Access lamp 1 Open the battery/"Memory Stick" cover. Connector Erasure prevention switch Label space...
Operating Instructions
Page 17
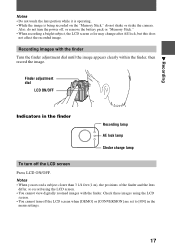
... the camera. Finder adjustment dial LCD ON/OFF Indicators in the finder Recording lamp AE lock lamp Strobe charge lamp To turn off the LCD screen when [DEMO] or [CONVERSION] are set to [ON] in the menu settings. 17 B Recording Notes • Do not touch the lens portion while it is operating. • While the image is being recorded on the "Memory Stick," do not turn the power off, or remove the battery...
... the camera. Finder adjustment dial LCD ON/OFF Indicators in the finder Recording lamp AE lock lamp Strobe charge lamp To turn off the LCD screen when [DEMO] or [CONVERSION] are set to [ON] in the menu settings. 17 B Recording Notes • Do not touch the lens portion while it is operating. • While the image is being recorded on the "Memory Stick," do not turn the power off, or remove the battery...
Operating Instructions
Page 20
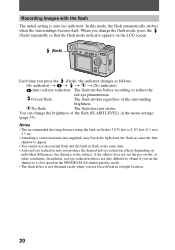
... shutter to a slow speed in the PROGRAM AE shutter priority mode. • The flash effect is not obtained easily when you use an external flash and the built-in flash at the same time. • Auto red-eye reduction may not produce the desired red-eye reduction effects depending on the LCD screen. (flash) Each time you change the brightness of the surrounding brightness. When you press the (flash), the indicator changes...
... shutter to a slow speed in the PROGRAM AE shutter priority mode. • The flash effect is not obtained easily when you use an external flash and the built-in flash at the same time. • Auto red-eye reduction may not produce the desired red-eye reduction effects depending on the LCD screen. (flash) Each time you change the brightness of the surrounding brightness. When you press the (flash), the indicator changes...
Operating Instructions
Page 21
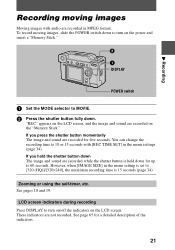
... sound are recorded while the shutter button is 15 seconds (page 34). Zooming or using the self-timer, etc. These indicators are recorded in the menu settings (page 34). B Recording Recording moving images, slide the POWER switch down to [320 (HQ)]/[320×240], the maximum recording time is held down The image and sound are recorded for five seconds. If you hold the shutter button down for a detailed description of the indicators. 21 DISPLAY POWER switch 1 Set the MODE...
... sound are recorded while the shutter button is 15 seconds (page 34). Zooming or using the self-timer, etc. These indicators are recorded in the menu settings (page 34). B Recording Recording moving images, slide the POWER switch down to [320 (HQ)]/[320×240], the maximum recording time is held down The image and sound are recorded for five seconds. If you hold the shutter button down for a detailed description of the indicators. 21 DISPLAY POWER switch 1 Set the MODE...
Operating Instructions
Page 25
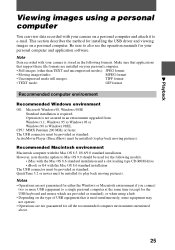
... also see the operation manuals for the following formats. Make sure that applications that support these file formats are installed on a personal computer. Operation is used for your camera is required. CPU: MMX Pentium 200 MHz or faster The USB connector must be installed (to play back moving pictures). Notes • Operations are not guaranteed for either the Windows or Macintosh environment if you connect two or more...
... also see the operation manuals for the following formats. Make sure that applications that support these file formats are installed on a personal computer. Operation is used for your camera is required. CPU: MMX Pentium 200 MHz or faster The USB connector must be installed (to play back moving pictures). Notes • Operations are not guaranteed for either the Windows or Macintosh environment if you connect two or more...
Operating Instructions
Page 26
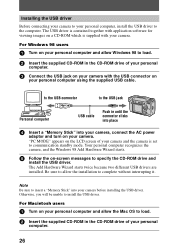
Be sure to allow the installation to communication standby mode. "PC MODE" appears on your personal computer and allow the Mac OS to load. 2 Insert the supplied CD-ROM in the CD-ROM drive of your personal computer. 3 Connect the USB jack on -screen messages to install the USB driver. For Windows 98 users 1 Turn on the LCD screen of your camera. For Macintosh users 1 Turn on your personal computer...
Be sure to allow the installation to communication standby mode. "PC MODE" appears on your personal computer and allow the Mac OS to load. 2 Insert the supplied CD-ROM in the CD-ROM drive of your personal computer. 3 Connect the USB jack on -screen messages to install the USB driver. For Windows 98 users 1 Turn on the LCD screen of your camera. For Macintosh users 1 Turn on your personal computer...
Operating Instructions
Page 33
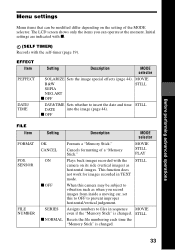
... settings are indicated with x. (SELF TIMER) Records with the STILL camera on the setting of a "Memory Stick." Cancels formatting of the MODE selector. x OFF FILE Item FORMAT POS. This function does not work for images recorded in sequence even if the "Memory Stick" is changed . SERIES x NORMAL Assigns numbers to vibration such as horizontal images. MOVIE B&W STILL SEPIA NEG.ART x OFF DAY&TIME Sets whether to prevent improper horizontal/vertical judgement. SENSOR FILE NUMBER Setting Description MODE...
... settings are indicated with x. (SELF TIMER) Records with the STILL camera on the setting of a "Memory Stick." Cancels formatting of the MODE selector. x OFF FILE Item FORMAT POS. This function does not work for images recorded in sequence even if the "Memory Stick" is changed . SERIES x NORMAL Assigns numbers to vibration such as horizontal images. MOVIE B&W STILL SEPIA NEG.ART x OFF DAY&TIME Sets whether to prevent improper horizontal/vertical judgement. SENSOR FILE NUMBER Setting Description MODE...
Operating Instructions
Page 35
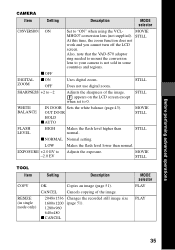
... and regions. WHITE BALANCE IN DOOR Sets the white balance (page 43). EXPOSURE +2.0 EV to your camera is not sold in single mode only) OK Copies an image (page 51). Does not use digital zoom. MOVIE MHG07 conversion lens (not supplied). Before performing advanced operations CAMERA Item Setting Description MODE selector CONVERSION ON Set to "ON" when using the VCL- STILL At this time, the zoom function does not work and you cannot turn off the LCD screen.
... and regions. WHITE BALANCE IN DOOR Sets the white balance (page 43). EXPOSURE +2.0 EV to your camera is not sold in single mode only) OK Copies an image (page 51). Does not use digital zoom. MOVIE MHG07 conversion lens (not supplied). Before performing advanced operations CAMERA Item Setting Description MODE selector CONVERSION ON Set to "ON" when using the VCL- STILL At this time, the zoom function does not work and you cannot turn off the LCD screen.
Operating Instructions
Page 36
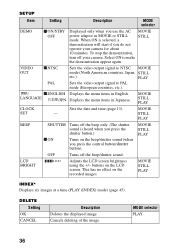
... recorded images. SETUP Item Setting Description MODE selector DEMO x ON/STBY OFF Displayed only when you do not operate your camera. MOVIE STILL PLAY CLOCK SET Sets the date and time (page 13). - MOVIE STILL PLAY BEEP SHUTTER Turns off the beep only. (The shutter sound is selected, a demonstration will start if you use the AC MOVIE power adaptor in MOVIE or STILL STILL mode. MOVIE STILL PLAY INDEX* Displays six images at a time (PLAY (INDEX) mode) (page 45). DELETE Setting OK CANCEL Description Deletes the displayed image. MODE...
... recorded images. SETUP Item Setting Description MODE selector DEMO x ON/STBY OFF Displayed only when you do not operate your camera. MOVIE STILL PLAY CLOCK SET Sets the date and time (page 13). - MOVIE STILL PLAY BEEP SHUTTER Turns off the beep only. (The shutter sound is selected, a demonstration will start if you use the AC MOVIE power adaptor in MOVIE or STILL STILL mode. MOVIE STILL PLAY INDEX* Displays six images at a time (PLAY (INDEX) mode) (page 45). DELETE Setting OK CANCEL Description Deletes the displayed image. MODE...

Operating Instructions
Page 55
... recording medium with a data capacity that uses encryption technology. However, because your camera does not support the MagicGate standards, data recorded with your camera is not subject to MagicGate copyright protection. ∗ MagicGate is removable, "Memory Stick" can also be used for about half a year it becomes completely discharged. you do not record the date and time. On battery pack • Use only the specified charger with the charging function...
... recording medium with a data capacity that uses encryption technology. However, because your camera does not support the MagicGate standards, data recorded with your camera is not subject to MagicGate copyright protection. ∗ MagicGate is removable, "Memory Stick" can also be used for about half a year it becomes completely discharged. you do not record the date and time. On battery pack • Use only the specified charger with the charging function...
Operating Instructions
Page 57
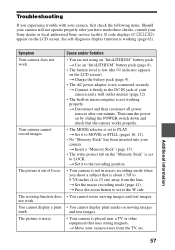
... trouble with your camera, first check the following items. Should your camera still not operate properly after one minute. Your camera cannot record images. The picture is not connected securely. Cause and/or Solution • You are not using an "InfoLITHIUM" battery pack. t Connect it to PLAY. t Set it firmly to 25 cm) away from the TV, etc. 57 t Set the macro recording mode (page 41). t Press the zoom button to set...
... trouble with your camera, first check the following items. Should your camera still not operate properly after one minute. Your camera cannot record images. The picture is not connected securely. Cause and/or Solution • You are not using an "InfoLITHIUM" battery pack. t Connect it to PLAY. t Set it firmly to 25 cm) away from the TV, etc. 57 t Set the macro recording mode (page 41). t Press the zoom button to set...
Operating Instructions
Page 58
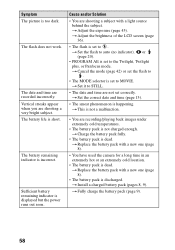
The battery remaining indicator is dead. t Set it to STILL. • The date and time are shooting a very bright subject. t Replace the battery pack with a new one (page 8). • The battery pack is too dark. t Install a charged battery pack (pages 8, 9). t Adjust the brightness of the LCD screen (page 36). • The flash is set to . • The MODE selector is not charged enough. t Set the flash to auto (no indicator), or (page 20). •...
The battery remaining indicator is dead. t Set it to STILL. • The date and time are shooting a very bright subject. t Replace the battery pack with a new one (page 8). • The battery pack is too dark. t Install a charged battery pack (pages 8, 9). t Adjust the brightness of the LCD screen (page 36). • The flash is set to . • The MODE selector is not charged enough. t Set the flash to auto (no indicator), or (page 20). •...

Operating Instructions
Page 59
... Sony service facility. • The battery pack is larger than 2048×1536. t Use an image size of 2048×1536 or smaller. • The camera is set to [ON]. t Cancel the Panfocus mode (page 42). • [CONVERSION] in the display window or the indicators flash during charging. t Set it to [OFF]. • You cannot use digital zoom to record moving pictures. • The MODE selector is protected. t Set it with a charged battery. • The video...
... Sony service facility. • The battery pack is larger than 2048×1536. t Use an image size of 2048×1536 or smaller. • The camera is set to [ON]. t Cancel the Panfocus mode (page 42). • [CONVERSION] in the display window or the indicators flash during charging. t Set it to [OFF]. • You cannot use digital zoom to record moving pictures. • The MODE selector is protected. t Set it with a charged battery. • The video...

Operating Instructions
Page 64
... C Recording/EV level indicator D Image size indicator E Flash mode/flash level indicator F PROGRAM AE indicator White balance indicator Picture effect indicator Date/time indicator G Battery usable time indicator (displayed only during charging) Number of recorded images Error display : Some kind of misoperation has occurred. Turn the camera on the LCD screen (page 62) and take the appropriate corrective action. : A problem has occurred with lens drive. Check the selfdiagnosis display on and off several times, and if the problem persists, contact your Sony dealer or authorized Sony service...
... C Recording/EV level indicator D Image size indicator E Flash mode/flash level indicator F PROGRAM AE indicator White balance indicator Picture effect indicator Date/time indicator G Battery usable time indicator (displayed only during charging) Number of recorded images Error display : Some kind of misoperation has occurred. Turn the camera on the LCD screen (page 62) and take the appropriate corrective action. : A problem has occurred with lens drive. Check the selfdiagnosis display on and off several times, and if the problem persists, contact your Sony dealer or authorized Sony service...
Operating Instructions
Page 67
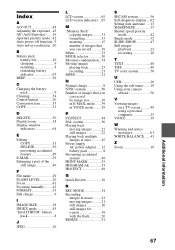
...power-off function ..9 Auto red-eye reduction ..20 B Battery pack battery life 10 charging 9 installing 8 remaining battery indicator 65 BEEP 36 C Charging the battery pack 9 Cleaning 54 Control button 30 Conversion lens 35 COPY 51 D DELETE 50 Digital zoom 18 Display window indicators 64 E Editing COPY 51 DELETE 50 preventing accidental erasure 49 E-MAIL 39 Enlarging a part of the still image 46 F File name 29 FLASH LEVEL 20 Focus 41 Focusing manually.........41 FORMAT 33 Full charge 9 I IMAGE SIZE 38 INDEX mode 45 "InfoLITHIUM" battery pack 8 J JPEG 16 L LCD screen...
...power-off function ..9 Auto red-eye reduction ..20 B Battery pack battery life 10 charging 9 installing 8 remaining battery indicator 65 BEEP 36 C Charging the battery pack 9 Cleaning 54 Control button 30 Conversion lens 35 COPY 51 D DELETE 50 Digital zoom 18 Display window indicators 64 E Editing COPY 51 DELETE 50 preventing accidental erasure 49 E-MAIL 39 Enlarging a part of the still image 46 F File name 29 FLASH LEVEL 20 Focus 41 Focusing manually.........41 FORMAT 33 Full charge 9 I IMAGE SIZE 38 INDEX mode 45 "InfoLITHIUM" battery pack 8 J JPEG 16 L LCD screen...


