Operating Instructions (primary manual)
Page 1
... serial number in the space provided below. DSC-P92 Serial No. DSC-P92 © 2003 Sony Corporation 3-082-719-11(1) Getting started Shooting still images Viewing still images Deleting still images Before advanced operations Advanced still image shooting Advanced still image viewing Still image editing Enjoying movies Enjoying images on the bottom. Model No. Digital Still Camera Operating Instructions Before operating the unit, please...
... serial number in the space provided below. DSC-P92 Serial No. DSC-P92 © 2003 Sony Corporation 3-082-719-11(1) Getting started Shooting still images Viewing still images Deleting still images Before advanced operations Advanced still image shooting Advanced still image viewing Still image editing Enjoying movies Enjoying images on the bottom. Model No. Digital Still Camera Operating Instructions Before operating the unit, please...
Operating Instructions (primary manual)
Page 3
... BSI to BS 1362, (i.e., marked with BS 1363 is fitted to this equipment has a detachable fuse cover, be sure to power this digital camera. Attention The electromagnetic fields at the specific frequencies may regulate disposal of rechargeable batteries, call toll free 1-800-822-8837, or visit http...United Kingdom A moulded plug complying with or mark) must be replaced, a 5 AMP fuse approved by returning your nearest Sony service station. and Canada THIS CLASS B DIGITAL DEVICE COMPLIES WITH PART 15 OF THE FCC RULES AND THE CANADIAN ICES-003 OPERATION IS SUBJECT TO THE FOLLOWING TWO ...
... BSI to BS 1362, (i.e., marked with BS 1363 is fitted to this equipment has a detachable fuse cover, be sure to power this digital camera. Attention The electromagnetic fields at the specific frequencies may regulate disposal of rechargeable batteries, call toll free 1-800-822-8837, or visit http...United Kingdom A moulded plug complying with or mark) must be replaced, a 5 AMP fuse approved by returning your nearest Sony service station. and Canada THIS CLASS B DIGITAL DEVICE COMPLIES WITH PART 15 OF THE FCC RULES AND THE CANADIAN ICES-003 OPERATION IS SUBJECT TO THE FOLLOWING TWO ...
Operating Instructions (primary manual)
Page 4
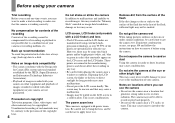
...with other materials may be emitted. No compensation for contents of the recording Contents of the recording cannot be careful not to get the camera wet When taking pictures outdoors in the rain or under similar conditions, be compensated for long periods may cause noise to a disk. Back... up ) data to interfere the camera. Exposing the LCD screen, the finder or the lens to direct sunlight for if recording or playback is not a malfunction. If moisture condensation ...
...with other materials may be emitted. No compensation for contents of the recording Contents of the recording cannot be careful not to get the camera wet When taking pictures outdoors in the rain or under similar conditions, be compensated for long periods may cause noise to a disk. Back... up ) data to interfere the camera. Exposing the LCD screen, the finder or the lens to direct sunlight for if recording or playback is not a malfunction. If moisture condensation ...
Operating Instructions (primary manual)
Page 5
...; "Memory Stick Duo" and are trademarks of Sony Corporation. • "Memory Stick PRO" and are trademarks of Sony Corporation. • "MagicGate" and are trademarks of Sony Corporation. • Microsoft and Windows are registered trademarks of pictures in this manual are reproduced images, and are not actual images shot using this manual. 5 Microsoft Corporation in... addition, system and product names used as examples of the U.S. The pictures used in this manual The photographs used in this manual are, in this camera.
...; "Memory Stick Duo" and are trademarks of Sony Corporation. • "Memory Stick PRO" and are trademarks of Sony Corporation. • "MagicGate" and are trademarks of Sony Corporation. • Microsoft and Windows are registered trademarks of pictures in this manual are reproduced images, and are not actual images shot using this manual. 5 Microsoft Corporation in... addition, system and product names used as examples of the U.S. The pictures used in this manual The photographs used in this manual are, in this camera.

Operating Instructions (primary manual)
Page 6
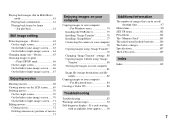
... a focus method 44 Setting the distance to scene conditions 54 Adding special effects - Slide show 59 Rotating still images - Voice 53 Shooting according to the subject - using your camera 4 Identifying the parts 8 Getting started Preparing batteries 10 Charging the batteries 10 Inserting the batteries 12 Using ... 46 Selecting a metering mode 47 Adjusting color tones - Table of contents Before using auto mode 22 Checking the last image shot - Flash Level...49 Shooting multiple frames - Burst 3 51 Shooting still images for e-mail - Folder 57 Enlarging a portion of...
... a focus method 44 Setting the distance to scene conditions 54 Adding special effects - Slide show 59 Rotating still images - Voice 53 Shooting according to the subject - using your camera 4 Identifying the parts 8 Getting started Preparing batteries 10 Charging the batteries 10 Inserting the batteries 12 Using ... 46 Selecting a metering mode 47 Adjusting color tones - Table of contents Before using auto mode 22 Checking the last image shot - Flash Level...49 Shooting multiple frames - Burst 3 51 Shooting still images for e-mail - Folder 57 Enlarging a portion of...
Operating Instructions (primary manual)
Page 7
...computer 81 Image file storage destinations and file names 82 Copying images to your computer Copying images to print - Playing back images shot in Multi Burst mode 61 Playing back continuously 61 Playing back frame by frame - For Windows users 74 Installing the USB driver... 75 Installing "Image Transfer 76 Installing "ImageMixer 77 Connecting the camera to your computer 78 Copying images using "Image Transfer" 79 Changing "Image Transfer" settings .. 80 Copying images without using "Image Transfer...
...computer 81 Image file storage destinations and file names 82 Copying images to your computer Copying images to print - Playing back images shot in Multi Burst mode 61 Playing back continuously 61 Playing back frame by frame - For Windows users 74 Installing the USB driver... 75 Installing "Image Transfer 76 Installing "ImageMixer 77 Connecting the camera to your computer 78 Copying images using "Image Transfer" 79 Changing "Image Transfer" settings .. 80 Copying images without using "Image Transfer...

Operating Instructions (primary manual)
Page 8
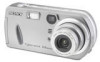
You will be unable to firmly secure the camera to tripods having longer screws, and may damage the camera. Identifying the parts 1 7 2 8 3 9 4 q; 5 qa 6 A POWER button (16) B Shutter button (22) C Flash (28) D Microphone E Self-timer lamp (27)/ AF illuminator (29) F Tripod receptacle (bottom surface) G POWER lamp (16) H Finder window I Lens 8 J Access lamp (19) K "Memory Stick" cover (19) • Use a tripod with a screw length of less than 5.5 mm (7/32 inch).
You will be unable to firmly secure the camera to tripods having longer screws, and may damage the camera. Identifying the parts 1 7 2 8 3 9 4 q; 5 qa 6 A POWER button (16) B Shutter button (22) C Flash (28) D Microphone E Self-timer lamp (27)/ AF illuminator (29) F Tripod receptacle (bottom surface) G POWER lamp (16) H Finder window I Lens 8 J Access lamp (19) K "Memory Stick" cover (19) • Use a tripod with a screw length of less than 5.5 mm (7/32 inch).
Operating Instructions (primary manual)
Page 10
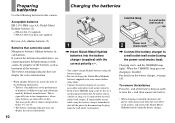
...see page 107. end of the battery down in the performance of batteries of different types and of batteries made by property of the camera by different manufacturers. Preparing batteries Use the following information. - The battery remaining indicator may not be used , take note of the ... twin-pack (not supplied) R6 (size AA) alkaline batteries (2) Batteries that cannot be able to charge the Nickel-Metal Hydride batteries supplied with your camera before using the power cord (mains lead). Acceptable batteries HR 15/51:HR6 (size AA) Nickel-Metal Hydride batteries (2) - NH-AA-DA (2)...
...see page 107. end of the battery down in the performance of batteries of different types and of batteries made by property of the camera by different manufacturers. Preparing batteries Use the following information. - The battery remaining indicator may not be used , take note of the ... twin-pack (not supplied) R6 (size AA) alkaline batteries (2) Batteries that cannot be able to charge the Nickel-Metal Hydride batteries supplied with your camera before using the power cord (mains lead). Acceptable batteries HR 15/51:HR6 (size AA) Nickel-Metal Hydride batteries (2) - NH-AA-DA (2)...

Operating Instructions (primary manual)
Page 11
... may cause a malfunction of battery, and is not a malfunction. • If you recharge Nickel-Metal Hydride batteries before using up the batteries completely, put the camera in the slide show mode (page 59) and leave it , should correct the problem. * The "memory effect" - If this type of the battery charger. 11...
... may cause a malfunction of battery, and is not a malfunction. • If you recharge Nickel-Metal Hydride batteries before using up the batteries completely, put the camera in the slide show mode (page 59) and leave it , should correct the problem. * The "memory effect" - If this type of the battery charger. 11...

Operating Instructions (primary manual)
Page 12
... skin, the operating time of the battery cover by wiping them with the OPEN button pressed, and it clicks. To remove the batteries Stand the camera on end, open the battery cover upward, then remove the batteries. • Make sure you do not drop the batteries when opening or closing the...; poles of the batteries to the +/ − marks inside the battery case. • Occasionally clean the poles of the batteries and the terminals of the camera can be greatly reduced. 1 3 , Close the battery cover.
... skin, the operating time of the battery cover by wiping them with the OPEN button pressed, and it clicks. To remove the batteries Stand the camera on end, open the battery cover upward, then remove the batteries. • Make sure you do not drop the batteries when opening or closing the...; poles of the batteries to the +/ − marks inside the battery case. • Occasionally clean the poles of the batteries and the terminals of the camera can be greatly reduced. 1 3 , Close the battery cover.
Operating Instructions (primary manual)
Page 13
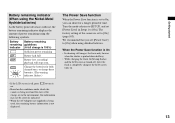
... (A full charge is set [Power Save] in Setup 1 to [On] when using the following symbols. When the Power Save function is On • In shooting still images, the focus only focuses when the shutter is pushed down halfway. • While charging the flash, the lamp flashes and the LCD screen is... to [On] (page 103). Turn the mode selector to SET UP, and set to turn it on. • Based on the conditions under which the camera is not displayed. After the flash is completely charged, the LCD screen turns on the environment, this information may not be correctly indicated. • When...
... (A full charge is set [Power Save] in Setup 1 to [On] when using the following symbols. When the Power Save function is On • In shooting still images, the focus only focuses when the shutter is pushed down halfway. • While charging the flash, the lamp flashes and the LCD screen is... to [On] (page 103). Turn the mode selector to SET UP, and set to turn it on. • Based on the conditions under which the camera is not displayed. After the flash is completely charged, the LCD screen turns on the environment, this information may not be correctly indicated. • When...
Operating Instructions (primary manual)
Page 14
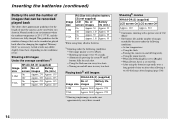
... self-discharge after often allowing it to [Off]. - Alternatively pressing the zoom W and T buttons fully for each shot. - Using the zoom heavily - After using Sony alkaline batteries 1) Shooting under the following conditions: - Actual results may differ slightly from these, depending on and off... number of images recordable decrease under the following conditions: - Turning on and off frequently. - Playing back2) still images NH-AA-DA (2) (supplied) No. Turning the camera on the conditions of use. of Battery screen images life (min.) On Approx. 270 Approx. 135 Off ...
... self-discharge after often allowing it to [Off]. - Alternatively pressing the zoom W and T buttons fully for each shot. - Using the zoom heavily - After using Sony alkaline batteries 1) Shooting under the following conditions: - Actual results may differ slightly from these, depending on and off... number of images recordable decrease under the following conditions: - Turning on and off frequently. - Playing back2) still images NH-AA-DA (2) (supplied) No. Turning the camera on the conditions of use. of Battery screen images life (min.) On Approx. 270 Approx. 135 Off ...
Operating Instructions (primary manual)
Page 15
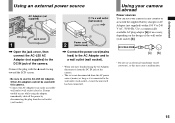
...outlet (wall socket), even if the unit itself has been turned off the power by . Using your camera abroad Power sources You can use your camera in any country or area with this camera. • Connect the AC Adaptor to an easily accessible wall outlet (wall socket) close by disconnecting... When you have finished using the adaptor, immediately shut off . Use a commercially available AC plug adaptor [a], if necessary, depending on the design of the camera. Other AC adaptors cannot be used with the supplied battery charger or AC Adaptor (not supplied) within 100 V to 240 V AC, 50/60 Hz....
...outlet (wall socket), even if the unit itself has been turned off the power by . Using your camera abroad Power sources You can use your camera in any country or area with this camera. • Connect the AC Adaptor to an easily accessible wall outlet (wall socket) close by disconnecting... When you have finished using the adaptor, immediately shut off . Use a commercially available AC plug adaptor [a], if necessary, depending on the design of the camera. Other AC adaptors cannot be used with the supplied battery charger or AC Adaptor (not supplied) within 100 V to 240 V AC, 50/60 Hz....
Operating Instructions (primary manual)
Page 16
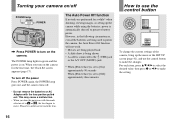
...appears (page 17). To turn off the power Press POWER again, the POWER lamp goes out, and the camera turns off. • Do not remove the batteries or AC Adaptor with the mode selector set to [...MONO) jack * When [Power Save] is set to [On]: approximately 90 seconds When [Power Save] is on the camera for a while* when shooting, viewing images, or setting up the menu or the SET UP screen (page 41), and... use the control button to make the setting. 16 Turning your camera on/off POWER lamp POWER POWER , Press POWER to turn on with the lens portion pulled out. When...
...appears (page 17). To turn off the power Press POWER again, the POWER lamp goes out, and the camera turns off. • Do not remove the batteries or AC Adaptor with the mode selector set to [...MONO) jack * When [Power Save] is set to [On]: approximately 90 seconds When [Power Save] is on the camera for a while* when shooting, viewing images, or setting up the menu or the SET UP screen (page 41), and... use the control button to make the setting. 16 Turning your camera on/off POWER lamp POWER POWER , Press POWER to turn on with the lens portion pulled out. When...
Operating Instructions (primary manual)
Page 17
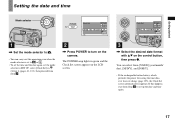
... Set Y/M/D M/D/Y D/M/Y 2003 / OK 1/ 1 12 : 00 OK AM Cancel 1 , Set the mode selector to . • You can select from Step 3. 2 , Press POWER to turn on the camera. You can carry out this happens, start from Step 3 to set the mode selector to or . • To set the time and the date again...
... Set Y/M/D M/D/Y D/M/Y 2003 / OK 1/ 1 12 : 00 OK AM Cancel 1 , Set the mode selector to . • You can select from Step 3. 2 , Press POWER to turn on the camera. You can carry out this happens, start from Step 3 to set the mode selector to or . • To set the time and the date again...

Operating Instructions (primary manual)
Page 19
... it can go. Slide the cover in the illustration. • Whenever you do not insert it out. • Whenever the access lamp is lit, the camera is recording or reading out an image. To remove the "Memory Stick" Open the "Memory Stick" cover, then push the "Memory Stick" to pop it... the "Memory Stick" cover. Never remove the "Memory Stick" or turn off the power at this time. The data may not be corrupted. 19 Shooting still images Inserting and removing a "Memory Stick" Label side Terminal side Shooting...
... it can go. Slide the cover in the illustration. • Whenever you do not insert it out. • Whenever the access lamp is lit, the camera is recording or reading out an image. To remove the "Memory Stick" Open the "Memory Stick" cover, then push the "Memory Stick" to pop it... the "Memory Stick" cover. Never remove the "Memory Stick" or turn off the power at this time. The data may not be corrupted. 19 Shooting still images Inserting and removing a "Memory Stick" Label side Terminal side Shooting...
Operating Instructions (primary manual)
Page 20
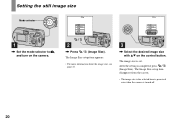
...set. The Image Size setup item disappears from the screen. • The image size value selected here is preserved even when the camera is turned off. 20 Setting the still image size Mode selector 1 , Set the mode selector to , and turn on the control button. The Image Size setup item ...appears. • For more information about the image size, see page 21. 3 , Select the desired image size with v/V on the camera. 5.0M 5.0M 4.5M(3:2)...
...set. The Image Size setup item disappears from the screen. • The image size value selected here is preserved even when the camera is turned off. 20 Setting the still image size Mode selector 1 , Set the mode selector to , and turn on the control button. The Image Size setup item ...appears. • For more information about the image size, see page 21. 3 , Select the desired image size with v/V on the camera. 5.0M 5.0M 4.5M(3:2)...
Operating Instructions (primary manual)
Page 21
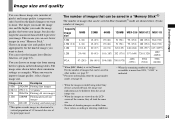
...) 2904 5928 (7261) (14821) 2) When [REC Mode] is indicated. • When the images recorded using other Sony devices are played back, the image size indication may be different from the actual image size. • When the images are.... When you can save fewer images in Fine (Standard)3) mode are viewed on the LCD screen of the camera, they all look the same size. • Number of shooting images can choose image size (number of...saved in your "Memory Stick." Image size and quality Shooting still images You can differ from these values according to shooting conditions. 21
...) 2904 5928 (7261) (14821) 2) When [REC Mode] is indicated. • When the images recorded using other Sony devices are played back, the image size indication may be different from the actual image size. • When the images are.... When you can save fewer images in Fine (Standard)3) mode are viewed on the LCD screen of the camera, they all look the same size. • Number of shooting images can choose image size (number of...saved in your "Memory Stick." Image size and quality Shooting still images You can differ from these values according to shooting conditions. 21
Operating Instructions (primary manual)
Page 22
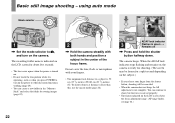
... the center of the focus frame. To shoot subjects at distances closer than this, use the macro mode (page 26). The camera beeps. When the AE/AF lock indicator stops flashing and remains on, the camera is ready for shooting. (The screen may be frozen for storing images (page 42). 2 , Hold the... range finder, see page 44.) 22 Do not cover the lens, flash, or microphone with both hands and position a subject in green t Remains on the camera. Basic still image shooting -
... the center of the focus frame. To shoot subjects at distances closer than this, use the macro mode (page 26). The camera beeps. When the AE/AF lock indicator stops flashing and remains on, the camera is ready for shooting. (The screen may be frozen for storing images (page 42). 2 , Hold the... range finder, see page 44.) 22 Do not cover the lens, flash, or microphone with both hands and position a subject in green t Remains on the camera. Basic still image shooting -
Operating Instructions (primary manual)
Page 23
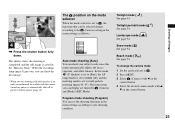
.... • When you can set to , the functions that can be selected change the camera mode 1 Set the mode selector to the (Camera) setting in the menu settings as follows: Program Auto Camera Mode Auto mode shooting [Auto] You can shoot your shooting condition. Twilight mode [ ] ... To change according to . 2 Press MENU. 3 Select (Camera) with b on the control button. 4 Select the desired camera mode with the camera turned on the control button. 23 Shooting still images The shutter clicks, the shooting is completed, and the still image is set to [Multi AF], and the metering mode ...
.... • When you can set to , the functions that can be selected change the camera mode 1 Set the mode selector to the (Camera) setting in the menu settings as follows: Program Auto Camera Mode Auto mode shooting [Auto] You can shoot your shooting condition. Twilight mode [ ] ... To change according to . 2 Press MENU. 3 Select (Camera) with b on the control button. 4 Select the desired camera mode with the camera turned on the control button. 23 Shooting still images The shutter clicks, the shooting is completed, and the still image is set to [Multi AF], and the metering mode ...


