
Operating Instructions (primary manual)
Page 1
Digital Still Camera Operating Instructions Before operating the unit, please read this product. Model No. DSC-P31/P71 Serial No. Record the serial number in the space provided below. Refer to your Sony dealer regarding this manual thoroughly, and retain it for future reference. DSC-P31/P71 © 2002 Sony Corporation 3-074-351-11(1) Getting started Shooting still images Viewing still images...
Digital Still Camera Operating Instructions Before operating the unit, please read this product. Model No. DSC-P31/P71 Serial No. Record the serial number in the space provided below. Refer to your Sony dealer regarding this manual thoroughly, and retain it for future reference. DSC-P31/P71 © 2002 Sony Corporation 3-074-351-11(1) Getting started Shooting still images Viewing still images...

Operating Instructions (primary manual)
Page 4
Attention The electromagnetic fields at the specific frequencies may influence the picture and sound of this camera. and Canada THIS CLASS B DIGITAL DEVICE COMPLIES WITH PART 15 OF THE FCC RULES AND THE CANADIAN ICES-003 OPERATION IS SUBJECT TO THE FOLLOWING TWO CONDITIONS: (1) THIS DEVICE MAY ...
Attention The electromagnetic fields at the specific frequencies may influence the picture and sound of this camera. and Canada THIS CLASS B DIGITAL DEVICE COMPLIES WITH PART 15 OF THE FCC RULES AND THE CANADIAN ICES-003 OPERATION IS SUBJECT TO THE FOLLOWING TWO CONDITIONS: (1) THIS DEVICE MAY ...

Operating Instructions (primary manual)
Page 5
... standard established by the JEITA (Japan Electronics and Information Technology Industries Association). • Playback of images recorded with your camera on other equipment and playback of images recorded or edited with other equipment on copyright Television programs, films, video tapes,... and other materials may be contrary to a malfunction of your camera or recording medium, etc. Notes on image data compatibility • This camera conforms with the Design Rules for if recording or playback is working correctly. Before using your...
... standard established by the JEITA (Japan Electronics and Information Technology Industries Association). • Playback of images recorded with your camera on other equipment and playback of images recorded or edited with other equipment on copyright Television programs, films, video tapes,... and other materials may be contrary to a malfunction of your camera or recording medium, etc. Notes on image data compatibility • This camera conforms with the Design Rules for if recording or playback is working correctly. Before using your...

Operating Instructions (primary manual)
Page 6
..., see page 99 and follow the instructions on the LCD screen and the LCD finder. Do not shake or strike the camera In addition to malfunctions and inability to get the camera wet When taking pictures outdoors in the rain or under similar conditions, be careful not to record images, this may... loss may be some tiny black points and/or bright points (white, red, blue or green in any way. • Be careful when placing the camera near a window or outdoors. However, there may occur. LCD screen, LCD finder (only models with a finder) and lens • The LCD screen and the LCD...
..., see page 99 and follow the instructions on the LCD screen and the LCD finder. Do not shake or strike the camera In addition to malfunctions and inability to get the camera wet When taking pictures outdoors in the rain or under similar conditions, be careful not to record images, this may... loss may be some tiny black points and/or bright points (white, red, blue or green in any way. • Be careful when placing the camera near a window or outdoors. However, there may occur. LCD screen, LCD finder (only models with a finder) and lens • The LCD screen and the LCD...

Operating Instructions (primary manual)
Page 7
... in this camera. Trademarks • "Memory Stick," , "MagicGate Memory Stick," and , are trademarks of Sony Corporation. • is equipped with an auto zoom lens. The pictures used in this manual The photographs used in this manual are reproduced images, and are not actual images shot using this...; marks not used in general, trademarks or registered trademarks of their respective developers or manufacturers. The auto zoom lens (for the DSC-P71 only) This camera is a trademark of Sony Corporation. • Microsoft and Windows are registered trademarks of the U.S.
... in this camera. Trademarks • "Memory Stick," , "MagicGate Memory Stick," and , are trademarks of Sony Corporation. • is equipped with an auto zoom lens. The pictures used in this manual The photographs used in this manual are reproduced images, and are not actual images shot using this...; marks not used in general, trademarks or registered trademarks of their respective developers or manufacturers. The auto zoom lens (for the DSC-P71 only) This camera is a trademark of Sony Corporation. • Microsoft and Windows are registered trademarks of the U.S.
Operating Instructions (primary manual)
Page 8
...removing a "Memory Stick 23 Deciding the still image size and image quality 24 Basic still image shooting (using auto adjustment mode 26 Checking the last shot image (Quick Review 27 Using the zoom feature 28 Shooting close-ups (Macro) (DSC-P71 only 28 Using the self-timer 29 Selecting... on the Index (3 images) screen 41 Formatting a "Memory Stick 43 Copying still images to your computer Copying still images to your computer ...44 1 Installing the USB driver 45 2 Preparing your camera 46 3 Connecting your camera to your computer 47 4 Copying images 48 When a removable disk icon is ...
...removing a "Memory Stick 23 Deciding the still image size and image quality 24 Basic still image shooting (using auto adjustment mode 26 Checking the last shot image (Quick Review 27 Using the zoom feature 28 Shooting close-ups (Macro) (DSC-P71 only 28 Using the self-timer 29 Selecting... on the Index (3 images) screen 41 Formatting a "Memory Stick 43 Copying still images to your computer Copying still images to your computer ...44 1 Installing the USB driver 45 2 Preparing your camera 46 3 Connecting your camera to your computer 47 4 Copying images 48 When a removable disk icon is ...
Operating Instructions (primary manual)
Page 9
...an enlarged image - EFFECT).......60 Spot light-metering 61 Shooting multiple frames (CLIP MOTION 62 Shooting in the SET UP screen 55 Advanced still image shooting Adjusting the exposure (EV adjustment) 56 Adjusting color tones (WHITE BALANCE 57 Choosing a focus method (MULTI AF/CENTER AF...movies 78 Deleting unnecessary portions of a movie 79 Copying movies to your camera ...55 Changing menu settings 55 Changing items in Multi Burst mode (MULTI BURST 64 Shooting still images for e-mail (E-MAIL 65 Advanced still image viewing Enlarging a portion of images that can be saved/ shooting...
...an enlarged image - EFFECT).......60 Spot light-metering 61 Shooting multiple frames (CLIP MOTION 62 Shooting in the SET UP screen 55 Advanced still image shooting Adjusting the exposure (EV adjustment) 56 Adjusting color tones (WHITE BALANCE 57 Choosing a focus method (MULTI AF/CENTER AF...movies 78 Deleting unnecessary portions of a movie 79 Copying movies to your camera ...55 Changing menu settings 55 Changing items in Multi Burst mode (MULTI BURST 64 Shooting still images for e-mail (E-MAIL 65 Advanced still image viewing Enlarging a portion of images that can be saved/ shooting...

Operating Instructions (primary manual)
Page 10
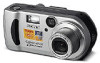
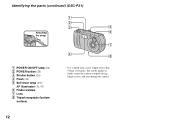
You will be unable to firmly secure the camera to tripods having longer screws, and may damage the camera. 10 Identifying the parts (DSC-P71) Attaching the strap A POWER ON/OFF lamp (20) B POWER button (20) C Shutter button (26) D Flash (30) E Self-timer lamp (29)/ AF illuminator (31, 97) F Finder window G Lens H Tripod receptacle (bottom surface) 1 2 3 6 4 5 7 8 • Use a tripod with a screw length of less than 5.5mm (7/32 inch).
You will be unable to firmly secure the camera to tripods having longer screws, and may damage the camera. 10 Identifying the parts (DSC-P71) Attaching the strap A POWER ON/OFF lamp (20) B POWER button (20) C Shutter button (26) D Flash (30) E Self-timer lamp (29)/ AF illuminator (31, 97) F Finder window G Lens H Tripod receptacle (bottom surface) 1 2 3 6 4 5 7 8 • Use a tripod with a screw length of less than 5.5mm (7/32 inch).
Operating Instructions (primary manual)
Page 12
You will be unable to firmly secure the camera to tripods having longer screws, and may damage the camera. 12 Identifying the parts (continued) (DSC-P31) 1 2 3 5 Attaching 6 the strap 7 4 8 A POWER ON/OFF lamp (20) B POWER button (20) C Shutter button (26) D Flash (30) E Self-timer lamp (29)/ AF illuminator (31, 97) F Finder window G Lens H Tripod receptacle (bottom surface) • Use a tripod with a screw length of less than 5.5mm (7/32 inch).
You will be unable to firmly secure the camera to tripods having longer screws, and may damage the camera. 12 Identifying the parts (continued) (DSC-P31) 1 2 3 5 Attaching 6 the strap 7 4 8 A POWER ON/OFF lamp (20) B POWER button (20) C Shutter button (26) D Flash (30) E Self-timer lamp (29)/ AF illuminator (31, 97) F Finder window G Lens H Tripod receptacle (bottom surface) • Use a tripod with a screw length of less than 5.5mm (7/32 inch).

Operating Instructions (primary manual)
Page 14
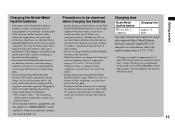
...• When transporting the Nickel-Metal Hydride batteries, be sure to use the Finder to charge the Nickel-Metal Hydride batteries supplied with the DSC-P71) * Use of AA alkaline batteries may not display the correct information. To the wall outlet (mains) Power cord (mains lead) Charge ... temperatures below +5°C (41°F). • The battery remaining indicator may result in shorter than desired operating time. (only in this camera. When the charge lamp goes out, charging is finished. • When charging is outside that cannot be used Manganese batteries, lithium batteries...
...• When transporting the Nickel-Metal Hydride batteries, be sure to use the Finder to charge the Nickel-Metal Hydride batteries supplied with the DSC-P71) * Use of AA alkaline batteries may not display the correct information. To the wall outlet (mains) Power cord (mains lead) Charge ... temperatures below +5°C (41°F). • The battery remaining indicator may result in shorter than desired operating time. (only in this camera. When the charge lamp goes out, charging is finished. • When charging is outside that cannot be used Manganese batteries, lithium batteries...
Operating Instructions (primary manual)
Page 15
...lithium batteries) than the batteries specified, those batteries may leak, overheat, or explode, causing the danger of burns or other batteries except Sony Nickel-Metal Hydride batteries in approximately 13 hours. It is not a malfunction. If you recharge Nickel-Metal Hydride batteries before fully using them... longer than 13 hours, but this type of purchase, or when the NickelMetal Hydride batteries haven't been used up the batteries completely, put the camera in "SLIDE SHOW" mode and leave it , should correct the problem. * The "memory effect" - If this happens, repeatedly using the ...
...lithium batteries) than the batteries specified, those batteries may leak, overheat, or explode, causing the danger of burns or other batteries except Sony Nickel-Metal Hydride batteries in approximately 13 hours. It is not a malfunction. If you recharge Nickel-Metal Hydride batteries before fully using them... longer than 13 hours, but this type of purchase, or when the NickelMetal Hydride batteries haven't been used up the batteries completely, put the camera in "SLIDE SHOW" mode and leave it , should correct the problem. * The "memory effect" - If this happens, repeatedly using the ...
Operating Instructions (primary manual)
Page 16
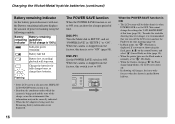
...DISPLAY/ LCD ON/OFF button to turn off . • In shooting still images, the focus only focuses when the shutter is pushed down halfway. DSC-P71 Turn the Mode dial to SET UP, and set to ON, you ...information may not be darker than it on. • Based on the conditions under which the camera is being used , the Remaining battery information is not displayed. 16 The POWER SAVE function When ...displays the amount of the charge, or on the environment, this switch is set to OFF. When the camera is shipped from the factory, this time (page 98). When the POWER SAVE function is ON • ...
...DISPLAY/ LCD ON/OFF button to turn off . • In shooting still images, the focus only focuses when the shutter is pushed down halfway. DSC-P71 Turn the Mode dial to SET UP, and set to ON, you ...information may not be darker than it on. • Based on the conditions under which the camera is being used , the Remaining battery information is not displayed. 16 The POWER SAVE function When ...displays the amount of the charge, or on the environment, this switch is set to OFF. When the camera is shipped from the factory, this time (page 98). When the POWER SAVE function is ON • ...

Operating Instructions (primary manual)
Page 17
... cover by wiping them with a film of dirt or oil from the skin, the operating time of the camera can be greatly reduced. 3 , Close the Battery cover. To remove the batteries Stand the camera on end, open the Battery cover upward, then remove the batteries. • Make sure you don't drop the...
... cover by wiping them with a film of dirt or oil from the skin, the operating time of the camera can be greatly reduced. 3 , Close the Battery cover. To remove the batteries Stand the camera on end, open the Battery cover upward, then remove the batteries. • Make sure you don't drop the...
Operating Instructions (primary manual)
Page 18
... to Standard, when you shoot in Flash mode " ", and when you shoot in Normal mode in order, one image every three seconds When playing back** still images DSC-P71 R6 (size AA) Ni-MH (2) (supplied) Battery life No. of size screen life (min.) images 1600×1200 ON Approx. 120 Approx. 2400 OFF.... Inserting the batteries (continued) Battery life and the number of images that can be recorded or played back allow for the length of time the camera can be used when picture quality is 25°C (77°F), and the supplied Nickel-Metal Hydride batteries are fully charged.
... to Standard, when you shoot in Flash mode " ", and when you shoot in Normal mode in order, one image every three seconds When playing back** still images DSC-P71 R6 (size AA) Ni-MH (2) (supplied) Battery life No. of size screen life (min.) images 1600×1200 ON Approx. 120 Approx. 2400 OFF.... Inserting the batteries (continued) Battery life and the number of images that can be recorded or played back allow for the length of time the camera can be used when picture quality is 25°C (77°F), and the supplied Nickel-Metal Hydride batteries are fully charged.

Operating Instructions (primary manual)
Page 19
... (mains). • When you have finished using the AC power adaptor, disconnect it from the DC IN jack of the camera. • To use power from an automobile, use your camera in any country or area with the supplied battery charger within 100 V to the DC IN jack of the wall outlet... (wall socket) [b]. Use a commercially available AC plug adaptor [a], if necessary, depending on the design of the camera. Using your camera abroad Power sources You can use a DC adaptor/Charger (not supplied). • If you insert or remove the DC plug while you are using...
... (mains). • When you have finished using the AC power adaptor, disconnect it from the DC IN jack of the camera. • To use power from an automobile, use your camera in any country or area with the supplied battery charger within 100 V to the DC IN jack of the wall outlet... (wall socket) [b]. Use a commercially available AC plug adaptor [a], if necessary, depending on the design of the camera. Using your camera abroad Power sources You can use a DC adaptor/Charger (not supplied). • If you insert or remove the DC plug while you are using...
Operating Instructions (primary manual)
Page 20
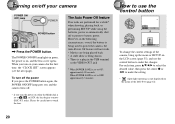
...and the lens cover opens. When you turn on your camera POWER ON/ OFF lamp POWER button 1 , Press the POWER button. Please be careful not to move (DSC-P71 only). To turn off the power If you press the... POWER button again, the POWER ON/OFF lamp goes out, and the camera turns off to preserve battery power. Turning on/off your camera for a ...the control button 0EV 0EV EV WB ISO AUTO WHITE BAL ISO To change the current settings of the camera, bring up the menu or SET UP on the LCD screen (page 55), and use the control ...
...and the lens cover opens. When you turn on your camera POWER ON/ OFF lamp POWER button 1 , Press the POWER button. Please be careful not to move (DSC-P71 only). To turn off the power If you press the... POWER button again, the POWER ON/OFF lamp goes out, and the camera turns off to preserve battery power. Turning on/off your camera for a ...the control button 0EV 0EV EV WB ISO AUTO WHITE BAL ISO To change the current settings of the camera, bring up the menu or SET UP on the LCD screen (page 55), and use the control ...
Operating Instructions (primary manual)
Page 23
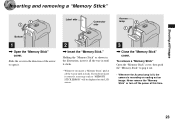
... Inserting and removing a "Memory Stick" Shooting still images Label side Connector side Access lamp Bottom 1 , Open the "Memory Stick" cover. Holding the "Memory Stick" as "MEMORY STICK ERROR" will be displayed on ... Stick" cover. Slide the cover in until it clicks. • Whenever you do not insert it out. • Whenever the Access lamp is lit, the camera is recording or reading out an image. To remove a "Memory Stick" Open the "Memory Stick" cover, then push the "Memory Stick" to open it clicks...
... Inserting and removing a "Memory Stick" Shooting still images Label side Connector side Access lamp Bottom 1 , Open the "Memory Stick" cover. Holding the "Memory Stick" as "MEMORY STICK ERROR" will be displayed on ... Stick" cover. Slide the cover in until it clicks. • Whenever you do not insert it out. • Whenever the Access lamp is lit, the camera is recording or reading out an image. To remove a "Memory Stick" Open the "Memory Stick" cover, then push the "Memory Stick" to open it clicks...
Operating Instructions (primary manual)
Page 24
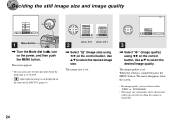
...and quality values chosen here will be preserved even when the camera is not displayed on the menu of the DSC-P31 (page 61). 2048x1536 2048 (3 : 2) 1600x1200 1280 x 960 640 x 480 IMAGESIZE 1600x1200 1600 (3 : 2) 1280 x 960 640 x 480 SO IMAGE SIZE DSC-P71 DSC-P31 2 , Select " " (Image size) using ...FINE STANDARD P.QUALITY MODE PFX 3 , Select " " (Image quality) using b/B on the control button. When the setting is set . Deciding the still image size and image quality FINE AUTO WHITE BAL ISO 1 Menu button , Turn the Mode dial to select the desired image size. Use v/V to ,...
...and quality values chosen here will be preserved even when the camera is not displayed on the menu of the DSC-P31 (page 61). 2048x1536 2048 (3 : 2) 1600x1200 1280 x 960 640 x 480 IMAGESIZE 1600x1200 1600 (3 : 2) 1280 x 960 640 x 480 SO IMAGE SIZE DSC-P71 DSC-P31 2 , Select " " (Image size) using ...FINE STANDARD P.QUALITY MODE PFX 3 , Select " " (Image quality) using b/B on the control button. When the setting is set . Deciding the still image size and image quality FINE AUTO WHITE BAL ISO 1 Menu button , Turn the Mode dial to select the desired image size. Use v/V to ,...
Operating Instructions (primary manual)
Page 25
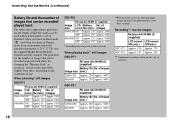
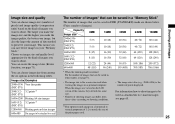
...DSC-P31) 1280×960 Printing postcard size images 640×480 For images to be attached to e-mail The number of images* that can be saved in a "Memory Stick" The number of images that can be saved in FINE (STANDARD) mode are viewed on the LCD screen of the camera...the larger the amount of the print paper used. 25 Shooting still images For information how to shoot images to be saved in...images are shown below. (Units: number of images) Capacity Image size 2048×1536 (DSC-P71) 2048(3:2) (DSC-P71) 1600×1200 1600 (3:2) (DSC-P31) 1280×960 640×480 8MB 5 (9) 5 (9) 8 (15) ...
...DSC-P31) 1280×960 Printing postcard size images 640×480 For images to be attached to e-mail The number of images* that can be saved in a "Memory Stick" The number of images that can be saved in FINE (STANDARD) mode are viewed on the LCD screen of the camera...the larger the amount of the print paper used. 25 Shooting still images For information how to shoot images to be saved in...images are shown below. (Units: number of images) Capacity Image size 2048×1536 (DSC-P71) 2048(3:2) (DSC-P71) 1600×1200 1600 (3:2) (DSC-P31) 1280×960 640×480 8MB 5 (9) 5 (9) 8 (15) ...
Operating Instructions (primary manual)
Page 26
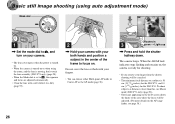
...shutter, shooting will be canceled. • The minimum focal distance to focus on. The camera beeps. Basic still image shooting (using auto adjustment mode) Mode dial 2048 4 F2.1 50 1 , Set the mode dial to , and turn on your camera. • The lens cover opens when the power is turned on. • When... the camera is turned on or when using the zoom, and the lens is moving, don't touch the lens assembly (DSC-P71 only) (page 28). • When the Mode dial is set to , the exposure and focus are adjusted automatically. ...
...shutter, shooting will be canceled. • The minimum focal distance to focus on. The camera beeps. Basic still image shooting (using auto adjustment mode) Mode dial 2048 4 F2.1 50 1 , Set the mode dial to , and turn on your camera. • The lens cover opens when the power is turned on. • When... the camera is turned on or when using the zoom, and the lens is moving, don't touch the lens assembly (DSC-P71 only) (page 28). • When the Mode dial is set to , the exposure and focus are adjusted automatically. ...


