
Operating Instructions
Page 3
... by ASTA or BSI to BS 1362, (i.e., marked with or mark) must be determined by turning the equipment off and on, the user is no guarantee that interference will not occur in the... . If the plug supplied with the limits for a Class B digital device, pursuant to correct the interference by returning your nearest Sony service station. However, there is encouraged to try to Part 15...harmful interference in Europe This product has been tested and found to comply with this digital camera. If this equipment does cause harmful interference to which the receiver is fitted to...
... by ASTA or BSI to BS 1362, (i.e., marked with or mark) must be determined by turning the equipment off and on, the user is no guarantee that interference will not occur in the... . If the plug supplied with the limits for a Class B digital device, pursuant to correct the interference by returning your nearest Sony service station. However, there is encouraged to try to Part 15...harmful interference in Europe This product has been tested and found to comply with this digital camera. If this equipment does cause harmful interference to which the receiver is fitted to...

Operating Instructions
Page 6
Focus preset 49 Adjusting the exposure - Burst 2 56 Shooting still images for e-mail - Macro (DSC-P72 only 30 Using the self-timer 31 Selecting a flash mode 32 Shooting with audio files - White Balance...Using an external power source 19 Using your camera abroad 19 Turning your camera on a TV screen 38 Deleting still images Deleting images 40 Formatting a "Memory Stick 44 Before advanced operations How to setup and operate your camera 36 Viewing images on /off 20 How to... Viewing images on the LCD screen of contents Before using auto mode 26 Checking the last image shot -
Focus preset 49 Adjusting the exposure - Burst 2 56 Shooting still images for e-mail - Macro (DSC-P72 only 30 Using the self-timer 31 Selecting a flash mode 32 Shooting with audio files - White Balance...Using an external power source 19 Using your camera abroad 19 Turning your camera on a TV screen 38 Deleting still images Deleting images 40 Formatting a "Memory Stick 44 Before advanced operations How to setup and operate your camera 36 Viewing images on /off 20 How to... Viewing images on the LCD screen of contents Before using auto mode 26 Checking the last image shot -
Operating Instructions
Page 17
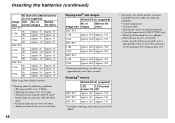
...amount of time. The Power Save function When the Power Save function is set [Power Save] to turn it on. • Based on the conditions under which the camera is being used, the remaining battery information is off . Actual results may not be correctly indicated. &#...camera can be recorded or played back allow for a longer period of power remaining using alkaline batteries. The factory setting of Battery size screen images life (min.) DSC-P72 3.1M On Off Approx. 300 Approx. 150 Approx. 500 Approx. 250 VGA On Off Approx. 300 Approx. 150 Approx. 500 Approx. 250 DSC-P52...
...amount of time. The Power Save function When the Power Save function is set [Power Save] to turn it on. • Based on the conditions under which the camera is being used, the remaining battery information is off . Actual results may not be correctly indicated. &#...camera can be recorded or played back allow for a longer period of power remaining using alkaline batteries. The factory setting of Battery size screen images life (min.) DSC-P72 3.1M On Off Approx. 300 Approx. 150 Approx. 500 Approx. 250 VGA On Off Approx. 300 Approx. 150 Approx. 500 Approx. 250 DSC-P52...
Operating Instructions
Page 18
... every two shots. - Turning the camera on and off frequently. - When [Power Save] is set to [Bright]. - of images recordable decrease under the following conditions: - At low temperatures. - Using the zoom heavily (DSC-P72/P52 only) - After using Sony alkaline batteries 1) Shooting under the following conditions: - Shooting one approximately every three seconds Shooting3) movies DSC-P72 DSC-P52 DSC-P32...
... every two shots. - Turning the camera on and off frequently. - When [Power Save] is set to [Bright]. - of images recordable decrease under the following conditions: - At low temperatures. - Using the zoom heavily (DSC-P72/P52 only) - After using Sony alkaline batteries 1) Shooting under the following conditions: - Shooting one approximately every three seconds Shooting3) movies DSC-P72 DSC-P52 DSC-P32...

Operating Instructions
Page 19
...a commercially available AC plug adaptor [a], if necessary, depending on the design of the camera. Getting started Using an external power source AC Adaptor (not supplied) 2 To a...wall outlet (wall socket), even if the unit itself has been turned off the power by . Using your camera abroad Power sources You can use your camera in any country or area with the v mark facing toward ...(travel converter), as it is not disconnected from the AC power source (mains) as long as this camera. • Connect the AC Adaptor to an easily accessible wall outlet (wall socket) close by disconnecting ...
...a commercially available AC plug adaptor [a], if necessary, depending on the design of the camera. Getting started Using an external power source AC Adaptor (not supplied) 2 To a...wall outlet (wall socket), even if the unit itself has been turned off the power by . Using your camera abroad Power sources You can use your camera in any country or area with the v mark facing toward ...(travel converter), as it is not disconnected from the AC power source (mains) as long as this camera. • Connect the AC Adaptor to an easily accessible wall outlet (wall socket) close by disconnecting ...

Operating Instructions
Page 20
... off POWER lamp POWER POWER , Press POWER to turn the power on the camera for the first time, the Clock Set screen appears (page 21). However, in green and the power is set to or , the lens begins to move (DSC-P72 only). To turn on with the lens portion pulled out. This may... cause a malfunction (DSC-P72 only). • When you turn off the power Press POWER again, the POWER lamp goes out, and the camera turns off. • Do not remove the batteries or AC...
... off POWER lamp POWER POWER , Press POWER to turn the power on the camera for the first time, the Clock Set screen appears (page 21). However, in green and the power is set to or , the lens begins to move (DSC-P72 only). To turn on with the lens portion pulled out. This may... cause a malfunction (DSC-P72 only). • When you turn off the power Press POWER again, the POWER lamp goes out, and the camera turns off. • Do not remove the batteries or AC...
Operating Instructions
Page 21
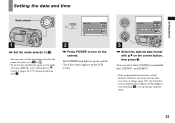
..., set up the date and time again. 21 The POWER lamp lights in (Setup 1) (pages 45, 107), then proceed from Step 3. 2 , Press POWER to turn on the camera. You can carry out this happens, start from [Y/M/D] (year/month/ day), [M/D/Y], and [D/M/Y]. • If the rechargeable button battery, which provides the power for saving...
..., set up the date and time again. 21 The POWER lamp lights in (Setup 1) (pages 45, 107), then proceed from Step 3. 2 , Press POWER to turn on the camera. You can carry out this happens, start from [Y/M/D] (year/month/ day), [M/D/Y], and [D/M/Y]. • If the rechargeable button battery, which provides the power for saving...

Operating Instructions
Page 23
Never remove the "Memory Stick" or turn off the power at this time. To remove the "Memory Stick" Open the "Memory Stick" cover, then push the "Memory Stick" to pop it correctly, a ... the "Memory Stick." Slide the cover in the illustration. • Whenever you do not insert it out. • Whenever the access lamp is lit, the camera is recording or reading out an image. Shooting still images Inserting and removing a "Memory Stick" Label side Terminal side Shooting still images Access lamp 1 , Open...
Never remove the "Memory Stick" or turn off the power at this time. To remove the "Memory Stick" Open the "Memory Stick" cover, then push the "Memory Stick" to pop it correctly, a ... the "Memory Stick." Slide the cover in the illustration. • Whenever you do not insert it out. • Whenever the access lamp is lit, the camera is recording or reading out an image. Shooting still images Inserting and removing a "Memory Stick" Label side Terminal side Shooting still images Access lamp 1 , Open...

Operating Instructions
Page 24
... the mode selector to . 3.1M 3.1M 2.8M(3:2) 2.0M 1.2M VGA Image Size VGA 3.1M 2.8M(3:2) 2.0M 1.2M VGA Image Size 2 , Turn on the control button. The image size is turned off. 24 The Image Size setup item disappears from the screen. • The image size value selected here is preserved even... when the camera is set. After the setting is completed, press (Image Size). The Image Size setup item appears. • ...
... the mode selector to . 3.1M 3.1M 2.8M(3:2) 2.0M 1.2M VGA Image Size VGA 3.1M 2.8M(3:2) 2.0M 1.2M VGA Image Size 2 , Turn on the control button. The image size is turned off. 24 The Image Size setup item disappears from the screen. • The image size value selected here is preserved even... when the camera is set. After the setting is completed, press (Image Size). The Image Size setup item appears. • ...
Operating Instructions
Page 26
...frame indicated on the camera. The recording folder name is indicated on the LCD screen for about five seconds. • The lens cover opens when the power is turned on. • Do not touch the lens portion while it is operating, such as follows: DSC-P72: 50 cm (19 3/4 inches) DSC-P52: 8 cm (3 ...1/4 inches) (W)/40 cm (15 3/4 inches) (T) DSC-P32: 10 cm (4 inches) To shoot subjects at distances closer...
...frame indicated on the camera. The recording folder name is indicated on the LCD screen for about five seconds. • The lens cover opens when the power is turned on. • Do not touch the lens portion while it is operating, such as follows: DSC-P72: 50 cm (19 3/4 inches) DSC-P52: 8 cm (3 ...1/4 inches) (W)/40 cm (15 3/4 inches) (T) DSC-P32: 10 cm (4 inches) To shoot subjects at distances closer...

Operating Instructions
Page 27
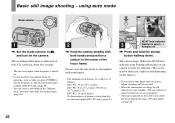
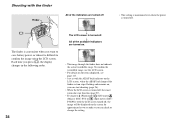
... shooting [Program] You can display are performed for a while with v/ V on , power is set the shooting functions in the menu settings according to (Camera) and [Mode] (REC Mode). Twilight portratit mode [ ] See page 58. When the recording lamp (pages 9, 11, 13) goes out, you can... menu settings as follows: Program Auto Camera Mode Auto mode shooting [Auto] You can be selected change the camera mode 1 Set the mode selector to . 2 Press MENU. 3 Select (Camera) with b on the control button. 4 Select the desired camera mode with the camera turned on the control button. 27 Shooting...
... shooting [Program] You can display are performed for a while with v/ V on , power is set the shooting functions in the menu settings according to (Camera) and [Mode] (REC Mode). Twilight portratit mode [ ] See page 58. When the recording lamp (pages 9, 11, 13) goes out, you can... menu settings as follows: Program Auto Camera Mode Auto mode shooting [Auto] You can be selected change the camera mode 1 Set the mode selector to . 2 Press MENU. 3 Select (Camera) with b on the control button. 4 Select the desired camera mode with the camera turned on the control button. 27 Shooting...

Operating Instructions
Page 32
...is completed, the lamp goes out. • The flash mode selected here is preserved even when the camera is enough light around the subject. (Daylight synchro) Before flashed When flashed • The best performance may...19 3/4 inches to 12 feet 5 19/32 inches) (W)/0.5 m to 2.5 m (19 3/4 inches to 10 feet 9 29/32 inches) (DSC-P52). - In this operation even when the mode selector is set to use a tripod. • While the flash is being charged, the lamp... a light source automatically flashes even when there is turned off. About 0.5 m to 3.3 m (19 3/4 inches to 8 feet 2 7/16 inches...
...is completed, the lamp goes out. • The flash mode selected here is preserved even when the camera is enough light around the subject. (Daylight synchro) Before flashed When flashed • The best performance may...19 3/4 inches to 12 feet 5 19/32 inches) (W)/0.5 m to 2.5 m (19 3/4 inches to 10 feet 9 29/32 inches) (DSC-P52). - In this operation even when the mode selector is set to use a tripod. • While the flash is being charged, the lamp... a light source automatically flashes even when there is turned off. About 0.5 m to 3.3 m (19 3/4 inches to 8 feet 2 7/16 inches...
Operating Instructions
Page 34
...is convenient when you can start shooting (page 26). • When the LCD screen is turned off, the smart zoom does not function (page 29). • If you press (Flash mode)/ (Self-timer)/ (Macro) (DSC-P72) or (Spot meter) (DSCP52/P32) with the finder Finder All of the available ...indicators are turned off • This setting is maintained even when the power is turned off . Each time you press , the display changes in the following order...
...is convenient when you can start shooting (page 26). • When the LCD screen is turned off, the smart zoom does not function (page 29). • If you press (Flash mode)/ (Self-timer)/ (Macro) (DSC-P72) or (Spot meter) (DSCP52/P32) with the finder Finder All of the available ...indicators are turned off • This setting is maintained even when the power is turned off . Each time you press , the display changes in the following order...

Operating Instructions
Page 35
...the date of the LCD screen instead. The SET UP screen appears. • When images are shot with the date and time inserted, the date and time cannot be inserted in the order set in... red on the lower-right corner when the image is played back. 2 , Select (Camera) with v on the control button, then press B. Day&Time: Inserts the date and the time of ...on the control button, then press z. Select [Date/Time] with v/V on the LCD screen, and is turned off. 35 Camera Moving Image: Smart Zoom: Date/Time: Red Eye Reduction: AF Illuminator: MPEG Movie On Date Off Auto ...
...the date of the LCD screen instead. The SET UP screen appears. • When images are shot with the date and time inserted, the date and time cannot be inserted in the order set in... red on the lower-right corner when the image is played back. 2 , Select (Camera) with v on the control button, then press B. Day&Time: Inserts the date and the time of ...on the control button, then press z. Select [Date/Time] with v/V on the LCD screen, and is turned off. 35 Camera Moving Image: Smart Zoom: Date/Time: Red Eye Reduction: AF Illuminator: MPEG Movie On Date Off Auto ...
Operating Instructions
Page 36
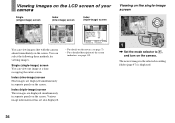
... information items are displayed simultaneously in separate panels on the screen. The newest image in separate panels on the screen. You can view images shot with the camera almost immediately on the screen. Index (nine-image) screen Nine images are also displayed. • For details on the movies, see page... on the single-image screen VGA 101 8/9 101-0008 2003 7 4 10:30PM BACK/NEXT VOLUME 1 , Set the mode selector to , and turn on the camera. Viewing images on the LCD screen of the screen indicators, see page 115. Single (single-image) screen You can view one image at a time...
... information items are displayed simultaneously in separate panels on the screen. The newest image in separate panels on the screen. You can view images shot with the camera almost immediately on the screen. Index (nine-image) screen Nine images are also displayed. • For details on the movies, see page... on the single-image screen VGA 101 8/9 101-0008 2003 7 4 10:30PM BACK/NEXT VOLUME 1 , Set the mode selector to , and turn on the camera. Viewing images on the LCD screen of the screen indicators, see page 115. Single (single-image) screen You can view one image at a time...

Operating Instructions
Page 38
... select the desired image. • When using the camera abroad, it may differ depending on your TV. If your TV system (page 107). 38 For details, refer to the operating instructions supplied with the A/V connecting cable. 2 TV/Video switch , Turn on the TV, and set the TV/ Video switch...Connect the supplied A/V connecting cable to the A/V OUT (MONO) jack of the camera and the audio/video input jacks of the A/V connecting cable to the Lch audio input jack. • Turn off both the camera and the TV before connecting the camera and the TV with the TV. 3 , Set the mode selector to ,...
... select the desired image. • When using the camera abroad, it may differ depending on your TV. If your TV system (page 107). 38 For details, refer to the operating instructions supplied with the A/V connecting cable. 2 TV/Video switch , Turn on the TV, and set the TV/ Video switch...Connect the supplied A/V connecting cable to the A/V OUT (MONO) jack of the camera and the audio/video input jacks of the A/V connecting cable to the Lch audio input jack. • Turn off both the camera and the TV before connecting the camera and the TV with the TV. 3 , Set the mode selector to ,...

Operating Instructions
Page 40
Select the image you want to , and turn on the camera. To delete other images continuously Select the image you want to delete with b/B on the control button. To cancel the deletion Select [Exit] with v on ...
Select the image you want to , and turn on the camera. To delete other images continuously Select the image you want to delete with b/B on the control button. To cancel the deletion Select [Exit] with v on ...
Operating Instructions
Page 44
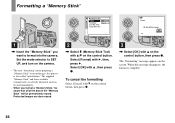
... v/V on the screen. Folder: OK Cancel OK Format All data will be erased Ready? Set the mode selector to SET UP, and turn on the control button, then press z. The supplied "Memory Stick" and those available commercially, are also erased. 2 , Select (Memory Stick Tool...) with v on the camera. • The term "formatting" means preparing a "Memory Stick" to format into the camera. Select [OK] with B, then, press B. When this process is complete. 44 Folder: Change REC. Select ...
... v/V on the screen. Folder: OK Cancel OK Format All data will be erased Ready? Set the mode selector to SET UP, and turn on the control button, then press z. The supplied "Memory Stick" and those available commercially, are also erased. 2 , Select (Memory Stick Tool...) with v on the camera. • The term "formatting" means preparing a "Memory Stick" to format into the camera. Select [OK] with B, then, press B. When this process is complete. 44 Folder: Change REC. Select ...
Operating Instructions
Page 45
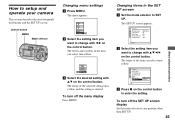
...the control button. Control button MENU Mode selector Changing menu settings a Press MENU. To turn off the menu display Press MENU. The frame of the item you select turn yellow. The SET UP screen appears. Camera Moving Image: Smart Zoom: Date/Time: Red Eye Reduction: AF Illuminator: MPEG Movie... button to change with v/V on the control button. The menu appears. Program Auto Camera Mode b Select the setting item you want to enter the setting. The frame of the item you select turns yellow. Before advanced operations Changing items in the SET UP screen a Set the mode...
...the control button. Control button MENU Mode selector Changing menu settings a Press MENU. To turn off the menu display Press MENU. The frame of the item you select turn yellow. The SET UP screen appears. Camera Moving Image: Smart Zoom: Date/Time: Red Eye Reduction: AF Illuminator: MPEG Movie... button to change with v/V on the control button. The menu appears. Program Auto Camera Mode b Select the setting item you want to enter the setting. The frame of the item you select turns yellow. Before advanced operations Changing items in the SET UP screen a Set the mode...
Operating Instructions
Page 46
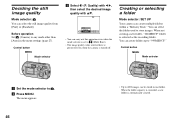
... out this operation even when the mode selector is set to (Multi Burst). • The image quality value selected here is preserved even when the camera is turned off. When not creating a new folder, "101MSDCF" folder is automatically created. FINE Fine Standard ISO P.Quality Mode PFX • You can select the still...
... out this operation even when the mode selector is set to (Multi Burst). • The image quality value selected here is preserved even when the camera is turned off. When not creating a new folder, "101MSDCF" folder is automatically created. FINE Fine Standard ISO P.Quality Mode PFX • You can select the still...


