
Operating Instructions
Page 3
... Metal Hydride batteries. For the Customers in a particular installation. You can help . CAUTION TO PREVENT ELECTRIC SHOCK, DO NOT USE THIS POLARIZED AC PLUG WITH AN EXTENSION CORD, RECEPTACLE OR OTHER OUTLET UNLESS THE BLADES CAN BE FULLY INSERTED TO PREVENT BLADE EXPOSURE. Notice on the supplied battery charger for the customers in the EMC Directive for a digital device pursuant...
... Metal Hydride batteries. For the Customers in a particular installation. You can help . CAUTION TO PREVENT ELECTRIC SHOCK, DO NOT USE THIS POLARIZED AC PLUG WITH AN EXTENSION CORD, RECEPTACLE OR OTHER OUTLET UNLESS THE BLADES CAN BE FULLY INSERTED TO PREVENT BLADE EXPOSURE. Notice on the supplied battery charger for the customers in the EMC Directive for a digital device pursuant...

Operating Instructions
Page 4
... over 99.99% of the battery used to direct sunlight for long periods may occur. The screen may be uneven and that may cause a malfunction. • Images may want to make a trial recording to the provision of images recorded or edited with power zoom lens. LCD screen, LCD finder (only models with a LCD finder) and lens • The LCD screen and the LCD finder are operational for Camera File system universal standard established by...
... over 99.99% of the battery used to direct sunlight for long periods may occur. The screen may be uneven and that may cause a malfunction. • Images may want to make a trial recording to the provision of images recorded or edited with power zoom lens. LCD screen, LCD finder (only models with a LCD finder) and lens • The LCD screen and the LCD finder are operational for Camera File system universal standard established by...

Operating Instructions
Page 6
... Turning your camera on a TV screen 38 Deleting still images Deleting images 40 Formatting a "Memory Stick 44 Before advanced operations How to setup and operate your camera 36 Viewing images on /off 20 How to use the control button 20 Setting the date and time 21 Shooting still images Inserting and removing a "Memory Stick 23 Setting the still image size 24 Image size and quality 25 Basic still image shooting - Clip Motion 54 Shooting in succession - Macro (DSC-P72 only 30 Using the self-timer 31 Selecting a flash mode 32 Shooting...
... Turning your camera on a TV screen 38 Deleting still images Deleting images 40 Formatting a "Memory Stick 44 Before advanced operations How to setup and operate your camera 36 Viewing images on /off 20 How to use the control button 20 Setting the date and time 21 Shooting still images Inserting and removing a "Memory Stick 23 Setting the still image size 24 Image size and quality 25 Basic still image shooting - Clip Motion 54 Shooting in succession - Macro (DSC-P72 only 30 Using the self-timer 31 Selecting a flash mode 32 Shooting...
Operating Instructions
Page 7
Playback zoom 62 Recording an enlarged image - Protect 67 On the single screen 67 On the Index (nine-image) screen.......67 On the Index (triple-image) screen .....68 Changing image size - For Windows users 78 Installing the USB driver 79 Installing "Image Transfer 80 Installing "ImageMixer 81 Connecting the camera to your computer 82 Copying images using "Image Transfer" 83 Changing "Image Transfer" settings .. 84 Copying images without using "Image Transfer 84 Viewing the images on your computer Copying images to your computer - Print (DPOF) mark 70 On the single ...
Playback zoom 62 Recording an enlarged image - Protect 67 On the single screen 67 On the Index (nine-image) screen.......67 On the Index (triple-image) screen .....68 Changing image size - For Windows users 78 Installing the USB driver 79 Installing "Image Transfer 80 Installing "ImageMixer 81 Connecting the camera to your computer 82 Copying images using "Image Transfer" 83 Changing "Image Transfer" settings .. 84 Copying images without using "Image Transfer 84 Viewing the images on your computer Copying images to your computer - Print (DPOF) mark 70 On the single ...
Operating Instructions
Page 17
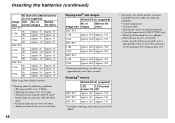
... camera is not displayed. After the flash is set to On, you set [Power Save] in an environment where the ambient temperature is 25°C (77°F), and the batteries are fully charged. Battery life and the number of images that can shoot for changing the supplied "Memory Stick" as necessary. Shooting still images Under the average conditions1) NH-AA-DA (2) (supplied) Image LCD No. The factory setting of time. of power remaining using...
... camera is not displayed. After the flash is set to On, you set [Power Save] in an environment where the ambient temperature is 25°C (77°F), and the batteries are fully charged. Battery life and the number of images that can shoot for changing the supplied "Memory Stick" as necessary. Shooting still images Under the average conditions1) NH-AA-DA (2) (supplied) Image LCD No. The factory setting of time. of power remaining using...
Operating Instructions
Page 18
... period of images recordable decrease under the following conditions: - Shooting one approximately every three seconds Shooting3) movies DSC-P72 DSC-P52 DSC-P32 NH-AA-DA (2) (supplied) LCD LCD screen screen On Off Approx. 160 Approx. 210 Approx. 160 Approx. 210 Approx. 160 Approx. 210 3) Continuous shooting with a picture size of 160 (Mail) • The battery life and the number of time or after charging (page 110). Using the flash once in...
... period of images recordable decrease under the following conditions: - Shooting one approximately every three seconds Shooting3) movies DSC-P72 DSC-P52 DSC-P32 NH-AA-DA (2) (supplied) LCD LCD screen screen On Off Approx. 160 Approx. 210 Approx. 160 Approx. 210 Approx. 160 Approx. 210 3) Continuous shooting with a picture size of 160 (Mail) • The battery life and the number of time or after charging (page 110). Using the flash once in...
Operating Instructions
Page 26
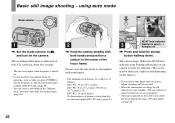
... and hold the shutter button halfway down. using auto mode Mode selector VGA FINE 101 98 F2.8 30 1 , Set the mode selector to , and turn on the power or when the zoom function is as when you release your fingers. • The minimum focal distance to a subject is working (DSC-P72 only) (page 29). • You can continue to turn on the LCD screen shows the focus adjustment range. (AF...
... and hold the shutter button halfway down. using auto mode Mode selector VGA FINE 101 98 F2.8 30 1 , Set the mode selector to , and turn on the power or when the zoom function is as when you release your fingers. • The minimum focal distance to a subject is working (DSC-P72 only) (page 29). • You can continue to turn on the LCD screen shows the focus adjustment range. (AF...
Operating Instructions
Page 79
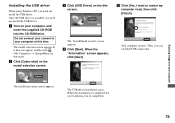
... USB driver installation starts. Once the USB driver is completed, the screen informs you can establish USB connection. Do not connect your computer The installation menu screen appears. The "InstallShield wizard" screen appears. Installing the USB driver When using Windows XP, you need not install the USB driver. The model selection screen appears. b Click [Cyber-shot] on your camera to restart my computer now], then click [Finish]. Your computer restarts. Then, you of completion. 79 When the installation is installed, you need not install...
... USB driver installation starts. Once the USB driver is completed, the screen informs you can establish USB connection. Do not connect your computer The installation menu screen appears. The "InstallShield wizard" screen appears. Installing the USB driver When using Windows XP, you need not install the USB driver. The model selection screen appears. b Click [Cyber-shot] on your camera to restart my computer now], then click [Finish]. Your computer restarts. Then, you of completion. 79 When the installation is installed, you need not install...
Operating Instructions
Page 88
... Folder icon in the screen opened in the folder selected by the camera is copied to the computer. When connected to a computer, only the data in step 4. • Sony USB Driver • Sony USB Shim 6 When the message for a USB connection, [Normal] and [PTP]* modes. iBook or Power Mac G4 with your computer When your camera, may not recover at the factory. Communication with the Mac OS 8.6 installed at the factory USB connector: Provided as standard Display...
... Folder icon in the screen opened in the folder selected by the camera is copied to the computer. When connected to a computer, only the data in step 4. • Sony USB Driver • Sony USB Shim 6 When the message for a USB connection, [Normal] and [PTP]* modes. iBook or Power Mac G4 with your computer When your camera, may not recover at the factory. Communication with the Mac OS 8.6 installed at the factory USB connector: Provided as standard Display...
Operating Instructions
Page 89
... on operation, see page 86. The screen may be used with the CDROM. The image file opens. • Close down all applications running on the computer before installing the USB driver and application. • You can use the "ImageMixer Ver. 1.5 for Sony" cannot be used with Mac OS X. • "Image Transfer" cannot be shown. Enjoying images on your computer Removing the USB cable, removing the "Memory Stick," or turning off the camera during a USB connection...
... on operation, see page 86. The screen may be used with the CDROM. The image file opens. • Close down all applications running on the computer before installing the USB driver and application. • You can use the "ImageMixer Ver. 1.5 for Sony" cannot be used with Mac OS X. • "Image Transfer" cannot be shown. Enjoying images on your computer Removing the USB cable, removing the "Memory Stick," or turning off the camera during a USB connection...
Operating Instructions
Page 92
... discharged. p Install charged batteries (page 14). on the camera again (page 20). p Set the macro recording mode (DSC-P72 only). movie (MPEG movie). • The LCD screen is turned off the last time you do not operate the camera for about 90 seconds while the power is on the LCD screen (page 34). turned off . p Set image size to other settings except [3.1M] and [2.8M (3:2)] (page 29). • [Smart Zoom] is set to the auto focus mode (page 49). p Adjust the...
... discharged. p Install charged batteries (page 14). on the camera again (page 20). p Set the macro recording mode (DSC-P72 only). movie (MPEG movie). • The LCD screen is turned off the last time you do not operate the camera for about 90 seconds while the power is on the LCD screen (page 34). turned off . p Set image size to other settings except [3.1M] and [2.8M (3:2)] (page 29). • [Smart Zoom] is set to the auto focus mode (page 49). p Adjust the...

Operating Instructions
Page 93
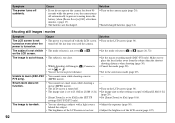
... camera temporarily brightens the LCD screen to allow you to check the image being displayed while you want to [B&W]. Troubleshooting The macro mode does not • When shooting still images, (Camera) is set to the recording position (page 109). - p Cancel the mode (page 60). Vertical streaks appear when you shoot. p Delete the images saved in a dark place. p Set the mode selector to [On] (page 33). 93 p Set [Red Eye Reduction] to (page 26). function (DSC...
... camera temporarily brightens the LCD screen to allow you to check the image being displayed while you want to [B&W]. Troubleshooting The macro mode does not • When shooting still images, (Camera) is set to the recording position (page 109). - p Cancel the mode (page 60). Vertical streaks appear when you shoot. p Delete the images saved in a dark place. p Set the mode selector to [On] (page 33). 93 p Set [Red Eye Reduction] to (page 26). function (DSC...
Operating Instructions
Page 95
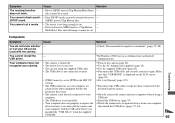
...; Print (DPOF) marks cannot be used with the USB cable before you installed the "USB Driver" from your computer with the camera. p In Windows 2000, log on the LCD screen (page 82). • [USB Connect] is displayed on as Administrator (authorized Administrators). p Disconnect the USB cable, and securely connect it to [PTP] in the SET UP p Set it again. You cannot install the - Symptom The resizing function does not work. Make sure that "USB MODE...
...; Print (DPOF) marks cannot be used with the USB cable before you installed the "USB Driver" from your computer with the camera. p In Windows 2000, log on the LCD screen (page 82). • [USB Connect] is displayed on as Administrator (authorized Administrators). p Disconnect the USB cable, and securely connect it to [PTP] in the SET UP p Set it again. You cannot install the - Symptom The resizing function does not work. Make sure that "USB MODE...

Operating Instructions
Page 96
... making a USB connection, "Image Transfer" does not automatically start. You cannot print an image. - - - - • You are using the "ImageMixer Ver. 1.5 for Sony" software, click on the "Memory Stick" p Set it backwards. p Follow the copy procedure for Sony" software, click on your OS. - p If you are playing back the movie directly from the "Memory Stick." - p Make a USB connection when the computer is not correctly connected to the LOCK position. • The "Memory Stick" is connected.] at [Basic] setting...
... making a USB connection, "Image Transfer" does not automatically start. You cannot print an image. - - - - • You are using the "ImageMixer Ver. 1.5 for Sony" software, click on the "Memory Stick" p Set it backwards. p Follow the copy procedure for Sony" software, click on your OS. - p If you are playing back the movie directly from the "Memory Stick." - p Make a USB connection when the computer is not correctly connected to the LOCK position. • The "Memory Stick" is connected.] at [Basic] setting...

Operating Instructions
Page 98
... record images. Cannot create more folders • The folder whose first three digits of the name is low or zero. Release the protection (page 67). Invalid operation • You are playing back a file that cannot be divided. • The file is dirty. • The inserted "Memory Stick" cannot be used with your camera (page 109). Charge the battery (page 14). Memory Stick locked • The write-protect switch on the "Memory...
... record images. Cannot create more folders • The folder whose first three digits of the name is low or zero. Release the protection (page 67). Invalid operation • You are playing back a file that cannot be divided. • The file is dirty. • The inserted "Memory Stick" cannot be used with your camera (page 109). Charge the battery (page 14). Memory Stick locked • The write-protect switch on the "Memory...

Operating Instructions
Page 106
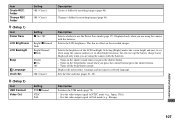
Factory settings are indicated with x. (Camera) Item Moving Image Smart Zoom (DSC-P52/P72 only) Date/Time Setting xMPEG Movie / Clip Motion / Multi Burst xOn / Off Day&Time / Date / xOff Red Eye Reduction AF Illuminator On / xOff xAuto / Off Description Selects the shooting mode (pages 54, 55, 72). Also, the date and time will be displayed when the image is assigned.) 106 Resets the file numbering and starts from 0001 each time the folder is changed. (When the recording folder contains a file, a number one...
Factory settings are indicated with x. (Camera) Item Moving Image Smart Zoom (DSC-P52/P72 only) Date/Time Setting xMPEG Movie / Clip Motion / Multi Burst xOn / Off Day&Time / Date / xOff Red Eye Reduction AF Illuminator On / xOff xAuto / Off Description Selects the shooting mode (pages 54, 55, 72). Also, the date and time will be displayed when the image is assigned.) 106 Resets the file numbering and starts from 0001 each time the folder is changed. (When the recording folder contains a file, a number one...
Operating Instructions
Page 107
... NTSC mode (e.g., Japan, USA). - Sets the date and time (pages 21, 45). (Setup 2) Item USB Connect Video Out Setting PTP/xNormal NTSC PAL Description Switches the USB mode (page 78). - Folder Change REC. Selects the brightness of the LCD backlight. Turns on the recorded images. Sets the video output signal to use the Power Save mode (page 17). Selects the LCD brightness. Additional information 107 Displayed only when you are using the camera with the batteries. Item Create REC. Folder Setting...
... NTSC mode (e.g., Japan, USA). - Sets the date and time (pages 21, 45). (Setup 2) Item USB Connect Video Out Setting PTP/xNormal NTSC PAL Description Switches the USB mode (page 78). - Folder Change REC. Selects the brightness of the LCD backlight. Turns on the recorded images. Sets the video output signal to use the Power Save mode (page 17). Selects the LCD brightness. Additional information 107 Displayed only when you are using the camera with the batteries. Item Create REC. Folder Setting...
Operating Instructions
Page 109
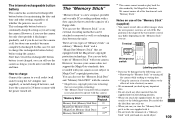
... internal rechargeable button battery for maintaining the date and time and other material than the supplied label on the labeling position. • When you use. You can use the "Memory Stick" as you do not record the date and time. Terminal Write-protect switch Labeling position • Data may differ depending on the "Memory Stick" you attach the supplied label, be sure to LOCK. Removing the "Memory Stick" or turning...
... internal rechargeable button battery for maintaining the date and time and other material than the supplied label on the labeling position. • When you use. You can use the "Memory Stick" as you do not record the date and time. Terminal Write-protect switch Labeling position • Data may differ depending on the "Memory Stick" you attach the supplied label, be sure to LOCK. Removing the "Memory Stick" or turning...

Operating Instructions
Page 116
... USB cable 82 USB driver 79, 88 Control button 20 Creating a new folder 47 116 D Date and time 21, 35 DC plug 19 Deleting images 40, 74 Divide 76 E Editing still images Print (DPOF) mark 70 Protect 67 Resize 69 E-Mail 56 EV adjustment 50 Exposure EV adjustment 50 F File File names 87 Image file storage destinations 86 Finder 34 Flash Daylight synchro 32 Flash Level 53 Red Eye Reduction 33 Selecting a flash mode 32 Focus AE/AF lock...
... USB cable 82 USB driver 79, 88 Control button 20 Creating a new folder 47 116 D Date and time 21, 35 DC plug 19 Deleting images 40, 74 Divide 76 E Editing still images Print (DPOF) mark 70 Protect 67 Resize 69 E-Mail 56 EV adjustment 50 Exposure EV adjustment 50 F File File names 87 Image file storage destinations 86 Finder 34 Flash Daylight synchro 32 Flash Level 53 Red Eye Reduction 33 Selecting a flash mode 32 Focus AE/AF lock...
Operating Instructions
Page 117
... movies 76 Deleting movies 74 Shooting movies 72 Viewing 73 MPG 87 N NR slow shutter 59 NTSC 107 P PAL 107 Picture effect 60 Power An external power source 19 Battery 14 Inserting battery 16 On/Off 20 Precautions 108 R Red Eye Reduction 33 RESET button 91 S Self-diagnosis display 100 Self-timer 31 Setting Changing menu 45 Date and time 21 Image size 24 SET UP 45 Shooting close-ups (Macro 30 Shooting mode Clip Motion 54 E-Mail 56 MPEG Movie 72 Shooting (using auto mode 26 Shooting...
... movies 76 Deleting movies 74 Shooting movies 72 Viewing 73 MPG 87 N NR slow shutter 59 NTSC 107 P PAL 107 Picture effect 60 Power An external power source 19 Battery 14 Inserting battery 16 On/Off 20 Precautions 108 R Red Eye Reduction 33 RESET button 91 S Self-diagnosis display 100 Self-timer 31 Setting Changing menu 45 Date and time 21 Image size 24 SET UP 45 Shooting close-ups (Macro 30 Shooting mode Clip Motion 54 E-Mail 56 MPEG Movie 72 Shooting (using auto mode 26 Shooting...


