
Operating Instructions
Page 6
...35 Viewing still images Viewing images on the LCD screen of contents Before using auto mode 26 Checking the last image shot - Picture Effect 60 Macro (DSC-P72 only 30 Using the self-timer 31 Selecting a flash mode 32 Shooting with audio files - EV adjustment 50...48 Setting the distance to the subject - using your camera 4 Identifying the parts 8 Getting started Preparing batteries 14 Charging the batteries 14 Inserting the batteries 16 Using an external power source 19 Using your camera abroad 19 Turning your camera on a TV screen 38 Deleting still images Deleting images ...
...35 Viewing still images Viewing images on the LCD screen of contents Before using auto mode 26 Checking the last image shot - Picture Effect 60 Macro (DSC-P72 only 30 Using the self-timer 31 Selecting a flash mode 32 Shooting with audio files - EV adjustment 50...48 Setting the distance to the subject - using your camera 4 Identifying the parts 8 Getting started Preparing batteries 14 Charging the batteries 14 Inserting the batteries 16 Using an external power source 19 Using your camera abroad 19 Turning your camera on a TV screen 38 Deleting still images Deleting images ...
Operating Instructions
Page 17
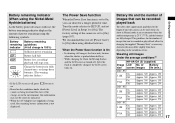
...used and the state of the camera is not displayed. Shooting still images Under the average conditions1) NH-AA-DA (2) (supplied) Image LCD No. After the flash is turned off , press to [On] when using alkaline batteries. Change the batteries for the number of power remaining using the following symbols. .... 250 VGA On Off Approx. 300 Approx. 150 Approx. 500 Approx. 250 DSC-P52 3.1M On Off Approx. 320 Approx. 160 Approx. 540 Approx. 270 VGA On Off Approx. 320 Approx. 160 Approx. 540 Approx. 270 DSC-P32 3.1M On Off Approx. 320 Approx. 160 Approx. 540 Approx. 270 VGA...
...used and the state of the camera is not displayed. Shooting still images Under the average conditions1) NH-AA-DA (2) (supplied) Image LCD No. After the flash is turned off , press to [On] when using alkaline batteries. Change the batteries for the number of power remaining using the following symbols. .... 250 VGA On Off Approx. 300 Approx. 150 Approx. 500 Approx. 250 DSC-P52 3.1M On Off Approx. 320 Approx. 160 Approx. 540 Approx. 270 VGA On Off Approx. 320 Approx. 160 Approx. 540 Approx. 270 DSC-P32 3.1M On Off Approx. 320 Approx. 160 Approx. 540 Approx. 270 VGA...
Operating Instructions
Page 18
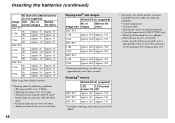
...] is set to [Fine]. - After using Sony alkaline batteries 1) Shooting under the following conditions: - At low temperatures. - Turning the camera on and off frequently. - When [Power Save] is set to [Off]. - Turning on and off once in every two shots. - Shooting one approximately every three seconds Shooting3) movies DSC-P72 DSC-P52 DSC-P32 NH-AA-DA (2) (supplied) LCD LCD...
...] is set to [Fine]. - After using Sony alkaline batteries 1) Shooting under the following conditions: - At low temperatures. - Turning the camera on and off frequently. - When [Power Save] is set to [Off]. - Turning on and off once in every two shots. - Shooting one approximately every three seconds Shooting3) movies DSC-P72 DSC-P52 DSC-P32 NH-AA-DA (2) (supplied) LCD LCD...

Operating Instructions
Page 19
...jack cover, then connect the AC-LS5 AC Adaptor (not supplied) to the DC IN jack of the camera. • The set is not disconnected from the AC power source (mains) as long as this camera. • Connect the AC Adaptor to an easily accessible wall outlet (wall socket) close by disconnecting ...AC Adaptor (not supplied) within 100 V to the wall outlet (wall socket), even if the unit itself has been turned off the power by . Using your camera abroad Power sources You can use your camera in any country or area with this may cause a malfunction. 19 BC-CS2A/CS2B • Do not use the AC...
...jack cover, then connect the AC-LS5 AC Adaptor (not supplied) to the DC IN jack of the camera. • The set is not disconnected from the AC power source (mains) as long as this camera. • Connect the AC Adaptor to an easily accessible wall outlet (wall socket) close by disconnecting ...AC Adaptor (not supplied) within 100 V to the wall outlet (wall socket), even if the unit itself has been turned off the power by . Using your camera abroad Power sources You can use your camera in any country or area with this may cause a malfunction. 19 BC-CS2A/CS2B • Do not use the AC...

Operating Instructions
Page 20
... set to or , the lens begins to preserve battery power. This may cause a malfunction (DSC-P72 only). • When you turn off the power Press POWER again, the POWER lamp goes out, and the camera turns off to move (DSC-P72 only). However, in green and the power is on the camera. For each item, press v/V/b/B to select the desired value...
... set to or , the lens begins to preserve battery power. This may cause a malfunction (DSC-P72 only). • When you turn off the power Press POWER again, the POWER lamp goes out, and the camera turns off to move (DSC-P72 only). However, in green and the power is on the camera. For each item, press v/V/b/B to select the desired value...
Operating Instructions
Page 21
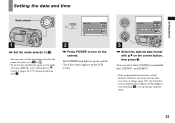
... / OK 1/ 1 12 : 00 OK AM Cancel 3 , Select the desired date format with v/V on the camera. The POWER lamp lights in (Setup 1) (pages 45, 107), then proceed from Step 3. 2 , Press POWER to turn on the control button, then press z. Getting started Setting the date and time Mode selector... POWER Clock Set Y/M/D M/D/Y D/M/Y 2003 / OK 1/ 1 12 : 00 OK AM Cancel 1 , Set the mode selector to . • You...
... / OK 1/ 1 12 : 00 OK AM Cancel 3 , Select the desired date format with v/V on the camera. The POWER lamp lights in (Setup 1) (pages 45, 107), then proceed from Step 3. 2 , Press POWER to turn on the control button, then press z. Getting started Setting the date and time Mode selector... POWER Clock Set Y/M/D M/D/Y D/M/Y 2003 / OK 1/ 1 12 : 00 OK AM Cancel 1 , Set the mode selector to . • You...

Operating Instructions
Page 23
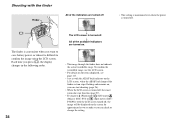
... of the arrow. • For more information about the "Memory Stick," see page 109. 2 , Insert the "Memory Stick." Never remove the "Memory Stick" or turn off the power at this time. If you insert a "Memory Stick," push it as far as it out. • Whenever the access lamp is lit, the... camera is recording or reading out an image. Shooting still images Inserting and removing a "Memory Stick" Label side Terminal side Shooting still images Access lamp 1 , ...
... of the arrow. • For more information about the "Memory Stick," see page 109. 2 , Insert the "Memory Stick." Never remove the "Memory Stick" or turn off the power at this time. If you insert a "Memory Stick," push it as far as it out. • Whenever the access lamp is lit, the... camera is recording or reading out an image. Shooting still images Inserting and removing a "Memory Stick" Label side Terminal side Shooting still images Access lamp 1 , ...
Operating Instructions
Page 26
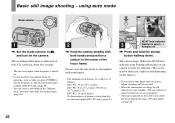
...image shooting - The camera beeps. The recording folder name is indicated on the LCD screen for about five seconds. • The lens cover opens when the power is turned on. • Do not touch the lens portion while it is operating, such as follows: DSC-P72: 50 cm (19 3/4 inches) DSC-P52: 8 cm (3... 1/4 inches) (W)/40 cm (15 3/4 inches) (T) DSC-P32: 10 cm (4 inches) To shoot subjects at ...
...image shooting - The camera beeps. The recording folder name is indicated on the LCD screen for about five seconds. • The lens cover opens when the power is turned on. • Do not touch the lens portion while it is operating, such as follows: DSC-P72: 50 cm (19 3/4 inches) DSC-P52: 8 cm (3... 1/4 inches) (W)/40 cm (15 3/4 inches) (T) DSC-P32: 10 cm (4 inches) To shoot subjects at ...

Operating Instructions
Page 27
... is set to , the functions that can set to . 2 Press MENU. 3 Select (Camera) with b on the control button. 4 Select the desired camera mode with the camera turned on, power is automatically shut off to the (Camera) setting in the menu settings according to (Camera) and [Mode] (REC Mode). In this mode, [Mode] is set to [Fine], the...
... is set to , the functions that can set to . 2 Press MENU. 3 Select (Camera) with b on the control button. 4 Select the desired camera mode with the camera turned on, power is automatically shut off to the (Camera) setting in the menu settings according to (Camera) and [Mode] (REC Mode). In this mode, [Mode] is set to [Fine], the...
Operating Instructions
Page 34
...is convenient when you press (Flash mode)/ (Self-timer)/ (Macro) (DSC-P72) or (Spot meter) (DSCP52/P32) with the finder Finder All of the available indicators are turned off • This setting is maintained even when the power is difficult to confirm the image using the LCD screen. Each time you... press , the display changes in the following order. 34 r The LCD screen is turned off , the image will be ...
...is convenient when you press (Flash mode)/ (Self-timer)/ (Macro) (DSC-P72) or (Spot meter) (DSCP52/P32) with the finder Finder All of the available indicators are turned off • This setting is maintained even when the power is difficult to confirm the image using the LCD screen. Each time you... press , the display changes in the following order. 34 r The LCD screen is turned off , the image will be ...

Operating Instructions
Page 35
... indicated in "Setting the date and time" (page 21). • This setting is maintained even when the power is played back. 2 , Select (Camera) with the date and time inserted, the actual date and time are shot with the date and time inserted, the date and time cannot be inserted in the order set... in red on the lower-right corner when the image is turned off. 35 Select [Date/Time] with v/V on...
... indicated in "Setting the date and time" (page 21). • This setting is maintained even when the power is played back. 2 , Select (Camera) with the date and time inserted, the actual date and time are shot with the date and time inserted, the date and time cannot be inserted in the order set... in red on the lower-right corner when the image is turned off. 35 Select [Date/Time] with v/V on...
Operating Instructions
Page 45
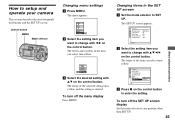
... control button. Setup 1 Power Save: LCD Brightness: LCD Backlight: Beep: Language: Clock Set: OK Cancel OK c Press z on the control button to any position other than SET UP. 45 Before advanced operations To turn off the menu display Press MENU. Program Auto Camera Mode b Select the setting... item you select turn off the SET UP screen display Set the mode selector to enter the setting. The...
... control button. Setup 1 Power Save: LCD Brightness: LCD Backlight: Beep: Language: Clock Set: OK Cancel OK c Press z on the control button to any position other than SET UP. 45 Before advanced operations To turn off the menu display Press MENU. Program Auto Camera Mode b Select the setting... item you select turn off the SET UP screen display Set the mode selector to enter the setting. The...

Operating Instructions
Page 59
To return to the normal shooting In Step 3, select [Auto] or [Program]. • The setting is maintained even when the power is recommended. 59 NR2'' Advanced still image shooting a Set the mode selector to the shutter speed indicator. r Processing Finally, when "Processing"... Mode selector NR slow shutter The NR slow shutter mode removes noise from recorded images, providing clear images. r Capturing Then the screen turns black. c Select (Camera) with b, then select the desired mode with v/V. So, the image may not be recorded exactly as you select Twilight or Twilight ...
To return to the normal shooting In Step 3, select [Auto] or [Program]. • The setting is maintained even when the power is recommended. 59 NR2'' Advanced still image shooting a Set the mode selector to the shutter speed indicator. r Processing Finally, when "Processing"... Mode selector NR slow shutter The NR slow shutter mode removes noise from recorded images, providing clear images. r Capturing Then the screen turns black. c Select (Camera) with b, then select the desired mode with v/V. So, the image may not be recorded exactly as you select Twilight or Twilight ...
Operating Instructions
Page 88
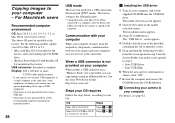
...drive. iBook or Power Mac G4 with...camera and your computer - OS Mac OS 8.5.1/8.6/9.0 Mac OS 9.1/9.2/Mac OS X (v 10.0/v 10.1/v10.2) Steps Steps 1 to 4 Steps 2 to Mac OS 9.0 or 9.1. - http://www.sony.net/ Steps your OS requires Follow the steps below, according to your OS. The model selection screen appears. 2 Click [Cyber-shot...Turn on your computer When neither a USB connector nor a "Memory Stick" slot is the [Normal] mode. * Compatible only with your computer When your camera, may not recover at the factory, and a slot loading type CD-ROM drive - b Connecting your camera...
...drive. iBook or Power Mac G4 with...camera and your computer - OS Mac OS 8.5.1/8.6/9.0 Mac OS 9.1/9.2/Mac OS X (v 10.0/v 10.1/v10.2) Steps Steps 1 to 4 Steps 2 to Mac OS 9.0 or 9.1. - http://www.sony.net/ Steps your OS requires Follow the steps below, according to your OS. The model selection screen appears. 2 Click [Cyber-shot...Turn on your computer When neither a USB connector nor a "Memory Stick" slot is the [Normal] mode. * Compatible only with your computer When your camera, may not recover at the factory, and a slot loading type CD-ROM drive - b Connecting your camera...
Operating Instructions
Page 91
... RESET button located inside the jack cover, then turn on . • The AC Adaptor (not supplied) is displayed but the power soon runs out. • You have trouble with your Sony dealer or local authorized Sony service facility. p To restore the batteries to 97. turned on the camera again. (This will clear the date and time...
... RESET button located inside the jack cover, then turn on . • The AC Adaptor (not supplied) is displayed but the power soon runs out. • You have trouble with your Sony dealer or local authorized Sony service facility. p To restore the batteries to 97. turned on the camera again. (This will clear the date and time...
Operating Instructions
Page 92
...other settings except [3.1M] and [2.8M (3:2)] (page 29). • [Smart Zoom] is out of the LCD screen (page 107). 92 Symptom The power turns off . The subject is not visible • The mode selector is too dark. • You are discharged. Make sure to or (pages 26, 72...subject with the LCD screen p Turn on the LCD screen. settings (DSC-P52/P72 only). p Set the macro recording mode (DSC-P72 only). p Turn on the LCD screen (page 34). • The image size is too low. Cause Solution • If you used the camera. p Turn on the camera again (page 20). p ...
...other settings except [3.1M] and [2.8M (3:2)] (page 29). • [Smart Zoom] is out of the LCD screen (page 107). 92 Symptom The power turns off . The subject is not visible • The mode selector is too dark. • You are discharged. Make sure to or (pages 26, 72...subject with the LCD screen p Turn on the LCD screen. settings (DSC-P52/P72 only). p Set the macro recording mode (DSC-P72 only). p Turn on the LCD screen (page 34). • The image size is too low. Cause Solution • If you used the camera. p Turn on the camera again (page 20). p ...

Operating Instructions
Page 97
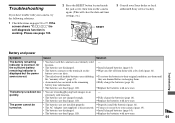
..., 16, 19). The lens gets fogged. • Condensation is not a malfunction. p Turn off the camera. (DSC-P72 only) • The batteries are erased by mistake. p Charge the batteries (page 14). camera does not work , no operations can be performed. • The battery level is low ... Stick" write-protect formatting. Troubleshooting 97 p Disconnect, and then, after one minute, reconnect all power sources and turn the power on the camera. p Replace them with a pointed object, then turn on again. (This will clear the date and time settings, etc.) You cannot identify the -...
..., 16, 19). The lens gets fogged. • Condensation is not a malfunction. p Turn off the camera. (DSC-P72 only) • The batteries are erased by mistake. p Charge the batteries (page 14). camera does not work , no operations can be performed. • The battery level is low ... Stick" write-protect formatting. Troubleshooting 97 p Disconnect, and then, after one minute, reconnect all power sources and turn the power on the camera. p Replace them with a pointed object, then turn on again. (This will clear the date and time settings, etc.) You cannot identify the -...

Operating Instructions
Page 98
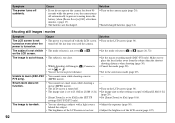
...Depending on the LCD screen. System error Memory Stick error Memory Stick type error • Turn the power off and on the "Memory Stick" is "999" exists in this folder • The...For example: 123MSDCF and 123ABCDE) Select other folders (page 47). Folder error • A folder with your camera (page 109). • Insert the "Memory Stick" correctly (page 23). • The "Memory Stick" ... divided. • The file is available only for viewing with the same first three digits number already exists in this folder. Set it to the recording position (page 109). Cannot create...
...Depending on the LCD screen. System error Memory Stick error Memory Stick type error • Turn the power off and on the "Memory Stick" is "999" exists in this folder • The...For example: 123MSDCF and 123ABCDE) Select other folders (page 47). Folder error • A folder with your camera (page 109). • Insert the "Memory Stick" correctly (page 23). • The "Memory Stick" ... divided. • The file is available only for viewing with the same first three digits number already exists in this folder. Set it to the recording position (page 109). Cannot create...

Operating Instructions
Page 99
Message Turn the power off and on a tripod, or otherwise secure the camera in place. • A problem with the lens caused an error. Troubleshooting 99 Use the flash, mount the camera on again Meaning/ Corrective Action • Camera shake may occur due to insufficient light.
Message Turn the power off and on a tripod, or otherwise secure the camera in place. • A problem with the lens caused an error. Troubleshooting 99 Use the flash, mount the camera on again Meaning/ Corrective Action • Camera shake may occur due to insufficient light.
Operating Instructions
Page 100
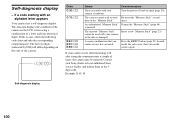
... display 100 times. If a code starting with your Sony dealer or local autholized Sony service facility and inform them of the camera. Turn the power off and on the state of the 5digit code. The inserted "Memory Stick" Insert a new "Memory Stick" (page 23). The last two digits (indicated by ss)will differ depending on again...
... display 100 times. If a code starting with your Sony dealer or local autholized Sony service facility and inform them of the camera. Turn the power off and on the state of the 5digit code. The inserted "Memory Stick" Insert a new "Memory Stick" (page 23). The last two digits (indicated by ss)will differ depending on again...


