Operating Instructions
Page 1
3-068-186-11(1) Digital Still Camera Operating Instructions Before operating the unit, please read this product. Owner's Record The model and serial numbers are located on the bottom. DSC-P30/P50 Serial No DSC-P30/P50 ©2001 Sony Corporation Model No. Refer to these numbers whenever you call upon your Sony dealer regarding this manual thoroughly, and retain it for future reference. Record the serial number in the space provided below.
3-068-186-11(1) Digital Still Camera Operating Instructions Before operating the unit, please read this product. Owner's Record The model and serial numbers are located on the bottom. DSC-P30/P50 Serial No DSC-P30/P50 ©2001 Sony Corporation Model No. Refer to these numbers whenever you call upon your Sony dealer regarding this manual thoroughly, and retain it for future reference. Record the serial number in the space provided below.
Operating Instructions
Page 3
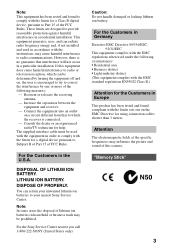
...Consult the dealer or an experienced radio/TV technician for a Class B digital device, pursuant to Part 15 of the FCC Rules. DISPOSAL OF LITHIUM ION BATTERY. For the Sony Service Center nearest you call 1-800-222-SONY (United States only) Caution: Do not handle damaged or leaking lithium...lithium ion batteries in household or business trash may cause harmful interference to radio communications. If this camera. Connect the equipment into an outlet on the EMC Directive for a digital device pursuant to comply with the limits for using connection cables shorter than 3 meters. However,...
...Consult the dealer or an experienced radio/TV technician for a Class B digital device, pursuant to Part 15 of the FCC Rules. DISPOSAL OF LITHIUM ION BATTERY. For the Sony Service Center nearest you call 1-800-222-SONY (United States only) Caution: Do not handle damaged or leaking lithium...lithium ion batteries in household or business trash may cause harmful interference to radio communications. If this camera. Connect the equipment into an outlet on the EMC Directive for a digital device pursuant to comply with the limits for using connection cables shorter than 3 meters. However,...
Operating Instructions
Page 4
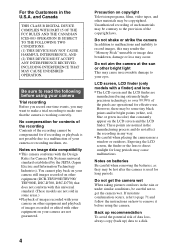
... These points are operational for if recording or playback is not possible due to your camera or recording medium, etc. Do not get the camera wet. and Canada THIS CLASS B DIGITAL DEVICE COMPLIES WITH PART 15 OF THE FCC RULES AND THE CANADIAN ICES-003 OPERATION IS...are manufactured using the camera. Precaution on other materials may occur. You cannot play back on your camera still images recorded on copyright Television programs, films, video tapes, and other equipment (DCR-TRV890E/TRV900/ TRV900E, DSC-D700, DSC-D770) that the camera is used for Camera File Systems universal ...
... These points are operational for if recording or playback is not possible due to your camera or recording medium, etc. Do not get the camera wet. and Canada THIS CLASS B DIGITAL DEVICE COMPLIES WITH PART 15 OF THE FCC RULES AND THE CANADIAN ICES-003 OPERATION IS...are manufactured using the camera. Precaution on other materials may occur. You cannot play back on your camera still images recorded on copyright Television programs, films, video tapes, and other equipment (DCR-TRV890E/TRV900/ TRV900E, DSC-D700, DSC-D770) that the camera is used for Camera File Systems universal ...

Operating Instructions
Page 5
When the camera is used for long periods Note that the camera body may become hot. 5
When the camera is used for long periods Note that the camera body may become hot. 5
Operating Instructions
Page 7
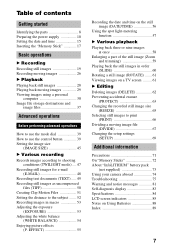
... (DIVIDE 67 Changing the setup settings (SETUP 69 Additional information Precautions 71 On "Memory Sticks 72 About "InfoLITHIUM" battery pack (not supplied 73 Using your camera abroad 74 Troubleshooting 75 Warning and notice messages 81 Self-diagnosis display 83 Specifications 84 LCD screen indicators 85 Notes on Using Batteries 88 Index...
... (DIVIDE 67 Changing the setup settings (SETUP 69 Additional information Precautions 71 On "Memory Sticks 72 About "InfoLITHIUM" battery pack (not supplied 73 Using your camera abroad 74 Troubleshooting 75 Warning and notice messages 81 Self-diagnosis display 83 Specifications 84 LCD screen indicators 85 Notes on Using Batteries 88 Index...
Operating Instructions
Page 8
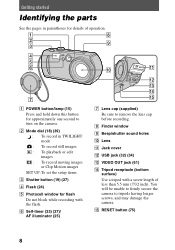
.... F Self-timer (23) (27)/ AF illuminator (25) G Lens cap (supplied) Be sure to tripods having longer screws, and may damage the camera. You will be unable to firmly secure the camera to remove the lens cap before recording. O RESET button (75) 8 B Mode dial (18) (39) : To record in parentheses for details of... Motion images SET UP:To set the setup items C Shutter button (19) (27) D Flash (24) E Photocell window for approximately one second to turn on the camera.
.... F Self-timer (23) (27)/ AF illuminator (25) G Lens cap (supplied) Be sure to tripods having longer screws, and may damage the camera. You will be unable to firmly secure the camera to remove the lens cap before recording. O RESET button (75) 8 B Mode dial (18) (39) : To record in parentheses for details of... Motion images SET UP:To set the setup items C Shutter button (19) (27) D Flash (24) E Photocell window for approximately one second to turn on the camera.
Operating Instructions
Page 10
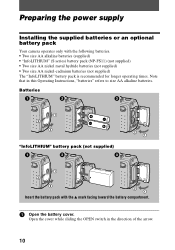
... in this Operating Instructions, "batteries" refers to size AA alkaline batteries. Preparing the power supply Installing the supplied batteries or an optional battery pack Your camera operates only with the v mark facing toward the battery compartment. 1 Open the battery cover. Note that in the direction of the arrow. 10 Batteries "InfoLITHIUM...
... in this Operating Instructions, "batteries" refers to size AA alkaline batteries. Preparing the power supply Installing the supplied batteries or an optional battery pack Your camera operates only with the v mark facing toward the battery compartment. 1 Open the battery cover. Note that in the direction of the arrow. 10 Batteries "InfoLITHIUM...
Operating Instructions
Page 11
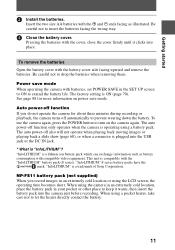
...facing as battery consumption with batteries, set POWER SAVE in your pocket or other place to keep it clicks into the USB jack or the DC IN jack. * What is compatible with the battery cover side facing upward and remove the batteries. Be careful not to drop the batteries... when removing them. Power save mode. Auto power-off function only operates when the camera is a trademark of Sony Corporation. To use the camera again, press the POWER button to let the heater directly contact the battery. 11 "InfoLITHIUM" is operating using the LCD ...
...facing as battery consumption with batteries, set POWER SAVE in your pocket or other place to keep it clicks into the USB jack or the DC IN jack. * What is compatible with the battery cover side facing upward and remove the batteries. Be careful not to drop the batteries... when removing them. Power save mode. Auto power-off function only operates when the camera is a trademark of Sony Corporation. To use the camera again, press the POWER button to let the heater directly contact the battery. 11 "InfoLITHIUM" is operating using the LCD ...

Operating Instructions
Page 12
... facing up when charging begins. Be sure to turn the LCD screen on the camera shows the remaining time for which you turn off , it takes about one minute for the correct battery remaining time to the DC IN jack of 10°C to 30°C (50°F to a wall outlet (...mains). Charging the battery pack (not supplied) You cannot charge the battery pack while your camera is recommended. DC IN jack cover Battery pack (S series) (not supplied) To the wall outlet (mains) Power cord (mains lead) AC-LS1A AC power adaptor (not supplied...
... facing up when charging begins. Be sure to turn the LCD screen on the camera shows the remaining time for which you turn off , it takes about one minute for the correct battery remaining time to the DC IN jack of 10°C to 30°C (50°F to a wall outlet (...mains). Charging the battery pack (not supplied) You cannot charge the battery pack while your camera is recommended. DC IN jack cover Battery pack (S series) (not supplied) To the wall outlet (mains) Power cord (mains lead) AC-LS1A AC power adaptor (not supplied...

Operating Instructions
Page 13
...a guide when you use your camera at low temperatures, use the zoom. • The numbers of images shown on tables above figures are as a guide. Battery life and number of images that can be recorded/played back Getting started Still image recording* SONY alkaline batteries (supplied) NP-FS11 ...; When using an "InfoLITHIUM" battery pack (not supplied), the battery life and number of images will be decreased. 13 Notes • The camera may be decreased if you continuously record/play back while replacing the "Memory Stick." • When LCD BACKLIGHT is limited. Even when using a...
...a guide when you use your camera at low temperatures, use the zoom. • The numbers of images shown on tables above figures are as a guide. Battery life and number of images that can be recorded/played back Getting started Still image recording* SONY alkaline batteries (supplied) NP-FS11 ...; When using an "InfoLITHIUM" battery pack (not supplied), the battery life and number of images will be decreased. 13 Notes • The camera may be decreased if you continuously record/play back while replacing the "Memory Stick." • When LCD BACKLIGHT is limited. Even when using a...

Operating Instructions
Page 14
When using the AC-LS1A AC power adaptor (not supplied) at a temperature of your camera abroad For details, see page 74. Using your camera with the v mark facing up. 2 Connect the power cord (mains lead) to the AC power adaptor (not supplied) and then to use it near the ... adaptor Be sure to a wall outlet (mains). If a malfunction occurs, disconnect the plug from the wall outlet. 14 Using the AC power adaptor (not supplied) DC IN jack cover To the wall outlet (mains) Power cord (mains lead) AC-LS1A AC power adaptor (not supplied) 1 Open the...
When using the AC-LS1A AC power adaptor (not supplied) at a temperature of your camera abroad For details, see page 74. Using your camera with the v mark facing up. 2 Connect the power cord (mains lead) to the AC power adaptor (not supplied) and then to use it near the ... adaptor Be sure to a wall outlet (mains). If a malfunction occurs, disconnect the plug from the wall outlet. 14 Using the AC power adaptor (not supplied) DC IN jack cover To the wall outlet (mains) Power cord (mains lead) AC-LS1A AC power adaptor (not supplied) 1 Open the...
Operating Instructions
Page 15
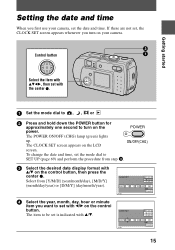
... center z. 1 Set the mode dial to , , or 2 Press and hold down the POWER button for approximately one second to turn on your camera, set is indicated with v/V. ON/OFF(CHG) The CLOCK SET screen appears on the POWER power. The item to set , the CLOCK SET screen... appears whenever you turn on the LCD screen. Setting the date and time When you first use your camera. CLOCK SET Y / M / D M / D /Y D / M /Y 2001 / 1 / 1 OK 12 : 00 OK AM CANCEL CLOCK SET Y / M / D M / D /Y D / M /Y 2001 / OK 1/ 1 12 : 00 OK AM CANCEL 15 The POWER ON/...
... center z. 1 Set the mode dial to , , or 2 Press and hold down the POWER button for approximately one second to turn on your camera, set is indicated with v/V. ON/OFF(CHG) The CLOCK SET screen appears on the POWER power. The item to set , the CLOCK SET screen... appears whenever you turn on the LCD screen. Setting the date and time When you first use your camera. CLOCK SET Y / M / D M / D /Y D / M /Y 2001 / 1 / 1 OK 12 : 00 OK AM CANCEL CLOCK SET Y / M / D M / D /Y D / M /Y 2001 / OK 1/ 1 12 : 00 OK AM CANCEL 15 The POWER ON/...
Operating Instructions
Page 18
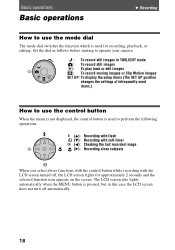
Set the dial as follows before starting to operate your camera. : To record still images in this case the LCD screen does not turn off , the LCD screen lights for recording, playback, or editing. The LCD ...
Set the dial as follows before starting to operate your camera. : To record still images in this case the LCD screen does not turn off , the LCD screen lights for recording, playback, or editing. The LCD ...
Operating Instructions
Page 19
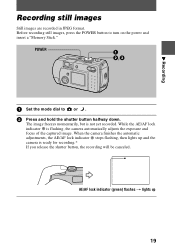
The image freezes momentarily, but is flashing, the camera automatically adjusts the exposure and focus of the captured image. While the AE/AF lock indicator z is not yet recorded. POWER 1 Set the mode dial ... and hold the shutter button halfway down. AE/AF lock indicator (green) flashes t lights up and the camera is ready for recording.* If you release the shutter button, the recording will be canceled. When the camera finishes the automatic adjustments, the AE/AF lock indicator z stops flashing, then lights up 19 B Recording...
The image freezes momentarily, but is flashing, the camera automatically adjusts the exposure and focus of the captured image. While the AE/AF lock indicator z is not yet recorded. POWER 1 Set the mode dial ... and hold the shutter button halfway down. AE/AF lock indicator (green) flashes t lights up and the camera is ready for recording.* If you release the shutter button, the recording will be canceled. When the camera finishes the automatic adjustments, the AE/AF lock indicator z stops flashing, then lights up 19 B Recording...

Operating Instructions
Page 20
... record the next image. 3 Press the shutter button fully down at once in step 2, the camera starts recording after AE/AF lock, but this time, the camera is charging the flash.) Holding the camera correctly Hold the camera so that your fingers do not block the flash and do not touch the lens portion...
... record the next image. 3 Press the shutter button fully down at once in step 2, the camera starts recording after AE/AF lock, but this time, the camera is charging the flash.) Holding the camera correctly Hold the camera so that your fingers do not block the flash and do not touch the lens portion...
Operating Instructions
Page 23
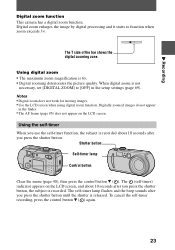
...not work for moving images. • Use the LCD screen when using digital zoom function. Using digital zoom • The maximum zoom magnification is recorded. B Recording Digital zoom function This camera has a digital zoom function. Using the self-timer When you use the self-timer function,... the subject is recorded about 10 seconds after you press the shutter button, the subject is 6×. • Digital zooming deteriorates the picture...
...not work for moving images. • Use the LCD screen when using digital zoom function. Using digital zoom • The maximum zoom magnification is recorded. B Recording Digital zoom function This camera has a digital zoom function. Using the self-timer When you use the self-timer function,... the subject is recorded about 10 seconds after you press the shutter button, the subject is 6×. • Digital zooming deteriorates the picture...
Operating Instructions
Page 24
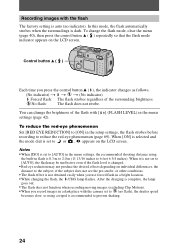
... not see the pre-strobe, or other conditions. • The flash effect is not obtained easily when you record images in a dark place with the camera set to 6 feet 6 3/4 inches). After the charging is 0.3 m to 2.0 m (11 13/16 inches to (no indicator). In this mode, the flash automatically strobes when the...
... not see the pre-strobe, or other conditions. • The flash effect is not obtained easily when you record images in a dark place with the camera set to 6 feet 6 3/4 inches). After the charging is 0.3 m to 2.0 m (11 13/16 inches to (no indicator). In this mode, the flash automatically strobes when the...
Operating Instructions
Page 26
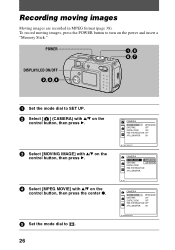
... Moving images are recorded in MPEG format (page 38). POWER DISPLAY/LCD ON/OFF 1 Set the mode dial to SET UP. 2 Select [ ] (CAMERA) with v/V on the control button, then press B. 3 Select [MOVING IMAGE] with v/V on the control button, then press B. 4 Select [MPEG MOVIE] .... 26 CAMERA MOVING IMAGE: MPEG MOVIE DATE/TIME: OFF DIGITAL ZOOM: OFF RED EYE REDUCTION: OFF AF ILLUMINATOR: ON PAGE SELECT CAMERA MOVING IMAGE: MPEG MOVIE DATE/TIME: CLIP MOTION DIGITAL ZOOM: RED EYE REDUCTION: AF ILLUMINATOR: OK CAMERA MOVING IMAGE: MPEG MOVIE DATE/TIME: OFF DIGITAL ZOOM: ...
... Moving images are recorded in MPEG format (page 38). POWER DISPLAY/LCD ON/OFF 1 Set the mode dial to SET UP. 2 Select [ ] (CAMERA) with v/V on the control button, then press B. 3 Select [MOVING IMAGE] with v/V on the control button, then press B. 4 Select [MPEG MOVIE] .... 26 CAMERA MOVING IMAGE: MPEG MOVIE DATE/TIME: OFF DIGITAL ZOOM: OFF RED EYE REDUCTION: OFF AF ILLUMINATOR: ON PAGE SELECT CAMERA MOVING IMAGE: MPEG MOVIE DATE/TIME: CLIP MOTION DIGITAL ZOOM: RED EYE REDUCTION: AF ILLUMINATOR: OK CAMERA MOVING IMAGE: MPEG MOVIE DATE/TIME: OFF DIGITAL ZOOM: ...
Operating Instructions
Page 27
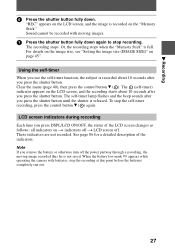
... through a recording, the moving images. 7 Press the shutter button fully down . These indicators are not recorded. When the battery low mark E appears while operating the camera with moving image recorded thus far is full. Sound cannot be recorded with batteries, stop the self-timer recording, press the control button V ( ) again. For...
... through a recording, the moving images. 7 Press the shutter button fully down . These indicators are not recorded. When the battery low mark E appears while operating the camera with moving image recorded thus far is full. Sound cannot be recorded with batteries, stop the self-timer recording, press the control button V ( ) again. For...
Operating Instructions
Page 28
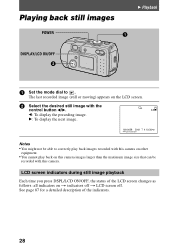
... B: To display the next image. 640 6/8 100-0028 2001 7 4 10:30PM FILE BACK/NEXT Notes • You might not be recorded with this camera on other equipment. • You cannot play back on t indicators off t LCD screen off. The last recorded image (still or moving) appears on the... LCD screen. 2 Select the desired still image with this camera. b: To display the preceding image. Playing back still images POWER DISPLAY/LCD ON/OFF B Playback 1 Set the mode dial to correctly play back ...
... B: To display the next image. 640 6/8 100-0028 2001 7 4 10:30PM FILE BACK/NEXT Notes • You might not be recorded with this camera on other equipment. • You cannot play back on t indicators off t LCD screen off. The last recorded image (still or moving) appears on the... LCD screen. 2 Select the desired still image with this camera. b: To display the preceding image. Playing back still images POWER DISPLAY/LCD ON/OFF B Playback 1 Set the mode dial to correctly play back ...


