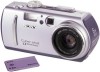
Operating Instructions
Page 3
... is connected. - DISPOSE OF PROPERLY. You can radiate radio frequency energy and, if not installed and used in a particular installation. This equipment generates, uses, and can return your unwanted lithium ion batteries to your nearest Sony Service Center. The supplied interface cable must be determined by turning the equipment off and on the EMC Directive for a digital device pursuant to Subpart B of Part...
... is connected. - DISPOSE OF PROPERLY. You can radiate radio frequency energy and, if not installed and used in a particular installation. This equipment generates, uses, and can return your unwanted lithium ion batteries to your nearest Sony Service Center. The supplied interface cable must be determined by turning the equipment off and on the EMC Directive for a digital device pursuant to Subpart B of Part...
Operating Instructions
Page 4
... condensation occurs, refer to page 71 and follow the instructions on batteries Be careful when removing the batteries, as they may be careful not to make sure that constantly appear on image data compatibility • This camera conforms with your camera are not guaranteed. Notes on the LCD screen and the LCD finder. Unauthorized recording of such materials may be compensated for long periods...
... condensation occurs, refer to page 71 and follow the instructions on batteries Be careful when removing the batteries, as they may be careful not to make sure that constantly appear on image data compatibility • This camera conforms with your camera are not guaranteed. Notes on the LCD screen and the LCD finder. Unauthorized recording of such materials may be compensated for long periods...

Operating Instructions
Page 6
Viewing images using the supplied USB cable and application software. Introduction Checks the image after recording images Recording still images: page 19 Playing back still images: page 28 Deleting images (DELETE): page 62 Captures images with your computer You can copy images onto your computer and view and modify images or attach images to e-mail on your computer using a personal computer: page 30 Recording still images for e-mail (E-MAIL): page 48 Records a moving picture (MPEG Movie or Clip Motion...
Viewing images using the supplied USB cable and application software. Introduction Checks the image after recording images Recording still images: page 19 Playing back still images: page 28 Deleting images (DELETE): page 62 Captures images with your computer You can copy images onto your computer and view and modify images or attach images to e-mail on your computer using a personal computer: page 30 Recording still images for e-mail (E-MAIL): page 48 Records a moving picture (MPEG Movie or Clip Motion...
Operating Instructions
Page 7
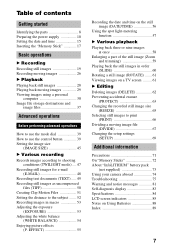
... display 83 Specifications 84 LCD screen indicators 85 Notes on a TV screen ......... 61 B Editing Deleting images (DELETE 62 Preventing accidental erasure (PROTECT 63 Changing the recorded still image size (RESIZE 65 Selecting still images to the subject ....... 52 Recording images in order (SLIDE 60 Rotating a still image (ROTATE) ....... 61 Viewing images on Using Batteries 88 Index 89 7 Table of the still image (Zoom and trimming 59 Playing back the still images in macro 53 Adjusting the exposure (EXPOSURE 53 Adjusting the white balance (WHITE BALANCE...
... display 83 Specifications 84 LCD screen indicators 85 Notes on a TV screen ......... 61 B Editing Deleting images (DELETE 62 Preventing accidental erasure (PROTECT 63 Changing the recorded still image size (RESIZE 65 Selecting still images to the subject ....... 52 Recording images in order (SLIDE 60 Rotating a still image (ROTATE) ....... 61 Viewing images on Using Batteries 88 Index 89 7 Table of the still image (Zoom and trimming 59 Playing back the still images in macro 53 Adjusting the exposure (EXPOSURE 53 Adjusting the white balance (WHITE BALANCE...
Operating Instructions
Page 11
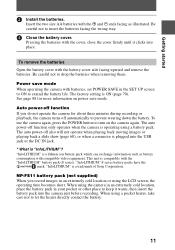
Getting started 2 Install the batteries. To remove the batteries Open the battery cover with the "InfoLITHIUM" battery pack (S series). The factory setting is a trademark of Sony Corporation. To use the camera again, press the POWER button to turn on power save mode When operating the camera with the cover, close the cover firmly until it warm, then insert the battery pack into the USB jack or the DC IN jack. * What is compatible with the battery cover...
Getting started 2 Install the batteries. To remove the batteries Open the battery cover with the "InfoLITHIUM" battery pack (S series). The factory setting is a trademark of Sony Corporation. To use the camera again, press the POWER button to turn on power save mode When operating the camera with the cover, close the cover firmly until it warm, then insert the battery pack into the USB jack or the DC IN jack. * What is compatible with the battery cover...

Operating Instructions
Page 12
... use and the operating environment. This indication may not be entirely accurate depending on your camera. Note When you can still record or play back images. When the /CHG lamp goes off , it takes about one minute for which you turn off your camera. Battery remaining indicator When using size AA alkaline batteries, the remaining time is not shown. Charging the battery pack (not supplied) You cannot charge the battery...
... use and the operating environment. This indication may not be entirely accurate depending on your camera. Note When you can still record or play back images. When the /CHG lamp goes off , it takes about one minute for which you turn off your camera. Battery remaining indicator When using size AA alkaline batteries, the remaining time is not shown. Charging the battery pack (not supplied) You cannot charge the battery...

Operating Instructions
Page 30
... USB mode is stored in the personal computer beforehand. This is used to connect the camera to a computer, use a fully charged "InfoLITHIUM" battery pack (not supplied) or the AC power adapter (not supplied). Moving images: MPEG format - Do not use the USB cable, a USB driver must be performed on a personal computer using the supplied USB cable. Viewing images using a personal computer You can view data recorded with your personal computer. - Make sure that applications that operations can be installed...
... USB mode is stored in the personal computer beforehand. This is used to connect the camera to a computer, use a fully charged "InfoLITHIUM" battery pack (not supplied) or the AC power adapter (not supplied). Moving images: MPEG format - Do not use the USB cable, a USB driver must be performed on a personal computer using the supplied USB cable. Viewing images using a personal computer You can view data recorded with your personal computer. - Make sure that applications that operations can be installed...
Operating Instructions
Page 32
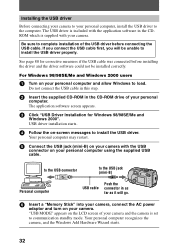
... standby mode. Do not connect the USB cable in this step. 2 Insert the supplied CD-ROM in the CDROM which is set to install the USB driver properly. USB driver installation starts. 4 Follow the on your personal computer. Your personal computer recognizes the camera, and the Windows Add Hardware Wizard starts. 32 Your personal computer may restart. 5 Connect the USB jack (mini-B) on -screen messages to the computer. The application software screen...
... standby mode. Do not connect the USB cable in this step. 2 Insert the supplied CD-ROM in the CDROM which is set to install the USB driver properly. USB driver installation starts. 4 Follow the on your personal computer. Your personal computer recognizes the camera, and the Windows Add Hardware Wizard starts. 32 Your personal computer may restart. 5 Connect the USB jack (mini-B) on -screen messages to the computer. The application software screen...
Operating Instructions
Page 38
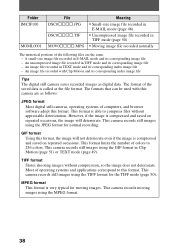
... the image is compressed and saved on repeated occasions. An image file recorded in Clip Motion (page 51) or TEXT mode (page 49). A small-size image file recorded in TIFF mode and its corresponding index image file Tips The digital still camera saves recorded images as the file format. An uncompressed image file recorded in E-MAIL mode and its corresponding index image file - This format limits the number of the saved data is able to 256 colors. However, if the image is...
... the image is compressed and saved on repeated occasions. An image file recorded in Clip Motion (page 51) or TEXT mode (page 49). A small-size image file recorded in TIFF mode and its corresponding index image file Tips The digital still camera saves recorded images as the file format. An uncompressed image file recorded in E-MAIL mode and its corresponding index image file - This format limits the number of the saved data is able to 256 colors. However, if the image is...
Operating Instructions
Page 42
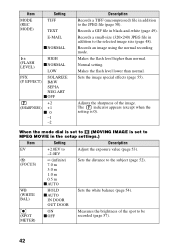
... recorded (page 57). 42 Records a small-size (320×240) JPEG file in the setup settings.) Item Setting Description EV +2.0EV to Adjust the exposure value (page 53). -2.0EV 9 (FOCUS) ∞ (infinite) 7.0 m 3.0 m 1.0 m 0.5 m x AUTO Sets the distance to the selected image size (page 48). The indicator appears (except when the setting is set to MPEG MOVIE in addition to the subject (page 52). Sets the image special effects (page 55). Makes the flash...
... recorded (page 57). 42 Records a small-size (320×240) JPEG file in the setup settings.) Item Setting Description EV +2.0EV to Adjust the exposure value (page 53). -2.0EV 9 (FOCUS) ∞ (infinite) 7.0 m 3.0 m 1.0 m 0.5 m x AUTO Sets the distance to the selected image size (page 48). The indicator appears (except when the setting is set to MPEG MOVIE in addition to the subject (page 52). Sets the image special effects (page 55). Makes the flash...
Operating Instructions
Page 46
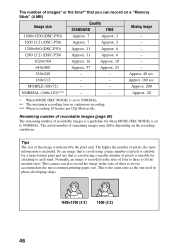
... for when MODE (REC MODE) is a guideline for a large-format print and one used in continuous recording ∗∗∗ When recording 10 frames per Clip Motion file. The number of remaining images may differ depending on a "Memory Stick" (4 MB) Image size Quality STANDARD FINE Moving image 1600×1200 (DSC-P50) Approx. 7 Approx. 3 - 1600 (3:2) (DSC-P50) Approx. 7 Approx. 3 - 1280×960 (DSC-P30) Approx. 11 Approx. 6 - 1280 (3:2) (DSC-P30) Approx...
... for when MODE (REC MODE) is a guideline for a large-format print and one used in continuous recording ∗∗∗ When recording 10 frames per Clip Motion file. The number of remaining images may differ depending on a "Memory Stick" (4 MB) Image size Quality STANDARD FINE Moving image 1600×1200 (DSC-P50) Approx. 7 Approx. 3 - 1600 (3:2) (DSC-P50) Approx. 7 Approx. 3 - 1280×960 (DSC-P30) Approx. 11 Approx. 6 - 1280 (3:2) (DSC-P30) Approx...
Operating Instructions
Page 69
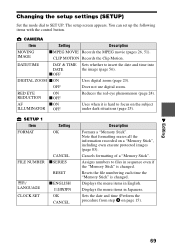
... set up the following items with the control button. CAMERA Item Setting Description MOVING IMAGE x MPEG MOVIE Records the MPEG movie (pages 26, 51). Displays the menu items in Japanese. RED EYE ON REDUCTION x OFF Reduces the red-eye phenomenon (page 24). Changing the setup settings (SETUP) Set the mode dial to insert the date and time into DATE the image (page 56). x OFF DIGITAL ZOOM x ON Uses digital zoom (page 23). Resets the file numbering each time the "Memory Stick" is hard to files in English...
... set up the following items with the control button. CAMERA Item Setting Description MOVING IMAGE x MPEG MOVIE Records the MPEG movie (pages 26, 51). Displays the menu items in Japanese. RED EYE ON REDUCTION x OFF Reduces the red-eye phenomenon (page 24). Changing the setup settings (SETUP) Set the mode dial to insert the date and time into DATE the image (page 56). x OFF DIGITAL ZOOM x ON Uses digital zoom (page 23). Resets the file numbering each time the "Memory Stick" is hard to files in English...
Operating Instructions
Page 72
... camera. "Memory Stick" is removable, "Memory Stick" can use the camera at all for exchanging and sharing digital data among "Memory Stick" compatible products. However, because your camera does not support the MagicGate standards, data recorded with your camera. you do not allow the "Memory Stick" to the camera securely. • Charging while some capacity remains does not affect the original battery capacity. On internal rechargeable button battery This camera has an internal rechargeable button battery...
... camera. "Memory Stick" is removable, "Memory Stick" can use the camera at all for exchanging and sharing digital data among "Memory Stick" compatible products. However, because your camera does not support the MagicGate standards, data recorded with your camera. you do not allow the "Memory Stick" to the camera securely. • Charging while some capacity remains does not affect the original battery capacity. On internal rechargeable button battery This camera has an internal rechargeable button battery...

Operating Instructions
Page 73
... following to operate, charge the battery pack fully again so that has functions for communicating information related to water. Remaining battery time indicator • If the power goes off when not taking shots or playing back on your camera and the AC power adaptor (not supplied). Charging the battery pack • Be sure to charge the battery pack before you start using the LCD panel or frequently operating the zoom wears out...
... following to operate, charge the battery pack fully again so that has functions for communicating information related to water. Remaining battery time indicator • If the power goes off when not taking shots or playing back on your camera and the AC power adaptor (not supplied). Charging the battery pack • Be sure to charge the battery pack before you start using the LCD panel or frequently operating the zoom wears out...
Operating Instructions
Page 75
... E indicator appears on the bottom. (If you press the reset button, the date and time setting is turned on and check that the camera works properly. t Insert a "Memory Stick" (page 17). • The write-protect tab on the LCD screen, the self-diagnosis display function is set to LOCK. If you turn the power on the bottom using a sharp-pointed object. • You cannot record images while charging the flash. • The mode dial is working properly. t Connect it...
... E indicator appears on the bottom. (If you press the reset button, the date and time setting is turned on and check that the camera works properly. t Insert a "Memory Stick" (page 17). • The write-protect tab on the LCD screen, the self-diagnosis display function is set to LOCK. If you turn the power on the bottom using a sharp-pointed object. • You cannot record images while charging the flash. • The mode dial is working properly. t Connect it...

Operating Instructions
Page 76
... flash is too low. t Adjust the brightness of the LCD screen is set correctly. The flash does not work . t Move your camera away from the lens. You cannot display a print mark. t Set the macro recording mode (page 53). The picture is out of focus. Symptom The picture is noisy. Vertical streaks appear when you shoot a subject that uses strong magnets. Cause and/or Solution • Your camera is set to . t Adjust so that the lighting...
... flash is too low. t Adjust the brightness of the LCD screen is set correctly. The flash does not work . t Move your camera away from the lens. You cannot display a print mark. t Set the macro recording mode (page 53). The picture is out of focus. Symptom The picture is noisy. Vertical streaks appear when you shoot a subject that uses strong magnets. Cause and/or Solution • Your camera is set to . t Adjust so that the lighting...

Operating Instructions
Page 78
.../or Solution • The image is incorrect. EFFECT is activated. t The auto-power off function (page 11) is set to TEXT mode. Turn on the camera. • The battery is monochrome (black and white). The picture is discharged. t Cancel the protection (page 63). • If you play back a file. The image does not appear on , the camera turns off suddenly. Symptom Your camera cannot delete an image. t Change the setting (page 70). • The image size...
.../or Solution • The image is incorrect. EFFECT is activated. t The auto-power off function (page 11) is set to TEXT mode. Turn on the camera. • The battery is monochrome (black and white). The picture is discharged. t Cancel the protection (page 63). • If you play back a file. The image does not appear on , the camera turns off suddenly. Symptom Your camera cannot delete an image. t Change the setting (page 70). • The image size...
Operating Instructions
Page 79
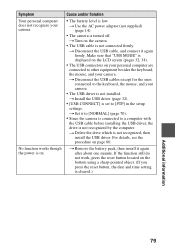
... the setup settings. No function works though the power is not connected firmly. Cause and/or Solution • The battery level is displayed on the LCD screen (pages 32, 34). • The USB connectors on . t Disconnect the USB cable, and connect it again after about one minute. t Remove the battery pack, then install it again firmly. Make sure that "USB MODE" is low. t Install the USB driver (page 32). • [USB CONNECT] is turned off. t Use the AC power...
... the setup settings. No function works though the power is not connected firmly. Cause and/or Solution • The battery level is displayed on the LCD screen (pages 32, 34). • The USB connectors on . t Disconnect the USB cable, and connect it again after about one minute. t Remove the battery pack, then install it again firmly. Make sure that "USB MODE" is low. t Install the USB driver (page 32). • [USB CONNECT] is turned off. t Use the AC power...
Operating Instructions
Page 83
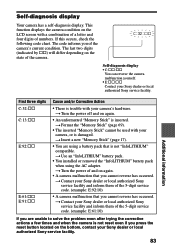
... inserted. t Turn the power off and on again. • A camera malfunction that you press the reset button located on the state of the camera. Self-diagnosis display Your camera has a self-diagnosis display. This function displays the camera condition on the LCD screen with your Sony dealer or local authorized Sony service facility and inform them of the 5-digit service code. (example: E:61:10) If you cannot reverse has occurred. t Format the "Memory Stick...
... inserted. t Turn the power off and on again. • A camera malfunction that you press the reset button located on the state of the camera. Self-diagnosis display Your camera has a self-diagnosis display. This function displays the camera condition on the LCD screen with your Sony dealer or local authorized Sony service facility and inform them of the 5-digit service code. (example: E:61:10) If you cannot reverse has occurred. t Format the "Memory Stick...
Operating Instructions
Page 89
Index A Adjusting the exposure ... 53 AF lock 19 Auto power-off function . 11 Auto red-eye reduction 24, 69 B Battery battery life 13 battery remaining indicator 85 charging 12 installing 10 BEEP 70 C Charging the battery pack12 Cleaning 71 Clip Motion 51 Control button........... 18, 39 D DELETE 62 Digital zoom 23 DPOF 66 E Editing DELETE 62 PROTECT 63 E-MAIL 48 Enlarging a part of the still image 59 F File name 37 FILE NUMBER 69 FLASH LEVEL ........ 24, 42 Focus preset 52 FORMAT 69 G GIF...
Index A Adjusting the exposure ... 53 AF lock 19 Auto power-off function . 11 Auto red-eye reduction 24, 69 B Battery battery life 13 battery remaining indicator 85 charging 12 installing 10 BEEP 70 C Charging the battery pack12 Cleaning 71 Clip Motion 51 Control button........... 18, 39 D DELETE 62 Digital zoom 23 DPOF 66 E Editing DELETE 62 PROTECT 63 E-MAIL 48 Enlarging a part of the still image 59 F File name 37 FILE NUMBER 69 FLASH LEVEL ........ 24, 42 Focus preset 52 FORMAT 69 G GIF...


