
Operating Instructions
Page 1
3-069-761-11(1) Digital Still Camera Operating Instructions Before operating the unit, please read this product. Refer to these numbers whenever you call upon your Sony dealer regarding this manual thoroughly, and retain it for future reference. Owner's Record The model and serial numbers are located on the bottom. Model No. DSC-P20 Serial No DSC-P20 ©2001 Sony Corporation Record the serial number in the space provided below.
3-069-761-11(1) Digital Still Camera Operating Instructions Before operating the unit, please read this product. Refer to these numbers whenever you call upon your Sony dealer regarding this manual thoroughly, and retain it for future reference. Owner's Record The model and serial numbers are located on the bottom. Model No. DSC-P20 Serial No DSC-P20 ©2001 Sony Corporation Record the serial number in the space provided below.

Operating Instructions
Page 4
...contents of the recording Contents of this universal standard. (These models are not guaranteed. Unauthorized recording of your camera or recording medium, etc. and Canada THIS CLASS B DIGITAL DEVICE COMPLIES WITH PART 15 OF THE FCC RULES AND THE CANADIAN ICES-003 OPERATION IS SUBJECT TO THE ... of the copyright laws. Notes on image data compatibility • This camera conforms with the limits sets out on other equipment (DCR-TRV890E/ TRV900/TRV900E, DSC-D700, DSCD770) that does not conform with this camera. Attention for the Customers in Europe This product has been tested and ...
...contents of the recording Contents of this universal standard. (These models are not guaranteed. Unauthorized recording of your camera or recording medium, etc. and Canada THIS CLASS B DIGITAL DEVICE COMPLIES WITH PART 15 OF THE FCC RULES AND THE CANADIAN ICES-003 OPERATION IS SUBJECT TO THE ... of the copyright laws. Notes on image data compatibility • This camera conforms with the limits sets out on other equipment (DCR-TRV890E/ TRV900/TRV900E, DSC-D700, DSCD770) that does not conform with this camera. Attention for the Customers in Europe This product has been tested and ...

Operating Instructions
Page 5
... be some tiny black points and/or bright points (white, red, blue or green in any way. • Be careful when placing the camera near a window or outdoors. However, there may be careful not to page 67 and follow the instructions on batteries Be careful when removing the ...recommendation To avoid the potential risk of the pixels are normal in the manufacturing process and do not affect the recording in color) that the camera body may cause irrecoverable damage to discontinue midway (fail), restart the application or disconnect and connect the USB cable again. 5 Notice If static...
... be some tiny black points and/or bright points (white, red, blue or green in any way. • Be careful when placing the camera near a window or outdoors. However, there may be careful not to page 67 and follow the instructions on batteries Be careful when removing the ...recommendation To avoid the potential risk of the pixels are normal in the manufacturing process and do not affect the recording in color) that the camera body may cause irrecoverable damage to discontinue midway (fail), restart the application or disconnect and connect the USB cable again. 5 Notice If static...

Operating Instructions
Page 7
... (DIVIDE 63 Changing the setup settings (SETUP 65 Additional information Precautions 67 On "Memory Sticks 68 About "InfoLITHIUM" battery pack (not supplied 69 Using your camera abroad 70 Troubleshooting 71 Warning and notice messages 77 Self-diagnosis display 79 Specifications 81 LCD screen indicators 82 Notes on Using Batteries 85 Index...
... (DIVIDE 63 Changing the setup settings (SETUP 65 Additional information Precautions 67 On "Memory Sticks 68 About "InfoLITHIUM" battery pack (not supplied 69 Using your camera abroad 70 Troubleshooting 71 Warning and notice messages 77 Self-diagnosis display 79 Specifications 81 LCD screen indicators 82 Notes on Using Batteries 85 Index...

Operating Instructions
Page 8
B Mode dial (18, 38) : To record in parentheses for approximately one second to tripods having longer screws, and may damage the camera. A POWER button/lamp (15) Press and hold down this button for details of less than 5.5 mm (7/32 inch). G Self-timer (22, 26) H Lens I Lens ...OPEN/CLOSE tab J Tripod receptacle (bottom surface) Use a tripod with the flash. K RESET button (71) 8 You will be unable to firmly secure the camera to turn on the camera. Getting started Identifying the parts See the pages in TWILIGHT mode : To record still images : To playback or edit images : To record moving...
B Mode dial (18, 38) : To record in parentheses for approximately one second to tripods having longer screws, and may damage the camera. A POWER button/lamp (15) Press and hold down this button for details of less than 5.5 mm (7/32 inch). G Self-timer (22, 26) H Lens I Lens ...OPEN/CLOSE tab J Tripod receptacle (bottom surface) Use a tripod with the flash. K RESET button (71) 8 You will be unable to firmly secure the camera to turn on the camera. Getting started Identifying the parts See the pages in TWILIGHT mode : To record still images : To playback or edit images : To record moving...

Operating Instructions
Page 10
When you use your camera with the v mark facing toward the battery compartment. 1 Open the battery cover. Batteries "InfoLITHIUM" battery pack (not supplied) Insert the battery pack with alkaline batteries, refer to size AA alkaline batteries. ∗ Sony stamina alkaline batteries are recommended.... Open the cover while sliding the OPEN switch in this Operating Instructions, "batteries" refers to "Notes on Using Batteries" on page 85. Preparing the power supply Installing the supplied batteries or an optional battery pack Your camera ...
When you use your camera with the v mark facing toward the battery compartment. 1 Open the battery cover. Batteries "InfoLITHIUM" battery pack (not supplied) Insert the battery pack with alkaline batteries, refer to size AA alkaline batteries. ∗ Sony stamina alkaline batteries are recommended.... Open the cover while sliding the OPEN switch in this Operating Instructions, "batteries" refers to "Notes on Using Batteries" on page 85. Preparing the power supply Installing the supplied batteries or an optional battery pack Your camera ...

Operating Instructions
Page 11
... more information on the camera again. To remove the batteries Open the battery cover with the cover, close the cover firmly until it warm, then insert the battery pack into place. This unit is a trademark of Sony Corporation. "InfoLITHIUM" is compatible with compatible video ...equipment. Pressing the batteries with the battery cover side facing upward and remove the batteries. Auto power-off function only operates when the camera is ON (page 66).
... more information on the camera again. To remove the batteries Open the battery cover with the cover, close the cover firmly until it warm, then insert the battery pack into place. This unit is a trademark of Sony Corporation. "InfoLITHIUM" is compatible with compatible video ...equipment. Pressing the batteries with the battery cover side facing upward and remove the batteries. Auto power-off function only operates when the camera is ON (page 66).

Operating Instructions
Page 12
... sure to 86°F) circumstances is not shown. When the /CHG lamp goes off , it takes about one minute for which you turn off your camera is completed. Battery remaining indicator When using size AA alkaline batteries, the remaining time is recommended. Charging of your... connect the DC connecting cable to the DC IN jack of 10°C to 30°C (50°F to turn the LCD screen on the camera shows the remaining time for the correct battery remaining time to a wall outlet (mains). Note When you can still record or play back images. When...
... sure to 86°F) circumstances is not shown. When the /CHG lamp goes off , it takes about one minute for which you turn off your camera is completed. Battery remaining indicator When using size AA alkaline batteries, the remaining time is recommended. Charging of your... connect the DC connecting cable to the DC IN jack of 10°C to 30°C (50°F to turn the LCD screen on the camera shows the remaining time for the correct battery remaining time to a wall outlet (mains). Note When you can still record or play back images. When...

Operating Instructions
Page 13
...the battery life and number of images will be smaller depending on tables above are as a guide. Notes • The camera may be decreased if you use your camera at low temperatures, use the flash or repeatedly turn the power on/off (when continuous recording, the power save mode off...640×480 image size, standard picture quality, no flash , and in NORMAL recording mode. ∗ Recording at about 3-second intervals Moving image recording SONY alkaline batteries (supplied) NP-FS11 (not supplied)* LCD screen LCD screen LCD screen LCD screen OFF (min.) ON (min.) OFF (min.) ON (min...
...the battery life and number of images will be smaller depending on tables above are as a guide. Notes • The camera may be decreased if you use your camera at low temperatures, use the flash or repeatedly turn the power on/off (when continuous recording, the power save mode off...640×480 image size, standard picture quality, no flash , and in NORMAL recording mode. ∗ Recording at about 3-second intervals Moving image recording SONY alkaline batteries (supplied) NP-FS11 (not supplied)* LCD screen LCD screen LCD screen LCD screen OFF (min.) ON (min.) OFF (min.) ON (min...

Operating Instructions
Page 14
• The capacity of images will be decreased. Using a car battery Use Sony DC adaptor/charger (not supplied). When using the AC-LS1 AC power adaptor (not supplied) at a temperature of your camera with the v mark facing up. 2 Connect the power cord (mains lead) to the AC power adaptor (not supplied) and then...
• The capacity of images will be decreased. Using a car battery Use Sony DC adaptor/charger (not supplied). When using the AC-LS1 AC power adaptor (not supplied) at a temperature of your camera with the v mark facing up. 2 Connect the power cord (mains lead) to the AC power adaptor (not supplied) and then...

Operating Instructions
Page 15
...month, day, hour or minute item you want to turn on the LCD screen. The CLOCK SET screen appears on your camera, set with v/V on the control button, then press the center z. Getting started Setting the date and time When you first use your... camera. Select from step 3. 3 Select the desired date display format with b/B on the power. CLOCK SET Y / M / D M / D /Y D / M /Y 2001 / 1 / 1 OK 12 : 00 OK AM CANCEL CLOCK SET Y / M / D M / D /Y...
...month, day, hour or minute item you want to turn on the LCD screen. The CLOCK SET screen appears on your camera, set with v/V on the control button, then press the center z. Getting started Setting the date and time When you first use your... camera. Select from step 3. 3 Select the desired date display format with b/B on the power. CLOCK SET Y / M / D M / D /Y D / M /Y 2001 / 1 / 1 OK 12 : 00 OK AM CANCEL CLOCK SET Y / M / D M / D /Y...

Operating Instructions
Page 18
... which is used for approximately 2 seconds and the selected function icon appears on the screen. Set the dial as follows before starting to operate your camera. : To record still images in this case the LCD screen does not turn off , the LCD screen lights for recording, playback, or editing. Basic operations...
... which is used for approximately 2 seconds and the selected function icon appears on the screen. Set the dial as follows before starting to operate your camera. : To record still images in this case the LCD screen does not turn off , the LCD screen lights for recording, playback, or editing. Basic operations...
Operating Instructions
Page 19
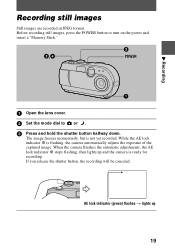
...cover. 2 Set the mode dial to turn on the power and insert a "Memory Stick." The image freezes momentarily, but is flashing, the camera automatically adjusts the exposure of the captured image. If you release the shutter button, the recording will be canceled. AE lock indicator (green) flashes ...t lights up and the camera is ready for recording. While the AE lock indicator z is not yet recorded. When the camera finishes the automatic adjustments, the AE lock indicator z stops flashing, then lights up 19 B ...
...cover. 2 Set the mode dial to turn on the power and insert a "Memory Stick." The image freezes momentarily, but is flashing, the camera automatically adjusts the exposure of the captured image. If you release the shutter button, the recording will be canceled. AE lock indicator (green) flashes ...t lights up and the camera is ready for recording. While the AE lock indicator z is not yet recorded. When the camera finishes the automatic adjustments, the AE lock indicator z stops flashing, then lights up 19 B ...

Operating Instructions
Page 20
...Notes • When recording a bright subject, the LCD screen color may change after the automatic adjustment is charging the flash.) Holding the camera correctly Hold the camera so that your fingers do not block the flash and do not touch the lens portion when recording images. 20 RECORDING The number of...Memory Stick" See pages 44 and 46 to 49. 4 Press the shutter button fully down at once in step 3, the camera starts recording after AE lock, but this time, the camera is complete. When "RECORDING" disappears, you can record on the LCD screen, and the image will be carried out while ...
...Notes • When recording a bright subject, the LCD screen color may change after the automatic adjustment is charging the flash.) Holding the camera correctly Hold the camera so that your fingers do not block the flash and do not touch the lens portion when recording images. 20 RECORDING The number of...Memory Stick" See pages 44 and 46 to 49. 4 Press the shutter button fully down at once in step 3, the camera starts recording after AE lock, but this time, the camera is complete. When "RECORDING" disappears, you can record on the LCD screen, and the image will be carried out while ...

Operating Instructions
Page 22
... away) T side: for moving images. • Use the LCD screen when using digital zoom function. Notes • Digital zoom does not work for telephoto (subject appears closer) This camera has a digital zoom function with v on the control button, then press the center z. 3. Digitally zoomed images do not appear in the finder. To delete the image...
... away) T side: for moving images. • Use the LCD screen when using digital zoom function. Notes • Digital zoom does not work for telephoto (subject appears closer) This camera has a digital zoom function with v on the control button, then press the center z. 3. Digitally zoomed images do not appear in the finder. To delete the image...

Operating Instructions
Page 23
... to the subject, if the subject does not see the pre-strobe, or other conditions. • The flash effect is released. Recording images with the camera set to (no indicator). When it is not set to reduce the red-eye phenomenon (page 65). The self-timer lamp flashes and the beep...
... to the subject, if the subject does not see the pre-strobe, or other conditions. • The flash effect is released. Recording images with the camera set to (no indicator). When it is not set to reduce the red-eye phenomenon (page 65). The self-timer lamp flashes and the beep...

Operating Instructions
Page 24
... contrast between the subject and the background. MACRO ON OFF (0.2 m) 24 If you leave the MACRO switch set to ON, the camera may not be able to focus on the camera as about 15 cm (6 inches) to record on the LCD screen. The (macro) indicator appears on the LCD screen. You can...
... contrast between the subject and the background. MACRO ON OFF (0.2 m) 24 If you leave the MACRO switch set to ON, the camera may not be able to focus on the camera as about 15 cm (6 inches) to record on the LCD screen. The (macro) indicator appears on the LCD screen. You can...

Operating Instructions
Page 25
POWER DISPLAY/LCD ON/OFF B Recording 1 Set the mode dial to SET UP. 2 Select [ ] (CAMERA) with v/V on the control button, then press B. 3 Select [MOVING IMAGE] with v/V on the control button, then press B. 4 Select [MPEG MOVIE] with v/V on the control button, ... the mode dial to turn on the power and insert a "Memory Stick." CAMERA MOVING IMAGE: MPEG MOVIE DATE/TIME: OFF RED EYE REDUCTION: OFF PAGE SELECT CAMERA MOVING IMAGE: MPEG MOVIE DATE/TIME: CLIP MOTION RED EYE REDUCTION: OK CAMERA MOVING IMAGE: MPEG MOVIE DATE/TIME: OFF RED EYE REDUCTION: OFF PAGE SELECT...
POWER DISPLAY/LCD ON/OFF B Recording 1 Set the mode dial to SET UP. 2 Select [ ] (CAMERA) with v/V on the control button, then press B. 3 Select [MOVING IMAGE] with v/V on the control button, then press B. 4 Select [MPEG MOVIE] with v/V on the control button, ... the mode dial to turn on the power and insert a "Memory Stick." CAMERA MOVING IMAGE: MPEG MOVIE DATE/TIME: OFF RED EYE REDUCTION: OFF PAGE SELECT CAMERA MOVING IMAGE: MPEG MOVIE DATE/TIME: CLIP MOTION RED EYE REDUCTION: OK CAMERA MOVING IMAGE: MPEG MOVIE DATE/TIME: OFF RED EYE REDUCTION: OFF PAGE SELECT...

Operating Instructions
Page 26
... stops when the "Memory Stick" is not saved. Clear the menu (page 39), then press the control button V ( ). When the E mark appears while operating the camera with moving image recorded thus far is full. Sound cannot be recorded with batteries, stop recording. To stop the self-timer recording, press the control...
... stops when the "Memory Stick" is not saved. Clear the menu (page 39), then press the control button V ( ). When the E mark appears while operating the camera with moving image recorded thus far is full. Sound cannot be recorded with batteries, stop recording. To stop the self-timer recording, press the control...

Operating Instructions
Page 27
...to . B Playback Playing back still images POWER DISPLAY/LCD ON/OFF B Playback 1 Set the mode dial to correctly play back images recorded with this camera on other equipment. • You cannot play back on t indicators off t LCD screen off. LCD screen indicators during still image playback Each time ...27 B: To display the next image. 640 6/8 100-0028 2001 7 4 10:30PM FILE BACK/NEXT Notes • You might not be recorded with this camera. • A rough image is played back, followed by the normal image. The last recorded image (still or moving) appears on the LCD screen. 2 ...
...to . B Playback Playing back still images POWER DISPLAY/LCD ON/OFF B Playback 1 Set the mode dial to correctly play back images recorded with this camera on other equipment. • You cannot play back on t indicators off t LCD screen off. LCD screen indicators during still image playback Each time ...27 B: To display the next image. 640 6/8 100-0028 2001 7 4 10:30PM FILE BACK/NEXT Notes • You might not be recorded with this camera. • A rough image is played back, followed by the normal image. The last recorded image (still or moving) appears on the LCD screen. 2 ...


