
Operating Instructions
Page 1
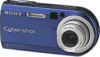
... Still image printing PictBridge printer) Enjoying movies Enjoying images on the bottom. Model No. DSC-P100/P120 Serial No. Owner's Record The model and serial numbers are located on your Sony dealer regarding this manual thoroughly, and retain it for future reference. Record the serial number in the space provided below. Refer to these numbers whenever you call upon your computer_________ Troubleshooting Additional information Index Digital Still Camera Operating Instructions Before operating...
... Still image printing PictBridge printer) Enjoying movies Enjoying images on the bottom. Model No. DSC-P100/P120 Serial No. Owner's Record The model and serial numbers are located on your Sony dealer regarding this manual thoroughly, and retain it for future reference. Record the serial number in the space provided below. Refer to these numbers whenever you call upon your computer_________ Troubleshooting Additional information Index Digital Still Camera Operating Instructions Before operating...

Operating Instructions
Page 4
..., films, video tapes, and other bright light This may cause irrecoverable damage to direct sunlight for if recording or playback is working correctly. Exposing the LCD screen, the finder or the lens to your camera on image data compatibility • This camera conforms with the Design rule for contents of the recording Contents of the pixels are manufactured using the camera. Clean the flash surface before using extremely high...
..., films, video tapes, and other bright light This may cause irrecoverable damage to direct sunlight for if recording or playback is working correctly. Exposing the LCD screen, the finder or the lens to your camera on image data compatibility • This camera conforms with the Design rule for contents of the recording Contents of the pixels are manufactured using the camera. Clean the flash surface before using extremely high...
Operating Instructions
Page 6
Macro 26 Using the self-timer 27 Selecting a flash mode 28 Shooting images with special effects - Scene Selection 32 6 Viewing still images Viewing images on the LCD screen of your camera 36 Viewing images on a TV screen 38 Deleting still images Deleting images 40 Formatting a "Memory Stick 42 Before advanced operations How to setup and operate your camera 15 How to use the control button 15 Setting the date and time 16 Shooting still images Inserting and removing a "Memory Stick 18 Setting the still image size 19 Image size and quality 20 Basic still...
Macro 26 Using the self-timer 27 Selecting a flash mode 28 Shooting images with special effects - Scene Selection 32 6 Viewing still images Viewing images on the LCD screen of your camera 36 Viewing images on a TV screen 38 Deleting still images Deleting images 40 Formatting a "Memory Stick 42 Before advanced operations How to setup and operate your camera 15 How to use the control button 15 Setting the date and time 16 Shooting still images Inserting and removing a "Memory Stick 18 Setting the still image size 19 Image size and quality 20 Basic still...
Operating Instructions
Page 7
... printer 70 Printing images 71 Printing index-images 73 Enjoying movies Shooting movies 76 Viewing movies on the LCD screen .......77 Deleting movies 78 Cutting movies 79 Enjoying images on your computer 86 Image file storage destinations and file names 86 Viewing image files once copied to a computer with your computer - For Macintosh users 92 Using "ImageMixer VCD2 93 Troubleshooting Troubleshooting 95 Warnings and messages 105 Self-diagnosis display 107 Additional information Number of images that can be saved or shooting time 108 Menu items 109 SET...
... printer 70 Printing images 71 Printing index-images 73 Enjoying movies Shooting movies 76 Viewing movies on the LCD screen .......77 Deleting movies 78 Cutting movies 79 Enjoying images on your computer 86 Image file storage destinations and file names 86 Viewing image files once copied to a computer with your computer - For Macintosh users 92 Using "ImageMixer VCD2 93 Troubleshooting Troubleshooting 95 Warnings and messages 105 Self-diagnosis display 107 Additional information Number of images that can be saved or shooting time 108 Menu items 109 SET...

Operating Instructions
Page 15
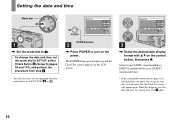
... control button to make the changes. To set to make the setting. 15 Getting started The POWER lamp (green) lights up the menu or the SET UP screen (page 45), and use the control button Camera AF Mode: Digital Zoom: Date/Time: 1 Red Eye Reduction: 2 AF Illuminator: Auto Review: Single Smart Off Off Auto Off SELECT Setup 2 File Number: USB Connect: Video Out: 1 Clock Set: OK Cancel To change the current settings of time with the power off function If you turn on the power when the mode dial is operating using a battery pack. The auto power-off function...
... control button to make the changes. To set to make the setting. 15 Getting started The POWER lamp (green) lights up the menu or the SET UP screen (page 45), and use the control button Camera AF Mode: Digital Zoom: Date/Time: 1 Red Eye Reduction: 2 AF Illuminator: Auto Review: Single Smart Off Off Auto Off SELECT Setup 2 File Number: USB Connect: Video Out: 1 Clock Set: OK Cancel To change the current settings of time with the power off function If you turn on the power when the mode dial is operating using a battery pack. The auto power-off function...
Operating Instructions
Page 16
... rechargeable button battery (page 116), which provides the power for saving the time data, ever becomes low, the Clock Set screen will appear again. Setting the date and time Mode dial 1 , Set the mode dial to . • To change the date and time, set to P, M, SCN, or . POWER Clock Set Y/M/D M/D/Y D/M/Y 2004 / 1 / 1 12 : 00 OK AM Cancel POWER button 2 , Press POWER to turn on the LCD screen. The POWER lamp (green) lights up and the Clock Set screen appears on the power. Clock Set...
... rechargeable button battery (page 116), which provides the power for saving the time data, ever becomes low, the Clock Set screen will appear again. Setting the date and time Mode dial 1 , Set the mode dial to . • To change the date and time, set to P, M, SCN, or . POWER Clock Set Y/M/D M/D/Y D/M/Y 2004 / 1 / 1 12 : 00 OK AM Cancel POWER button 2 , Press POWER to turn on the LCD screen. The POWER lamp (green) lights up and the Clock Set screen appears on the power. Clock Set...
Operating Instructions
Page 45
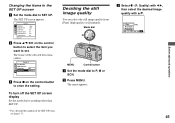
... screen a Set the mode dial to enter the setting. Setup 2 File Number: USB Connect: Video Out: 1 Clock Set: OK Cancel c Press z on the control button to select the item you want to P, M or SCN. The menu appears. Fine FINE Standard P.Quality WB ISO 45 Before advanced operations Mode dial MENU Control button a Set the mode dial to set. b Press MENU. The frame of the SET UP items, see page 113. To turn off the SET UP screen display Set the mode...
... screen a Set the mode dial to enter the setting. Setup 2 File Number: USB Connect: Video Out: 1 Clock Set: OK Cancel c Press z on the control button to select the item you want to P, M or SCN. The menu appears. Fine FINE Standard P.Quality WB ISO 45 Before advanced operations Mode dial MENU Control button a Set the mode dial to set. b Press MENU. The frame of the SET UP items, see page 113. To turn off the SET UP screen display Set the mode...

Operating Instructions
Page 60
Mode dial Shutter MENU Control button a Set the mode dial to the operating instructions supplied with the Cyber-shot Station lets you enjoy image playback on a TV from a remote location. Effect) with b/ B, then select the desired mode with special effects - To cancel Picture Effects Select [Off] in the Cyber-shot Station (not supplied). Using the Cyber-shot Station Charging starts automatically when you easily charge the camera so that it is connected, images can digitally process images to obtain special...
Mode dial Shutter MENU Control button a Set the mode dial to the operating instructions supplied with the Cyber-shot Station lets you enjoy image playback on a TV from a remote location. Effect) with b/ B, then select the desired mode with special effects - To cancel Picture Effects Select [Off] in the Cyber-shot Station (not supplied). Using the Cyber-shot Station Charging starts automatically when you easily charge the camera so that it is connected, images can digitally process images to obtain special...
Operating Instructions
Page 76
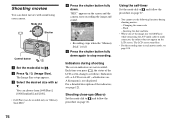
... (Image Size). Indicators during shooting movies: - Shooting close-ups (Macro) Set the mode dial to and follow the procedure on page 26. Changing the zoom scale - Enjoying movies Shooting movies d Press the shutter button fully down again to stop recording. A histogram is full. The LCD screen turns blue. • For the recording time in each movie mode, see page 121. Using the self-timer Set the mode dial to and follow the procedure on page 27. • You cannot use...
... (Image Size). Indicators during shooting movies: - Shooting close-ups (Macro) Set the mode dial to and follow the procedure on page 26. Changing the zoom scale - Enjoying movies Shooting movies d Press the shutter button fully down again to stop recording. A histogram is full. The LCD screen turns blue. • For the recording time in each movie mode, see page 121. Using the self-timer Set the mode dial to and follow the procedure on page 27. • You cannot use...
Operating Instructions
Page 81
... camera is the [Normal] mode. Communication with Hi-Speed USB (USB 2.0compliant) allows advanced transfer (highspeed transfer). • If you need not install the USB driver. x Picture Package This application is used to utilize the various functions. When you to transfer images from the suspend or sleep mode, communication between your camera and your computer When neither a USB connector nor a "Memory Stick" slot is needed in a multi-boot environment. For Windows users • Operations...
... camera is the [Normal] mode. Communication with Hi-Speed USB (USB 2.0compliant) allows advanced transfer (highspeed transfer). • If you need not install the USB driver. x Picture Package This application is used to utilize the various functions. When you to transfer images from the suspend or sleep mode, communication between your camera and your computer When neither a USB connector nor a "Memory Stick" slot is needed in a multi-boot environment. For Windows users • Operations...

Operating Instructions
Page 84
... folder that image with the camera, perform the operation on the screen are copied to display the menu, then select [Paste] from the menu. The image files are turned white and carry out only step 5 above. However, note that the access indicators (page 83) on page 88. 84 Copying images - c Right-click the image file to the desired name and then copy the image file. P Disconnecting the USB multi cable, removing the "Memory Stick," or turning...
... folder that image with the camera, perform the operation on the screen are copied to display the menu, then select [Paste] from the menu. The image files are turned white and carry out only step 5 above. However, note that the access indicators (page 83) on page 88. 84 Copying images - c Right-click the image file to the desired name and then copy the image file. P Disconnecting the USB multi cable, removing the "Memory Stick," or turning...
Operating Instructions
Page 88
... MPG. b Copy the image file to play back some images depending on your Windows computer to "DSC0ssss". For computer environment See page 81 for installation: approximately 200 MB Display: Video card (Direct Draw driver compliant) with 4 MB of VRAM 88 Installing "Picture Package" "Picture Package" is not necessary when the file name set with your camera has not been changed. • You may be unable to the "Memory Stick" folder. 1 Right...
... MPG. b Copy the image file to play back some images depending on your Windows computer to "DSC0ssss". For computer environment See page 81 for installation: approximately 200 MB Display: Video card (Direct Draw driver compliant) with 4 MB of VRAM 88 Installing "Picture Package" "Picture Package" is not necessary when the file name set with your camera has not been changed. • You may be unable to the "Memory Stick" folder. 1 Right...
Operating Instructions
Page 97
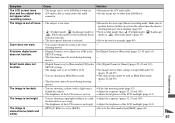
.... p Set it to other modes than [640(Fine)]. p Set the image size to other settings except [5M] and [3:2] (pages 19 and 25). Symptom Cause Solution The LCD screen turns blue and the subject does not appear when recording movies. • The image size is set to [B&W]. shooting movies. Smart zoom does not function. • [Digital Zoom] is set to [Smart] or [Off] in a dark p Adjust the exposure (pages 52, 53 and 109). Troubleshooting The image is set...
.... p Set it to other modes than [640(Fine)]. p Set the image size to other settings except [5M] and [3:2] (pages 19 and 25). Symptom Cause Solution The LCD screen turns blue and the subject does not appear when recording movies. • The image size is set to [B&W]. shooting movies. Smart zoom does not function. • [Digital Zoom] is set to [Smart] or [Off] in a dark p Adjust the exposure (pages 52, 53 and 109). Troubleshooting The image is set...
Operating Instructions
Page 101
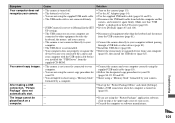
... cannot copy images. Solution p Turn on the LCD screen (page 83). Make sure that "USB Mode" is displayed on the camera (page 15). p Connect the camera directly to shoot using the "Picture Package" application software, click on a computer. p Install the USB driver (page 82). p Connect the camera and your computer correctly using a "Memory Stick" formatted by a computer. - - - - p If you installed the "USB Driver" from the supplied CD-ROM. • The camera is not correctly connected to your computer without passing through a USB...
... cannot copy images. Solution p Turn on the LCD screen (page 83). Make sure that "USB Mode" is displayed on the camera (page 15). p Connect the camera directly to shoot using the "Picture Package" application software, click on a computer. p Install the USB driver (page 82). p Connect the camera and your computer correctly using a "Memory Stick" formatted by a computer. - - - - p If you installed the "USB Driver" from the supplied CD-ROM. • The camera is not correctly connected to your computer without passing through a USB...
Operating Instructions
Page 105
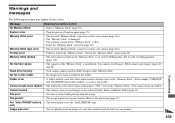
... are playing back an image of a size that cannot be used in your camera (page 116). • The "Memory Stick" is damaged. • The terminal section of the "Memory Stick" is set to this folder. • A folder with the same first three digits number already exists in the "Memory Stick." You cannot create any folders. Select a different folder (page 46). Memory Stick locked • The write-protect switch on again...
... are playing back an image of a size that cannot be used in your camera (page 116). • The "Memory Stick" is damaged. • The terminal section of the "Memory Stick" is set to this folder. • A folder with the same first three digits number already exists in the "Memory Stick." You cannot create any folders. Select a different folder (page 46). Memory Stick locked • The write-protect switch on again...

Operating Instructions
Page 113
... date or time onto the image (page 31). Selects whether to focus on a "Memory Stick," including even protected images (page 42). You cannot shoot the next image during recording. Note that formatting irrevocably erases all data on the subject under dark lighting (page 29). Folder Change REC. The SET UP screen appears. The date and time are indicated with x. (Camera) Item AF Mode Digital Zoom Date/time Setting xSingle / Monitor xSmart / Precision / Off Day&Time / Date / xOff Red Eye Reduction AF Illuminator Auto Review...
... date or time onto the image (page 31). Selects whether to focus on a "Memory Stick," including even protected images (page 42). You cannot shoot the next image during recording. Note that formatting irrevocably erases all data on the subject under dark lighting (page 29). Folder Change REC. The SET UP screen appears. The date and time are indicated with x. (Camera) Item AF Mode Digital Zoom Date/time Setting xSingle / Monitor xSmart / Precision / Off Day&Time / Date / xOff Red Eye Reduction AF Illuminator Auto Review...
Operating Instructions
Page 116
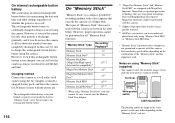
... this camera are using "Memory Stick" (supplied) • You cannot record, edit or delete images if you do not record the date and time. Terminal Write-protect switch Labeling position The position and/or the shape of the writeprotect switch may differ depending on the combination of whether the power is not charged, you can be sure to LOCK. On internal rechargeable button battery This camera has an internal rechargeable button battery for...
... this camera are using "Memory Stick" (supplied) • You cannot record, edit or delete images if you do not record the date and time. Terminal Write-protect switch Labeling position The position and/or the shape of the writeprotect switch may differ depending on the combination of whether the power is not charged, you can be sure to LOCK. On internal rechargeable button battery This camera has an internal rechargeable button battery for...

Operating Instructions
Page 124
... Deleting still images 40 Digital zoom 24 Divide 79 DPOF 68 E Enlarging an image 62 EV adjustment 53 F File names 86 File storage destinations 86 Finder 30 Fireworks mode 33 Flash Level 57, 110 Flash mode 28 Fluorescent 56 Focus 47 Focus preset 49 Folder 46, 61 Format 42 H High-speed shutter mode 33 Histogram 54 I Image quality 20, 45 Image size 19, 20 ImageMixer VCD2 93 Incandescent 56 Index screen 36 "InfoLITHIUM" battery...
... Deleting still images 40 Digital zoom 24 Divide 79 DPOF 68 E Enlarging an image 62 EV adjustment 53 F File names 86 File storage destinations 86 Finder 30 Fireworks mode 33 Flash Level 57, 110 Flash mode 28 Fluorescent 56 Focus 47 Focus preset 49 Folder 46, 61 Format 42 H High-speed shutter mode 33 Histogram 54 I Image quality 20, 45 Image size 19, 20 ImageMixer VCD2 93 Incandescent 56 Index screen 36 "InfoLITHIUM" battery...
Marketing Features & Specifications
Page 1
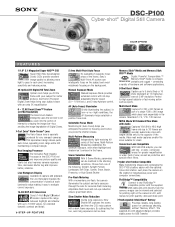
...® Battery Provides reliable, long-lasting power for instantaneous power and computer connections. Images can add tele- Adjustable flash level and red-eye reduction ensure great flash shots. By subtracting the two, even long exposures can be viewed and selected for printing right on the cradle for continuous shooting, without "Memory Effect". This specialized design allows quick auto-focus, appealing zoom range while still maintaining a compact design. Perfect for better pictures. even...
...® Battery Provides reliable, long-lasting power for instantaneous power and computer connections. Images can add tele- Adjustable flash level and red-eye reduction ensure great flash shots. By subtracting the two, even long exposures can be viewed and selected for printing right on the cradle for continuous shooting, without "Memory Effect". This specialized design allows quick auto-focus, appealing zoom range while still maintaining a compact design. Perfect for better pictures. even...
Marketing Features & Specifications
Page 2
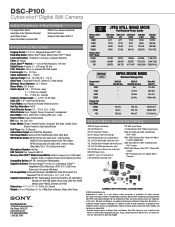
... and specifications subject to 1GB media capacity; Non-metric weights and measures are registered trademarks of their respective owners. DSC-P100 Cyber-shot® Digital Still Camera ADDITIONAL FEATURES 3:2 Aspect Ratio Mode Adjustable Color Saturation/Contrast Audio/Video Output Clear Color/Clear Luminance NR MPEG1 Cue, Review and Divide Multi-Use Terminal Supports High Speed USB 2.0 S P E C I F I C AT I O N S Imaging Device: 1/1.8" 5.1 Megapixel Super HAD™ CCD Recording Media: Memory Stick® Media, Memory Stick...
... and specifications subject to 1GB media capacity; Non-metric weights and measures are registered trademarks of their respective owners. DSC-P100 Cyber-shot® Digital Still Camera ADDITIONAL FEATURES 3:2 Aspect Ratio Mode Adjustable Color Saturation/Contrast Audio/Video Output Clear Color/Clear Luminance NR MPEG1 Cue, Review and Divide Multi-Use Terminal Supports High Speed USB 2.0 S P E C I F I C AT I O N S Imaging Device: 1/1.8" 5.1 Megapixel Super HAD™ CCD Recording Media: Memory Stick® Media, Memory Stick...


