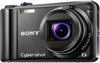
Cyber-shot® Handbook
Page 5
... use this handbook 2 Notes on using the camera 3 Operation Search 8 MENU/Settings Search 11 Identifying parts 15 List of icons displayed on the screen 16 Using the mode dial 18 Using the internal memory 19 Shooting Intelligent Auto Adjustment 20 Easy Shooting 21 Anti Motion Blur 23 Hand-held Twilight 24 Backlight Correction HDR 25 Scene Selection 26 Movie Mode 28 Intelligent Sweep Panorama 29 Manual Exposure Shooting 31 Program Auto 32 Zoom 33 DISP (Screen Display Settings 34 Flash 36 Smile Shutter 37 Self-Timer...
... use this handbook 2 Notes on using the camera 3 Operation Search 8 MENU/Settings Search 11 Identifying parts 15 List of icons displayed on the screen 16 Using the mode dial 18 Using the internal memory 19 Shooting Intelligent Auto Adjustment 20 Easy Shooting 21 Anti Motion Blur 23 Hand-held Twilight 24 Backlight Correction HDR 25 Scene Selection 26 Movie Mode 28 Intelligent Sweep Panorama 29 Manual Exposure Shooting 31 Program Auto 32 Zoom 33 DISP (Screen Display Settings 34 Flash 36 Smile Shutter 37 Self-Timer...
Cyber-shot® Handbook
Page 6
Table of contents Viewing Viewing still images 40 Playback zoom 41 Image Index 42 Delete 43 Viewing movies 45 Operation Search MENU (Shooting) MENU items (Shooting 11 MENU/Settings Search MENU (Viewing) MENU items (Viewing 12 Index Settings Setting items 13 TV Viewing an image on a Standard Definition (SD) TV 117 Viewing an image on a High Definition (HD) TV 118 Computer Using with your computer 122 Using the software 123 Connecting the camera to the computer 125 Uploading images to a media service 127 Creating a movie disc 129 6GB
Table of contents Viewing Viewing still images 40 Playback zoom 41 Image Index 42 Delete 43 Viewing movies 45 Operation Search MENU (Shooting) MENU items (Shooting 11 MENU/Settings Search MENU (Viewing) MENU items (Viewing 12 Index Settings Setting items 13 TV Viewing an image on a Standard Definition (SD) TV 117 Viewing an image on a High Definition (HD) TV 118 Computer Using with your computer 122 Using the software 123 Connecting the camera to the computer 125 Uploading images to a media service 127 Creating a movie disc 129 6GB

Cyber-shot® Handbook
Page 7
Table of contents Operation Search MENU/Settings Search Printing Printing still images 133 Troubleshooting Troubleshooting 135 Warning indicators and messages 144 Others Using the camera abroad 149 "Memory Stick Duo" media 150 Battery pack 152 Battery charger 153 AVCHD format 154 GPS (DSC-HX5V only 155 TransferJet standard 156 Index Index 157 Index 7GB
Table of contents Operation Search MENU/Settings Search Printing Printing still images 133 Troubleshooting Troubleshooting 135 Warning indicators and messages 144 Others Using the camera abroad 149 "Memory Stick Duo" media 150 Battery pack 152 Battery charger 153 AVCHD format 154 GPS (DSC-HX5V only 155 TransferJet standard 156 Index Index 157 Index 7GB

Cyber-shot® Handbook
Page 10
Table of contents Operation Search MENU/Settings Search Shooting/Viewing with Easy Shooting 21 easy-to-see indicators Printing images with the date Using the "PMB (Picture Motion Browser)" 123 Changing date and time settings Area Setting 114 Date & Time Setting 115 Initializing settings Initialize 95 GPS (DSC-HX5V only) GPS assist data 93 GPS setting 51, 104 Adjust Compass 106 Auto Clock ADJ 116 Printing images Print 133 Viewing on TVs Viewing an image on a Standard Definition (SD) TV 117 Viewing an image on a High Definition (HD) TV...
Table of contents Operation Search MENU/Settings Search Shooting/Viewing with Easy Shooting 21 easy-to-see indicators Printing images with the date Using the "PMB (Picture Motion Browser)" 123 Changing date and time settings Area Setting 114 Date & Time Setting 115 Initializing settings Initialize 95 GPS (DSC-HX5V only) GPS assist data 93 GPS setting 51, 104 Adjust Compass 106 Auto Clock ADJ 116 Printing images Print 133 Viewing on TVs Viewing an image on a Standard Definition (SD) TV 117 Viewing an image on a High Definition (HD) TV...
Cyber-shot® Handbook
Page 11
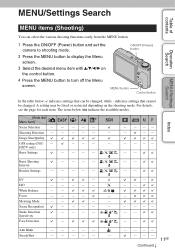
...Anti Blink SteadyShot - - --- - - -- - - --- - - -- 11GB Continued r indicates settings that can select the various shooting functions easily from the MENU button. 1 Press the ON/OFF (Power) button and set the camera to shooting mode. 2 Press the MENU button to turn off the Menu screen. For details, see the page for each item. ISO - - --- -- Burst Shooting Interval Bracket Settings -- -- The icons below , indicates settings that cannot be fixed or restricted depending on the control button. 4 Press the MENU button to display the Menu screen. 3 Select...
...Anti Blink SteadyShot - - --- - - -- - - --- - - -- 11GB Continued r indicates settings that can select the various shooting functions easily from the MENU button. 1 Press the ON/OFF (Power) button and set the camera to shooting mode. 2 Press the MENU button to turn off the Menu screen. For details, see the page for each item. ISO - - --- -- Burst Shooting Interval Bracket Settings -- -- The icons below , indicates settings that cannot be fixed or restricted depending on the control button. 4 Press the MENU button to display the Menu screen. 3 Select...

Cyber-shot® Handbook
Page 13
...Items Movie format AF Illuminator Grid Line Digital Zoom Auto Orientation Red Eye Reduction Blink Alert Beep Language Setting Function Guide GPS assist data (DSC-HX5V only) Demo Mode Initialize HDMI Resolution CTRL FOR HDMI COMPONENT USB Connect LUN Settings Download Music Format Music Power Save GPS setting (DSC-HX5V only) Adjust Compass (DSC-HX5V only) TransferJet Control button MENU button Index 13GB Continued r Table of contents Operation Search MENU/Settings Search Setting items You can change the settings on the (Settings) screen. 1 Press the MENU button to display the Menu screen...
...Items Movie format AF Illuminator Grid Line Digital Zoom Auto Orientation Red Eye Reduction Blink Alert Beep Language Setting Function Guide GPS assist data (DSC-HX5V only) Demo Mode Initialize HDMI Resolution CTRL FOR HDMI COMPONENT USB Connect LUN Settings Download Music Format Music Power Save GPS setting (DSC-HX5V only) Adjust Compass (DSC-HX5V only) TransferJet Control button MENU button Index 13GB Continued r Table of contents Operation Search MENU/Settings Search Setting items You can change the settings on the (Settings) screen. 1 Press the MENU button to display the Menu screen...

Cyber-shot® Handbook
Page 15
... the loop to the camera at the factory. Hook 15GB Table of contents Operation Search MENU/Settings Search Index Identifying parts A Shutter button B Mode dial (18) C For shooting: W/T (zoom) lever (33) For viewing: (Playback zoom) lever/ (Index) lever (41, 42) D Flash E ON/OFF (Power) button F (Burst/Bracket) button G Microphone H Self-timer lamp/Smile Shutter lamp/AF illuminator I Lens J LCD screen K Hook for wrist strap* L MOVIE (Movie) button M (Playback) button (40) N (Delete) button (43) O MENU button (11) P Control button Menu on: v/V/b/B/z Menu off: DISP/ / / Q Tripod receptacle...
... the loop to the camera at the factory. Hook 15GB Table of contents Operation Search MENU/Settings Search Index Identifying parts A Shutter button B Mode dial (18) C For shooting: W/T (zoom) lever (33) For viewing: (Playback zoom) lever/ (Index) lever (41, 42) D Flash E ON/OFF (Power) button F (Burst/Bracket) button G Microphone H Self-timer lamp/Smile Shutter lamp/AF illuminator I Lens J LCD screen K Hook for wrist strap* L MOVIE (Movie) button M (Playback) button (40) N (Delete) button (43) O MENU button (11) P Control button Menu on: v/V/b/B/z Menu off: DISP/ / / Q Tripod receptacle...

Cyber-shot® Handbook
Page 21
... Easy Shooting mode Image Size: GPS setting (DSCHX5V only): Self-Timer: Flash: Smile Shutter: MENU t [Image Size] t z on the control button t desired mode t z Select between [Auto] or [Off] mode. Index 21GB Continued r Scene Recognition icon • The camera recognizes (Twilight), (Twilight Portrait), (Twilight using the minimum necessary functions. Table of contents Operation Search MENU/Settings Search Easy Shooting Allows you to (Easy Shooting). 2 Shoot with the shutter button. Note • The battery charge is recognized. on the control button t desired mode...
... Easy Shooting mode Image Size: GPS setting (DSCHX5V only): Self-Timer: Flash: Smile Shutter: MENU t [Image Size] t z on the control button t desired mode t z Select between [Auto] or [Off] mode. Index 21GB Continued r Scene Recognition icon • The camera recognizes (Twilight), (Twilight Portrait), (Twilight using the minimum necessary functions. Table of contents Operation Search MENU/Settings Search Easy Shooting Allows you to (Easy Shooting). 2 Shoot with the shutter button. Note • The battery charge is recognized. on the control button t desired mode...

Cyber-shot® Handbook
Page 52
... Easy Shooting, Anti Motion Blur, Hand-held Twilight, Backlight Correction HDR, Movie Mode, iSweep Panorama or Smile Shutter. • The flash is set to 10 images in succession when you press and hold down the shutter button. Table of five images is recorded. • The recording interval becomes longer, depending on the setting for the image size. • When the battery level is low, or when the internal memory or memory card...
... Easy Shooting, Anti Motion Blur, Hand-held Twilight, Backlight Correction HDR, Movie Mode, iSweep Panorama or Smile Shutter. • The flash is set to 10 images in succession when you press and hold down the shutter button. Table of five images is recorded. • The recording interval becomes longer, depending on the setting for the image size. • When the battery level is low, or when the internal memory or memory card...
Cyber-shot® Handbook
Page 59
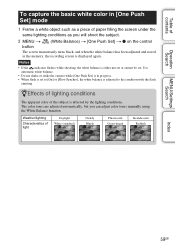
... control The screen momentarily turns black, and when the white balance has been adjusted and stored in the memory, the recording screen is adjusted to [On] or [Slow Synchro], the white balance is displayed again. Table of contents Operation Search To capture the basic white color in [One Push Set] mode 1 Frame a white object such as a piece of paper filling the screen under the same lighting conditions as you can adjust color tones manually using the White Balance function...
... control The screen momentarily turns black, and when the white balance has been adjusted and stored in the memory, the recording screen is adjusted to [On] or [Slow Synchro], the white balance is displayed again. Table of contents Operation Search To capture the basic white color in [One Push Set] mode 1 Frame a white object such as a piece of paper filling the screen under the same lighting conditions as you can adjust color tones manually using the White Balance function...
Cyber-shot® Handbook
Page 68
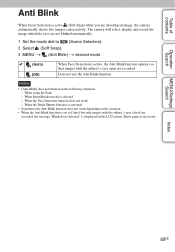
... Anti Blink function does not work - MENU/Settings Search Index 68GB When Burst/Bracket mode is displayed on the LCD screen. When using the flash - Notes • [Anti Blink] does not function in the following situations: - When the Face Detection function does not work depending on the situation. • When the Anti Blink function is set to [Auto] but only images with the subject's eyes open are shooting an image, the camera automatically shoots two images consecutively...
... Anti Blink function does not work - MENU/Settings Search Index 68GB When Burst/Bracket mode is displayed on the LCD screen. When using the flash - Notes • [Anti Blink] does not function in the following situations: - When the Face Detection function does not work depending on the situation. • When the Anti Blink function is set to [Auto] but only images with the subject's eyes open are shooting an image, the camera automatically shoots two images consecutively...
Cyber-shot® Handbook
Page 75
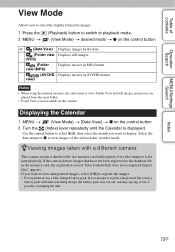
... in the memory card, the registration screen "Files found which were not recognized Import files" appears. zViewing images taken with little remaining charge, the battery pack may run out, causing copying to it for images. 1 Press the 2 MENU t (Playback) button to switch to playback mode. (View Mode) t desired mode t z on the control button (Date View) (Folder view (Still)) (Folder view (MP4)) (AVCHD view) Displays images by the date. Notes • When using a battery pack with a different camera This camera creates a database file in a memory card and registers every shot image to...
... in the memory card, the registration screen "Files found which were not recognized Import files" appears. zViewing images taken with little remaining charge, the battery pack may run out, causing copying to it for images. 1 Press the 2 MENU t (Playback) button to switch to playback mode. (View Mode) t desired mode t z on the control button (Date View) (Folder view (Still)) (Folder view (MP4)) (AVCHD view) Displays images by the date. Notes • When using a battery pack with a different camera This camera creates a database file in a memory card and registers every shot image to...
Cyber-shot® Handbook
Page 104
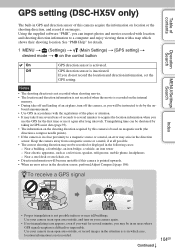
... may take off and landing of an airplane, turn on your camera in an open area outside, or record images in the situation as is not recorded. Using the supplied software "PMB", you wait for details. 1 MENU t (Settings) t (Main Settings) t [GPS setting] t desired mode t z on the control button On GPS direction sensor is difficult or impossible. Triangulating time can import photos and movies recorded with location and shooting direction information to do not record the...
... may take off and landing of an airplane, turn on your camera in an open area outside, or record images in the situation as is not recorded. Using the supplied software "PMB", you wait for details. 1 MENU t (Settings) t (Main Settings) t [GPS setting] t desired mode t z on the control button On GPS direction sensor is difficult or impossible. Triangulating time can import photos and movies recorded with location and shooting direction information to do not record the...
Cyber-shot® Handbook
Page 118
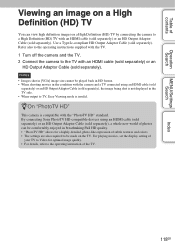
... photos can view high definition images on the TV. By connecting Sony PhotoTV HD-compatible devices using an HDMI cable (sold separately) or an HD Output Adaptor Cable (sold separately). Refer also to the operating instructions supplied with the TV. 1 Turn off the camera and the TV. 2 Connect the camera to the TV with the "PhotoTV HD" standard. Table of contents Operation Search MENU/Settings Search Index Viewing an image...
... photos can view high definition images on the TV. By connecting Sony PhotoTV HD-compatible devices using an HDMI cable (sold separately) or an HD Output Adaptor Cable (sold separately). Refer also to the operating instructions supplied with the TV. 1 Turn off the camera and the TV. 2 Connect the camera to the TV with the "PhotoTV HD" standard. Table of contents Operation Search MENU/Settings Search Index Viewing an image...

Cyber-shot® Handbook
Page 122
... of the operating systems described above or in an environment based on an upgrade of USB devices you connect two or more *1 64-bit editions and Starter (Edition) are using. • Connecting the camera using a USB interface that is compatible with Hi-Speed USB (USB 2.0 compliant) allows advanced transfer (high speed transfer), as the camera is recommended when using the supplied software, "Music Transfer" or "PMB Portable" and importing images via a USB connection. Windows Image Mastering...
... of the operating systems described above or in an environment based on an upgrade of USB devices you connect two or more *1 64-bit editions and Starter (Edition) are using. • Connecting the camera using a USB interface that is compatible with Hi-Speed USB (USB 2.0 compliant) allows advanced transfer (high speed transfer), as the camera is recommended when using the supplied software, "Music Transfer" or "PMB Portable" and importing images via a USB connection. Windows Image Mastering...

Cyber-shot® Handbook
Page 124
... time.) • You can upload images to media services. (An internet connection environment is not compatible with your computer, click [Export] t [Easy Export (PC Sync)] in the [Mac] folder. Make a USB connection between the camera and your computer - The installation of your computer, and click [Import]. • Images on a computer can be exported to a memory card, and displayed on the hard disk of the software starts. zIntroduction to "Music Transfer" "Music Transfer" allows you need...
... time.) • You can upload images to media services. (An internet connection environment is not compatible with your computer, click [Export] t [Easy Export (PC Sync)] in the [Mac] folder. Make a USB connection between the camera and your computer - The installation of your computer, and click [Import]. • Images on a computer can be exported to a memory card, and displayed on the hard disk of the software starts. zIntroduction to "Music Transfer" "Music Transfer" allows you need...

Cyber-shot® Handbook
Page 139
... the protection (page 79). It takes time to triangulate although [GPS assist data] is taken in open area, and turn on the camera again. Update [GPS assist data] (page 93). • As the positions of GPS satellites vary constantly, it (page 126). • When shooting movies with the camera and a TV connected, the image being shot is shifted greatly. Avoid using the camera in index mode. • Cancel the Easy Viewing mode if...
... the protection (page 79). It takes time to triangulate although [GPS assist data] is taken in open area, and turn on the camera again. Update [GPS assist data] (page 93). • As the positions of GPS satellites vary constantly, it (page 126). • When shooting movies with the camera and a TV connected, the image being shot is shifted greatly. Avoid using the camera in index mode. • Cancel the Easy Viewing mode if...
Cyber-shot® Handbook
Page 145
... LOCK position. Read only memory card • The camera cannot record or delete images on the screen. No still images • The selected folder or date does not contain a file that can be played back have been recorded in a cool location until the temperature goes down. System error • Turn the power off and then on again. Set the switch to cool • The camera temperature has risen. Operation Search Internal memory error • Turn the power...
... LOCK position. Read only memory card • The camera cannot record or delete images on the screen. No still images • The selected folder or date does not contain a file that can be played back have been recorded in a cool location until the temperature goes down. System error • Turn the power off and then on again. Set the switch to cool • The camera temperature has risen. Operation Search Internal memory error • Turn the power...
Marketing Specifications
Page 1
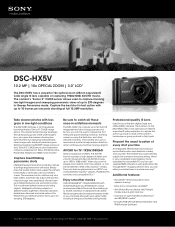
... you take panoramic shots up close or more of the wide-angle G lens, plus gives the camera stunning lowlight sensitivity for excessive camera shake so you can use supplied PMB software or web application, like Google Earth™ mapping service. Capture the best shot in low-light conditions The DSC-HX5V features a 10.2 megapixel, back-illuminated "Exmor R" CMOS image sensor. Once uploaded to compatible PC you take . Available...
... you take panoramic shots up close or more of the wide-angle G lens, plus gives the camera stunning lowlight sensitivity for excessive camera shake so you can use supplied PMB software or web application, like Google Earth™ mapping service. Capture the best shot in low-light conditions The DSC-HX5V features a 10.2 megapixel, back-illuminated "Exmor R" CMOS image sensor. Once uploaded to compatible PC you take . Available...
Marketing Specifications
Page 2
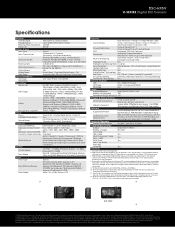
... Inc. DSC-HX5V H-SERIES Digital Still Camera Specifications General Camera Type Image Device Effective Pixels Resolution Processor Optics & Lens Lens Type Lens Construction Aperture Range Focal Length 35mm Equivalency Optical Zoom Digital Zoom Total Zoom LCD & Viewfinder LCD Type Viewfinder Recording Media Slot Still Images Video Microphone / Speaker Focus Focus Intelligent Auto Focus Macro Mode Exposure Exposure Metering Exposure Compensation ISO Backlight Correction HDR Dynamic Range Optimizer White Balance Shutter Shutter Speed Burst Mode Flash Flash Type Flash Effective...
... Inc. DSC-HX5V H-SERIES Digital Still Camera Specifications General Camera Type Image Device Effective Pixels Resolution Processor Optics & Lens Lens Type Lens Construction Aperture Range Focal Length 35mm Equivalency Optical Zoom Digital Zoom Total Zoom LCD & Viewfinder LCD Type Viewfinder Recording Media Slot Still Images Video Microphone / Speaker Focus Focus Intelligent Auto Focus Macro Mode Exposure Exposure Metering Exposure Compensation ISO Backlight Correction HDR Dynamic Range Optimizer White Balance Shutter Shutter Speed Burst Mode Flash Flash Type Flash Effective...


