
Instruction Manual
Page 7
... 9 1 Preparing the battery pack 10 2 Inserting the battery pack/a "Memory Stick Duo" (not supplied) ........ 11 3 Turning the camera on the screen 25 Battery life and memory capacity 27 Battery life and number of images you can record/view 27 Number of still images... your computer 23 Supported Operating Systems for USB connection and application software (supplied 23 Viewing "Cyber-shot Handbook 24 Indicators on /setting the clock 13 Shooting images easily 14 Mode dial/Zoom/Flash/Macro/Self-timer/Display/Lens hood 15 Viewing/deleting images 17 Learning the various functions -
... 9 1 Preparing the battery pack 10 2 Inserting the battery pack/a "Memory Stick Duo" (not supplied) ........ 11 3 Turning the camera on the screen 25 Battery life and memory capacity 27 Battery life and number of images you can record/view 27 Number of still images... your computer 23 Supported Operating Systems for USB connection and application software (supplied 23 Viewing "Cyber-shot Handbook 24 Indicators on /setting the clock 13 Shooting images easily 14 Mode dial/Zoom/Flash/Macro/Self-timer/Display/Lens hood 15 Viewing/deleting images 17 Learning the various functions -

Instruction Manual
Page 14
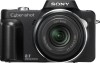
...receptacle (bottom) ɠ Shutter button Mode dial W/T (Zoom) button MENU button Control button HOME button Macro button DISP button Flash button Self-timer button 1Select the desired function from the mode dial. Position the subject in the ... To stop recording, press the shutter button fully down to steady it. When shooting still images (Auto Adjustment mode): Select . When shooting still images: 1 Press and hold the shutter button halfway down again. 14 AE... 2 Press the shutter button fully down . When shooting movies: Select . 2Hold the camera, with the shutter button.
...receptacle (bottom) ɠ Shutter button Mode dial W/T (Zoom) button MENU button Control button HOME button Macro button DISP button Flash button Self-timer button 1Select the desired function from the mode dial. Position the subject in the ... To stop recording, press the shutter button fully down to steady it. When shooting still images (Auto Adjustment mode): Select . When shooting still images: 1 Press and hold the shutter button halfway down again. 14 AE... 2 Press the shutter button fully down . When shooting movies: Select . 2Hold the camera, with the shutter button.

Instruction Manual
Page 15
... portraits of the water captured more clearly. Landscape Shoots with the settings adjusted automatically. Mode dial/Zoom/Flash/Macro/Self-timer/Display/Lens hood [ Using the mode dial Set the mode dial to shoot after use. 15 M Manual Exposure shooting Allows you to shoot with audio....on ) The shutter speed is slow in a dark place without losing the nighttime atmosphere. High Sensitivity Shoots images without a flash even in SCN mode Press MENU and select a setting. Snow Shoots snow scenes in all their splendor. [ W/T Using the zoom Press T to zoom, press ...
... portraits of the water captured more clearly. Landscape Shoots with the settings adjusted automatically. Mode dial/Zoom/Flash/Macro/Self-timer/Display/Lens hood [ Using the mode dial Set the mode dial to shoot after use. 15 M Manual Exposure shooting Allows you to shoot with audio....on ) The shutter speed is slow in a dark place without losing the nighttime atmosphere. High Sensitivity Shoots images without a flash even in SCN mode Press MENU and select a setting. Snow Shoots snow scenes in all their splendor. [ W/T Using the zoom Press T to zoom, press ...

Instruction Manual
Page 16
... Position the lens hood as shown below and turn the lens hood clockwise until it clicks. [ Macro (Shooting close-up) Press b ( ) on the control button repeatedly until the desired mode is selected. : Macro off . Each time you press the shutter button, the selftimer lamp flashes and a beep sounds ...(DISP) on * r Indicators off* * The brightness of the LCD Backlight up. [ Attaching the lens hood 1 Attach the adaptor ring while the power is off : Macro on (W side: Approx. 2 cm or farther (13/16 inches or farther), T side: Approx. 90 cm or farther (2 feet 11 1/2 inches or farther)) [ ...
... Position the lens hood as shown below and turn the lens hood clockwise until it clicks. [ Macro (Shooting close-up) Press b ( ) on the control button repeatedly until the desired mode is selected. : Macro off . Each time you press the shutter button, the selftimer lamp flashes and a beep sounds ...(DISP) on * r Indicators off* * The brightness of the LCD Backlight up. [ Attaching the lens hood 1 Attach the adaptor ring while the power is off : Macro on (W side: Approx. 2 cm or farther (13/16 inches or farther), T side: Approx. 90 cm or farther (2 feet 11 1/2 inches or farther)) [ ...

Instruction Manual
Page 26
....5 +2.0EV N Standby REC 0:12 Manual exposure setting mode Function guide for Manual exposure Focus preset distance AE/AF lock ISO number NR slow shutter Shutter speed Aperture value Exposure Value AF range finder frame indicator Macro Playback Playback bar Standby/Recording a movie Recording time (...images recorded in selected folder Recordable time (hours : minutes : seconds) Changing folder AF illuminator Red-eye reduction Metering mode Flash mode Flash charging White balance Self-diagnosis display ISO number Exposure Value Shutter speed Aperture value Conversion lens Self-diagnosis display ...
....5 +2.0EV N Standby REC 0:12 Manual exposure setting mode Function guide for Manual exposure Focus preset distance AE/AF lock ISO number NR slow shutter Shutter speed Aperture value Exposure Value AF range finder frame indicator Macro Playback Playback bar Standby/Recording a movie Recording time (...images recorded in selected folder Recordable time (hours : minutes : seconds) Changing folder AF illuminator Red-eye reduction Metering mode Flash mode Flash charging White balance Self-diagnosis display ISO number Exposure Value Shutter speed Aperture value Conversion lens Self-diagnosis display ...


