
Instruction Manual
Page 2
... plug will fit into the set through openings as they may touch dangerous voltage points or short out parts that may be equipped with a polarized ac power cord plug (a plug having one described in the operating instructions and adhere to them. Never spill liquid of power source indicated on the set. [ Attachments Do not use attachments not recommended by forcing it...
... plug will fit into the set through openings as they may touch dangerous voltage points or short out parts that may be equipped with a polarized ac power cord plug (a plug having one described in the operating instructions and adhere to them. Never spill liquid of power source indicated on the set. [ Attachments Do not use attachments not recommended by forcing it...

Instruction Manual
Page 3
... direct sunlight. [ Lightning For added protection for this indicates a need for example, near a swimming pool, etc. [ Power-Cord Protection Route the power cord so that it is exposed to the set. Adjust only those controls that are specified in a wet basement, or near a bathtub, washbowl, kitchen sink, or laundry tub, in the operating instructions. Never cover the slots and openings with water for necessary ventilation. Service...
... direct sunlight. [ Lightning For added protection for this indicates a need for example, near a swimming pool, etc. [ Power-Cord Protection Route the power cord so that it is exposed to the set. Adjust only those controls that are specified in a wet basement, or near a bathtub, washbowl, kitchen sink, or laundry tub, in the operating instructions. Never cover the slots and openings with water for necessary ventilation. Service...
Instruction Manual
Page 4
....S.A. Otherwise, fire or injury may call toll free 1-800-822-8837, or visit http://www.rbrc.org/ Caution: Do not handle damaged or leaking Lithium-Ion batteries. Battery charger This power unit is for the FCC related matters only. [ Regulatory Information Declaration of Conformity Trade Name: SONY Model No.: DSC-H3 Responsible Party: Sony Electronics Inc. Telephone No.: 858-942...
....S.A. Otherwise, fire or injury may call toll free 1-800-822-8837, or visit http://www.rbrc.org/ Caution: Do not handle damaged or leaking Lithium-Ion batteries. Battery charger This power unit is for the FCC related matters only. [ Regulatory Information Declaration of Conformity Trade Name: SONY Model No.: DSC-H3 Responsible Party: Sony Electronics Inc. Telephone No.: 858-942...

Instruction Manual
Page 5
... in the EMC Directive for using connection cables shorter than 3 meters (9.8 feet). [ Attention The electromagnetic fields at the specific frequencies may influence the picture and sound of this unit. [ Notice If static electricity or electromagnetism causes data transfer to Subpart B of Part 15 of materials will help to provide reasonable protection against harmful interference in a particular installation. This equipment generates, uses, and can be...
... in the EMC Directive for using connection cables shorter than 3 meters (9.8 feet). [ Attention The electromagnetic fields at the specific frequencies may influence the picture and sound of this unit. [ Notice If static electricity or electromagnetism causes data transfer to Subpart B of Part 15 of materials will help to provide reasonable protection against harmful interference in a particular installation. This equipment generates, uses, and can be...

Instruction Manual
Page 7
... Supported Operating Systems for USB connection and application software (supplied 23 Viewing "Cyber-shot Handbook 24 Indicators on /setting the clock 13 Shooting images easily 14 Mode dial/Zoom/Flash/Macro/Self-timer/Display/Lens hood 15 Viewing/deleting images 17 Learning the various functions - Table of contents IMPORTANT SAFEGUARDS 2 Read this first 4 Notes on using the camera 8 Getting started 9 Checking the accessories supplied 9 1 Preparing the battery pack 10 2 Inserting the battery pack/a "Memory Stick Duo" (not supplied) ........ 11 3 Turning the camera on the screen...
... Supported Operating Systems for USB connection and application software (supplied 23 Viewing "Cyber-shot Handbook 24 Indicators on /setting the clock 13 Shooting images easily 14 Mode dial/Zoom/Flash/Macro/Self-timer/Display/Lens hood 15 Viewing/deleting images 17 Learning the various functions - Table of contents IMPORTANT SAFEGUARDS 2 Read this first 4 Notes on using the camera 8 Getting started 9 Checking the accessories supplied 9 1 Preparing the battery pack 10 2 Inserting the battery pack/a "Memory Stick Duo" (not supplied) ........ 11 3 Turning the camera on the screen...

Instruction Manual
Page 8
... occurs, remove it before operating the camera. • Avoid exposing the camera to protect your data. [ Notes on the LCD screen and lens • The LCD screen is lit. It may cause a malfunction and you start recording, make a trial recording to make a backup copy to water. However, some cases, the camera cannot be damaged. • Clean the flash surface before use the camera near a location that other equipment will play back images recorded or...
... occurs, remove it before operating the camera. • Avoid exposing the camera to protect your data. [ Notes on the LCD screen and lens • The LCD screen is lit. It may cause a malfunction and you start recording, make a trial recording to make a backup copy to water. However, some cases, the camera cannot be damaged. • Clean the flash surface before use the camera near a location that other equipment will play back images recorded or...

Instruction Manual
Page 9
"Cyber-shot Handbook" - Getting started Checking the accessories supplied • Battery charger BC-CSG/BC-CSGB/ BC-CSGC (1) • Shoulder strap (1) • Power cord (mains lead) (1) (not supplied in the USA and Canada) • Lens hood (1)/Adaptor ring (1) • Lens cap (1)/Lens cap strap (1) • Rechargeable battery pack NP-BG1 (1)/ Battery case (1) GB • USB, A/V cable for multi-use terminal (1) • CD-ROM (1) - "Cyber-shot Step-up Guide" • Instruction Manual (this...
"Cyber-shot Handbook" - Getting started Checking the accessories supplied • Battery charger BC-CSG/BC-CSGB/ BC-CSGC (1) • Shoulder strap (1) • Power cord (mains lead) (1) (not supplied in the USA and Canada) • Lens hood (1)/Adaptor ring (1) • Lens cap (1)/Lens cap strap (1) • Rechargeable battery pack NP-BG1 (1)/ Battery case (1) GB • USB, A/V cable for multi-use terminal (1) • CD-ROM (1) - "Cyber-shot Step-up Guide" • Instruction Manual (this...

Instruction Manual
Page 11
... Duo" inserted The camera records/plays back images using the internal memory (approx. 31 MB). [ To check the remaining battery charge Press POWER to turn on the LCD screen. Remaining charge indicator Status Sufficient power remaining Battery almost fully charged Battery half full Battery low, recording/ playback will stop soon. Duo" cover Insert the battery pack while pressing the battery eject lever with fully charged one, or charge the battery. (The warning indicator flashes.) • It takes about one minute...
... Duo" inserted The camera records/plays back images using the internal memory (approx. 31 MB). [ To check the remaining battery charge Press POWER to turn on the LCD screen. Remaining charge indicator Status Sufficient power remaining Battery almost fully charged Battery half full Battery low, recording/ playback will stop soon. Duo" cover Insert the battery pack while pressing the battery eject lever with fully charged one, or charge the battery. (The warning indicator flashes.) • It takes about one minute...
Instruction Manual
Page 13
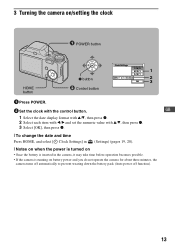
... control button. 3 Turning the camera on/setting the clock POWER button HOME button z button ɟ Control button Clock Settings Y/M/D M/D/Y 1 D/M/Y 2007 / 1 / 1 10 : 30 AM 2 OK 3 1 Press POWER. 2 Set the clock with v/V, then press z. 3 Select [OK], then press z. [ To change the date and time Press HOME, and select [ Clock Settings] in (Settings) (pages 19, 20). [ Notes on when the power is turned on • Once the battery is inserted in the camera, it may take time before operation...
... control button. 3 Turning the camera on/setting the clock POWER button HOME button z button ɟ Control button Clock Settings Y/M/D M/D/Y 1 D/M/Y 2007 / 1 / 1 10 : 30 AM 2 OK 3 1 Press POWER. 2 Set the clock with v/V, then press z. 3 Select [OK], then press z. [ To change the date and time Press HOME, and select [ Clock Settings] in (Settings) (pages 19, 20). [ Notes on when the power is turned on • Once the battery is inserted in the camera, it may take time before operation...

Instruction Manual
Page 15
... shutter speed is insufficient light or backlight (default setting) : Flash forced on : Slow synchro (Flash forced on a distant subject. Snow Shoots snow scenes in SCN mode Press MENU and select a setting. Twilight Shoots night scenes without a flash even in a dark place to shoot with audio. You can adjust other settings using the flash. Soft Snap Shoots images with the settings adjusted automatically. Auto Adjustment Allows easy shooting with a softer atmosphere for still images) Press B ( ) on the control button repeatedly...
... shutter speed is insufficient light or backlight (default setting) : Flash forced on : Slow synchro (Flash forced on a distant subject. Snow Shoots snow scenes in SCN mode Press MENU and select a setting. Twilight Shoots night scenes without a flash even in a dark place to shoot with audio. You can adjust other settings using the flash. Soft Snap Shoots images with the settings adjusted automatically. Auto Adjustment Allows easy shooting with a softer atmosphere for still images) Press B ( ) on the control button repeatedly...

Instruction Manual
Page 20
...Folder Copy Function Guide COMPONENT Grid Line Digital Zoom 20 Folder Internal Memory Tool Format Main Settings Main Settings 1 Beep Initialize Main Settings 2 USB Connect Video Out Shooting Settings Shooting Settings 1 AF Illuminator AF Mode Conversion Lens Shooting Settings 2 Auto Review Clock Settings Language Setting Format Music Create REC. For details on the operation 1 page 19 HOME items Pressing HOME displays the following items. Details on the items are displayed on the screen by the guide. Categories Shooting View Images Printing, Other Manage Memory Settings Items Shooting...
...Folder Copy Function Guide COMPONENT Grid Line Digital Zoom 20 Folder Internal Memory Tool Format Main Settings Main Settings 1 Beep Initialize Main Settings 2 USB Connect Video Out Shooting Settings Shooting Settings 1 AF Illuminator AF Mode Conversion Lens Shooting Settings 2 Auto Review Clock Settings Language Setting Format Music Create REC. For details on the operation 1 page 19 HOME items Pressing HOME displays the following items. Details on the items are displayed on the screen by the guide. Categories Shooting View Images Printing, Other Manage Memory Settings Items Shooting...

Instruction Manual
Page 23
..., refer to "Cyber-shot Handbook". 23 Enjoying your OS does not support USB connections, use a commercially available Memory Stick Reader/Writer. • For further details on a computer. Supported Operating Systems for USB connection and application software (supplied) For Windows users For Macintosh users USB connection Windows 2000 Professional SP4, Windows XP* SP2, Windows Vista* Mac OS 9.1/9.2/ Mac OS X(v10.1 to v10.4) Application software "Picture Motion Browser" Windows 2000 Professional SP4, Windows XP* SP2, Windows Vista* not compatible * 64-bit...
..., refer to "Cyber-shot Handbook". 23 Enjoying your OS does not support USB connections, use a commercially available Memory Stick Reader/Writer. • For further details on a computer. Supported Operating Systems for USB connection and application software (supplied) For Windows users For Macintosh users USB connection Windows 2000 Professional SP4, Windows XP* SP2, Windows Vista* Mac OS 9.1/9.2/ Mac OS X(v10.1 to v10.4) Application software "Picture Motion Browser" Windows 2000 Professional SP4, Windows XP* SP2, Windows Vista* not compatible * 64-bit...

Instruction Manual
Page 24
.... 2 Select the [Handbook] folder and copy "Handbook.pdf" stored in the [GB] folder to your computer. 3 After copying is complete, double-click "Handbook.pdf". When you click the [Cyber-shot Handbook] button, the screen for copying "Cyber-shot Handbook" appears. 2 Follow the on-screen instructions to copy. • When you install "Cyber-shot Handbook," the "Cyber-shot Step-up Guide" will be installed automatically. 3 After the installation is required to use the camera in detail. The screen below appears. [ For Macintosh users 1 Turn on the...
.... 2 Select the [Handbook] folder and copy "Handbook.pdf" stored in the [GB] folder to your computer. 3 After copying is complete, double-click "Handbook.pdf". When you click the [Cyber-shot Handbook] button, the screen for copying "Cyber-shot Handbook" appears. 2 Follow the on-screen instructions to copy. • When you install "Cyber-shot Handbook," the "Cyber-shot Step-up Guide" will be installed automatically. 3 After the installation is required to use the camera in detail. The screen below appears. [ For Macintosh users 1 Turn on the...

Instruction Manual
Page 26
...date/time of the playback image z STOP z PLAY Function guide for playing image BACK/NEXT Selecting images V VOLUME Adjusting volume C 96 12/12 00:25:05 C:32:00 ISO400 +2.0EV 500 F3.5 D C:32:00 Recording/playback Media ("Memory Stick Duo", Internal memory) Recording folder Playback folder Number of recordable images Image number/Number of images recorded in selected folder Recordable time (hours : minutes : seconds) Changing folder AF illuminator Red-eye reduction Metering mode Flash mode Flash charging White balance Self-diagnosis display ISO number Exposure Value Shutter speed Aperture...
...date/time of the playback image z STOP z PLAY Function guide for playing image BACK/NEXT Selecting images V VOLUME Adjusting volume C 96 12/12 00:25:05 C:32:00 ISO400 +2.0EV 500 F3.5 D C:32:00 Recording/playback Media ("Memory Stick Duo", Internal memory) Recording folder Playback folder Number of recordable images Image number/Number of images recorded in selected folder Recordable time (hours : minutes : seconds) Changing folder AF illuminator Red-eye reduction Metering mode Flash mode Flash charging White balance Self-diagnosis display ISO number Exposure Value Shutter speed Aperture...

Instruction Manual
Page 27
... shooting still images Battery life (min.) Approx. 165 No. The surrounding temperature is set to [On]. The flash strobes once every two times. - The zoom is used at about three second intervals [ Notes on the CIPA standard. (CIPA: Camera & Imaging Products Association) • The battery life and the number of images do not change, regardless of image size. [ When viewing still images Battery life (min.) Approx. 370 No. The battery power...
... shooting still images Battery life (min.) Approx. 165 No. The surrounding temperature is set to [On]. The flash strobes once every two times. - The zoom is used at about three second intervals [ Notes on the CIPA standard. (CIPA: Camera & Imaging Products Association) • The battery life and the number of images do not change, regardless of image size. [ When viewing still images Battery life (min.) Approx. 370 No. The battery power...

Instruction Manual
Page 29
The maximum length of movies The numbers in the table below show the approximate maximum recordable time obtained by totaling all movie files. [ The approximate recording time of time you can shoot continuously is about 10 minutes. (Units: hour : minute : second) Internal Capacity memory "Memory Stick Duo" formatted with the camera Size Approx. 31 MB 128 MB 256 MB ...:10 3:00:20 6:03:30 11:59:30 24:04:50 • Movies with the size set to [640(Fine)] can only be recorded on a "Memory Stick PRO Duo". • The camera does not support HD recordings or playbacks for movies. GB 29
The maximum length of movies The numbers in the table below show the approximate maximum recordable time obtained by totaling all movie files. [ The approximate recording time of time you can shoot continuously is about 10 minutes. (Units: hour : minute : second) Internal Capacity memory "Memory Stick Duo" formatted with the camera Size Approx. 31 MB 128 MB 256 MB ...:10 3:00:20 6:03:30 11:59:30 24:04:50 • Movies with the size set to [640(Fine)] can only be recorded on a "Memory Stick PRO Duo". • The camera does not support HD recordings or playbacks for movies. GB 29

Instruction Manual
Page 30
... authorized Sony service facility. Turn on the camera. • After inserting the battery pack into the camera, it may take a few moments for the camera to "Cyber-shot Handbook". 2 Remove the battery pack, wait for repair, you give consent that the contents of the internal memory, Music files may be checked. The power turns off automatically to prevent wearing down the battery pack. Replace it with a new one . • Use a recommended battery pack...
... authorized Sony service facility. Turn on the camera. • After inserting the battery pack into the camera, it may take a few moments for the camera to "Cyber-shot Handbook". 2 Remove the battery pack, wait for repair, you give consent that the contents of the internal memory, Music files may be checked. The power turns off automatically to prevent wearing down the battery pack. Replace it with a new one . • Use a recommended battery pack...

Instruction Manual
Page 31
... remaining battery charge. Set the image size to [640(Fine)] when recording movies. By using the AC Adapter (not supplied). Delete the USB connection. 31 If it to correct the indication. • The battery pack is discharged. Delete unnecessary images (page 17). - Do one . Viewing images Cannot play back images. • Press (Playback) (page 17). • The folder/file name has been changed on your computer. • Sony does not guarantee playback of the following : - Replace it...
... remaining battery charge. Set the image size to [640(Fine)] when recording movies. By using the AC Adapter (not supplied). Delete the USB connection. 31 If it to correct the indication. • The battery pack is discharged. Delete unnecessary images (page 17). - Do one . Viewing images Cannot play back images. • Press (Playback) (page 17). • The folder/file name has been changed on your computer. • Sony does not guarantee playback of the following : - Replace it...

Instruction Manual
Page 32
... the power is not charged, you are using the camera. In this rechargeable battery is on your hand. - Do not touch the camera with any of the internal rechargeable backup battery Insert charged battery pack in the camera, and then leave the camera for maintaining the date and time and other settings regardless of the camera. This moisture condensation may condense inside the lens, images will not be indicated...
... the power is not charged, you are using the camera. In this rechargeable battery is on your hand. - Do not touch the camera with any of the internal rechargeable backup battery Insert charged battery pack in the camera, and then leave the camera for maintaining the date and time and other settings regardless of the camera. This moisture condensation may condense inside the lens, images will not be indicated...

Instruction Manual
Page 33
... Vario-Tessar 10× zoom lens f = 6.3 - 63 mm (38 - 380 mm when converted to a 35 mm still camera) F3.5 - 4.4 Exposure control: Automatic exposure, Scene Selection (9 modes) White balance: Automatic, Daylight, Cloudy, Fluorescent 1,2,3, Incandescent, Flash File format (DCF compliant): Still images: Exif Ver. 2.21 JPEG compliant, DPOF compatible Movies: MPEG1 compliant (Monaural) Recording media: Internal Memory (approx. 31 MB), "Memory Stick Duo" Flash:Flash range (ISO sensitivity (Recommended exposure Index) set to Auto): approx. 0.2 to 7.0 m (7 7/8 inches...
... Vario-Tessar 10× zoom lens f = 6.3 - 63 mm (38 - 380 mm when converted to a 35 mm still camera) F3.5 - 4.4 Exposure control: Automatic exposure, Scene Selection (9 modes) White balance: Automatic, Daylight, Cloudy, Fluorescent 1,2,3, Incandescent, Flash File format (DCF compliant): Still images: Exif Ver. 2.21 JPEG compliant, DPOF compatible Movies: MPEG1 compliant (Monaural) Recording media: Internal Memory (approx. 31 MB), "Memory Stick Duo" Flash:Flash range (ISO sensitivity (Recommended exposure Index) set to Auto): approx. 0.2 to 7.0 m (7 7/8 inches...


