Operating Instructions
Page 1
Record the serial number in the space provided below. DSC-D770 © 1999 by Sony Corporation Model No. Refer to these numbers whenever you call upon your Sony dealer regarding this manual thoroughly, and retain it for future reference. DSC-D770 3-867-444-11 (1) Digital Still Camera Operating Instructions Before operating the unit, please read this product. Owner's Record The model and serial numbers are located on the bottom. DSC-D770 Serial No.
Record the serial number in the space provided below. DSC-D770 © 1999 by Sony Corporation Model No. Refer to these numbers whenever you call upon your Sony dealer regarding this manual thoroughly, and retain it for future reference. DSC-D770 3-867-444-11 (1) Digital Still Camera Operating Instructions Before operating the unit, please read this product. Owner's Record The model and serial numbers are located on the bottom. DSC-D770 Serial No.
Operating Instructions
Page 3
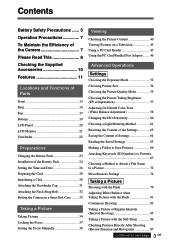
Contents Introduction Battery Safety Precautions ...... 5 Operation Precautions 7 To Maintain the Efficiency of the Camera 7 Please Read This 8 Checking the Supplied Accessories 10 Features 11 Locations and Functions of Parts Front 13 Rear 14 Top 17 Bottom 19 LCD Panel... the Time and Date 26 Preparing the Card 28 Initializing a Card 30 Attaching the Viewfinder Cap 31 Attaching the Neck Strap Belt 32 Putting the Camera in a Semi-Soft Case ........ 33 Taking a Picture Taking Pictures 34 Locking the Focus 37 Setting the Focus Manually 38 Viewing Checking the Picture Content 40...
Contents Introduction Battery Safety Precautions ...... 5 Operation Precautions 7 To Maintain the Efficiency of the Camera 7 Please Read This 8 Checking the Supplied Accessories 10 Features 11 Locations and Functions of Parts Front 13 Rear 14 Top 17 Bottom 19 LCD Panel... the Time and Date 26 Preparing the Card 28 Initializing a Card 30 Attaching the Viewfinder Cap 31 Attaching the Neck Strap Belt 32 Putting the Camera in a Semi-Soft Case ........ 33 Taking a Picture Taking Pictures 34 Locking the Focus 37 Setting the Focus Manually 38 Viewing Checking the Picture Content 40...
Operating Instructions
Page 5
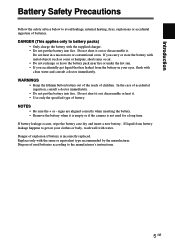
... aligned correctly when inserting the battery. • Remove the battery when it . Do not short it out or dissassemble it is empty or if the camera is incorrectly replaced. In the case of used for a long time.
... aligned correctly when inserting the battery. • Remove the battery when it . Do not short it out or dissassemble it is empty or if the camera is incorrectly replaced. In the case of used for a long time.
Operating Instructions
Page 6
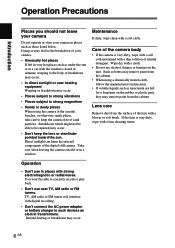
... places with strong electromagnetic or radial waves. Breakdown which might not be able to such devices as electric transformers. Maintenance If dirty, wipe clean with digital recording. • Don't connect the AC power adaptor or battery charger to be able to correctly record or play back. • Don't use near... left in very hot places such as under the sun or in a car with the windows closed in summer, warping to the breakdown of the digital still camera. Doing so may lead to the body or breakdown may occur. • In direct sunlight or near TV, AM radio or FM tuners. TV, ...
... places with strong electromagnetic or radial waves. Breakdown which might not be able to such devices as electric transformers. Maintenance If dirty, wipe clean with digital recording. • Don't connect the AC power adaptor or battery charger to be able to correctly record or play back. • Don't use near... left in very hot places such as under the sun or in a car with the windows closed in summer, warping to the breakdown of the digital still camera. Doing so may lead to the body or breakdown may occur. • In direct sunlight or near TV, AM radio or FM tuners. TV, ...
Operating Instructions
Page 7
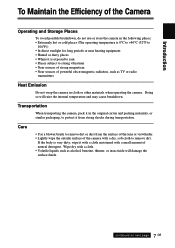
...; Use a blower brush to remove dirt or dust from strong shocks during transportation. Transportation When transporting the camera, pack it in cloth or other materials when operating the camera. Doing so will damage the surface finish. 7 continued on next page GB If the body is exposed to... will raise the internal temperature and may cause breakdown. Introduction To Maintain the Efficiency of the Camera Operating and Storage Places To avoid possible breakdown, do not use or store the camera in the following places: • Extremely hot or cold places (The operating temperature is 0&#...
...; Use a blower brush to remove dirt or dust from strong shocks during transportation. Transportation When transporting the camera, pack it in cloth or other materials when operating the camera. Doing so will damage the surface finish. 7 continued on next page GB If the body is exposed to... will raise the internal temperature and may cause breakdown. Introduction To Maintain the Efficiency of the Camera Operating and Storage Places To avoid possible breakdown, do not use or store the camera in the following places: • Extremely hot or cold places (The operating temperature is 0&#...
Operating Instructions
Page 8
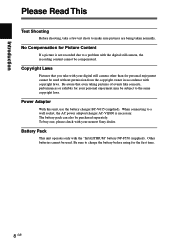
...that even taking pictures of events like concerts, performances or exhibits for your personal enjoyment may be subject to a problem with the digital still camera, the recording content cannot be compensated. To buy one, please check with the "InfoLITHIUM" battery NP-F550 (supplied). Be sure... aware that you take a few test shots to make sure pictures are being taken normally. Battery Pack This unit operates only with your nearest Sony dealer. Introduction Please Read This Test Shooting Before shooting, take with your digital still camera other than for personal enjoyment cannot be ...
...that even taking pictures of events like concerts, performances or exhibits for your personal enjoyment may be subject to a problem with the digital still camera, the recording content cannot be compensated. To buy one, please check with the "InfoLITHIUM" battery NP-F550 (supplied). Be sure... aware that you take a few test shots to make sure pictures are being taken normally. Battery Pack This unit operates only with your nearest Sony dealer. Introduction Please Read This Test Shooting Before shooting, take with your digital still camera other than for personal enjoyment cannot be ...
Operating Instructions
Page 9
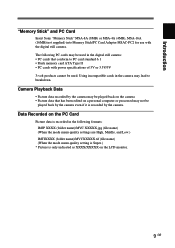
The following PC cards may be used . Introduction "Memory Stick" and PC Card Insert Sony "Memory Stick" MSA-8A (8MB) or MSA-4A (4MB), MSA-16A (16MB)(not supplied) into Memory Stick/PC Card Adaptor MSAC-PC2 for use with ....) IMTIXXXX (folder name)/MVCXXXXX.tif (file name) (When the mode menu quality setting is Super.) * Picture is recorded in the digital still camera: • PC cards that conform to breakdown. Using incompatible cards in the camera may lead to PC card standard 6.1 • Flash memory card ATA Type II • PC cards with the...
The following PC cards may be used . Introduction "Memory Stick" and PC Card Insert Sony "Memory Stick" MSA-8A (8MB) or MSA-4A (4MB), MSA-16A (16MB)(not supplied) into Memory Stick/PC Card Adaptor MSAC-PC2 for use with ....) IMTIXXXX (folder name)/MVCXXXXX.tif (file name) (When the mode menu quality setting is Super.) * Picture is recorded in the digital still camera: • PC cards that conform to breakdown. Using incompatible cards in the camera may lead to PC card standard 6.1 • Flash memory card ATA Type II • PC cards with the...
Operating Instructions
Page 10
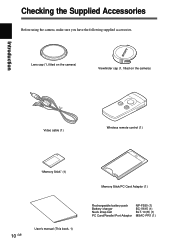
Lens cap (1, fitted on the camera) Viewfinder cap (1, fitted on the camera) Introduction Video cable (1) Wireless remote control (1) "Memory Stick" (1) 10 GB User's manual (This book, 1) Memory Stick/PC Card Adaptor (1) Rechargeable battery pack Battery charger Neck strap belt PC Card/Parallel Port Adaptor NP-F550 (1) BC-V615 (1) BLT-10(H) (1) MSAC-PR1 (1) Checking the Supplied Accessories Before using the camera, make sure you have the following supplied accessories.
Lens cap (1, fitted on the camera) Viewfinder cap (1, fitted on the camera) Introduction Video cable (1) Wireless remote control (1) "Memory Stick" (1) 10 GB User's manual (This book, 1) Memory Stick/PC Card Adaptor (1) Rechargeable battery pack Battery charger Neck strap belt PC Card/Parallel Port Adaptor NP-F550 (1) BC-V615 (1) BLT-10(H) (1) MSAC-PR1 (1) Checking the Supplied Accessories Before using the camera, make sure you have the following supplied accessories.
Operating Instructions
Page 11
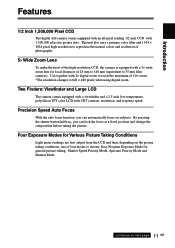
... and response speed. Two Finders: Viewfinder and Large LCD The camera comes equipped with a viewfinder and a 2.5 inch low-temperature, polysilicon TFT color LCD with 2× digital zoom to 640 × 480 pixels when using digital zoom. By pressing the shutter button halfway, you can lock ...the focus at a fixed position and change the composition before taking the picture. Introduction Features 1/2 Inch 1,500,000 Pixel CCD The digital still camera comes equipped with an all-pixel reading 1/2 inch CCD with a 5× wide zoom lens for general picture-taking, Shutter Speed Priority...
... and response speed. Two Finders: Viewfinder and Large LCD The camera comes equipped with a viewfinder and a 2.5 inch low-temperature, polysilicon TFT color LCD with 2× digital zoom to 640 × 480 pixels when using digital zoom. By pressing the shutter button halfway, you can lock ...the focus at a fixed position and change the composition before taking the picture. Introduction Features 1/2 Inch 1,500,000 Pixel CCD The digital still camera comes equipped with an all-pixel reading 1/2 inch CCD with a 5× wide zoom lens for general picture-taking, Shutter Speed Priority...
Operating Instructions
Page 12
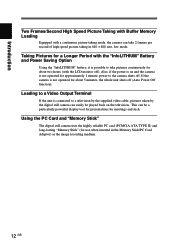
Loading to a Video Output Terminal If the unit is connected to a television by the supplied video cable, pictures taken by the digital still camera can easily be a particularly powerful display tool for presentations for meetings and such. Taking Pictures for a Longer Period with the "InfoLITHIUM" ...it is not operated for use when inserted in 640 × 480 size, low mode. If the camera is possible to the camera shuts off. Using the PC Card and "Memory Stick" The digital still camera uses the highly reliable PC card (PCMCIA ATA TYPE II) and long-lasting "Memory Stick" (for about...
Loading to a Video Output Terminal If the unit is connected to a television by the supplied video cable, pictures taken by the digital still camera can easily be a particularly powerful display tool for presentations for meetings and such. Taking Pictures for a Longer Period with the "InfoLITHIUM" ...it is not operated for use when inserted in 640 × 480 size, low mode. If the camera is possible to the camera shuts off. Using the PC Card and "Memory Stick" The digital still camera uses the highly reliable PC card (PCMCIA ATA TYPE II) and long-lasting "Memory Stick" (for about...

Operating Instructions
Page 13
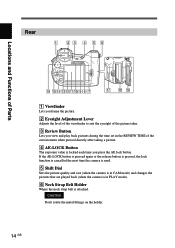
... is stored when you close the cover. 2 Flash Pop-up Key Press the flash pop-up key to 140 mm (5×) on a 35 mm film camera) by rotating the zoom ring. Locations and Functions of Parts Locations and Functions of Parts Front 1 2 6 5 3 WB 4 1 Flash The... camera has a built-in the WB (white balance) mode, white balance can manually adjust the zoom lens (28 mm to open and the flash warms up ...
... is stored when you close the cover. 2 Flash Pop-up Key Press the flash pop-up key to 140 mm (5×) on a 35 mm film camera) by rotating the zoom ring. Locations and Functions of Parts Locations and Functions of Parts Front 1 2 6 5 3 WB 4 1 Flash The... camera has a built-in the WB (white balance) mode, white balance can manually adjust the zoom lens (28 mm to open and the flash warms up ...
Operating Instructions
Page 14
... button is pressed, the lock function is cancelled the next time the camera is used. 5 Shift Dial Sets the picture quality and size (when the camera is in CAM mode) and changes the pictures that are played back (when the camera is in the REVIEW TIME of the custom menu when pressed directly...
... button is pressed, the lock function is cancelled the next time the camera is used. 5 Shift Dial Sets the picture quality and size (when the camera is in CAM mode) and changes the pictures that are played back (when the camera is in the REVIEW TIME of the custom menu when pressed directly...

Operating Instructions
Page 15
Caution When the access lamp is accessed by the camera during picture taking information, frame shots, and view recorded pictures. !™ MENU Button Brings up the menu on next page GB The PC Card or "Memory Stick" may be damaged. Switches to an enlargement of the camera or cards. !£ EXECUTE Button Lets you...
Caution When the access lamp is accessed by the camera during picture taking information, frame shots, and view recorded pictures. !™ MENU Button Brings up the menu on next page GB The PC Card or "Memory Stick" may be damaged. Switches to an enlargement of the camera or cards. !£ EXECUTE Button Lets you...

Operating Instructions
Page 16
... LCD Monitor Display When the power/mode dial is turned to eject it. 16 GB Locations and Functions of Parts !§ Power/Mode Dial Selects camera conditions when turned while the mode lock (green) is held down. • OFF Turns the power off . If necessary, press the LCD button to turn...
... LCD Monitor Display When the power/mode dial is turned to eject it. 16 GB Locations and Functions of Parts !§ Power/Mode Dial Selects camera conditions when turned while the mode lock (green) is held down. • OFF Turns the power off . If necessary, press the LCD button to turn...
Operating Instructions
Page 17
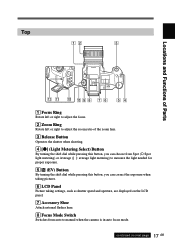
... speed and aperture, are displayed on the LCD panel. 7 Accessory Shoe Attach external flashes here. 8 Focus Mode Switch Switches from auto to manual when the camera is in auto focus mode. 17 continued on next page GB
... speed and aperture, are displayed on the LCD panel. 7 Accessory Shoe Attach external flashes here. 8 Focus Mode Switch Switches from auto to manual when the camera is in auto focus mode. 17 continued on next page GB

Operating Instructions
Page 23
... AC power cable into a wall socket. 1 23 continued on the LCD panel flashes. Preparations Preparations Charging the Battery Pack Charge the battery pack using the camera for the first time, you need to charge the battery pack. Before using battery charger BC-V615 (supplied) or AC power adaptor/charger ACVQ800 (not...
... AC power cable into a wall socket. 1 23 continued on the LCD panel flashes. Preparations Preparations Charging the Battery Pack Charge the battery pack using the camera for the first time, you need to charge the battery pack. Before using battery charger BC-V615 (supplied) or AC power adaptor/charger ACVQ800 (not...
Operating Instructions
Page 24
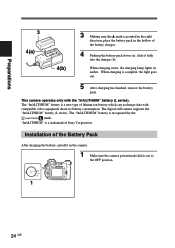
...remove the battery pack. Installation of Sony Corporation. This camera operates only with compatible video equipment about its battery consumption. The "InfoLITHIUM" battery is a trademark of the Battery Pack After charging the battery, install it fully into the charger (b). The digital still camera supports the "InfoLITHIUM" battery (L...(L series). "InfoLITHIUM" is a new type of the battery charger. 4 Pushing the battery pack down (a), slide it in the camera. •OFF •CAM •PLAY 1 •OFF •CAM •PLAY MENU EXCUTE EXIT AE-LOCK R-REVIEW DISP INDEX...
...remove the battery pack. Installation of Sony Corporation. This camera operates only with compatible video equipment about its battery consumption. The "InfoLITHIUM" battery is a trademark of the Battery Pack After charging the battery, install it fully into the charger (b). The digital still camera supports the "InfoLITHIUM" battery (L...(L series). "InfoLITHIUM" is a new type of the battery charger. 4 Pushing the battery pack down (a), slide it in the camera. •OFF •CAM •PLAY 1 •OFF •CAM •PLAY MENU EXCUTE EXIT AE-LOCK R-REVIEW DISP INDEX...

Operating Instructions
Page 25
Preparations 2(a) 2 Slide the battery cover lock in the direction of the 4 mark (a), and open the battery cover (b). 2(b) 3 Insert the battery 4 mark side first until it firmly locks in the direction of the 4 mark and open the battery cover. 3 3 Rotate the battery cover lock to the OFF position. 2 Slide the battery cover lock in place. 3 4 Close the battery cover. Removing the Battery 1 Make sure the camera power/mode dial is set to the outside and remove the battery pack. 25 GB
Preparations 2(a) 2 Slide the battery cover lock in the direction of the 4 mark (a), and open the battery cover (b). 2(b) 3 Insert the battery 4 mark side first until it firmly locks in the direction of the 4 mark and open the battery cover. 3 3 Rotate the battery cover lock to the OFF position. 2 Slide the battery cover lock in place. 3 4 Close the battery cover. Removing the Battery 1 Make sure the camera power/mode dial is set to the outside and remove the battery pack. 25 GB

Operating Instructions
Page 26
Set the clock to ensure the correct time and date are recorded automatically with information from the camera's internal clock. Mem WB Flash Date & Time LCD Set Display Set 4 Press the EXECUTE button. DATE & TIME Set 1999-07-04 20:45:58 Date ... 4~9 EXIT 3 Press the 4(UP)/$(DOWN) buttons to CAM mode. 3~ •OFF •CAM •PLAY 2 Press the MENU button. The year can now be set. CAMERA MENU Custom PC Card INIT User File Save New Folder ID Set File No. MENU 9 2 The LCD monitor turns on and the menu is displayed...
Set the clock to ensure the correct time and date are recorded automatically with information from the camera's internal clock. Mem WB Flash Date & Time LCD Set Display Set 4 Press the EXECUTE button. DATE & TIME Set 1999-07-04 20:45:58 Date ... 4~9 EXIT 3 Press the 4(UP)/$(DOWN) buttons to CAM mode. 3~ •OFF •CAM •PLAY 2 Press the MENU button. The year can now be set. CAMERA MENU Custom PC Card INIT User File Save New Folder ID Set File No. MENU 9 2 The LCD monitor turns on and the menu is displayed...
Operating Instructions
Page 27
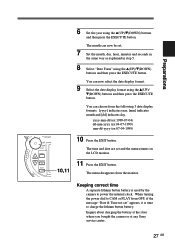
... year using the 4(UP)/ $(DOWN) buttons and then press the EXECUTE button. Inquire about charging the battery at the store where you bought the camera or at any Sony service center. 27 GB When turning the power dial to CAM or PLAY from OFF, if the message "Date & Time not set" appears..., it is used by the camera to charge the lithium button battery. You can now be set and the menu returns on MENU the LCD monitor...
... year using the 4(UP)/ $(DOWN) buttons and then press the EXECUTE button. Inquire about charging the battery at the store where you bought the camera or at any Sony service center. 27 GB When turning the power dial to CAM or PLAY from OFF, if the message "Date & Time not set" appears..., it is used by the camera to charge the lithium button battery. You can now be set and the menu returns on MENU the LCD monitor...


