Operating Instructions
Page 3
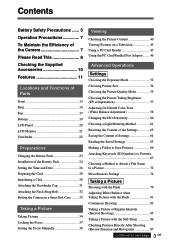
... Picture Size 54 Choosing the Picture Quality Mode 55 Choosing the Picture Taking Brightness (EV compensation 57 Adjusting for Natural Color Tone (White Balance Adjustment 58 Changing the ISO Sensitivity 60 Choosing a Light Metering Method 61 Resetting the Content of the Settings 63 Saving the Content of Settings 64 Reading the Saved Settings 65 Making a Folder to Save Pictures 66 Attaching Keywords (ID Numbers) to Pictures 67 Choosing a Method to Attach a File Name to a Picture 72 Miscellaneous Settings 74 Taking a Picture Shooting...
... Picture Size 54 Choosing the Picture Quality Mode 55 Choosing the Picture Taking Brightness (EV compensation 57 Adjusting for Natural Color Tone (White Balance Adjustment 58 Changing the ISO Sensitivity 60 Choosing a Light Metering Method 61 Resetting the Content of the Settings 63 Saving the Content of Settings 64 Reading the Saved Settings 65 Making a Folder to Save Pictures 66 Attaching Keywords (ID Numbers) to Pictures 67 Choosing a Method to Attach a File Name to a Picture 72 Miscellaneous Settings 74 Taking a Picture Shooting...
Operating Instructions
Page 4
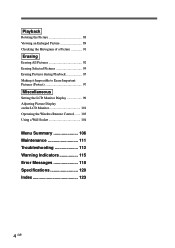
Introduction Playback Rotating the Picture 88 Viewing an Enlarged Picture 89 Checking the Histogram of a Picture 91 Erasing Erasing All Pictures 92 Erasing Selected Pictures 93 Erasing Pictures during Playback 95 Making it Impossible to Erase Important Pictures (Protect 97 Miscellaneous Setting the LCD Monitor Display 99 Adjusting Picture Display on the LCD Monitor 101 Operating the Wireless Remote Control ....... 103 Using a Wall Socket 104 Menu Summary 106 Maintenance 111 Troubleshooting 112 Warning Indicators 115 Error Messages 118 Specifications 120 Index 123 4 GB
Introduction Playback Rotating the Picture 88 Viewing an Enlarged Picture 89 Checking the Histogram of a Picture 91 Erasing Erasing All Pictures 92 Erasing Selected Pictures 93 Erasing Pictures during Playback 95 Making it Impossible to Erase Important Pictures (Protect 97 Miscellaneous Setting the LCD Monitor Display 99 Adjusting Picture Display on the LCD Monitor 101 Operating the Wireless Remote Control ....... 103 Using a Wall Socket 104 Menu Summary 106 Maintenance 111 Troubleshooting 112 Warning Indicators 115 Error Messages 118 Specifications 120 Index 123 4 GB
Operating Instructions
Page 12
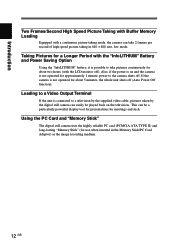
... off (Auto Power Off function). If the camera is not operated for approximately 1 minute, power to take 2 frames per second of high-speed picture taking mode, the camera can be played back on and the camera is not operated for use when inserted in 640 × 480 size, low mode. Introduction Two Frames/Second High Speed Picture Taking with Buffer Memory Loading Equipped with a continuous picture taking in the Memory Stick/PC Card Adaptor) as the image recording medium...
... off (Auto Power Off function). If the camera is not operated for approximately 1 minute, power to take 2 frames per second of high-speed picture taking mode, the camera can be played back on and the camera is not operated for use when inserted in 640 × 480 size, low mode. Introduction Two Frames/Second High Speed Picture Taking with Buffer Memory Loading Equipped with a continuous picture taking in the Memory Stick/PC Card Adaptor) as the image recording medium...

Operating Instructions
Page 13
... film camera) by the wireless remote control. 13 GB Locations and Functions of Parts Locations and Functions of Parts Front 1 2 6 5 3 WB 4 1 Flash The camera has a built-in the WB (white balance) mode, white balance can manually adjust the zoom lens (28 mm to open and the flash warms up. After adjusting the zoom, manually adjust the focus with the focus ring. 4 White Balance Button When HOLD is set in Guide Number GN10 flash. The shutter is pressed. The cover will open the flash cover. 3 5× Zoom Lens You...
... film camera) by the wireless remote control. 13 GB Locations and Functions of Parts Locations and Functions of Parts Front 1 2 6 5 3 WB 4 1 Flash The camera has a built-in the WB (white balance) mode, white balance can manually adjust the zoom lens (28 mm to open and the flash warms up. After adjusting the zoom, manually adjust the focus with the focus ring. 4 White Balance Button When HOLD is set in Guide Number GN10 flash. The shutter is pressed. The cover will open the flash cover. 3 5× Zoom Lens You...
Operating Instructions
Page 14
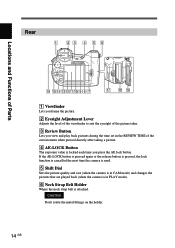
... Functions of Parts Rear 1 23 4 5 6 •OFF •CAM •PLAY MENU EXCUTE EXIT AE-LOCK R-REVIEW DISP INDEX/EZ.FOCUS LCD 0987 !¶ !• !ª 1 Viewfinder Lets you frame the picture. 2 Eyesight Adjustment Lever Adjusts the level of the viewfinder to suit the eyesight of the custom menu when pressed directly after taking a picture. 4 AE-LOCK Button The exposure value is locked each time you view and play back pictures during the time set...
... Functions of Parts Rear 1 23 4 5 6 •OFF •CAM •PLAY MENU EXCUTE EXIT AE-LOCK R-REVIEW DISP INDEX/EZ.FOCUS LCD 0987 !¶ !• !ª 1 Viewfinder Lets you frame the picture. 2 Eyesight Adjustment Lever Adjusts the level of the viewfinder to suit the eyesight of the custom menu when pressed directly after taking a picture. 4 AE-LOCK Button The exposure value is locked each time you view and play back pictures during the time set...

Operating Instructions
Page 15
... camera during picture taking information, frame shots, and view recorded pictures. !™ MENU Button Brings up the menu on the LCD monitor to change the settings of Parts 7 Access Lamp Lights in red when a card is lit, do not eject the card or turn off . 9 INDEX/EZ.FOCUS button Switches playback to index when pressed while in PLAY mode. Locations and Functions of the camera or cards. !£ EXECUTE Button Lets you choose items when adjusting settings in the menu. !¢ EXIT Button...
... camera during picture taking information, frame shots, and view recorded pictures. !™ MENU Button Brings up the menu on the LCD monitor to change the settings of Parts 7 Access Lamp Lights in red when a card is lit, do not eject the card or turn off . 9 INDEX/EZ.FOCUS button Switches playback to index when pressed while in PLAY mode. Locations and Functions of the camera or cards. !£ EXECUTE Button Lets you choose items when adjusting settings in the menu. !¢ EXIT Button...
Operating Instructions
Page 17
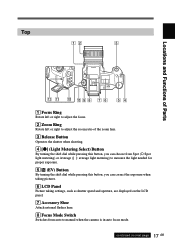
... Spot (® Spot light metering) or Average ([ ]: average light metering) to measure the light needed for proper exposure. 5 (EV) Button By turning the shift dial while pressing this button, you can correct the exposure when taking pictures. 6 LCD Panel Picture taking settings, such as shutter speed and aperture, are displayed on the LCD panel. 7 Accessory Shoe Attach external flashes here. 8 Focus Mode Switch Switches from auto to manual when the camera is in auto focus mode. 17 continued on next page GB
... Spot (® Spot light metering) or Average ([ ]: average light metering) to measure the light needed for proper exposure. 5 (EV) Button By turning the shift dial while pressing this button, you can correct the exposure when taking pictures. 6 LCD Panel Picture taking settings, such as shutter speed and aperture, are displayed on the LCD panel. 7 Accessory Shoe Attach external flashes here. 8 Focus Mode Switch Switches from auto to manual when the camera is in auto focus mode. 17 continued on next page GB

Operating Instructions
Page 18
... adjusted to the desired position sets the picture size and quality (in CAM mode) and changes the picture to be played back (in PLAY mode). 0 Connector Cover To view pictures on a television, open this cover and connect the video cable (supplied) to the video output terminal. !¡ Connector Cover Lock Slide this lock to open the connector cover. !™ Video Output Terminal To view pictures on the television, connect the video cable (supplied) here. !£ Shift Button...
... adjusted to the desired position sets the picture size and quality (in CAM mode) and changes the picture to be played back (in PLAY mode). 0 Connector Cover To view pictures on a television, open this cover and connect the video cable (supplied) to the video output terminal. !¡ Connector Cover Lock Slide this lock to open the connector cover. !™ Video Output Terminal To view pictures on the television, connect the video cable (supplied) here. !£ Shift Button...

Operating Instructions
Page 20
... display is pressed while pressing the shift button, the shutter speed indicator changes to the remaining shot number indicator and the aperture indicator changes to remaining shooting time. Locations and Functions of Parts LCD Panel CAM Mode Shutter speed ISO Sensitivity Picture taking mode Picture number Flash mode Interval/self-timer/ single picture/continuous picture taking indicator PLAY Mode Picture number Focus mode EV compensation Aperture Battery indicator Picture size Card indicator Picture quality WB (white balance) mode Battery indicator Card indicator 20 GB Note In CAM mode...
... display is pressed while pressing the shift button, the shutter speed indicator changes to the remaining shot number indicator and the aperture indicator changes to remaining shooting time. Locations and Functions of Parts LCD Panel CAM Mode Shutter speed ISO Sensitivity Picture taking mode Picture number Flash mode Interval/self-timer/ single picture/continuous picture taking indicator PLAY Mode Picture number Focus mode EV compensation Aperture Battery indicator Picture size Card indicator Picture quality WB (white balance) mode Battery indicator Card indicator 20 GB Note In CAM mode...

Operating Instructions
Page 21
.... PLAY Mode PLAY mode PLAY P No.10267 1344/High/0 Protect/Picture number Picture size/Quality/ Rotation Keyword Picture folder name/file name PICTURE01 1234/12345 1999-07-04 10:18:36 2000 F4.0 Battery indicator (/Remaining playback time*) Date/Time Aperture Shutter speed * Usually remaining playback time is not displayed when using AC power adaptor/charger AC-VQ800. When the battery gets weak, the battery indicator illuminates. The remaining playback time is displayed. Locations and Functions of Parts LCD Monitor CAM mode Flash indicator CAM Mode WB (white balance) mode...
.... PLAY Mode PLAY mode PLAY P No.10267 1344/High/0 Protect/Picture number Picture size/Quality/ Rotation Keyword Picture folder name/file name PICTURE01 1234/12345 1999-07-04 10:18:36 2000 F4.0 Battery indicator (/Remaining playback time*) Date/Time Aperture Shutter speed * Usually remaining playback time is not displayed when using AC power adaptor/charger AC-VQ800. When the battery gets weak, the battery indicator illuminates. The remaining playback time is displayed. Locations and Functions of Parts LCD Monitor CAM mode Flash indicator CAM Mode WB (white balance) mode...
Operating Instructions
Page 27
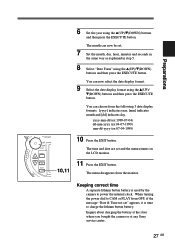
... the message "Date & Time not set and the menu returns on MENU the LCD monitor. Inquire about charging the battery at the store where you bought the camera or at any Sony service center. 27 GB EXCUTE 11 Press the EXIT button. The month can choose from the following 3 date display formats. [yyyy] indicates year, [mm] indicates month and [dd] indicates day. You can now select the date display format. 9 Select the date display format using...
... the message "Date & Time not set and the menu returns on MENU the LCD monitor. Inquire about charging the battery at the store where you bought the camera or at any Sony service center. 27 GB EXCUTE 11 Press the EXIT button. The month can choose from the following 3 date display formats. [yyyy] indicates year, [mm] indicates month and [dd] indicates day. You can now select the date display format. 9 Select the date display format using...

Operating Instructions
Page 36
... the picture cannot be focused, the indicator continues flashing. 2000 5.6 Centering the LCD monitor or the center of the release button and press it halfway again to refocus. • On the LCD monitor When the release button is in focus, the AF focusing mark in the CAM mode, the LCD monitor automatically shuts off (Standby EXIT Mode). Auto Focus This camera employs an auto focus mechanism. Taking a Picture 10 10 Turning the power/mode...
... the picture cannot be focused, the indicator continues flashing. 2000 5.6 Centering the LCD monitor or the center of the release button and press it halfway again to refocus. • On the LCD monitor When the release button is in focus, the AF focusing mark in the CAM mode, the LCD monitor automatically shuts off (Standby EXIT Mode). Auto Focus This camera employs an auto focus mechanism. Taking a Picture 10 10 Turning the power/mode...
Operating Instructions
Page 45
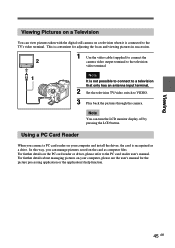
... see the user's manual for adjusting the focus and viewing pictures in succession. 1 Use the video cable (supplied) to connect the 2 camera video output terminal to the television video terminal. 1 AE QUAL SIZE USER ISO Note It is connected to the PC card reader user's manual. For further details about managing pictures on your computer and install the driver, the card is recognized as computer files. Viewing DRWIVBE Viewing Pictures on a Television You can view pictures taken with the digital still camera on...
... see the user's manual for adjusting the focus and viewing pictures in succession. 1 Use the video cable (supplied) to connect the 2 camera video output terminal to the television video terminal. 1 AE QUAL SIZE USER ISO Note It is connected to the PC card reader user's manual. For further details about managing pictures on your computer and install the driver, the card is recognized as computer files. Viewing DRWIVBE Viewing Pictures on a Television You can view pictures taken with the digital still camera on...

Operating Instructions
Page 65
... the user file you have saved sets the same content in the user file. The USER FILE menu appears. 65 continued on the LCD panel, this step is saved as a user file with the chosen file number. Advanced Operations Settings DRWIVBE W B •OFF •CAM •PLAY MENU EXCUTE EXIT 7,8 6 Press the EXECUTE button. After exiting the menu, the camera is also displayed. 7 Press the EXIT button. The setting content is not necessary. 3 Turn the mode dial to take pictures. SIZE...
... the user file you have saved sets the same content in the user file. The USER FILE menu appears. 65 continued on the LCD panel, this step is saved as a user file with the chosen file number. Advanced Operations Settings DRWIVBE W B •OFF •CAM •PLAY MENU EXCUTE EXIT 7,8 6 Press the EXECUTE button. After exiting the menu, the camera is also displayed. 7 Press the EXIT button. The setting content is not necessary. 3 Turn the mode dial to take pictures. SIZE...

Operating Instructions
Page 80
..., change the zoom setting or use the flash. If this mode when you want to take a picture of a subject far from the camera and the light from the flash can occur under the following circumstances, resulting in a shadow at the bottom of the recorded image. External Choose this mode when you want the flash to the accessory shoe. The flash mode is set to manual exposure, the shutter speed indicator or the aperture indicator flashes when...
..., change the zoom setting or use the flash. If this mode when you want to take a picture of a subject far from the camera and the light from the flash can occur under the following circumstances, resulting in a shadow at the bottom of the recorded image. External Choose this mode when you want the flash to the accessory shoe. The flash mode is set to manual exposure, the shutter speed indicator or the aperture indicator flashes when...
Operating Instructions
Page 106
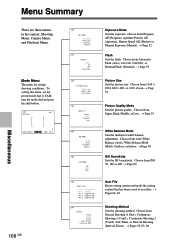
... 55 White Balance Mode Sets the method of white balance adjustment. Choose from Normal Shooting (1 Shot), Continuous Shooting 1 (Cont1), Continuous Shooting 2 (Cont2), Self-Timer, or Interval Shooting (Interval Timer). → Pages 83, 85, 86 Choose from Automatic Flash (Auto), On (On), Off (Off), or External Flash (External). → Page 79 Picture Size Sets the picture size. Menu Summary Miscellaneous There are three menus in the camera: Shooting Menu, Camera Menu, and Playback Menu. Choose from ISO 50, 100 or 400. → Page 60 User File Resets setting content...
... 55 White Balance Mode Sets the method of white balance adjustment. Choose from Normal Shooting (1 Shot), Continuous Shooting 1 (Cont1), Continuous Shooting 2 (Cont2), Self-Timer, or Interval Shooting (Interval Timer). → Pages 83, 85, 86 Choose from Automatic Flash (Auto), On (On), Off (Off), or External Flash (External). → Page 79 Picture Size Sets the picture size. Menu Summary Miscellaneous There are three menus in the camera: Shooting Menu, Camera Menu, and Playback Menu. Choose from ISO 50, 100 or 400. → Page 60 User File Resets setting content...
Operating Instructions
Page 107
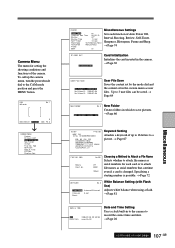
... serial numbers that continue even if a card is possible. → Page 72 WB FLASH No.2 Flash Mode Internal/External Interval 3 sec Start White Balance Setting (with Flash Use) Adjusts white balance when using a flash. → Page 81 DATE & TIME Set 1999-07-04 20:45:58 Date Form yyyy-mm-dd Date and Time Setting Uses a clock built-in the custom menu as serial numbers for setting the shooting conditions and functions of up the camera menu, turn the power/mode dial to 3 user files can be saved. →...
... serial numbers that continue even if a card is possible. → Page 72 WB FLASH No.2 Flash Mode Internal/External Interval 3 sec Start White Balance Setting (with Flash Use) Adjusts white balance when using a flash. → Page 81 DATE & TIME Set 1999-07-04 20:45:58 Date Form yyyy-mm-dd Date and Time Setting Uses a clock built-in the custom menu as serial numbers for setting the shooting conditions and functions of up the camera menu, turn the power/mode dial to 3 user files can be saved. →...

Operating Instructions
Page 114
... a new card. Check the remaining shot number and try again. (pages 55, 92) Files names for pictures recorded on the card. Camera will not play back. Cancel the protect function. (page 97) If the card is write-protected. Move the camera away from such equipment. Auto focus does not work when taking pictures at night. The battery needs to PLAY. Power/mode dial is dark. Charge the battery pack. (page 23) There are no pictures saved on the card have...
... a new card. Check the remaining shot number and try again. (pages 55, 92) Files names for pictures recorded on the card. Camera will not play back. Cancel the protect function. (page 97) If the card is write-protected. Move the camera away from such equipment. Auto focus does not work when taking pictures at night. The battery needs to PLAY. Power/mode dial is dark. Charge the battery pack. (page 23) There are no pictures saved on the card have...

Operating Instructions
Page 123
Index A AE-LOCK 37 Aperture 52 Aperture Priority AE 52 Auto Focus 36 Automatic Cycle Viewing 40, 41 B Battery Cover Lock 25 Battery Indicator 115, 116 Battery Pack Charging Time 23 Battery Pack Continuous Use Time ....... 23 Battery Pack Installation 24 Brightness EV compensation 57 LCD Monitor 101 C Charging the Battery 23 Continuous Shooting 83 D Date & Time Setting 26 Display Set 99 E Enlargement 89 Erasing a Picture 92 EV compensation 57 F Focus Lock 37 Folders 66 Frame 21 H Histogram 91 I Index Display 40 Initialization 30 ISO (Photographic) Sensitivity...
Index A AE-LOCK 37 Aperture 52 Aperture Priority AE 52 Auto Focus 36 Automatic Cycle Viewing 40, 41 B Battery Cover Lock 25 Battery Indicator 115, 116 Battery Pack Charging Time 23 Battery Pack Continuous Use Time ....... 23 Battery Pack Installation 24 Brightness EV compensation 57 LCD Monitor 101 C Charging the Battery 23 Continuous Shooting 83 D Date & Time Setting 26 Display Set 99 E Enlargement 89 Erasing a Picture 92 EV compensation 57 F Focus Lock 37 Folders 66 Frame 21 H Histogram 91 I Index Display 40 Initialization 30 ISO (Photographic) Sensitivity...
Operating Instructions
Page 124
... Control 103 Resetting Settings Content 63 Review Function 87 Rotation 88 S Saving User Files 64 Self-Timer 86 Semi-soft Case 33 Settings Auto Power Off Function 74 Beep 74 Frame 74 Histogram 74 Interval Shooting 74 Review Function 74 Self-Timer 74 Sharpness 74 Shooting Mode 52 Shutter Speed 53 Shutter Speed Priority AE 52 W Warning Indicators 115 White Balance 81 White Balance Adjustment 58 Wireless Remote Control 103 Z Zoom 35 Index T Taking a Picture 34, 79 Taking Pictures Continuous Shooting 83 Interval Shooting 85 Self-Timer 86 Tripod 19 Troubleshooting...
... Control 103 Resetting Settings Content 63 Review Function 87 Rotation 88 S Saving User Files 64 Self-Timer 86 Semi-soft Case 33 Settings Auto Power Off Function 74 Beep 74 Frame 74 Histogram 74 Interval Shooting 74 Review Function 74 Self-Timer 74 Sharpness 74 Shooting Mode 52 Shutter Speed 53 Shutter Speed Priority AE 52 W Warning Indicators 115 White Balance 81 White Balance Adjustment 58 Wireless Remote Control 103 Z Zoom 35 Index T Taking a Picture 34, 79 Taking Pictures Continuous Shooting 83 Interval Shooting 85 Self-Timer 86 Tripod 19 Troubleshooting...


