Operating Instructions
Page 2
... occur in the EMC Directive for help. Notice If static electricity or electromagnetism causes data transfer to provide reasonable protection against harmful interference in accordance with part 15 of Conformity Trade Name: SONY Model No.: DPP-FP95 Responsible Party: Sony Electronics Inc. Notice for a Class B digital device, pursuant to rain or moisture. If this digital photo printer. However, there is Sony Corporation, 1-7-1 Konan Minato...
... occur in the EMC Directive for help. Notice If static electricity or electromagnetism causes data transfer to provide reasonable protection against harmful interference in accordance with part 15 of Conformity Trade Name: SONY Model No.: DPP-FP95 Responsible Party: Sony Electronics Inc. Notice for a Class B digital device, pursuant to rain or moisture. If this digital photo printer. However, there is Sony Corporation, 1-7-1 Konan Minato...

Operating Instructions
Page 4
... sample pictures provided in this software cannot be modified or duplicated except for users Program © 2008 Sony Corporation Documentation © 2008 Sony Corporation All rights reserved. Any unauthorized duplication of this agreement. This manual or the software described herein, in whole or in part, may not be reproduced, translated or reduced to the supplied "Read This First" and "About the Print Packs...
... sample pictures provided in this software cannot be modified or duplicated except for users Program © 2008 Sony Corporation Documentation © 2008 Sony Corporation All rights reserved. Any unauthorized duplication of this agreement. This manual or the software described herein, in whole or in part, may not be reproduced, translated or reduced to the supplied "Read This First" and "About the Print Packs...
Operating Instructions
Page 5
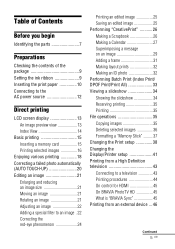
... parts 7 Preparations Checking the contents of the package 9 Setting the ink ribbon 9 Inserting the print paper 10 Connecting to the AC power source 12 Direct printing LCD screen display 13 An image preview view 13 Index View 14 Basic printing 15 Inserting a memory card 15 Printing selected images 16 Enjoying various printing 18 Correcting a failed photo automatically (AUTO TOUCH-UP 20 Editing an image 21 Enlarging and reducing an image size 21 Moving an image 21 Rotating an image 21 Adjusting an image...
... parts 7 Preparations Checking the contents of the package 9 Setting the ink ribbon 9 Inserting the print paper 10 Connecting to the AC power source 12 Direct printing LCD screen display 13 An image preview view 13 Index View 14 Basic printing 15 Inserting a memory card 15 Printing selected images 16 Enjoying various printing 18 Correcting a failed photo automatically (AUTO TOUCH-UP 20 Editing an image 21 Enlarging and reducing an image size 21 Moving an image 21 Rotating an image 21 Adjusting an image...

Operating Instructions
Page 6
... image to a memory card 49 Printing from a PC Printing from a PC 51 Installing the software 51 System requirements 51 Installing the printer driver 52 Uninstalling the printer driver ........ 54 Installing the Picture Motion Browser 55 Uninstalling the Picture Motion Browser 56 Printing photos from the Picture Motion Browser 56 Registering a browsing folder ........ 60 Stopping printing 60 Printing from a commercially-available software application 61 Error messages If an error message appears ......... 62 Troubleshooting If trouble occurs 65 If paper jams...
... image to a memory card 49 Printing from a PC Printing from a PC 51 Installing the software 51 System requirements 51 Installing the printer driver 52 Uninstalling the printer driver ........ 54 Installing the Picture Motion Browser 55 Uninstalling the Picture Motion Browser 56 Printing photos from the Picture Motion Browser 56 Registering a browsing folder ........ 60 Stopping printing 60 Printing from a commercially-available software application 61 Error messages If an error message appears ......... 62 Troubleshooting If trouble occurs 65 If paper jams...
Operating Instructions
Page 9
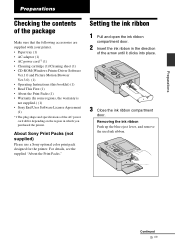
... remove the used ink ribbon. Continued 9 GB About Sony Print Packs (not supplied) Please use a Sony optional color print pack designed for the printer. For details, see the supplied "About the Print Packs." Preparations Preparations Checking the contents of the package Make sure that the following accessories are supplied with your printer. • Paper tray (1) • AC adaptor (1) • AC power cord*1 (1) • Cleaning cartridge (1)/Cleaning sheet (1) • CD-ROM (Windows Printer Driver Software Ver.1.0 and Picture Motion Browser Ver.3.0) (1) • Operating Instructions...
... remove the used ink ribbon. Continued 9 GB About Sony Print Packs (not supplied) Please use a Sony optional color print pack designed for the printer. For details, see the supplied "About the Print Packs." Preparations Preparations Checking the contents of the package Make sure that the following accessories are supplied with your printer. • Paper tray (1) • AC adaptor (1) • AC power cord*1 (1) • Cleaning cartridge (1)/Cleaning sheet (1) • CD-ROM (Windows Printer Driver Software Ver.1.0 and Picture Motion Browser Ver.3.0) (1) • Operating Instructions...

Operating Instructions
Page 11
... store partially-used print paper. Do not print on the same paper will not make sure of print paper sheets does not exceed 20 sheets. - Riffle the print paper thoroughly. Do not insert different types of print paper. Then remove the protective sheet. • Insert the print paper with its original bag or a similar container. Notes • You can set up . color changes or deterioration of the paper tray. • Avoid storing the paper with the printed faces...
... store partially-used print paper. Do not print on the same paper will not make sure of print paper sheets does not exceed 20 sheets. - Riffle the print paper thoroughly. Do not insert different types of print paper. Then remove the protective sheet. • Insert the print paper with its original bag or a similar container. Notes • You can set up . color changes or deterioration of the paper tray. • Avoid storing the paper with the printed faces...
Operating Instructions
Page 47
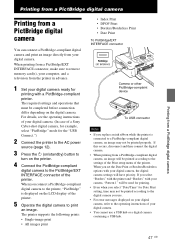
... and then connect the digital camera. • When printing from a PictBridge/EXT INTERFACE connector, make sure to print an image. When you use a USB hub or a digital camera containing a USB hub. 47 GB When printing from a PictBridge-compliant digital camera, an image will have priority. The required settings and operations that must be printed according to the settings of the Print setup menu of the printer. 5 Operate the digital camera to remove memory card(s), your computer...
... and then connect the digital camera. • When printing from a PictBridge/EXT INTERFACE connector, make sure to print an image. When you use a USB hub or a digital camera containing a USB hub. 47 GB When printing from a PictBridge-compliant digital camera, an image will have priority. The required settings and operations that must be printed according to the settings of the Print setup menu of the printer. 5 Operate the digital camera to remove memory card(s), your computer...

Operating Instructions
Page 52
... pause a printing job in this occurs, select "Setup.exe" and follow the instructions on to Windows using the Picture Motion Browser, you can also use the software to install the driver. The "InstallShield Wizard" dialog box is displayed. When using a "Computer administrator" user account. • Be sure to one of your PC, trouble may not work properly. • The printer does not support standby, sleep, and hibernation modes and...
... pause a printing job in this occurs, select "Setup.exe" and follow the instructions on to Windows using the Picture Motion Browser, you can also use the software to install the driver. The "InstallShield Wizard" dialog box is displayed. When using a "Computer administrator" user account. • Be sure to one of your PC, trouble may not work properly. • The printer does not support standby, sleep, and hibernation modes and...
Operating Instructions
Page 53
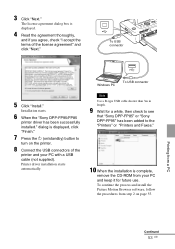
... "Sony DPP-FP95/FP85 printer driver has been successfully installed." The license agreement dialog box is complete, remove the CD-ROM from your PC with a USB cable (not supplied). Printer driver installation starts automatically. To continue the process and install the Picture Motion Browser software, follow the procedures from a PC Continued 53 GB 3 Click "Next." Windows PC To USB connector Note Use a B-type USB cable shorter than 3m in length. 9 Wait for future use. dialog is displayed...
... "Sony DPP-FP95/FP85 printer driver has been successfully installed." The license agreement dialog box is complete, remove the CD-ROM from your PC with a USB cable (not supplied). Printer driver installation starts automatically. To continue the process and install the Picture Motion Browser software, follow the procedures from a PC Continued 53 GB 3 Click "Next." Windows PC To USB connector Note Use a B-type USB cable shorter than 3m in length. 9 Wait for future use. dialog is displayed...
Operating Instructions
Page 54
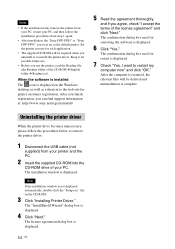
... registration. Notes • If the installation fails, remove the printer from your PC, restart your PC, and then follow the procedures below to remove the printer driver: 1 Disconnect the USB cable (not supplied) from step 1 again. • After installation, the "Sony DPP-FP85" or "Sony DPP-FP95" is not displayed automatically, double-click the "Setup.exe" file on the Windows desktop, as well as the default printer. The "InstallShield Wizard" dialog box is...
... registration. Notes • If the installation fails, remove the printer from your PC, restart your PC, and then follow the procedures below to remove the printer driver: 1 Disconnect the USB cable (not supplied) from step 1 again. • After installation, the "Sony DPP-FP85" or "Sony DPP-FP95" is not displayed automatically, double-click the "Setup.exe" file on the Windows desktop, as well as the default printer. The "InstallShield Wizard" dialog box is...

Operating Instructions
Page 55
... box is complete, remove the CD-ROM from your PC, start Windows, and insert the supplied CD-ROM into the CD-ROM drive of the license agreement" and click "Next." The "InstallShield Wizard" dialog box is displayed. 2 Click "Installing Picture Motion Browser." Keep it for possible future use . Notes • Please log on the screen to restart it. 7 When the installation is displayed. 5 Read the agreement thoroughly...
... box is complete, remove the CD-ROM from your PC, start Windows, and insert the supplied CD-ROM into the CD-ROM drive of the license agreement" and click "Next." The "InstallShield Wizard" dialog box is displayed. 2 Click "Installing Picture Motion Browser." Keep it for possible future use . Notes • Please log on the screen to restart it. 7 When the installation is displayed. 5 Read the agreement thoroughly...
Operating Instructions
Page 59
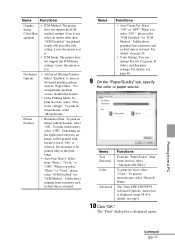
... Tray Selection Color Advanced From the "Paper Source" dropdown list box, select "Automatically Select." Even if you select "Photo" or "Vivid," please select "ICM Disabled" for "ICM Method." For details, see page 40. 9 On the "Paper/Quality" tab, specify the color or paper source. Printing from a memory card, no Exif data is referred. Items Functions Graphic Image Color Management • ICM Method: The printer does not support the ICM method settings. Document Options • Advanced Printing...
... Tray Selection Color Advanced From the "Paper Source" dropdown list box, select "Automatically Select." Even if you select "Photo" or "Vivid," please select "ICM Disabled" for "ICM Method." For details, see page 40. 9 On the "Paper/Quality" tab, specify the color or paper source. Printing from a memory card, no Exif data is referred. Items Functions Graphic Image Color Management • ICM Method: The printer does not support the ICM method settings. Document Options • Advanced Printing...
Operating Instructions
Page 63
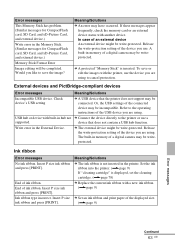
... operating instructions of the USB device you like to save or edit the images with a new ink ribbon. (.page 9) c Set an ink ribbon and print paper of the displayed size. (.page 9) Error messages Continued 63 GB Insert P size ink ribbon and press [PRINT]. Insert P size ink ribbon and press [PRINT]. Meaning/Solutions c The ink ribbon is inserted. Would you are using . c A protected "Memory Stick" is not inserted in the printer. To save the image? device that the printer does not support may be incompatible. Ink ribbon type incorrect. Meaning/Solutions c An error...
... operating instructions of the USB device you like to save or edit the images with a new ink ribbon. (.page 9) c Set an ink ribbon and print paper of the displayed size. (.page 9) Error messages Continued 63 GB Insert P size ink ribbon and press [PRINT]. Insert P size ink ribbon and press [PRINT]. Meaning/Solutions c The ink ribbon is inserted. Would you are using . c A protected "Memory Stick" is not inserted in the printer. To save the image? device that the printer does not support may be incompatible. Ink ribbon type incorrect. Meaning/Solutions c An error...
Operating Instructions
Page 64
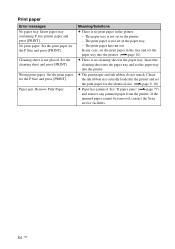
...Print paper Error messages No paper tray. Cleaning sheet is no print paper in the printer and set in the printer. - Wrong print paper. In any jammed paper from the printer. c The print paper and ink ribbon do not match. Insert paper tray containing P size printer paper and press [PRINT]. Set the print paper for the P Size and press [PRINT]. Remove Print Paper. Insert the cleaning sheet into the paper tray and set the paper tray into the printer. (.page 10) c There is not placed. If the jammed paper cannot be removed, contact the Sony service facilities. 64 GB No print paper...
...Print paper Error messages No paper tray. Cleaning sheet is no print paper in the printer and set in the printer. - Wrong print paper. In any jammed paper from the printer. c The print paper and ink ribbon do not match. Insert paper tray containing P size printer paper and press [PRINT]. Set the print paper for the P Size and press [PRINT]. Remove Print Paper. Insert the cleaning sheet into the paper tray and set the paper tray into the printer. (.page 10) c There is not placed. If the jammed paper cannot be removed, contact the Sony service facilities. 64 GB No print paper...

Operating Instructions
Page 68
If the sheets exceeds 20, remove the extra sheets. • Riffle the print paper thoroughly and insert it into the tray. c Use print paper designed for the printer. If you use incompatible print paper, the printer may develop trouble. (.About the Print Pack) 68 GB Printing Symptom Paper does not feed. Check Cause/Solutions • Is the print paper properly set of print paper and ink ribbon. • Load the print paper in the correct direction in the paper tray? c Use print paper designed for the printer. If you using print paper that was...
If the sheets exceeds 20, remove the extra sheets. • Riffle the print paper thoroughly and insert it into the tray. c Use print paper designed for the printer. If you use incompatible print paper, the printer may develop trouble. (.About the Print Pack) 68 GB Printing Symptom Paper does not feed. Check Cause/Solutions • Is the print paper properly set of print paper and ink ribbon. • Load the print paper in the correct direction in the paper tray? c Use print paper designed for the printer. If you using print paper that was...

Operating Instructions
Page 74
... Sony dealer. Cause/Solutions c The printer does not provide the function for some images" displayed? c Double-click "My Computer" and then the CD-ROM icon in the operating instructions to install the driver (.page 52). Symptom You cannot stop printing. You cannot make Index printing, insert the memory card directly or use , you specify the CD-ROM as the installation CD-ROM correctly? - c The next print from the printer. To make Index printing. You lost the - The printer driver...
... Sony dealer. Cause/Solutions c The printer does not provide the function for some images" displayed? c Double-click "My Computer" and then the CD-ROM icon in the operating instructions to install the driver (.page 52). Symptom You cannot stop printing. You cannot make Index printing, insert the memory card directly or use , you specify the CD-ROM as the installation CD-ROM correctly? - c The next print from the printer. To make Index printing. You lost the - The printer driver...

Operating Instructions
Page 78
... careful not to clean inside the printer. If there is connected to a PC or a PictBridge camera. 78 GB Cleaning sheet 5 Set the paper tray into the printer and close the ink ribbon compartment door. 3 Remove the paper tray from the printer. Notes • If you start cleaning the printer, please remove any memory cards, USB memories, or USB cables from the printer. 1 Open the ink ribbon compartment door and if there is automatically ejected. 6 Remove the cleaning cartridge and sheet from the printer. Tip Keep the cleaning cartridge and cleaning sheet together for...
... careful not to clean inside the printer. If there is connected to a PC or a PictBridge camera. 78 GB Cleaning sheet 5 Set the paper tray into the printer and close the ink ribbon compartment door. 3 Remove the paper tray from the printer. Notes • If you start cleaning the printer, please remove any memory cards, USB memories, or USB cables from the printer. 1 Open the ink ribbon compartment door and if there is automatically ejected. 6 Remove the cleaning cartridge and sheet from the printer. Tip Keep the cleaning cartridge and cleaning sheet together for...

Operating Instructions
Page 82
... Humid locations or locations with a power specification of 3.3V or 3.3V/5V. Locations subject to the operating instructions of 2 GB or smaller. Notes on using memory card • When using a card, make sure to check correct insertion direction of a car parked in the sun or/ and in the case supplied with a capacity of the adaptor you can use for 3V or 5V only. You cannot use a type for how to install the card...
... Humid locations or locations with a power specification of 3.3V or 3.3V/5V. Locations subject to the operating instructions of 2 GB or smaller. Notes on using memory card • When using a card, make sure to check correct insertion direction of a car parked in the sun or/ and in the case supplied with a capacity of the adaptor you can use for 3V or 5V only. You cannot use a type for how to install the card...
Operating Instructions
Page 84
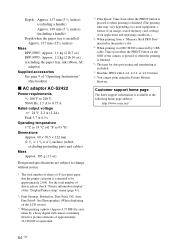
... LCD screen) *2: When printing a photo (Approx.4.37 MB file size) taken by USB cable. Depth: Approx. 137 mm (5 1/2 inches) (excluding a handle) Approx. 149 mm (5 7/8 inches) (including a handle) Depth when the paper tray is installed: Approx. 317 mm (121/2 inches) Mass DPP-FP85: Approx. 1.1 kg (2 lb 7 oz) DPP-FP95: Approx. 1.2 kg (2 lb 10 oz) (excluding the paper tray, ink ribbon, AC adaptor) Supplied accessories See page 9 of "Operating Instructions" (this booklet) x AC...
... LCD screen) *2: When printing a photo (Approx.4.37 MB file size) taken by USB cable. Depth: Approx. 137 mm (5 1/2 inches) (excluding a handle) Approx. 149 mm (5 7/8 inches) (including a handle) Depth when the paper tray is installed: Approx. 317 mm (121/2 inches) Mass DPP-FP85: Approx. 1.1 kg (2 lb 7 oz) DPP-FP95: Approx. 1.2 kg (2 lb 10 oz) (excluding the paper tray, ink ribbon, AC adaptor) Supplied accessories See page 9 of "Operating Instructions" (this booklet) x AC...

Operating Instructions
Page 87
... 37 Frame 31 Front panel 7 H Handle 8 Handwritten message 29 HDMI 43 I Icon 42 ID photo 32 Image data display 13 Image preview 13 Index Print 33 Index View by date 14, 42 by Filename 14, 42 Input indications 13 Inserting a memory card 15 Inserting an ink ribbon 9 Inserting the print paper 10 Installing Picture Motion Browser 55 Printer driver 52 L Language 42 Layout print 32, 40 LCD backlight 42 LCD screen 7 LCD screen disdplay...
... 37 Frame 31 Front panel 7 H Handle 8 Handwritten message 29 HDMI 43 I Icon 42 ID photo 32 Image data display 13 Image preview 13 Index Print 33 Index View by date 14, 42 by Filename 14, 42 Input indications 13 Inserting a memory card 15 Inserting an ink ribbon 9 Inserting the print paper 10 Installing Picture Motion Browser 55 Printer driver 52 L Language 42 Layout print 32, 40 LCD backlight 42 LCD screen 7 LCD screen disdplay...


