Operating Instructions
Page 1
...Serial No Before you call upon your Sony dealer regarding this manual, "Operating Instructions," thoroughly and retain them for future reference. Owner's Record The model and serial numbers are located on the bottom of the printer. Refer to these numbers whenever you ...Printing from a PC Error messages Troubleshooting Additional information © 2008 Sony Corporation Please read "Read This First" and "About the Print Pack" supplied and this product. 3-285-420-12 (1) Digital Photo Printer DPP-FP85/FP95 Operating Instructions Before operating this unit, please read the supplied "...
...Serial No Before you call upon your Sony dealer regarding this manual, "Operating Instructions," thoroughly and retain them for future reference. Owner's Record The model and serial numbers are located on the bottom of the printer. Refer to these numbers whenever you ...Printing from a PC Error messages Troubleshooting Additional information © 2008 Sony Corporation Please read "Read This First" and "About the Print Pack" supplied and this product. 3-285-420-12 (1) Digital Photo Printer DPP-FP85/FP95 Operating Instructions Before operating this unit, please read the supplied "...
Operating Instructions
Page 2
...108-0075 Japan. This equipment generates, uses, and can be determined by one or more of Conformity Trade Name: SONY Model No.: DPP-FP95 Responsible Party: Sony Electronics Inc. For the Customers in Europe This product has been tested and found to comply with the limits set... out in the countries applying EU Directives The manufacturer of this digital photo printer. Regulatory Information Declaration of the following ...
...108-0075 Japan. This equipment generates, uses, and can be determined by one or more of Conformity Trade Name: SONY Model No.: DPP-FP95 Responsible Party: Sony Electronics Inc. For the Customers in Europe This product has been tested and found to comply with the limits set... out in the countries applying EU Directives The manufacturer of this digital photo printer. Regulatory Information Declaration of the following ...

Operating Instructions
Page 3
...portraits may be used. Unless you save a backup copy of your data. The screen may be duplicated, use or malfunction of the printer or memory card. Sony shall assume no responsibility for any way. • Images may cause malfunctions. • The LCD screen is disposed of correctly, you...printing in any accidental or consequential damages or loss of the recorded content which could otherwise be caused by accidental operation or malfunction of the printer, we recommend that may be treated as just a reference. • Do not press against the LCD screen. NOTICE FOR CUSTOMERS IN ...
...portraits may be used. Unless you save a backup copy of your data. The screen may be duplicated, use or malfunction of the printer or memory card. Sony shall assume no responsibility for any way. • Images may cause malfunctions. • The LCD screen is disposed of correctly, you...printing in any accidental or consequential damages or loss of the recorded content which could otherwise be caused by accidental operation or malfunction of the printer, we recommend that may be treated as just a reference. • Do not press against the LCD screen. NOTICE FOR CUSTOMERS IN ...
Operating Instructions
Page 5
... 35 Printing 35 File operations 35 Copying images 35 Deleting selected images 36 Formatting a "Memory Stick" ......... 37 Changing the Print setup 38 Changing the Display/Printer setup 41 Printing from a High Definition television 43 Connecting to a television 43 Printing procedures 44 On control for HDMI 45 On BRAVIA PhotoTV HD 45...
... 35 Printing 35 File operations 35 Copying images 35 Deleting selected images 36 Formatting a "Memory Stick" ......... 37 Changing the Print setup 38 Changing the Display/Printer setup 41 Printing from a High Definition television 43 Connecting to a television 43 Printing procedures 44 On control for HDMI 45 On BRAVIA PhotoTV HD 45...

Operating Instructions
Page 6
... Transferring an image to a memory card 49 Printing from a PC Printing from a PC 51 Installing the software 51 System requirements 51 Installing the printer driver 52 Uninstalling the printer driver ........ 54 Installing the Picture Motion Browser 55 Uninstalling the Picture Motion Browser 56 Printing photos from the Picture Motion Browser 56 Registering...
... Transferring an image to a memory card 49 Printing from a PC Printing from a PC 51 Installing the software 51 System requirements 51 Installing the printer driver 52 Uninstalling the printer driver ........ 54 Installing the Picture Motion Browser 55 Uninstalling the Picture Motion Browser 56 Printing photos from the Picture Motion Browser 56 Registering...
Operating Instructions
Page 7
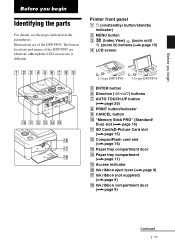
Printer front panel A 1 (on/standby) button/standby indicator) B MENU button C (Index View) (zoom out)/ (zoom in the parentheses. Illustrations are of the DPP-FP85 are identical, although the LCD screen size is different. The button locations and names of the DPP-FP95. Before you begin... Before you begin Identifying the parts For details, see the pages indicated in ) buttons (.page 15) D LCD screen 2.5 type DPP-FP85 3.6 type DPP-FP95 E ENTER button F Direction (g/G/f/F) buttons G AUTO TOUCH-UP button (.page 20) H PRINT button/indicator I CANCEL button J "Memory Stick PRO" ...
Printer front panel A 1 (on/standby) button/standby indicator) B MENU button C (Index View) (zoom out)/ (zoom in the parentheses. Illustrations are of the DPP-FP85 are identical, although the LCD screen size is different. The button locations and names of the DPP-FP95. Before you begin... Before you begin Identifying the parts For details, see the pages indicated in ) buttons (.page 15) D LCD screen 2.5 type DPP-FP85 3.6 type DPP-FP95 E ENTER button F Direction (g/G/f/F) buttons G AUTO TOUCH-UP button (.page 20) H PRINT button/indicator I CANCEL button J "Memory Stick PRO" ...

Operating Instructions
Page 8
... High-definition television, connect an HDMI cable into this connector. Otherwise malfunctions may occur. • When using the printer in PC mode, connect a USB cable to this connector. Printer left side panel E HDMI OUT (output) connector (.page 43) When using a PictBridge-compliant digital camera, a mass...-BT1 Bluetooth USB adaptor is not sold.) Notes • When you carry the printer, make sure to its original position. When you carry the printer. F USB connector (.page 53) When using the DPP-FP95, set the LCD panel to remove memory cards, external devices, the paper tray,...
... High-definition television, connect an HDMI cable into this connector. Otherwise malfunctions may occur. • When using the printer in PC mode, connect a USB cable to this connector. Printer left side panel E HDMI OUT (output) connector (.page 43) When using a PictBridge-compliant digital camera, a mass...-BT1 Bluetooth USB adaptor is not sold.) Notes • When you carry the printer, make sure to its original position. When you carry the printer. F USB connector (.page 53) When using the DPP-FP95, set the LCD panel to remove memory cards, external devices, the paper tray,...
Operating Instructions
Page 9
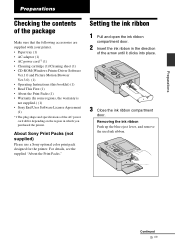
...; Operating Instructions (this booklet) (1) • Read This First (1) • About the Print Packs (1) • Warranty (In some regions, the warranty is not supplied.) (1) • Sony End User Software License Agreement (1) *1 The plug shape and specifications of the AC power cord differ depending on the region in the direction of the...until it clicks into place. 3 Close the ink ribbon compartment door. For details, see the supplied "About the Print Packs." Continued 9 GB About Sony Print Packs (not supplied) Please use a Sony optional color print pack designed for the printer.
...; Operating Instructions (this booklet) (1) • Read This First (1) • About the Print Packs (1) • Warranty (In some regions, the warranty is not supplied.) (1) • Sony End User Software License Agreement (1) *1 The plug shape and specifications of the AC power cord differ depending on the region in the direction of the...until it clicks into place. 3 Close the ink ribbon compartment door. For details, see the supplied "About the Print Packs." Continued 9 GB About Sony Print Packs (not supplied) Please use a Sony optional color print pack designed for the printer.

Operating Instructions
Page 11
... the printed faces touching each other or in its printing surface (the side with rubber or plastic products, including vinyl chloride or plasticizer for this printer only. - Notes • You can set up . Fingerprints or contamination on used print paper, store it in contact with no imprint) facing ...not attach a sticker or stamps on storing the print paper • To store print paper in the tray, remove the paper tray from the printer and close the slide door of the printed image may result in a location subject to high temperatures, high humidity, excessive dust or direct sunlight...
... the printed faces touching each other or in its printing surface (the side with rubber or plastic products, including vinyl chloride or plasticizer for this printer only. - Notes • You can set up . Fingerprints or contamination on used print paper, store it in contact with no imprint) facing ...not attach a sticker or stamps on storing the print paper • To store print paper in the tray, remove the paper tray from the printer and close the slide door of the printed image may result in a location subject to high temperatures, high humidity, excessive dust or direct sunlight...
Operating Instructions
Page 12
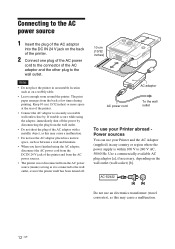
...AC adaptor, disconnect the AC power cord from the DC IN 24 V jack of the printer and from the AC power sources. • The printer is not disconnected from the AC power source (mains) as long as this may cause a.... 10 cm (13/32 inches) AC adaptor AC power cord To the wall outlet To use your Printer abroad Power sources You can use the AC adaptor placed in a narrow space, such as between a ... source 1 Insert the plug of the AC adaptor into the DC IN 24 V jack on the back of the printer. 2 Connect one plug of the AC power cord to the connector of the AC adaptor with a metallic object, as...
...AC adaptor, disconnect the AC power cord from the DC IN 24 V jack of the printer and from the AC power sources. • The printer is not disconnected from the AC power source (mains) as long as this may cause a.... 10 cm (13/32 inches) AC adaptor AC power cord To the wall outlet To use your Printer abroad Power sources You can use the AC adaptor placed in a narrow space, such as between a ... source 1 Insert the plug of the AC adaptor into the DC IN 24 V jack on the back of the printer. 2 Connect one plug of the AC power cord to the connector of the AC adaptor with a metallic object, as...

Operating Instructions
Page 13
...: On On-screen Display: Off On-screen Display: Details You can change the image preview view by setting the "On-screen Display" from the Display/Printer setup menu. Indicates Pages Per Sheet 9 "On." Indicates Pages Per Sheet 4 "On." Indicates Date Print (Date/Time) "On." A Input/setting indications Input indications and settings...
...: On On-screen Display: Off On-screen Display: Details You can change the image preview view by setting the "On-screen Display" from the Display/Printer setup menu. Indicates Pages Per Sheet 9 "On." Indicates Pages Per Sheet 4 "On." Indicates Date Print (Date/Time) "On." A Input/setting indications Input indications and settings...

Operating Instructions
Page 14
A Cursor (orange frame) You can move the cursor (selection) by file names. 14 GB When you purchased the printer. Note When the number of images exceeds 2,000, the images cannot be displayed.) E Operation tips F Shot or saved date (*month/day/ year) G Print quantity setting H ... order of the file name will be displayed by Filename" The images are listed by date" on the country or area you start using the printer, please make setting for each item. In the case of other file formats, only part of month, day, and year (page 42).
A Cursor (orange frame) You can move the cursor (selection) by file names. 14 GB When you purchased the printer. Note When the number of images exceeds 2,000, the images cannot be displayed.) E Operation tips F Shot or saved date (*month/day/ year) G Print quantity setting H ... order of the file name will be displayed by Filename" The images are listed by date" on the country or area you start using the printer, please make setting for each item. In the case of other file formats, only part of month, day, and year (page 42).
Operating Instructions
Page 15
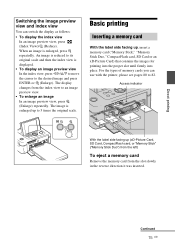
... card from the index view to 5 times the original scale. Direct printing Switching the image preview view and index view You can use with the printer, please see pages 80 to the desired image and press ENTER or (Enlarge).
... card from the index view to 5 times the original scale. Direct printing Switching the image preview view and index view You can use with the printer, please see pages 80 to the desired image and press ENTER or (Enlarge).
Operating Instructions
Page 16
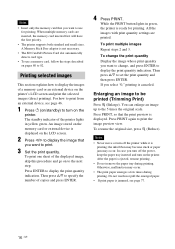
...direct printing). All the images with print quantity settings are inserted, the memory card inserted first will have the first priority. • The printer supports both standard and small sizes. If you select "0," printing is printing; The standby indicator of a memory card or an external device ...The print paper emerges a few times during printing. Printing selected images This section explains how to display the images of the printer lights in green, the printer is displayed. Notes • Never move or turn off the power, keep the paper tray inserted and turn on pages 80...
...direct printing). All the images with print quantity settings are inserted, the memory card inserted first will have the first priority. • The printer supports both standard and small sizes. If you select "0," printing is printing; The standby indicator of a memory card or an external device ...The print paper emerges a few times during printing. Printing selected images This section explains how to display the images of the printer lights in green, the printer is displayed. Notes • Never move or turn off the power, keep the paper tray inserted and turn on pages 80...
Operating Instructions
Page 17
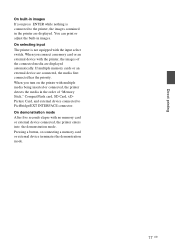
...in images If you connect a memory card or an external device with the printer, the images of "Memory Stick," CompactFlash card, SD Card, xDPicture Card, and external device connected to the printer, the images contained in the printer are connected, the media first connected has the priority. You can print ... of the connected media are displayed automatically. On demonstration mode After five seconds elapse with multiple media being inserted or connected, the printer detects the media in images. If multiple memory cards or an external device are displayed. On selecting input The...
...in images If you connect a memory card or an external device with the printer, the images of "Memory Stick," CompactFlash card, SD Card, xDPicture Card, and external device connected to the printer, the images contained in the printer are connected, the media first connected has the priority. You can print ... of the connected media are displayed automatically. On demonstration mode After five seconds elapse with multiple media being inserted or connected, the printer detects the media in images. If multiple memory cards or an external device are displayed. On selecting input The...
Operating Instructions
Page 18
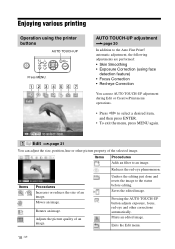
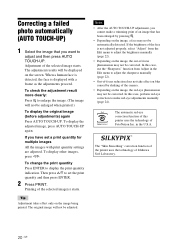
... adjustment .page 20 In addition to the Auto Fine Print5 automatic adjustment, the following adjustments are performed: • Skin Smoothing • Exposure Correction (using the printer buttons AUTO TOUCH-UP Press MENU. Reduces the red-eye phenomenon. Saves the edited image. Adjusts the picture quality of an image.
... adjustment .page 20 In addition to the Auto Fine Print5 automatic adjustment, the following adjustments are performed: • Skin Smoothing • Exposure Correction (using the printer buttons AUTO TOUCH-UP Press MENU. Reduces the red-eye phenomenon. Saves the edited image. Adjusts the picture quality of an image.
Operating Instructions
Page 19
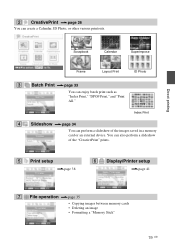
... enjoy batch print such as "Index Print," "DPOF Print," and "Print All." You can perform a slideshow of the "CreativePrint" prints. 5 Print setup .page 38 6 Display/Printer setup .page 41 7 File operation .page 35 • Copying images between memory cards • Deleting an image • Formatting a "Memory Stick" 19 GB
... enjoy batch print such as "Index Print," "DPOF Print," and "Print All." You can perform a slideshow of the "CreativePrint" prints. 5 Print setup .page 38 6 Display/Printer setup .page 41 7 File operation .page 35 • Copying images between memory cards • Deleting an image • Formatting a "Memory Stick" 19 GB
Operating Instructions
Page 20
...8226; After the AUTO TOUCH-UP adjustment, you cannot make red-eye adjustments manually (page 24). The automatic red-eye correction function of this printer uses the technology of the selected image(s) starts. The adjustment results will be displayed on the image, a face may not be automatically detected.... on blur caused by pressing . • Depending on the screen. Printing of FotoNation Inc. The "Skin Smoothing" correction function of the printer uses the technology of the selected image starts. To display the adjusted image, press AUTO TOUCH-UP again. If the brightness of the face...
...8226; After the AUTO TOUCH-UP adjustment, you cannot make red-eye adjustments manually (page 24). The automatic red-eye correction function of this printer uses the technology of the selected image(s) starts. The adjustment results will be displayed on the image, a face may not be automatically detected.... on blur caused by pressing . • Depending on the screen. Printing of FotoNation Inc. The "Skin Smoothing" correction function of the printer uses the technology of the selected image starts. To display the adjusted image, press AUTO TOUCH-UP again. If the brightness of the face...
Operating Instructions
Page 22
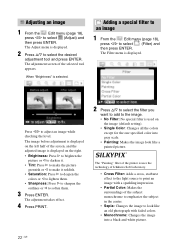
... picture greenish or g to make it reddish. • Saturation: Press G to deepen the colors or g to lighten them . 3 Press ENTER. The adjustment screen of the printer is displayed on the left half of the screen, and the adjusted image is uses the technology of Ichikawa Soft Laboratory. • Cross Filter: Adds...
... picture greenish or g to make it reddish. • Saturation: Press G to deepen the colors or g to lighten them . 3 Press ENTER. The adjustment screen of the printer is displayed on the left half of the screen, and the adjusted image is uses the technology of Ichikawa Soft Laboratory. • Cross Filter: Adds...

Operating Instructions
Page 24
... of ENTER. 24 GB You can adjust the image manually. The Red-eye correction menu is enlarged. 4 Press ENTER. The adjustment frame appears on the printer. To reset the adjustment Press CANCEL in step 5 instead of the adjustment frame. x To change the size of the adjustment frame 2 to 7 times as large...
... of ENTER. 24 GB You can adjust the image manually. The Red-eye correction menu is enlarged. 4 Press ENTER. The adjustment frame appears on the printer. To reset the adjustment Press CANCEL in step 5 instead of the adjustment frame. x To change the size of the adjustment frame 2 to 7 times as large...


