Instruction Manual
Page 5
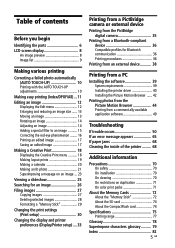
... from the Picture Motion Browser 44 Printing from a commercially-available application software 49 Troubleshooting If trouble occurs 50 If an error message appears 65 If paper jams 68 Cleaning the inside of the printer ......... 68 Additional information Precautions 70 On safety 70 On installation 70 On cleaning 70 On restrictions on...
... from the Picture Motion Browser 44 Printing from a commercially-available application software 49 Troubleshooting If trouble occurs 50 If an error message appears 65 If paper jams 68 Cleaning the inside of the printer ......... 68 Additional information Precautions 70 On safety 70 On installation 70 On cleaning 70 On restrictions on...
Instruction Manual
Page 6
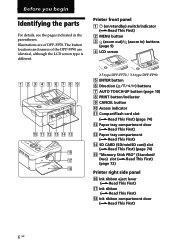
... indicated in ) buttons (page 9) 4 LCD screen 2.5 type DPP-FP70 / 3.6 type DPP-FP90 5 ENTER button 6 Direction (f/F/g/G) buttons 7 AUTO TOUCH-UP button (page 10) 8 PRINT button/indicator 9 CANCEL button 0 Access indicator qa CompactFlash card slot (.Read This First) (page 74) qs Paper tray compartment door (.Read This First) qd Paper tray compartment (.Read This First) qf SD.... Printer front panel 1 1 (on/standby) switch/indicator (.Read This First) 2 MENU button 3 (zoom out)/ (zoom in the parentheses. The button locations and names of the DPP-FP90 are of DPP-FP70.
... indicated in ) buttons (page 9) 4 LCD screen 2.5 type DPP-FP70 / 3.6 type DPP-FP90 5 ENTER button 6 Direction (f/F/g/G) buttons 7 AUTO TOUCH-UP button (page 10) 8 PRINT button/indicator 9 CANCEL button 0 Access indicator qa CompactFlash card slot (.Read This First) (page 74) qs Paper tray compartment door (.Read This First) qd Paper tray compartment (.Read This First) qf SD.... Printer front panel 1 1 (on/standby) switch/indicator (.Read This First) 2 MENU button 3 (zoom out)/ (zoom in the parentheses. The button locations and names of the DPP-FP90 are of DPP-FP70.
Instruction Manual
Page 7
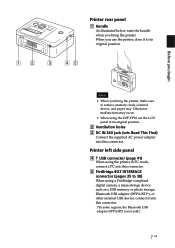
Otherwise malfunctions may occur. • When using the DPP-FP90, set the LCD panel to 38) When using the printer in PC mode, connect a PC into this connector. (*In some regions, the Bluetooth USB adaptor ... begin Printer rear panel 1 Handle As illustrated below, raise the handle when you bring the printer, make sure to remove memory cards, external device, and paper tray. Printer left side panel 4 USB connector (page 41) When using a PictBridge-compliant digital camera, a mass-storage device such as a USB memory or photo storage...
Otherwise malfunctions may occur. • When using the DPP-FP90, set the LCD panel to 38) When using the printer in PC mode, connect a PC into this connector. (*In some regions, the Bluetooth USB adaptor ... begin Printer rear panel 1 Handle As illustrated below, raise the handle when you bring the printer, make sure to remove memory cards, external device, and paper tray. Printer left side panel 4 USB connector (page 41) When using a PictBridge-compliant digital camera, a mass-storage device such as a USB memory or photo storage...
Instruction Manual
Page 12
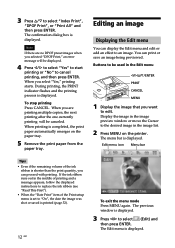
...instructions to replace the ink ribbon (see "Read This First"). • When the "Date Print" item of the ink ribbon is completed, the print paper automatically emerges on the printer. The previous window is printed (page 32). 12 GB To exit the menu mode Press MENU again. If the ink... ribbon runs out in the image list. 2 Press MENU on the paper tray. 5 Remove the print paper from the paper tray. 3 Press f/F to be canceled. During printing, the PRINT indicator flashes and the printing process is displayed. Editing an image ...
...instructions to replace the ink ribbon (see "Read This First"). • When the "Date Print" item of the ink ribbon is completed, the print paper automatically emerges on the printer. The previous window is printed (page 32). 12 GB To exit the menu mode Press MENU again. If the ink... ribbon runs out in the image list. 2 Press MENU on the paper tray. 5 Remove the print paper from the paper tray. 3 Press f/F to be canceled. During printing, the PRINT indicator flashes and the printing process is displayed. Editing an image ...
Instruction Manual
Page 23
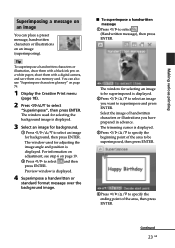
... menu (page 18). 2 Press g/G/f/F to select "Superimpose", then press ENTER. Tip To superimpose a handwritten characters or illustration, draw them with a black ink pen on a white paper, shoot them with a digital camera, and save them on page 19. 3 Press g/G to select an image for background. 1 Press g/G/f/F to select and then press ENTER...
... menu (page 18). 2 Press g/G/f/F to select "Superimpose", then press ENTER. Tip To superimpose a handwritten characters or illustration, draw them with a black ink pen on a white paper, shoot them with a digital camera, and save them on page 19. 3 Press g/G to select an image for background. 1 Press g/G/f/F to select and then press ENTER...
Instruction Manual
Page 44
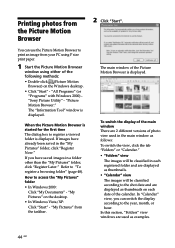
..." or "Calendar." • "Folders" view The images will be classified according to print an image from your PC using P size print paper. 1 Start the Picture Motion Browser window using either of the Picture Motion Browser is displayed. "My Pictures" from the Picture Motion Browser 2...Now." You can switch the display according to "To register a browsing folder" (page 48). "All Programs" (or "Programs" with Windows 2000) "Sony Picture Utility" - How to register a viewed folder is displayed. Printing photos from the taskbar. The main window of the following methods: • ...
..." or "Calendar." • "Folders" view The images will be classified according to print an image from your PC using P size print paper. 1 Start the Picture Motion Browser window using either of the Picture Motion Browser is displayed. "My Pictures" from the Picture Motion Browser 2...Now." You can switch the display according to "To register a browsing folder" (page 48). "All Programs" (or "Programs" with Windows 2000) "Sony Picture Utility" - How to register a viewed folder is displayed. Printing photos from the taskbar. The main window of the following methods: • ...
Instruction Manual
Page 45
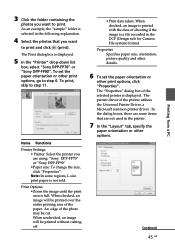
...are some regions, L size print paper is displayed. 5 In the "Printer" drop-down list box, select "Sony DPP-FP70" or "Sony DPP-FP90". To set the paper orientation or other print options, click "Properties". Properties Specifies paper size, orientation, picture quality and other details. 6 To set the paper orientation or other options. The ...8226; Printer: Select the printer you are not used in the following explanation. 4 Select the photos that are using: "Sony DPP-FP70" or "Sony DPP-FP90" •Paper size: To change the size, click "Properties". To print, skip to print.
...are some regions, L size print paper is displayed. 5 In the "Printer" drop-down list box, select "Sony DPP-FP70" or "Sony DPP-FP90". To set the paper orientation or other print options, click "Properties". Properties Specifies paper size, orientation, picture quality and other details. 6 To set the paper orientation or other options. The ...8226; Printer: Select the printer you are not used in the following explanation. 4 Select the photos that are using: "Sony DPP-FP70" or "Sony DPP-FP90" •Paper size: To change the size, click "Properties". To print, skip to print.
Instruction Manual
Page 46
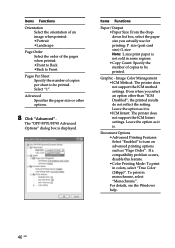
... •Copy Count: Specify the number of copies per sheet to be printed. To print in colors, select "True Color (24bpp)". The "DPP-FP70/FP90 Advanced Options" dialog box is . Image Color Management •ICM Method: The printer does not support the ICM method settings. Select "1". Advanced ... the printed results do not reflect the setting. Even when you actually use for printing: P size (post card size)/L size Note: L size print paper is . •ICM Intent: The printer does not support the ICM Intent settings. Leave the option as "Page Order". If a compatibility problem occurs,...
... •Copy Count: Specify the number of copies per sheet to be printed. To print in colors, select "True Color (24bpp)". The "DPP-FP70/FP90 Advanced Options" dialog box is . Image Color Management •ICM Method: The printer does not support the ICM method settings. Select "1". Advanced ... the printed results do not reflect the setting. Even when you actually use for printing: P size (post card size)/L size Note: L size print paper is . •ICM Intent: The printer does not support the ICM Intent settings. Leave the option as "Page Order". If a compatibility problem occurs,...
Instruction Manual
Page 47
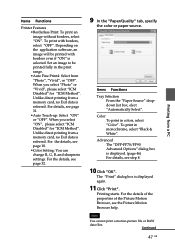
...To print an image without borders, select "ON". When you select "Photo" or "Vivid", please select "ICM Disabled" for "ICM Method". Advanced The "DPP-FP70/FP90 Advanced Options" dialog box is displayed. (page 46) For details, see page 31. •Auto Touch-up: Select "ON" or "OFF". The "... Printing starts. Set an image to be printed with borders, select "OFF". For the details, see page 32. 9 In the "Paper/Quality" tab, specify the color or paper source. To print with borders even if "ON" is referred. Unlike direct printing from "Photo", "Vivid", or "OFF". Unlike direct...
...To print an image without borders, select "ON". When you select "Photo" or "Vivid", please select "ICM Disabled" for "ICM Method". Advanced The "DPP-FP70/FP90 Advanced Options" dialog box is displayed. (page 46) For details, see page 31. •Auto Touch-up: Select "ON" or "OFF". The "... Printing starts. Set an image to be printed with borders, select "OFF". For the details, see page 32. 9 In the "Paper/Quality" tab, specify the color or paper source. To print with borders even if "ON" is referred. Unlike direct printing from "Photo", "Vivid", or "OFF". Unlike direct...
Instruction Manual
Page 48
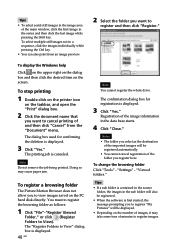
... Windows help Click on the upper right on the dialog box and then click the desired item on the number of images, it may cause paper jam. You must to register the browsing folder as the destination of the imported images will be registered. • When the software is displayed. 3 Click...
... Windows help Click on the upper right on the dialog box and then click the desired item on the number of images, it may cause paper jam. You must to register the browsing folder as the destination of the imported images will be registered. • When the software is displayed. 3 Click...
Instruction Manual
Page 49
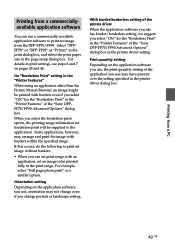
... example, select "Full page photo print" or a similar option. For details in the "Printer Features" of the "Sony DPP-FP70/FP90 Advanced Options" dialog box as "Printer" in the print dialog box, and select the print paper size in the print range. Print quantity setting Depending on the application software you select the borderless...
... example, select "Full page photo print" or a similar option. For details in the "Printer Features" of the "Sony DPP-FP70/FP90 Advanced Options" dialog box as "Printer" in the print dialog box, and select the print paper size in the print range. Print quantity setting Depending on the application software you select the borderless...
Instruction Manual
Page 53
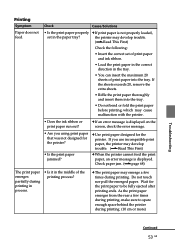
...20 sheets of the printing process? Check Cause/Solutions • Is the print paper properly c If print paper is displayed. Do not touch nor pull the emerged paper. c Use print paper designed for the print paper to spare enough space behind the printer during printing. (10 cm or more)... Troubleshooting Continued 53 GB Check paper jam. (.page 68) The print paper emerges partially during printing. If the sheets ...
...20 sheets of the printing process? Check Cause/Solutions • Is the print paper properly c If print paper is displayed. Do not touch nor pull the emerged paper. c Use print paper designed for the print paper to spare enough space behind the printer during printing. (10 cm or more)... Troubleshooting Continued 53 GB Check paper jam. (.page 68) The print paper emerges partially during printing. If the sheets ...
Instruction Manual
Page 54
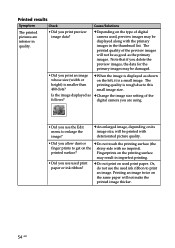
... the image? c Depending on the type of the follows? Is the image displayed as c Change the image size setting of digital camera used print paper or ink ribbon? Fingerprints on used ink ribbon to this small image size. Or, do not use used , preview images may be damaged. •... preview images, the data for the primary images may result in quality. • Did you use the used print paper. c An enlarged image, depending on the same paper will not be printed with the primary images in the thumbnail list. The printed quality of the preview images will not...
... the image? c Depending on the type of the follows? Is the image displayed as c Change the image size setting of digital camera used print paper or ink ribbon? Fingerprints on used ink ribbon to this small image size. Or, do not use used , preview images may be damaged. •... preview images, the data for the primary images may result in quality. • Did you use the used print paper. c An enlarged image, depending on the same paper will not be printed with the primary images in the thumbnail list. The printed quality of the preview images will not...
Instruction Manual
Page 57
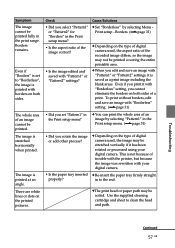
... image cannot be printed fully in the Print setup menu. (.page 31) • Did you rotate the image or add other process? • Is the paper tray inserted properly? Even if "Borders" is set "Pattern1" in to clean the head and path. There are white lines or dots on the type... it with "Pattern1" or "Pattern2" settings, it has been rotated or processed using your digital camera. c Re-insert the paper tray firmly straight in the Print setup menu? cThe print head or paper path may be printed covering the entire printable area. • Is the image edited and saved with your digital...
... image cannot be printed fully in the Print setup menu. (.page 31) • Did you rotate the image or add other process? • Is the paper tray inserted properly? Even if "Borders" is set "Pattern1" in to clean the head and path. There are white lines or dots on the type... it with "Pattern1" or "Pattern2" settings, it has been rotated or processed using your digital camera. c Re-insert the paper tray firmly straight in the Print setup menu? cThe print head or paper path may be printed covering the entire printable area. • Is the image edited and saved with your digital...

Instruction Manual
Page 60
... the data processing finishes, the printer starts printing. If this does not solve the problem, contact Sony service facilities or your Sony dealer. See "If paper jams" (.page 68) and remove jammed paper from the printer. After the motor sound stops, try to remove the slack. (.Read This First...) The ink ribbon cannot be removed, contact the Sony service facilities. The print paper • Is an error message jams. displayed ? Check Cause/Solutions c If the ink ribbon does not click into place, remove...
... the data processing finishes, the printer starts printing. If this does not solve the problem, contact Sony service facilities or your Sony dealer. See "If paper jams" (.page 68) and remove jammed paper from the printer. After the motor sound stops, try to remove the slack. (.Read This First...) The ink ribbon cannot be removed, contact the Sony service facilities. The print paper • Is an error message jams. displayed ? Check Cause/Solutions c If the ink ribbon does not click into place, remove...

Instruction Manual
Page 67
... and set the cleaning cartridge. Insert P c Set a ink ribbon and print paper of ink ribbon. Insert paper tray containing P size print paper and press [PRINT]. size. (.Read This First) Print paper Error messages No paper tray. If the jammed paper cannot be removed, contact the Sony service facilities. No ink ribbon. Ink ribbon Error messages No ink...
... and set the cleaning cartridge. Insert P c Set a ink ribbon and print paper of ink ribbon. Insert paper tray containing P size print paper and press [PRINT]. size. (.Read This First) Print paper Error messages No paper tray. If the jammed paper cannot be removed, contact the Sony service facilities. No ink ribbon. Ink ribbon Error messages No ink...
Instruction Manual
Page 68
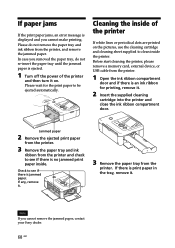
... printing, remove it . 3 Remove the paper tray from the printer and check to be ejected automatically. In case you cannot remove the jammed paper, contact your Sony dealer. 68 GB Jammed paper 2 Remove the ejected print paper from the printer. 3 Remove the paper tray and ink ribbon from the printer.... Note If you removed the paper tray, do not remove the paper tray and ink ribbon from the ...
... printing, remove it . 3 Remove the paper tray from the printer and check to be ejected automatically. In case you cannot remove the jammed paper, contact your Sony dealer. 68 GB Jammed paper 2 Remove the ejected print paper from the printer. 3 Remove the paper tray and ink ribbon from the printer.... Note If you removed the paper tray, do not remove the paper tray and ink ribbon from the ...
Instruction Manual
Page 69
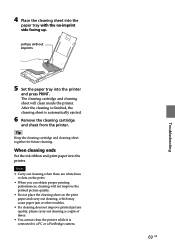
... and cleaning sheet together for future cleaning. Notes • Carry out cleaning when there are white lines or dots on the print paper and carry out cleaning, which may cause paper jam or other troubles. • If a cleaning does not improve printed picture quality, please carry out cleaning a couple of times. •... cleaning is finished, the cleaning sheet is connected to a PC or a PictBridge camera. 69 GB Troubleshooting When cleaning ends Set the ink ribbon and print paper into the printer and press PRINT. 4 Place the cleaning sheet into the...
... and cleaning sheet together for future cleaning. Notes • Carry out cleaning when there are white lines or dots on the print paper and carry out cleaning, which may cause paper jam or other troubles. • If a cleaning does not improve printed picture quality, please carry out cleaning a couple of times. •... cleaning is finished, the cleaning sheet is connected to a PC or a PictBridge camera. 69 GB Troubleshooting When cleaning ends Set the ink ribbon and print paper into the printer and press PRINT. 4 Place the cleaning sheet into the...
Instruction Manual
Page 70
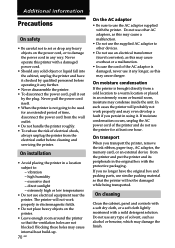
... power cord itself. • When the printer is not going to be damaged while being transported. If you transport the printer, remove the ink ribbon, paper tray, AC adaptor, the memory card, or an external device from the printer and put the printer and its peripherals in the original box with...
... power cord itself. • When the printer is not going to be damaged while being transported. If you transport the printer, remove the ink ribbon, paper tray, AC adaptor, the memory card, or an external device from the printer and put the printer and its peripherals in the original box with...

Instruction Manual
Page 71
... may result if the printing surface is contaminated with the printer, pay special attention to the following before printing. • To avoid paper jam or malfunctions of print paper or attempt to be obtained, or even a malfunction may be copyrighted. Use the oil ink pen to the printer. • Do...while printing. Do not print on the used sheets of the printer, make the printed image thicker. - Do not use the print paper ejected without the imprinting is too slack to rewind the ribbon inside the ink ribbon. On restrictions on duplication If duplicating documents with dust...
... may result if the printing surface is contaminated with the printer, pay special attention to the following before printing. • To avoid paper jam or malfunctions of print paper or attempt to be obtained, or even a malfunction may be copyrighted. Use the oil ink pen to the printer. • Do...while printing. Do not print on the used sheets of the printer, make the printed image thicker. - Do not use the print paper ejected without the imprinting is too slack to rewind the ribbon inside the ink ribbon. On restrictions on duplication If duplicating documents with dust...


