
Operating Instructions
Page 4
...OR OTHERWISE, ARISING OUT OF OR IN CONNECTION WITH THIS MANUAL, THE SOFTWARE OR OTHER INFORMATION CONTAINED HEREIN OR THE USE THEREOF. Sony Corporation reserves the right to make any modification to this agreement. This manual or the software described herein, in whole or in this...parts 8 Preparations 1 Checking the contents of the package 10 2 Preparing the print pack 11 Size of print paper 11 Optional print packs 11 3 Loading the print cartridge 12 4 Inserting the print paper 13 5 Connecting the AC power source ... 16 Inserting a memory card 17 Inserting a "Memory Stick 17 ...
...OR OTHERWISE, ARISING OUT OF OR IN CONNECTION WITH THIS MANUAL, THE SOFTWARE OR OTHER INFORMATION CONTAINED HEREIN OR THE USE THEREOF. Sony Corporation reserves the right to make any modification to this agreement. This manual or the software described herein, in whole or in this...parts 8 Preparations 1 Checking the contents of the package 10 2 Preparing the print pack 11 Size of print paper 11 Optional print packs 11 3 Loading the print cartridge 12 4 Inserting the print paper 13 5 Connecting the AC power source ... 16 Inserting a memory card 17 Inserting a "Memory Stick 17 ...

Operating Instructions
Page 5
... photos from the Picture Motion Browser 53 Printing from other application software 60 Troubleshooting If trouble occurs 62 If an error message appears 77 If paper jams 80 Cleaning the inside of the printer ......... 80 Additional information Precautions 82 About the Memory Cards 83 About the "Memory Stick 83 About the...
... photos from the Picture Motion Browser 53 Printing from other application software 60 Troubleshooting If trouble occurs 62 If an error message appears 77 If paper jams 80 Cleaning the inside of the printer ......... 80 Additional information Precautions 82 About the Memory Cards 83 About the "Memory Stick 83 About the...

Operating Instructions
Page 7
... high-performance printing system reproduces photo realistic printing. x Super Coat 2 feature enables high durability of an Exif 2.21-compliant camera to 20 sheets of paper at one time. (.page 13) Versatility of printing x You can select border or borderless prints (.page 42) x You can view a slideshow of... the images in an image file of a print and resistance against moisture and fingerprint. x A 20-sheet paper tray allows you to print up to adjust and print it with improved quality. (.page 42) x Red-eye phenomenon reduction, brightness, hue, and other...
... high-performance printing system reproduces photo realistic printing. x Super Coat 2 feature enables high durability of an Exif 2.21-compliant camera to 20 sheets of paper at one time. (.page 13) Versatility of printing x You can select border or borderless prints (.page 42) x You can view a slideshow of... the images in an image file of a print and resistance against moisture and fingerprint. x A 20-sheet paper tray allows you to print up to adjust and print it with improved quality. (.page 42) x Red-eye phenomenon reduction, brightness, hue, and other...
Operating Instructions
Page 8
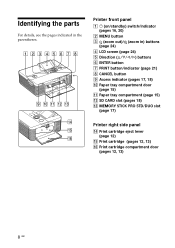
... (page 24) 4 LCD screen (page 24) 5 Direction (f/F/g/G) buttons 6 ENTER button 7 PRINT button/indicator (page 21) 8 CANCEL button 9 Access indicator (pages 17, 18) 0 Paper tray compartment door (page 15) qa Paper tray compartment (page 15) qs SD CARD slot (pages 18) qd MEMORY STICK PRO STD/DUO slot (page 17) Printer right side...
... (page 24) 4 LCD screen (page 24) 5 Direction (f/F/g/G) buttons 6 ENTER button 7 PRINT button/indicator (page 21) 8 CANCEL button 9 Access indicator (pages 17, 18) 0 Paper tray compartment door (page 15) qa Paper tray compartment (page 15) qs SD CARD slot (pages 18) qd MEMORY STICK PRO STD/DUO slot (page 17) Printer right side...

Operating Instructions
Page 9
Printer left side panel 3 USB connector (page 49) When using the printer in PC mode, connect a PC into this connector. 4 PictBridge connector (pages 19, 46) Paper tray 1 Paper eject tray (pages 13, 14) 2 Paper tray lid (pages 13, 14) 9 GB Before you begin Printer rear panel 1 Ventilation holes 2 DC IN 24V jack (page 16) Connect the supplied AC power adaptor into this connector.
Printer left side panel 3 USB connector (page 49) When using the printer in PC mode, connect a PC into this connector. 4 PictBridge connector (pages 19, 46) Paper tray 1 Paper eject tray (pages 13, 14) 2 Paper tray lid (pages 13, 14) 9 GB Before you begin Printer rear panel 1 Ventilation holes 2 DC IN 24V jack (page 16) Connect the supplied AC power adaptor into this connector.

Operating Instructions
Page 10
Sony DPP-FP55 Printer Driver Software for 120V only. AC power cord * (1) * The ...size, 10 sheets) • Operating Instructions (this booklet, 1) • Quick Start Guide (1) • Warranty (1)* • Sony End User Software License Agreement (1) * In some regions, the warranty is for Windows® XP Professional/Windows® XP Home... Edition/Windows® 2000 Professional/Windows® Millennium Edition - Paper tray (1) AC adaptor (AC-S2425) (1) CD-ROM (1) - The plug shape and specifications of the package Make sure...
Sony DPP-FP55 Printer Driver Software for 120V only. AC power cord * (1) * The ...size, 10 sheets) • Operating Instructions (this booklet, 1) • Quick Start Guide (1) • Warranty (1)* • Sony End User Software License Agreement (1) * In some regions, the warranty is for Windows® XP Professional/Windows® XP Home... Edition/Windows® 2000 Professional/Windows® Millennium Edition - Paper tray (1) AC adaptor (AC-S2425) (1) CD-ROM (1) - The plug shape and specifications of the package Make sure...

Operating Instructions
Page 11
...6 inch/10 x 15 cm) size (101.6 x 152.4 mm) (the maximum borderless printing size) Optional print packs You can use different types of 4 x 6 inch print paper (20- sheet-pack x 6) • 3 print cartridges each for 40 prints SVM-F80P • 80 sheets of print pack, printing may not be possible or malfunction...excessive dust, or direct sunlight. • Use print pack within two years from the date of print paper or attempt to avoid touching the printing surface. • Do not bend the paper or tear it off at the perforations before printing. • Do not print on storing printouts Do ...
...6 inch/10 x 15 cm) size (101.6 x 152.4 mm) (the maximum borderless printing size) Optional print packs You can use different types of 4 x 6 inch print paper (20- sheet-pack x 6) • 3 print cartridges each for 40 prints SVM-F80P • 80 sheets of print pack, printing may not be possible or malfunction...excessive dust, or direct sunlight. • Use print pack within two years from the date of print paper or attempt to avoid touching the printing surface. • Do not bend the paper or tear it off at the perforations before printing. • Do not print on storing printouts Do ...
Operating Instructions
Page 12
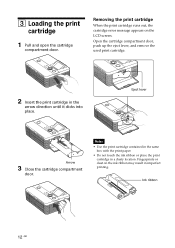
Notes • Use the print cartridge contained in the same box with the print paper. • Do not touch the ink ribbon or place the print cartridge in the arrow direction until it clicks into place. Ink ribbon 12 GB ...
Notes • Use the print cartridge contained in the same box with the print paper. • Do not touch the ink ribbon or place the print cartridge in the arrow direction until it clicks into place. Ink ribbon 12 GB ...
Operating Instructions
Page 13
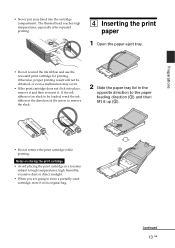
...or direct sunlight. • When you are going to store a partially-used cartridge, store it in the opposite direction to the paper feeding direction (1) and then lift it . Continued 13 GB The thermal head reaches high temperatures, especially after repeated printing. 4 Inserting the print... paper 1 Open the paper eject tray. • Do not rewind the ink ribbon and use the rewound print cartridge for printing. Otherwise, proper printing result will...
...or direct sunlight. • When you are going to store a partially-used cartridge, store it in the opposite direction to the paper feeding direction (1) and then lift it . Continued 13 GB The thermal head reaches high temperatures, especially after repeated printing. 4 Inserting the print... paper 1 Open the paper eject tray. • Do not rewind the ink ribbon and use the rewound print cartridge for printing. Otherwise, proper printing result will...

Operating Instructions
Page 14
... surface may result in imperfect printing. 14 GB Paper feeding direction Face stamp marker toward the paper feeding direction. Riffle the print paper thoroughly. You can set the print paper, face the stamp marker toward the paper feeding direction. Printing surface 4 Remove the protective sheet. 5 Close the paper tray lid (1) and slide it to 20 sheets...
... surface may result in imperfect printing. 14 GB Paper feeding direction Face stamp marker toward the paper feeding direction. Riffle the print paper thoroughly. You can set the print paper, face the stamp marker toward the paper feeding direction. Printing surface 4 Remove the protective sheet. 5 Close the paper tray lid (1) and slide it to 20 sheets...

Operating Instructions
Page 15
... in its original bag. 15 GB Use the oil ink pen to store partially-used print paper. color changes or deterioration of the printed image may occur. • Avoid placing the print paper in contact with rubber or plastic products including vinyl chloride or plasticizer for this printer only. ... it in until it is not inserted at any angle. Do not attach sticker or stamps on storing the print paper • Avoid storing the paper with the printed faces touching each other or in a location subject to high temperatures, high humidity, excessive dust or direct sunlight. • ...
... in its original bag. 15 GB Use the oil ink pen to store partially-used print paper. color changes or deterioration of the printed image may occur. • Avoid placing the print paper in contact with rubber or plastic products including vinyl chloride or plasticizer for this printer only. ... it in until it is not inserted at any angle. Do not attach sticker or stamps on storing the print paper • Avoid storing the paper with the printed faces touching each other or in a location subject to high temperatures, high humidity, excessive dust or direct sunlight. • ...
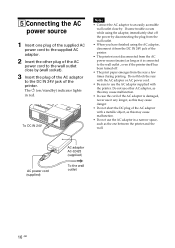
Operating Instructions
Page 16
... wall outlet close by disconnecting the plug from the wall outlet. • When you have finished using the adaptor, immediately shut off . • The print paper emerges from the rear a few times during printing.
... wall outlet close by disconnecting the plug from the wall outlet. • When you have finished using the adaptor, immediately shut off . • The print paper emerges from the rear a few times during printing.

Operating Instructions
Page 20
Make sure to 16), and the following: • "Inserting a memory card" (page 17) or "Connecting a camera or other external device" (page 18) Note The print paper emerges from the rear a few times during printing. The 1 (on the LCD screen. 20 GB An image contained in the memory card or external device ...
Make sure to 16), and the following: • "Inserting a memory card" (page 17) or "Connecting a camera or other external device" (page 18) Note The print paper emerges from the rear a few times during printing. The 1 (on the LCD screen. 20 GB An image contained in the memory card or external device ...

Operating Instructions
Page 21
... green. (If not, check to see that you want to be fully ejected after printing ends. • As the print paper emerges from the step 1. • The print paper emerges a few times during printing, make sure to spare enough space behind the printer during printing. Printing of the selected image ...starts. In case you want to move or turn on the LCD screen. Tip When the printer is ready for the print paper to print. 3 Press PRINT. One image preview changes to fix the quantity. Press g/G/f/F to print appears. Notes on printing • Do not remove or...
... green. (If not, check to see that you want to be fully ejected after printing ends. • As the print paper emerges from the step 1. • The print paper emerges a few times during printing, make sure to spare enough space behind the printer during printing. Printing of the selected image ...starts. In case you want to move or turn on the LCD screen. Tip When the printer is ready for the print paper to print. 3 Press PRINT. One image preview changes to fix the quantity. Press g/G/f/F to print appears. Notes on printing • Do not remove or...

Operating Instructions
Page 23
... f repeatedly. • To reduce the print quantity one by one currently printing will be canceled. 7 When printing is complete and the print paper automatically emerges, remove the printed paper from the paper tray. To cancel the selection 1 Press g/G/f/F to move the cursor to replace the printing cartridge (page 12). 23 GB During printing...
... f repeatedly. • To reduce the print quantity one by one currently printing will be canceled. 7 When printing is complete and the print paper automatically emerges, remove the printed paper from the paper tray. To cancel the selection 1 Press g/G/f/F to move the cursor to replace the printing cartridge (page 12). 23 GB During printing...

Operating Instructions
Page 36
... printer may not support some of the functions of the digital camera. 1 Press MENU on the printer. The previous window is complete and the print paper automatically emerges, remove the printed...
... printer may not support some of the functions of the digital camera. 1 Press MENU on the printer. The previous window is complete and the print paper automatically emerges, remove the printed...
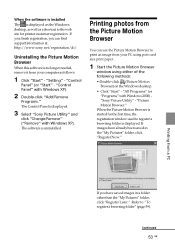
Operating Instructions
Page 53
...Browser." "Control Panel" (or "Start" - "Control Panel" with Windows 2000) "Sony Picture Utility" - The software is displayed. Refer to print an image from your PC using post card size print paper. 1 Start the Picture Motion Browser window using either of the following methods: • ... When the software is installed The is displayed on the Windows desktop. • Click "Start" - The Control Panel is displayed. 3 Select "Sony Picture Utility" and click "Change/Remove" ("Remove" with Windows XP). If you finish registration, you have already been saved in a folder other ...
...Browser." "Control Panel" (or "Start" - "Control Panel" with Windows 2000) "Sony Picture Utility" - The software is displayed. Refer to print an image from your PC using post card size print paper. 1 Start the Picture Motion Browser window using either of the following methods: • ... When the software is installed The is displayed on the Windows desktop. • Click "Start" - The Control Panel is displayed. 3 Select "Sony Picture Utility" and click "Change/Remove" ("Remove" with Windows XP). If you finish registration, you have already been saved in a folder other ...
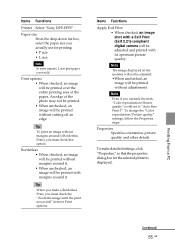
Operating Instructions
Page 55
...steps. Tip To print an image without adjustments. Printing from a PC Continued 55 GB Items Functions Printer Select "Sony DPP-FP55". Paper size From the drop-down list box, select the paper size you must check this option. To make a Borderless Print, you actually use for the selected printer is ...may not be printed. • When unchecked, an image will be adjusted and printed with margins around it . An edge of the paper. Properties Specifies orientation, picture quality and other details. Tip When you must check the "Zoom the image until the print area is still...
...steps. Tip To print an image without adjustments. Printing from a PC Continued 55 GB Items Functions Printer Select "Sony DPP-FP55". Paper size From the drop-down list box, select the paper size you must check this option. To make a Borderless Print, you actually use for the selected printer is ...may not be printed. • When unchecked, an image will be adjusted and printed with margins around it . An edge of the paper. Properties Specifies orientation, picture quality and other details. Tip When you must check the "Zoom the image until the print area is still...
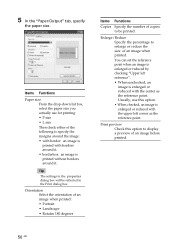
Operating Instructions
Page 56
... From the drop-down list box, select the paper size you actually use this option to display a preview of the following to be reflected in the Print dialog box. Enlarge/Reduce Specify the percentage ... can set the reference point when an image is enlarged or reduced by checking "Upper left corner as the reference point. 5 In the "Paper/Output" tab, specify the paper size. Orientation Select the orientation of an image when printed: • Portrait • Landscape • Rotates 180 degrees Items Functions Copies Specify the...
... From the drop-down list box, select the paper size you actually use this option to display a preview of the following to be reflected in the Print dialog box. Enlarge/Reduce Specify the percentage ... can set the reference point when an image is enlarged or reduced by checking "Upper left corner as the reference point. 5 In the "Paper/Output" tab, specify the paper size. Orientation Select the orientation of an image when printed: • Portrait • Landscape • Rotates 180 degrees Items Functions Copies Specify the...
Operating Instructions
Page 60
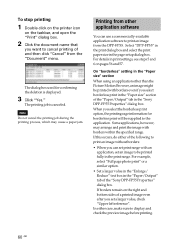
... during the printing process, which may arrange and print the image with borders even if you select borderless print in the "Paper size" section of the "Sony DPP-FP55 Properties" dialog box. If this occurs, do either case, make sure to the application. If borders remain on the right.... • Set a larger value in the "Enlarge/ Reduce" text box in the "Paper/Output" tab of the "Paper/Output" tab in the "Sony DPP-FP55 Properties" dialog box. Select "DPP-FP55" in the print dialog box and select the print paper size in print settings, see steps 5 and 6 on pages 56 and 57. On "...
... during the printing process, which may arrange and print the image with borders even if you select borderless print in the "Paper size" section of the "Sony DPP-FP55 Properties" dialog box. If this occurs, do either case, make sure to the application. If borders remain on the right.... • Set a larger value in the "Enlarge/ Reduce" text box in the "Paper/Output" tab of the "Paper/Output" tab in the "Sony DPP-FP55 Properties" dialog box. Select "DPP-FP55" in the print dialog box and select the print paper size in print settings, see steps 5 and 6 on pages 56 and 57. On "...


