
Operating Instructions
Page 1
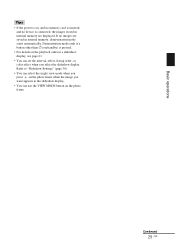
...Model No. 4-129-218-12 (2) Digital Photo Frame DPF-X800/X1000 DPF-V800/V1000 Operating Instructions Before operating this unit, please read this product. Record the serial number in the space provided below. Refer to these numbers whenever you call upon your Sony dealer regarding this manual thoroughly and retain... it for future reference. Owner's Record The model and serial numbers are located at the rear. DPF-X800/X1000, DPF-V800/V1000 Serial No Before operation Basic operations ...
...Model No. 4-129-218-12 (2) Digital Photo Frame DPF-X800/X1000 DPF-V800/V1000 Operating Instructions Before operating this unit, please read this product. Record the serial number in the space provided below. Refer to these numbers whenever you call upon your Sony dealer regarding this manual thoroughly and retain... it for future reference. Owner's Record The model and serial numbers are located at the rear. DPF-X800/X1000, DPF-V800/V1000 Serial No Before operation Basic operations ...
Operating Instructions
Page 3
...causes data transfer to provide reasonable protection against harmful interference in accordance with part 15 of Conformity Trade Name: SONY Model No.: DPF-X800 Responsible Party: Sony Electronics Inc. Address: 16530 Via Esprillo, San Diego, CA 92127 U.S.A. However, there is encouraged to ... undesired operation. Declaration of the FCC Rules. Telephone No.: 858-942-2230 This device complies with the limits set out in this digital photo frame. Address: 16530 Via Esprillo, San Diego, CA 92127 U.S.A. Declaration of the FCC Rules. Address: 16530 Via Esprillo, San Diego...
...causes data transfer to provide reasonable protection against harmful interference in accordance with part 15 of Conformity Trade Name: SONY Model No.: DPF-X800 Responsible Party: Sony Electronics Inc. Address: 16530 Via Esprillo, San Diego, CA 92127 U.S.A. However, there is encouraged to ... undesired operation. Declaration of the FCC Rules. Telephone No.: 858-942-2230 This device complies with the limits set out in this digital photo frame. Address: 16530 Via Esprillo, San Diego, CA 92127 U.S.A. Declaration of the FCC Rules. Address: 16530 Via Esprillo, San Diego...

Operating Instructions
Page 4
...you save a backup copy of your nearest Sony service station. When using photo images with or mark) must be used. Backup recommendations To avoid potential risk of data loss caused by accidental operation or malfunction of the digital photo frame, we recommend that for your household waste ... TV programs, copyrighted materials such as the supplied one and approved by ASTA or BSI to BS 1362, (i.e.marked with this digital photo frame, pay special attention not to the applicable collection point for the recycling of electrical and electronic equipment. By ensuring this product is ...
...you save a backup copy of your nearest Sony service station. When using photo images with or mark) must be used. Backup recommendations To avoid potential risk of data loss caused by accidental operation or malfunction of the digital photo frame, we recommend that for your household waste ... TV programs, copyrighted materials such as the supplied one and approved by ASTA or BSI to BS 1362, (i.e.marked with this digital photo frame, pay special attention not to the applicable collection point for the recycling of electrical and electronic equipment. By ensuring this product is ...
Operating Instructions
Page 5
... LLC. • Microsoft, Windows, and Windows Vista are registered trademarks of Apple Inc. Furthermore, "™" and "®" are those of the digital photo frame or memory card. Sony Face Recognition technology developed by Sony Corpration is under licence. This is used. and any use or malfunction of their respective companies. Continued 5 GB However, there may...
... LLC. • Microsoft, Windows, and Windows Vista are registered trademarks of Apple Inc. Furthermore, "™" and "®" are those of the digital photo frame or memory card. Sony Face Recognition technology developed by Sony Corpration is under licence. This is used. and any use or malfunction of their respective companies. Continued 5 GB However, there may...
Operating Instructions
Page 7
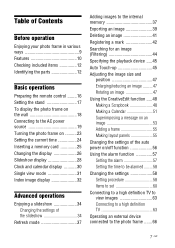
... Preparing the remote control ........16 Setting the stand 17 To display the photo frame on the wall 18 Connecting to the AC power source 19 Turning the photo frame on ..........23 Setting the current time 24 Inserting a memory card 25 ... CreativeEdit function .....48 Making a Scrapbook 48 Making a Calendar 51 Superimposing a message on an image 53 Adding a frame 55 Making layout panels 55 Changing the settings of the auto power on/off function 56 Using the alarm function 57... to a high definition TV 63 Operating an external device connected to the photo frame .......66 7 GB
... Preparing the remote control ........16 Setting the stand 17 To display the photo frame on the wall 18 Connecting to the AC power source 19 Turning the photo frame on ..........23 Setting the current time 24 Inserting a memory card 25 ... CreativeEdit function .....48 Making a Scrapbook 48 Making a Calendar 51 Superimposing a message on an image 53 Adding a frame 55 Making layout panels 55 Changing the settings of the auto power on/off function 56 Using the alarm function 57... to a high definition TV 63 Operating an external device connected to the photo frame .......66 7 GB
Operating Instructions
Page 9
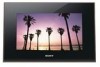
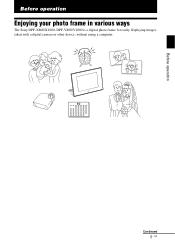
Continued 9 GB Before operation Before operation Enjoying your photo frame in various ways The Sony DPF-X800/X1000, DPF-V800/V1000 is a digital photo frame for easily displaying images taken with a digital camera or other device, without using a computer.
Continued 9 GB Before operation Before operation Enjoying your photo frame in various ways The Sony DPF-X800/X1000, DPF-V800/V1000 is a digital photo frame for easily displaying images taken with a digital camera or other device, without using a computer.
Operating Instructions
Page 11
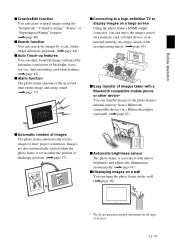
... enjoy beautiful images enhanced by automatic corrections of backlight, focus, red-eye, skin smoothing, and white balance. (.page 45) x Alarm function The photo frame announces the specified time on the image and using sound. (.page 57) x Connecting to a high definition TV to display images on a large ...screen Using the photo frame's HDMI output connector, you can enjoy the images stored on a memory card, external device, or in either the portrait or landscape position. (.page...
... enjoy beautiful images enhanced by automatic corrections of backlight, focus, red-eye, skin smoothing, and white balance. (.page 45) x Alarm function The photo frame announces the specified time on the image and using sound. (.page 57) x Connecting to a high definition TV to display images on a large ...screen Using the photo frame's HDMI output connector, you can enjoy the images stored on a memory card, external device, or in either the portrait or landscape position. (.page...
Operating Instructions
Page 12
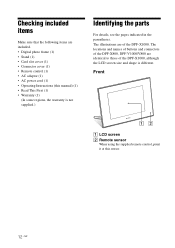
... to those of the DPF-X1000. The illustrations are of the DPF-X1000, although the LCD screen size and shape is not supplied.) Identifying the parts For details, see the pages indicated in the parentheses. The locations and names of buttons and connectors of the DPF-X800, DPF-V1000/V800 are included. • Digital photo frame (1) • Stand (1) •...
... to those of the DPF-X1000. The illustrations are of the DPF-X1000, although the LCD screen size and shape is not supplied.) Identifying the parts For details, see the pages indicated in the parentheses. The locations and names of buttons and connectors of the DPF-X800, DPF-V1000/V800 are included. • Digital photo frame (1) • Stand (1) •...
Operating Instructions
Page 13
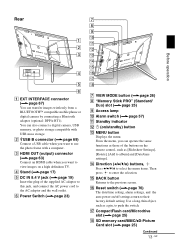
... buttons on the remote control, such as those of the supplied AC adaptor to this jack, and connect the AC power cord to use the photo frame with USB mass storage. F Power Switch (.page 23) G VIEW MODE button (.page 26) H "Memory Stick PRO" (Standard/ Duo) slot (.page 25) I ... [Add to view images on /standby) button M MENU button Displays the menu. You can transfer images wirelessly from a BLUETOOTH™ compatible mobile phone or digital camera by connecting a Bluetooth adaptor (optional: DPPA-BT1). B USB B connector (.page 69) Connect a USB cable when you want to the AC adaptor ...
... buttons on the remote control, such as those of the supplied AC adaptor to this jack, and connect the AC power cord to use the photo frame with USB mass storage. F Power Switch (.page 23) G VIEW MODE button (.page 26) H "Memory Stick PRO" (Standard/ Duo) slot (.page 25) I ... [Add to view images on /standby) button M MENU button Displays the menu. You can transfer images wirelessly from a BLUETOOTH™ compatible mobile phone or digital camera by connecting a Bluetooth adaptor (optional: DPPA-BT1). B USB B connector (.page 69) Connect a USB cable when you want to the AC adaptor ...
Operating Instructions
Page 16
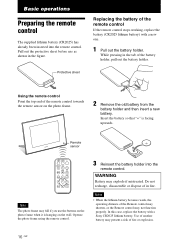
...Use of another battery may present a risk of the Remote control may shorten, or the Remote control may not function properly. Operate the photo frame using the remote control. 3 Reinsert the battery holder into the remote control. Notes • When the lithium battery becomes weak, the ...end of the remote control If the remote control stops working, replace the battery (CR2025 lithium battery) with a Sony CR2025 lithium battery. Remote sensor Note The photo frame may explode if mistreated. WARNING Battery may fall if you use as shown in fire. Basic operations Preparing the...
...Use of another battery may present a risk of the Remote control may shorten, or the Remote control may not function properly. Operate the photo frame using the remote control. 3 Reinsert the battery holder into the remote control. Notes • When the lithium battery becomes weak, the ...end of the remote control If the remote control stops working, replace the battery (CR2025 lithium battery) with a Sony CR2025 lithium battery. Remote sensor Note The photo frame may explode if mistreated. WARNING Battery may fall if you use as shown in fire. Basic operations Preparing the...
Operating Instructions
Page 17
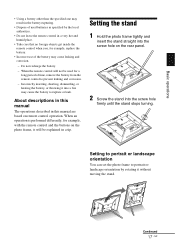
Setting to portrait or landscape orientation You can set the photo frame to portrait or landscape orientation by rotating it will not be explained in a tip. About descriptions in this manual The operations described in this manual ... operation. When an operation is performed differently, for example, with the remote control and the buttons on the photo frame, it without moving the stand. Do not recharge the battery. - Setting the stand 1 Hold the photo frame tightly and insert the stand straight into a fire may cause leaking and corrosion. - When the remote control...
Setting to portrait or landscape orientation You can set the photo frame to portrait or landscape orientation by rotating it will not be explained in a tip. About descriptions in this manual The operations described in this manual ... operation. When an operation is performed differently, for example, with the remote control and the buttons on the photo frame, it without moving the stand. Do not recharge the battery. - Setting the stand 1 Hold the photo frame tightly and insert the stand straight into a fire may cause leaking and corrosion. - When the remote control...
Operating Instructions
Page 18
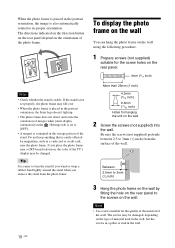
...display may be damaged, depending on the wall. The screws may fall over. • When the photo frame is placed in the portrait orientation, the Sony logo doesn't light up. • The photo frame does not detect and rotate the orientation of images when [Auto display orientation] on the (Settings) ...tab is set properly, the photo frame may be changed. Set the screws in a pillar or stud in ...
...display may be damaged, depending on the wall. The screws may fall over. • When the photo frame is placed in the portrait orientation, the Sony logo doesn't light up. • The photo frame does not detect and rotate the orientation of images when [Auto display orientation] on the (Settings) ...tab is set properly, the photo frame may be changed. Set the screws in a pillar or stud in ...
Operating Instructions
Page 19
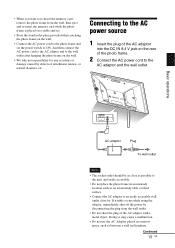
... using the adaptor, immediately shut off the power by disconnecting the plug from the wall, then eject and re-insert the memory card while the photo frame is placed on a stable surface. • Store the stand in an unsteady location such as between a wall and furniture. • When you hang the... power switch to ON. And then connect the AC power cord to the AC adaptor and to the wall outlet after hanging the photo frame on the rear of the photo frame. 2 Connect the AC power cord to the AC power source 1 Insert the plug of the AC adaptor into the DC IN 8.4 V jack...
... using the adaptor, immediately shut off the power by disconnecting the plug from the wall, then eject and re-insert the memory card while the photo frame is placed on a stable surface. • Store the stand in an unsteady location such as between a wall and furniture. • When you hang the... power switch to ON. And then connect the AC power cord to the AC adaptor and to the wall outlet after hanging the photo frame on the rear of the photo frame. 2 Connect the AC power cord to the AC power source 1 Insert the plug of the AC adaptor into the DC IN 8.4 V jack...

Operating Instructions
Page 20
• After use, remove the AC adaptor from the DC IN 8.4 V jack of the photo frame, and remove the AC power cord from the outlet. • Even if your photo frame is turned off, AC power (house current) is still supplied to it while connected to the wall outlet via the AC adaptor. 20 GB
• After use, remove the AC adaptor from the DC IN 8.4 V jack of the photo frame, and remove the AC power cord from the outlet. • Even if your photo frame is turned off, AC power (house current) is still supplied to it while connected to the wall outlet via the AC adaptor. 20 GB
Operating Instructions
Page 23
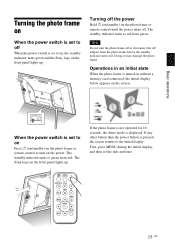
... off the power Hold 1 (on/standby) on the screen. Operations in an initial state When the photo frame is turned on without a memory card connected, the initial display below appears on the photo frame or remote control until the power turns off. First, press MENU during the initial display, and then ... or disconnect the AC adaptor from green. The standby indicator turns to the initial display. The Sony logo on the front panel lights up . Doing so may damage the photo frame. If the photo frame is not operated for 10 seconds, the demo mode is displayed. If any other button than the ...
... off the power Hold 1 (on/standby) on the screen. Operations in an initial state When the photo frame is turned on without a memory card connected, the initial display below appears on the photo frame or remote control until the power turns off. First, press MENU during the initial display, and then ... or disconnect the AC adaptor from green. The standby indicator turns to the initial display. The Sony logo on the front panel lights up . Doing so may damage the photo frame. If the photo frame is not operated for 10 seconds, the demo mode is displayed. If any other button than the ...
Operating Instructions
Page 24
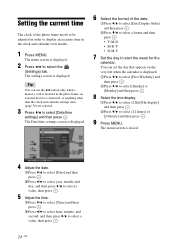
... select [Date/time settings] and then press . The Date/time settings screen is displayed. 6 Select the format of the photo frame needs to be adjusted in order to display an accurate time in the photo frame, an external device is closed. 4 Adjust the date. 1Press v/V to select [Date] and then press . 2Press B/b to select...
... select [Date/time settings] and then press . The Date/time settings screen is displayed. 6 Select the format of the photo frame needs to be adjusted in order to display an accurate time in the photo frame, an external device is closed. 4 Adjust the date. 1Press v/V to select [Date] and then press . 2Press B/b to select...
Operating Instructions
Page 25
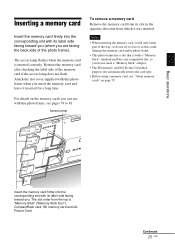
...with its label side facing toward you do not try to 81. Basic operations Insert the memory card firmly into the corresponding slot with this photo frame, see "About memory cards" on the memory cards you can use with its label side facing toward you (when you insert the memory ...card and leave it inserted for a long time. The slot order from which it as this could damage the memory card and/or photo frame. • This photo frame has a slot that is inserted correctly. For details on page 79. The access lamp flashes when the memory card is both a "Memory Stick...
...with its label side facing toward you do not try to 81. Basic operations Insert the memory card firmly into the corresponding slot with this photo frame, see "About memory cards" on the memory cards you can use with its label side facing toward you (when you insert the memory ...card and leave it inserted for a long time. The slot order from which it as this could damage the memory card and/or photo frame. • This photo frame has a slot that is inserted correctly. For details on page 79. The access lamp flashes when the memory card is both a "Memory Stick...
Operating Instructions
Page 26
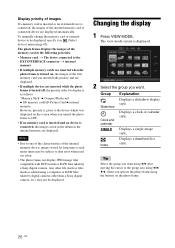
... and are displayed. • If multiple devices are inserted while the photo frame is turned off, the priority order for long time or read too often. • The photo frame can display JPEG image files compatible with DCF format or RAW files taken by a Sony digital camera. Group Slideshow Clock and calendar Index Explanation Displays a slideshow...
... and are displayed. • If multiple devices are inserted while the photo frame is turned off, the priority order for long time or read too often. • The photo frame can display JPEG image files compatible with DCF format or RAW files taken by a Sony digital camera. Group Slideshow Clock and calendar Index Explanation Displays a slideshow...
Operating Instructions
Page 29
Refer to "Slideshow Settings" (page 36). • You can select the single view mode when you press on the photo frame when the image you want appears in the slideshow display. • You can set the interval, effect, listing order, or color effect when you select ... connected, the images stored in internal memory are saved in a slideshow display, see page 61. • You can use the VIEW MODE button on the photo frame. Continued 29 GB Demonstration mode ends if a button other than 1 (on/standby) is pressed. • For details on the playback order in internal memory, demonstration...
Refer to "Slideshow Settings" (page 36). • You can select the single view mode when you press on the photo frame when the image you want appears in the slideshow display. • You can set the interval, effect, listing order, or color effect when you select ... connected, the images stored in internal memory are saved in a slideshow display, see page 61. • You can use the VIEW MODE button on the photo frame. Continued 29 GB Demonstration mode ends if a button other than 1 (on/standby) is pressed. • For details on the playback order in internal memory, demonstration...
Operating Instructions
Page 30
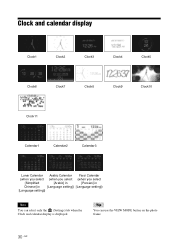
Clock and calendar display Clock1 Clock2 Clock3 Clock4 Clock5 Clock6 Clock7 Clock8 Clock9 Clock10 Clock11 Calendar1 Calendar2 Calendar3 Lunar Calendar Arabic Calendar Farsi Calendar (when you select (when you select (when you select [Simplified [Arabic] in [Persian] in Chinese] in [Language setting]) [Language setting]) [Language setting]) Note You can use the VIEW MODE button on the photo frame. 30 GB Tip You can select only the (Settings) tab when the Clock and calendar display is displayed.
Clock and calendar display Clock1 Clock2 Clock3 Clock4 Clock5 Clock6 Clock7 Clock8 Clock9 Clock10 Clock11 Calendar1 Calendar2 Calendar3 Lunar Calendar Arabic Calendar Farsi Calendar (when you select (when you select (when you select [Simplified [Arabic] in [Persian] in Chinese] in [Language setting]) [Language setting]) [Language setting]) Note You can use the VIEW MODE button on the photo frame. 30 GB Tip You can select only the (Settings) tab when the Clock and calendar display is displayed.


