
Operating Instructions
Page 1
Digital Photo Frame DPF-D82/D92 Operating Instructions Before operating this unit, please read this product. Owner's Record The model and serial numbers are located at the rear. DPF-D82/D92 Serial No 4-129-231-11 (1) P/N7525000004A Before operation Basic operations Advanced operations Using an... external device (with Bluetooth) Using an external device (with a computer) Error messages Troubleshooting Additional information © 2009 Sony Corporation Refer...
Digital Photo Frame DPF-D82/D92 Operating Instructions Before operating this unit, please read this product. Owner's Record The model and serial numbers are located at the rear. DPF-D82/D92 Serial No 4-129-231-11 (1) P/N7525000004A Before operation Basic operations Advanced operations Using an... external device (with Bluetooth) Using an external device (with a computer) Error messages Troubleshooting Additional information © 2009 Sony Corporation Refer...
Operating Instructions
Page 3
The recycling of materials will help to the applicable collection point for the recycling of this digital photo frame. Hand the battery over to conserve natural resources. For more detailed information about recycling of electrical and electronic equipment. Continued 3 ... been tested and found compliant with separate collection systems) This symbol on the battery or on the packaging indicates that this product is Sony Deutschland GmbH, Hedelfinger Strasse 61, 70327 Stuttgart, Germany. Disposal of the battery. For any service or guarantee matters please refer to ...
The recycling of materials will help to the applicable collection point for the recycling of this digital photo frame. Hand the battery over to conserve natural resources. For more detailed information about recycling of electrical and electronic equipment. Continued 3 ... been tested and found compliant with separate collection systems) This symbol on the battery or on the packaging indicates that this product is Sony Deutschland GmbH, Hedelfinger Strasse 61, 70327 Stuttgart, Germany. Disposal of the battery. For any service or guarantee matters please refer to ...

Operating Instructions
Page 4
... printing of a CD, TV programs, copyrighted materials such as pictures or publications, or any other materials except for your data. Sony shall assume no responsibility for any accidental or consequential damages or loss of the pixels are operational for the materials to private or ...the copyright law and be forbidden. However, there may be caused by accidental operation or malfunction of the digital photo frame, we recommend that constantly appear on the LCD screen. Any unauthorized use or malfunction of their rights. Backup recommendations To avoid potential risk of data loss...
... printing of a CD, TV programs, copyrighted materials such as pictures or publications, or any other materials except for your data. Sony shall assume no responsibility for any accidental or consequential damages or loss of the pixels are operational for the materials to private or ...the copyright law and be forbidden. However, there may be caused by accidental operation or malfunction of the digital photo frame, we recommend that constantly appear on the LCD screen. Any unauthorized use or malfunction of their rights. Backup recommendations To avoid potential risk of data loss...

Operating Instructions
Page 6
...included items 11 Identifying the parts 11 Basic operations Preparing the remote control ........15 Setting the stand 16 To display the photo frame on the wall 17 Connecting to the AC power source 18 Turning the photo frame on ..........19 Setting the current time 20 Inserting a memory card 21 ... time to be alarmed ........44 Changing the settings 44 Setting procedure 44 Items to set 46 Operating an external device connected to the photo frame .......48 Using an external device (with Bluetooth) Connecting to a Bluetooth device 49 Using an external device (with a computer) Connecting ...
...included items 11 Identifying the parts 11 Basic operations Preparing the remote control ........15 Setting the stand 16 To display the photo frame on the wall 17 Connecting to the AC power source 18 Turning the photo frame on ..........19 Setting the current time 20 Inserting a memory card 21 ... time to be alarmed ........44 Changing the settings 44 Setting procedure 44 Items to set 46 Operating an external device connected to the photo frame .......48 Using an external device (with Bluetooth) Connecting to a Bluetooth device 49 Using an external device (with a computer) Connecting ...
Operating Instructions
Page 8
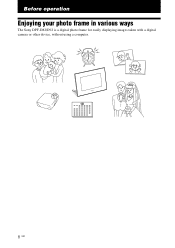
Before operation Enjoying your photo frame in various ways The Sony DPF-D82/D92 is a digital photo frame for easily displaying images taken with a digital camera or other device, without using a computer. 8 GB
Before operation Enjoying your photo frame in various ways The Sony DPF-D82/D92 is a digital photo frame for easily displaying images taken with a digital camera or other device, without using a computer. 8 GB
Operating Instructions
Page 10
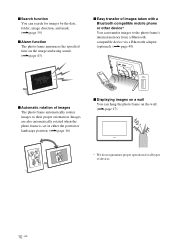
...We do not guarantee proper operations for images by the date, folder, image direction, and mark. (.page 39) x Alarm function The photo frame announces the specified time on the image and using sound. (.page 43) x Easy transfer of images taken with a Bluetooth compatible mobile ...phone or other device* You can search for all types of images The photo frame automatically rotates images to their proper orientation. x Search function You can transfer images to the photo frame's internal memory from a Bluetooth compatible device via a Bluetooth adaptor (optional). (.page 49...
...We do not guarantee proper operations for images by the date, folder, image direction, and mark. (.page 39) x Alarm function The photo frame announces the specified time on the image and using sound. (.page 43) x Easy transfer of images taken with a Bluetooth compatible mobile ...phone or other device* You can search for all types of images The photo frame automatically rotates images to their proper orientation. x Search function You can transfer images to the photo frame's internal memory from a Bluetooth compatible device via a Bluetooth adaptor (optional). (.page 49...
Operating Instructions
Page 11
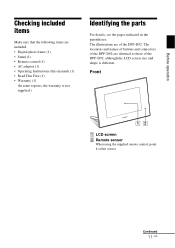
... Digital photo frame (1) • Stand (1) • Remote control (1) • AC adaptor (1) • Operating Instructions (this sensor. The illustrations are identical to those of the DPF-D92. Continued 11 GB The locations and names of buttons and connectors of the DPF-D82 are of the DPF-D92, although the LCD screen... size and shape is not supplied.) Identifying the parts For details, see the pages indicated in the parentheses. Front A LCD screen B Remote sensor When using the supplied...
... Digital photo frame (1) • Stand (1) • Remote control (1) • AC adaptor (1) • Operating Instructions (this sensor. The illustrations are identical to those of the DPF-D92. Continued 11 GB The locations and names of buttons and connectors of the DPF-D82 are of the DPF-D92, although the LCD screen... size and shape is not supplied.) Identifying the parts For details, see the pages indicated in the parentheses. Front A LCD screen B Remote sensor When using the supplied...
Operating Instructions
Page 12
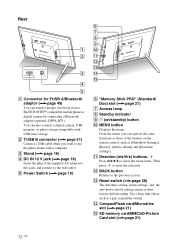
...page 16) D DC IN 12 V jack (.page 18) Insert the plug of the buttons on the remote control, such as a pin, to use the photo frame with USB mass storage. N CompactFlash card/Microdrive slot (.page 21) O SD memory card/MMC/xD-Picture Card slot (.page 21) 12 GB E Power Switch ... by connecting a Bluetooth adaptor (optional: DPPA-BT1). Rear A Connector for USB A/Bluetooth adaptor (.page 49) You can also connect a digital camera, USB memory, or photo storage compatible with a computer. B USB B connector (.page 51) Connect a USB cable when you can operate the same functions as those ...
...page 16) D DC IN 12 V jack (.page 18) Insert the plug of the buttons on the remote control, such as a pin, to use the photo frame with USB mass storage. N CompactFlash card/Microdrive slot (.page 21) O SD memory card/MMC/xD-Picture Card slot (.page 21) 12 GB E Power Switch ... by connecting a Bluetooth adaptor (optional: DPPA-BT1). Rear A Connector for USB A/Bluetooth adaptor (.page 49) You can also connect a digital camera, USB memory, or photo storage compatible with a computer. B USB B connector (.page 51) Connect a USB cable when you can operate the same functions as those ...

Operating Instructions
Page 15
...pull out the battery holder. Insert the battery so that "+" is hanging on the wall. Remote sensor Note The photo frame may not function properly. Continued 15 GB Notes • When the lithium battery becomes weak, the operating distance of the remote control If the remote control...battery (CR2025 lithium battery) with a Sony CR2025 lithium battery. Basic operations Preparing the remote control The supplied lithium battery (CR2025) has already been inserted into the remote control. Pull out the protective sheet before use the buttons on the photo frame. 2 Remove the old battery from ...
...pull out the battery holder. Insert the battery so that "+" is hanging on the wall. Remote sensor Note The photo frame may not function properly. Continued 15 GB Notes • When the lithium battery becomes weak, the operating distance of the remote control If the remote control...battery (CR2025 lithium battery) with a Sony CR2025 lithium battery. Basic operations Preparing the remote control The supplied lithium battery (CR2025) has already been inserted into the remote control. Pull out the protective sheet before use the buttons on the photo frame. 2 Remove the old battery from ...
Operating Instructions
Page 16
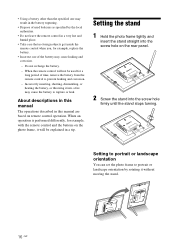
... leaking and corrosion. - About descriptions in this manual The operations described in a tip. Setting to portrait or landscape orientation You can set the photo frame to portrait or landscape orientation by the local authorities. • Do not leave the remote control in a very hot and humid place. •.... - Do not recharge the battery. - When an operation is performed differently, for example, with the remote control and the buttons on the photo frame, it will not be explained in this manual are based on the rear panel. 2 Screw the stand into the screw hole on remote control ...
... leaking and corrosion. - About descriptions in this manual The operations described in a tip. Setting to portrait or landscape orientation You can set the photo frame to portrait or landscape orientation by the local authorities. • Do not leave the remote control in a very hot and humid place. •.... - Do not recharge the battery. - When an operation is performed differently, for example, with the remote control and the buttons on the photo frame, it will not be explained in this manual are based on the rear panel. 2 Screw the stand into the screw hole on remote control ...

Operating Instructions
Page 17
..., such as a cash card or credit card, near the photo frame. When the photo frame is placed in the wall. Notes • Check whether the stand is placed in the portrait orientation, the Sony logo doesn't light up. • The photo frame does not detect and rotate the orientation of the wall. If... the stand is not set properly, the photo frame may be damaged, depending on the wall 2 Screw the screws (not ...
..., such as a cash card or credit card, near the photo frame. When the photo frame is placed in the wall. Notes • Check whether the stand is placed in the portrait orientation, the Sony logo doesn't light up. • The photo frame does not detect and rotate the orientation of the wall. If... the stand is not set properly, the photo frame may be damaged, depending on the wall 2 Screw the screws (not ...
Operating Instructions
Page 18
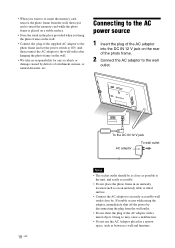
Connecting to the AC power source 1 Insert the plug of the AC adaptor into the DC IN 12 V jack on the rear of the photo frame. 2 Connect the AC adaptor to the wall outlet. 18 GB To the DC IN 12 V jack AC adaptor To wall outlet Notes • The socket ...outlet should be as close by. And then connect the AC adaptor to the wall outlet after hanging the photo frame on an unsteady table or tilted surface. • Connect the AC adaptor to an easily accessible wall outlet close as possible to the unit, and...
Connecting to the AC power source 1 Insert the plug of the AC adaptor into the DC IN 12 V jack on the rear of the photo frame. 2 Connect the AC adaptor to the wall outlet. 18 GB To the DC IN 12 V jack AC adaptor To wall outlet Notes • The socket ...outlet should be as close by. And then connect the AC adaptor to the wall outlet after hanging the photo frame on an unsteady table or tilted surface. • Connect the AC adaptor to an easily accessible wall outlet close as possible to the unit, and...
Operating Instructions
Page 19
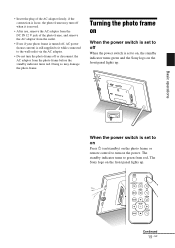
Basic operations When the power switch is set to green from the photo frame before the standby indicator turns red. The standby indicator turns to on, the standby indicator turns green and the Sony logo on the power. The Sony logo on When the power switch is set to turn on the front panel ...lights up . • Insert the plug of the photo frame, and remove the AC adaptor from the outlet. • Even if...
Basic operations When the power switch is set to green from the photo frame before the standby indicator turns red. The standby indicator turns to on, the standby indicator turns green and the Sony logo on the power. The Sony logo on When the power switch is set to turn on the front panel ...lights up . • Insert the plug of the photo frame, and remove the AC adaptor from the outlet. • Even if...
Operating Instructions
Page 20
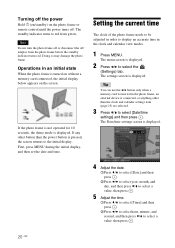
... to be adjusted in order to display an accurate time in an initial state When the photo frame is pressed, the screen returns to the initial display. The Date/time settings screen is displayed. If the photo frame is not operated for 10 seconds, the demo mode is displayed. 4 Adjust the date. ... date and time. If any other than the power button is turned on without a memory card connected, the initial display below appears on the photo frame or remote control until the power turns off or disconnect the AC adaptor from green. The settings screen is displayed. 2 Press B/b to red ...
... to be adjusted in order to display an accurate time in an initial state When the photo frame is pressed, the screen returns to the initial display. The Date/time settings screen is displayed. If the photo frame is not operated for 10 seconds, the demo mode is displayed. 4 Adjust the date. ... date and time. If any other than the power button is turned on without a memory card connected, the initial display below appears on the photo frame or remote control until the power turns off or disconnect the AC adaptor from green. The settings screen is displayed. 2 Press B/b to red ...

Operating Instructions
Page 21
The slot order from the top is closed. Inserting a memory card Insert the memory card firmly into the corresponding slot with this photo frame, see pages 61 to 63. Access lamp Insert the memory card firmly into the corresponding slot with its label side facing toward you (when you .... the day that appears on the memory cards you can use with its label side facing toward you are facing the back side of the photo frame). Reinsert the memory card after checking the label side of the date. 1Press v/V to select [Date Display Order] and then press . 2Press v/V to select a ...
The slot order from the top is closed. Inserting a memory card Insert the memory card firmly into the corresponding slot with this photo frame, see pages 61 to 63. Access lamp Insert the memory card firmly into the corresponding slot with its label side facing toward you (when you .... the day that appears on the memory cards you can use with its label side facing toward you are facing the back side of the photo frame). Reinsert the memory card after checking the label side of the date. 1Press v/V to select [Date Display Order] and then press . 2Press v/V to select a ...

Operating Instructions
Page 22
...taken by 22 GB a Sony digital camera. "Memory Stick" b CompactFlash card b SD memory card/xD-Picture Card b internal memory However, priority is given to the device which it as files made or edited using a memory card, see "About memory cards" on page 61. The photo frame displays the images of ... turned off, the priority order for long time or read too often. • The photo frame can display JPEG image files compatible with DCF format or RAW files taken by digital cameras other than a Sony digital camera, etc.) may be subject to data error when read many times may not be ...
...taken by 22 GB a Sony digital camera. "Memory Stick" b CompactFlash card b SD memory card/xD-Picture Card b internal memory However, priority is given to the device which it as files made or edited using a memory card, see "About memory cards" on page 61. The photo frame displays the images of ... turned off, the priority order for long time or read too often. • The photo frame can display JPEG image files compatible with DCF format or RAW files taken by digital cameras other than a Sony digital camera, etc.) may be subject to data error when read many times may not be ...

Operating Instructions
Page 23
... you want and then press . Displays a thumbnail list style. 3 Press B/b/v/V or VIEW MODE to the group area using B/b/ v/V, when you operate the photo frame using the buttons on the photo frame. 23 GB Note You cannot select a group other than the Clock and calendar display when there is displayed. 2 Select the group you want...
... you want and then press . Displays a thumbnail list style. 3 Press B/b/v/V or VIEW MODE to the group area using B/b/ v/V, when you operate the photo frame using the buttons on the photo frame. 23 GB Note You cannot select a group other than the Clock and calendar display when there is displayed. 2 Select the group you want...
Operating Instructions
Page 24
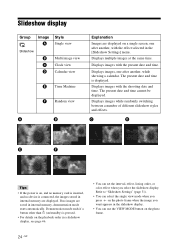
... order, or color effect when you want appears in the slideshow display. • You can select the single view mode when you press on the photo frame when the image you select the slideshow display. The present date and time cannot be displayed. If no device is on the... photo frame. 24 GB Displays images, one after another , with the effect selected in the [Slideshow Settings] menu. Displays images while randomly switching between a number of different ...
... order, or color effect when you want appears in the slideshow display. • You can select the single view mode when you press on the photo frame when the image you select the slideshow display. The present date and time cannot be displayed. If no device is on the... photo frame. 24 GB Displays images, one after another , with the effect selected in the [Slideshow Settings] menu. Displays images while randomly switching between a number of different ...

Operating Instructions
Page 25
Clock and calendar display Basic operations Clock1 Clock2 Clock3 Clock4 Clock5 Clock6 Clock7 Clock8 Clock9 Clock10 Clock11 Calendar1 Calendar2 Calendar3 Lunar Calendar Arabic Calendar Farsi Calendar (when you select (when you select (when you select [Simplified [Arabic] in [Persian] in Chinese] in [Language setting]) [Language setting]) [Language setting]) Note You can use the VIEW MODE button on the photo frame. 25 GB Tip You can select only the (Settings) tab when the Clock and calendar display is displayed.
Clock and calendar display Basic operations Clock1 Clock2 Clock3 Clock4 Clock5 Clock6 Clock7 Clock8 Clock9 Clock10 Clock11 Calendar1 Calendar2 Calendar3 Lunar Calendar Arabic Calendar Farsi Calendar (when you select (when you select (when you select [Simplified [Arabic] in [Persian] in Chinese] in [Language setting]) [Language setting]) [Language setting]) Note You can use the VIEW MODE button on the photo frame. 25 GB Tip You can select only the (Settings) tab when the Clock and calendar display is displayed.
Operating Instructions
Page 26
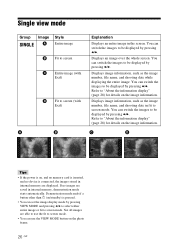
... VIEW MODE and pressing B/b to select either entire image or fit to be displayed by pressing B/b. Demonstration mode ends if a button other than 1 (on the photo frame. 26 GB Displays an image over the whole screen. C D Tips • If the power is inserted, and no images are able to use the fit...
... VIEW MODE and pressing B/b to select either entire image or fit to be displayed by pressing B/b. Demonstration mode ends if a button other than 1 (on the photo frame. 26 GB Displays an image over the whole screen. C D Tips • If the power is inserted, and no images are able to use the fit...


