

Operating Instructions
Page 6
... 8 Features 9 Checking included items 11 Identifying the parts 11 Basic operations Preparing the remote control ........15 Setting the stand 16 To display the photo frame on the wall 17 Connecting to the AC power source 18 Turning the photo frame on ..........19 Setting the current time 20 Inserting a memory card 21 Changing the display 23 Slideshow...
... 8 Features 9 Checking included items 11 Identifying the parts 11 Basic operations Preparing the remote control ........15 Setting the stand 16 To display the photo frame on the wall 17 Connecting to the AC power source 18 Turning the photo frame on ..........19 Setting the current time 20 Inserting a memory card 21 Changing the display 23 Slideshow...
Operating Instructions
Page 12
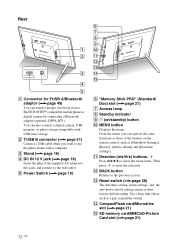
...Slideshow Settings], [Rotate], [Add to album] and [Date/time settings]. E Power Switch (.page 19) F "Memory Stick PRO" (Standard/ Duo) slot (.page 21) G Access lamp H Standby indicator I 1 (on /off settings return to use the photo frame with USB mass storage. From the menu, you want to their factory default ... as a pin, to the wall outlet. B USB B connector (.page 51) Connect a USB cable when you can also connect a digital camera, USB memory, or photo storage compatible with a computer. Use a long, thin object, such as those of the supplied AC adaptor to this jack, and connect ...
...Slideshow Settings], [Rotate], [Add to album] and [Date/time settings]. E Power Switch (.page 19) F "Memory Stick PRO" (Standard/ Duo) slot (.page 21) G Access lamp H Standby indicator I 1 (on /off settings return to use the photo frame with USB mass storage. From the menu, you want to their factory default ... as a pin, to the wall outlet. B USB B connector (.page 51) Connect a USB cable when you can also connect a digital camera, USB memory, or photo storage compatible with a computer. Use a long, thin object, such as those of the supplied AC adaptor to this jack, and connect ...
Operating Instructions
Page 18
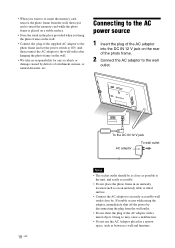
... with a metal object. And then connect the AC adaptor to the wall outlet after hanging the photo frame on the wall. • We take no responsibility for any accidents or damage caused by . Connecting to the AC power source 1 Insert the plug of the AC adaptor into the DC IN 12 V jack on... not short the plug of attachment, misuse, or natural disasters, etc. • When you hang the photo frame on the wall. • Connect the plug of the supplied AC adaptor to the photo frame and set the power switch to ON. Doing so may cause a malfunction. • Do not use the AC Adaptor placed in...
... with a metal object. And then connect the AC adaptor to the wall outlet after hanging the photo frame on the wall. • We take no responsibility for any accidents or damage caused by . Connecting to the AC power source 1 Insert the plug of the AC adaptor into the DC IN 12 V jack on... not short the plug of attachment, misuse, or natural disasters, etc. • When you hang the photo frame on the wall. • Connect the plug of the supplied AC adaptor to the photo frame and set the power switch to ON. Doing so may cause a malfunction. • Do not use the AC Adaptor placed in...
Operating Instructions
Page 19
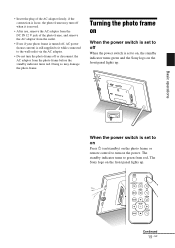
Basic operations When the power switch is set to turn on the power. Doing so may turn the photo frame off or disconnect the AC adaptor from red. The Sony logo on the front panel lights up . Turning the photo frame on When the power switch is set to off , AC power (house current) is... still supplied to it while connected to green from the photo frame before the standby indicator turns red. The...
Basic operations When the power switch is set to turn on the power. Doing so may turn the photo frame off or disconnect the AC adaptor from red. The Sony logo on the front panel lights up . Turning the photo frame on When the power switch is set to off , AC power (house current) is... still supplied to it while connected to green from the photo frame before the standby indicator turns red. The...
Operating Instructions
Page 20
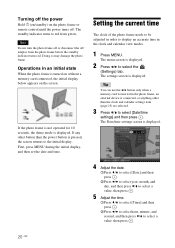
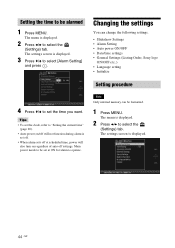
.... 3 Press v/V to the initial display. The settings screen is turned on without a memory card connected, the initial display below appears on the photo frame or remote control until the power turns off or disconnect the AC adaptor from green. Operations in the clock and calendar view modes. 1 Press MENU. Setting the current time...
.... 3 Press v/V to the initial display. The settings screen is turned on without a memory card connected, the initial display below appears on the photo frame or remote control until the power turns off or disconnect the AC adaptor from green. Operations in the clock and calendar view modes. 1 Press MENU. Setting the current time...
Operating Instructions
Page 24
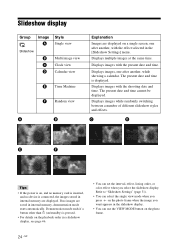
...standby) is displayed. Refer to "Slideshow Settings" (page 31). • You can select the single view mode when you press on the photo frame when the image you select the slideshow display. Displays images with the present date and time. If no device is connected, the images stored in...internal memory are saved in a slideshow display, see page 46. • You can use the VIEW MODE button on the photo frame. 24 GB C D E F Tips • If the power is on, and no memory card is inserted, and no images are displayed. Slideshow display Group Image Style A Single view ...
...standby) is displayed. Refer to "Slideshow Settings" (page 31). • You can select the single view mode when you press on the photo frame when the image you select the slideshow display. Displays images with the present date and time. If no device is connected, the images stored in...internal memory are saved in a slideshow display, see page 46. • You can use the VIEW MODE button on the photo frame. 24 GB C D E F Tips • If the power is on, and no memory card is inserted, and no images are displayed. Slideshow display Group Image Style A Single view ...
Operating Instructions
Page 26
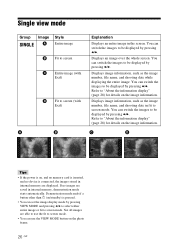
..., file name, and shooting date in the screen. C D Tips • If the power is on, and no memory card is inserted, and no images are saved in internal memory are able to use the VIEW MODE button on the photo frame. 26 GB Demonstration mode ends if a button other than 1 (on/standby) is...
..., file name, and shooting date in the screen. C D Tips • If the power is on, and no memory card is inserted, and no images are saved in internal memory are able to use the VIEW MODE button on the photo frame. 26 GB Demonstration mode ends if a button other than 1 (on/standby) is...

Operating Instructions
Page 27
... A B Explanation Displays a list of small thumbnails. C Tips • A thumbnail is a small-sized image for index use the VIEW MODE button on the photo frame. Demonstration mode ends if a button other than 1 (on/standby) is pressed. • You can use that is recorded in internal memory, demonstration mode starts ...no images are displayed. Continued 27 GB Displays a list of thumbnails. You can select an image by a digital camera. • If the power is on the photo frame when the image you want appears in the index image display. • You can select the single view...
... A B Explanation Displays a list of small thumbnails. C Tips • A thumbnail is a small-sized image for index use the VIEW MODE button on the photo frame. Demonstration mode ends if a button other than 1 (on/standby) is pressed. • You can use that is recorded in internal memory, demonstration mode starts ...no images are displayed. Continued 27 GB Displays a list of thumbnails. You can select an image by a digital camera. • If the power is on the photo frame when the image you want appears in the index image display. • You can select the single view...

Operating Instructions
Page 29
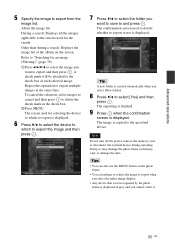
... starts from the last image that was displayed the previous time, if you set the power switch to OFF in the standby mode, or turn the photo frame to ON from the first image if you set the power switch to select the style you back up images on the memory card often. •...; When the photo frame is displayed. 2 Press B/b to select [Slideshow Settings] and then press . Refer to select the...
... starts from the last image that was displayed the previous time, if you set the power switch to OFF in the standby mode, or turn the photo frame to ON from the first image if you set the power switch to select the style you back up images on the memory card often. •...; When the photo frame is displayed. 2 Press B/b to select [Slideshow Settings] and then press . Refer to select the...

Operating Instructions
Page 34
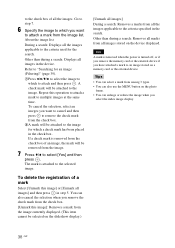
...internal device is being added. Go to step 5. Notes • Images in the internal memory to the album. • Do not turn off the power, remove the memory card, or disconnect the external device while an image is displayed on the slideshow display.) If you select [Selected images], you can... 6. If you perform a backup of the internal memory device, images stored for editing is exported to data error when read many times may damage the photo frame or memory card, or damage the data. If you want to avoid losing it. Tips • To perform this operation using [ / ] in the ...
...internal device is being added. Go to step 5. Notes • Images in the internal memory to the album. • Do not turn off the power, remove the memory card, or disconnect the external device while an image is displayed on the slideshow display.) If you select [Selected images], you can... 6. If you perform a backup of the internal memory device, images stored for editing is exported to data error when read many times may damage the photo frame or memory card, or damage the data. If you want to avoid losing it. Tips • To perform this operation using [ / ] in the ...
Operating Instructions
Page 35
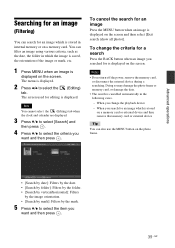
... it. 35 GB The image is displayed in the check box. 2Press MENU. The screen used for the search. Note Do not turn off the power, remove the memory card, or disconnect the external device during a search: Displays the image list of each selected image. Tips • You can also use... you select [New folder]. 8 Press v/V to the criteria used to decide whether to export multiple images at the same time. Doing so may damage the photo frame or memory card, or damage the data. About the image list During a search: Displays all the images applicable to select [Yes] and then press . Repeat...
... it. 35 GB The image is displayed in the check box. 2Press MENU. The screen used for the search. Note Do not turn off the power, remove the memory card, or disconnect the external device during a search: Displays the image list of each selected image. Tips • You can also use... you select [New folder]. 8 Press v/V to the criteria used to decide whether to export multiple images at the same time. Doing so may damage the photo frame or memory card, or damage the data. About the image list During a search: Displays all the images applicable to select [Yes] and then press . Repeat...
Operating Instructions
Page 38
... on the slideshow display.) [Unmark all images] During a search: Removes a marks from among 3 types. • You can also use the MENU button on the photo frame. • You can also cancel the selection when you select the index image display. 38 GB Repeat this image] or [Unmark all images in step...To cancel the selection, select an imeges you have attached a mark to an image stored on the device displayed. Note A mark is removed when the power is turned off, or if you remove the memory card or the external device if you want to attach a mark from the image currently displayed...
... on the slideshow display.) [Unmark all images] During a search: Removes a marks from among 3 types. • You can also use the MENU button on the photo frame. • You can also cancel the selection when you select the index image display. 38 GB Repeat this image] or [Unmark all images in step...To cancel the selection, select an imeges you have attached a mark to an image stored on the device displayed. Note A mark is removed when the power is turned off, or if you remove the memory card or the external device if you want to attach a mark from the image currently displayed...
Operating Instructions
Page 39
... is displayed on the screen and then select [Exit search (show all photo)]. To cancel the search for is cancelled automatically in which is displayed on the photo frame. Notes • Do not turn off the power, remove the memory card, or disconnect the external device during a searching.... Doing so may damage the photo frame or memory card, or damage the data. • The search...
... is displayed on the screen and then select [Exit search (show all photo)]. To cancel the search for is cancelled automatically in which is displayed on the photo frame. Notes • Do not turn off the power, remove the memory card, or disconnect the external device during a searching.... Doing so may damage the photo frame or memory card, or damage the data. • The search...
Operating Instructions
Page 41
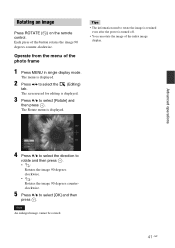
Each press of the photo frame 1 Press MENU in single display mode. The menu is displayed. 2 Press B/b to select the tab. (Editing) The screen used to rotate the image is retained even after the power is displayed. 3 Press v/V to select [OK] and then press . Advanced operations 4 Press v/V to select the direction to rotate and...
Each press of the photo frame 1 Press MENU in single display mode. The menu is displayed. 2 Press B/b to select the tab. (Editing) The screen used to rotate the image is retained even after the power is displayed. 3 Press v/V to select [OK] and then press . Advanced operations 4 Press v/V to select the direction to rotate and...
Operating Instructions
Page 42
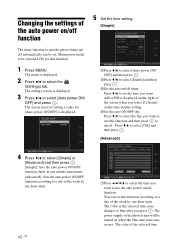
...press . 3Set the auto on/off timer. The menu is displayed on the right of the photo frame will be turned on when the blue time zone time occurs. Changing the settings of the auto power on/off function 5 Set the time setting. [Simple] The timer function to select [Auto... power ON/ OFF] and press . You can be switched ON for [Auto power ON/OFF] is displayed. 3 Press v/V to turn the photo frame on /off automatically can set this function. 1 Press MENU. The settings screen is displayed. 1Press ...
...press . 3Set the auto on/off timer. The menu is displayed on the right of the photo frame will be turned on when the blue time zone time occurs. Changing the settings of the auto power on/off function 5 Set the time setting. [Simple] The timer function to select [Auto... power ON/ OFF] and press . You can be switched ON for [Auto power ON/OFF] is displayed. 3 Press v/V to turn the photo frame on /off automatically can set this function. 1 Press MENU. The settings screen is displayed. 1Press ...
Operating Instructions
Page 43
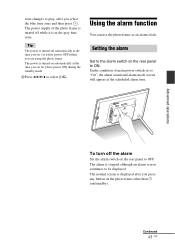
Using the alarm function You can use the photo frame as an alarm clock. Tip The power is turned off automatically at the scheduled alarm time. Under condition of the photo frame is turned off the alarm Set the alarm switch on the rear panel to OFF. The normal screen is turned on automatically at the... set to "On", the alarm sound and alarm mode screen will appear at the time you set for [Auto power OFF] when you are using the photo frame. The alarm is in the gray time zone. Continued 43 GB Setting the alarm Set to the alarm switch on the rear panel to ON...
Using the alarm function You can use the photo frame as an alarm clock. Tip The power is turned off automatically at the scheduled alarm time. Under condition of the photo frame is turned off the alarm Set the alarm switch on the rear panel to OFF. The normal screen is turned on automatically at the... set to "On", the alarm sound and alarm mode screen will appear at the time you set for [Auto power OFF] when you are using the photo frame. The alarm is in the gray time zone. Continued 43 GB Setting the alarm Set to the alarm switch on the rear panel to ON...
Operating Instructions
Page 44
...be formatted. 1 Press MENU. Tips • To set the clock, refer to "Setting the current time" (page 20). • Auto power on/off will also turn on regardless of auto off at ON for alarm to select the (Settings) tab. The menu is displayed. 2 ...settings. Note Only internal memory can change the following settings. • Slideshow Settings • Alarm Setting • Auto power ON/OFF • Date/time settings • General Settings (Listing Order, Sony logo ON/OFF etc,.) • Language setting • Initialize Setting procedure 4 Press v/V to select [Alarm Setting]...
...be formatted. 1 Press MENU. Tips • To set the clock, refer to "Setting the current time" (page 20). • Auto power on/off will also turn on regardless of auto off at ON for alarm to select the (Settings) tab. The menu is displayed. 2 ...settings. Note Only internal memory can change the following settings. • Slideshow Settings • Alarm Setting • Auto power ON/OFF • Date/time settings • General Settings (Listing Order, Sony logo ON/OFF etc,.) • Language setting • Initialize Setting procedure 4 Press v/V to select [Alarm Setting]...
Operating Instructions
Page 46
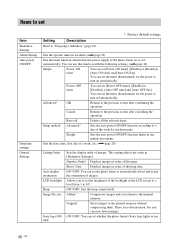
...the photo frame to automatically detect and rotate the orientation of images. Sets the date, time, first day of a week, etc. (.page 20) Listing Order Auto display orientation LCD backlight Beep Image file size Sony logo ON/ OFF Sets the display order of shooting date. Shoot. You can set [Power-OFF... week by one minute increments. ON*/OFF: You can set whether the photo frame's Sony logo lights or not. 46 GB You can use this function with the following settings. (.page 42) Simple Power-ON timer You can set [Power-ON timer] ([Enable] or [Disable]), [Auto ON time] and [...
...the photo frame to automatically detect and rotate the orientation of images. Sets the date, time, first day of a week, etc. (.page 20) Listing Order Auto display orientation LCD backlight Beep Image file size Sony logo ON/ OFF Sets the display order of shooting date. Shoot. You can set [Power-OFF... week by one minute increments. ON*/OFF: You can set whether the photo frame's Sony logo lights or not. 46 GB You can use this function with the following settings. (.page 42) Simple Power-ON timer You can set [Power-ON timer] ([Enable] or [Disable]), [Auto ON time] and [...

Operating Instructions
Page 48
... you connect the external device to the USB A/Bluetooth jack during playback the internal memory. 1 Connect the photo frame to the AC power source. (.page 18) 2 Set the digital camera or external device to page 32. Sony assumes no responsibility for instance, fingerprint authentication or a password. 48 GB The setting and operation method used before...
... you connect the external device to the USB A/Bluetooth jack during playback the internal memory. 1 Connect the photo frame to the AC power source. (.page 18) 2 Set the digital camera or external device to page 32. Sony assumes no responsibility for instance, fingerprint authentication or a password. 48 GB The setting and operation method used before...
Operating Instructions
Page 49
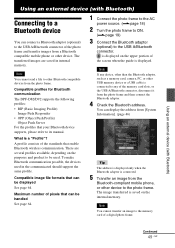
Compatible profiles for Bluetooth communication The DPF-D82/D92 supports the following profiles: • BIP (Basic Imaging Profile) Image Push Responder • OPP (Object Push Profile) Object Push Server For the profiles that enable ... can be handled See page 64. 1 Connect the photo frame to the AC power source. (.page 18) 2 Turn the photo frame to ON. (.page 19) 3 Connect the Bluetooth adaptor (optional) to the memory card of pixels that can be displayed See page 64. Maximum number of a digital photo frame. Note If any device, other than the Bluetooth adaptor...
Compatible profiles for Bluetooth communication The DPF-D82/D92 supports the following profiles: • BIP (Basic Imaging Profile) Image Push Responder • OPP (Object Push Profile) Object Push Server For the profiles that enable ... can be handled See page 64. 1 Connect the photo frame to the AC power source. (.page 18) 2 Turn the photo frame to ON. (.page 19) 3 Connect the Bluetooth adaptor (optional) to the memory card of pixels that can be displayed See page 64. Maximum number of a digital photo frame. Note If any device, other than the Bluetooth adaptor...


