
Operating Instructions
Page 6
... Connecting to a computer 33 System requirements 33 Connecting to a computer to exchange images 33 Basic operations Preparing the remote control ........12 Connecting to the AC power source 13 Setting the stand 14 Turning the photo frame on ..........15 Setting the clock 16 Inserting a memory card and viewing images 17 Inserting a memory card 17...
... Connecting to a computer 33 System requirements 33 Connecting to a computer to exchange images 33 Basic operations Preparing the remote control ........12 Connecting to the AC power source 13 Setting the stand 14 Turning the photo frame on ..........15 Setting the clock 16 Inserting a memory card and viewing images 17 Inserting a memory card 17...
Operating Instructions
Page 8
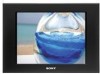
... the photo frame can enjoy various view modes, such as the playback order. x Various display functions You can display images on single image display, index display, zoom in the album to view the images immediately. x Exporting images You can select from a digital camera or other device without using a computer. Features The Sony DPF-D70/D80/D100...
... the photo frame can enjoy various view modes, such as the playback order. x Various display functions You can display images on single image display, index display, zoom in the album to view the images immediately. x Exporting images You can select from a digital camera or other device without using a computer. Features The Sony DPF-D70/D80/D100...
Operating Instructions
Page 9
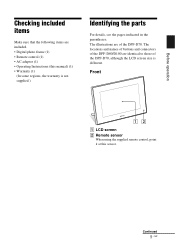
...of the DPF-D80/D100 are identical to those of the DPF-D70. Front A LCD screen B Remote sensor When using the supplied remote control, point it at this manual) (1) • Warranty (1) (In some regions, the warranty is different. The illustrations are of the DPF-D70, ...although the LCD screen size is not supplied.) Identifying the parts For details, see the pages indicated in the parentheses. Before operation Checking included items Make sure that the following items are included. • Digital photo frame (1) • Remote control (1) • ...
...of the DPF-D80/D100 are identical to those of the DPF-D70. Front A LCD screen B Remote sensor When using the supplied remote control, point it at this manual) (1) • Warranty (1) (In some regions, the warranty is different. The illustrations are of the DPF-D70, ...although the LCD screen size is not supplied.) Identifying the parts For details, see the pages indicated in the parentheses. Before operation Checking included items Make sure that the following items are included. • Digital photo frame (1) • Remote control (1) • ...
Operating Instructions
Page 11
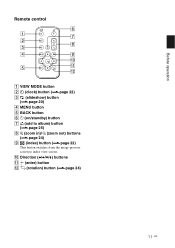
J Direction (B/b/v/V) buttons K (enter) button L (rotation) button (.page 24) 11 GB Before operation Remote control A VIEW MODE button B (clock) button (.page 22) C (slideshow) button (.page 20) D MENU button E BACK button F 1 (on/standby) button G (add to album) button (.page 25) H (zoom in)/ (zoom out) buttons (.page 24) I (index) button (.page 22) This button switches from the image preview screen to index view screen.
J Direction (B/b/v/V) buttons K (enter) button L (rotation) button (.page 24) 11 GB Before operation Remote control A VIEW MODE button B (clock) button (.page 22) C (slideshow) button (.page 20) D MENU button E BACK button F 1 (on/standby) button G (add to album) button (.page 25) H (zoom in)/ (zoom out) buttons (.page 24) I (index) button (.page 22) This button switches from the image preview screen to index view screen.
Operating Instructions
Page 12
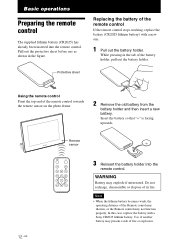
... the lithium battery becomes weak, the operating distance of the remote control towards the remote sensor on the photo frame. 2 Remove the old battery from the battery holder and ... holder. Remote sensor 12 GB 3 Reinsert the battery holder into the remote control. Use of another battery may explode if mistreated. Basic operations Preparing the remote control The... supplied lithium battery (CR2025) has already been inserted into the remote control. While pressing in the tab of in the figure. WARNING Battery may present a risk of the remote control If the remote...
... the lithium battery becomes weak, the operating distance of the remote control towards the remote sensor on the photo frame. 2 Remove the old battery from the battery holder and ... holder. Remote sensor 12 GB 3 Reinsert the battery holder into the remote control. Use of another battery may explode if mistreated. Basic operations Preparing the remote control The... supplied lithium battery (CR2025) has already been inserted into the remote control. While pressing in the tab of in the figure. WARNING Battery may present a risk of the remote control If the remote...
Operating Instructions
Page 13
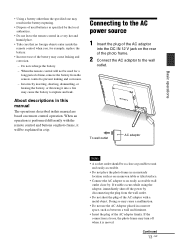
... battery. • Incorrect use the AC Adaptor placed in an unsteady location such as on the rear of the photo frame. 2 Connect the AC adaptor to prevent leaking and corrosion. - When an operation is loose, the photo frame may turn off the power by disconnecting the plug from the remote control to the wall outlet.
... battery. • Incorrect use the AC Adaptor placed in an unsteady location such as on the rear of the photo frame. 2 Connect the AC adaptor to prevent leaking and corrosion. - When an operation is loose, the photo frame may turn off the power by disconnecting the plug from the remote control to the wall outlet.
Operating Instructions
Page 15
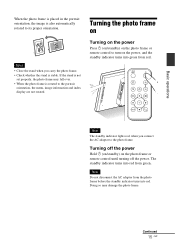
... fall over. • When the photo frame is not set properly, the photo frame may damage the photo frame. If the stand is rotated to its proper orientation. Turning off the power Hold 1 (on/standby) on the photo frame or remote control to the photo frame. Note Do not disconnect the AC adaptor from the photo frame before the standby indicator turns into...
... fall over. • When the photo frame is not set properly, the photo frame may damage the photo frame. If the stand is rotated to its proper orientation. Turning off the power Hold 1 (on/standby) on the photo frame or remote control to the photo frame. Note Do not disconnect the AC adaptor from the photo frame before the standby indicator turns into...
Operating Instructions
Page 16
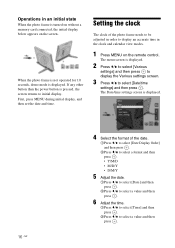
... v/V to select a value and then press . Operations in an initial state When the photo frame is turned on without a memory card connected, the initial display below appears on the remote control. The Date/time settings screen is displayed. When the photo frame is not operated for 10 seconds, demo mode is displayed. 16 GB 4 Select...
... v/V to select a value and then press . Operations in an initial state When the photo frame is turned on without a memory card connected, the initial display below appears on the remote control. The Date/time settings screen is displayed. When the photo frame is not operated for 10 seconds, demo mode is displayed. 16 GB 4 Select...
Operating Instructions
Page 19
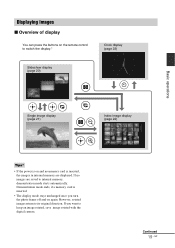
... return to keep an image rotated, save image rotated with the digital camera. If you turn the photo frame off and on and no images are displayed. Continued 19 GB Displaying images x Overview of display You can press the buttons on the remote control to switch the display.* Clock display (page 22) Slideshow display...
... return to keep an image rotated, save image rotated with the digital camera. If you turn the photo frame off and on and no images are displayed. Continued 19 GB Displaying images x Overview of display You can press the buttons on the remote control to switch the display.* Clock display (page 22) Slideshow display...
Operating Instructions
Page 22
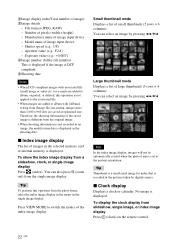
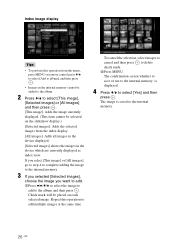
...image. • When shooting information is not recorded in the selected memory card or internal memory is recorded in the menu on the remote control. 22 GB You can select an image by pressing B/b/v/V. Small thumbnail mode Displays a list of image input device - Large ... • When DCF-compliant images with [Album] setting from the photo frame, select the index image display in the pictures taken by pressing B/b/v/V. x Clock display Displays a clock or calendar. You can select an image by digital camera. To display the clock display from a slideshow, clock, or...
...image. • When shooting information is not recorded in the selected memory card or internal memory is recorded in the menu on the remote control. 22 GB You can select an image by pressing B/b/v/V. Small thumbnail mode Displays a list of image input device - Large ... • When DCF-compliant images with [Album] setting from the photo frame, select the index image display in the pictures taken by pressing B/b/v/V. x Clock display Displays a clock or calendar. You can select an image by digital camera. To display the clock display from a slideshow, clock, or...
Operating Instructions
Page 24
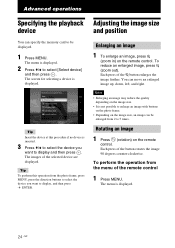
The menu is displayed. 2 Press v/V to enlarge an image with buttons on the photo frame. • Depending on the image size, an image can be displayed. 1 Press MENU. You can specify the memory card to 5 times. To perform the operation ... for selecting a device is displayed. 24 GB Each press of the selected device are displayed. Each press of the remote control 1 Press MENU. Tip Insert the device at this operation from the photo frame, press MENU, press the direction buttons to select the device you want to display and then press . To reduce...
The menu is displayed. 2 Press v/V to enlarge an image with buttons on the photo frame. • Depending on the image size, an image can be displayed. 1 Press MENU. You can specify the memory card to 5 times. To perform the operation ... for selecting a device is displayed. 24 GB Each press of the selected device are displayed. Each press of the remote control 1 Press MENU. Tip Insert the device at this operation from the photo frame, press MENU, press the direction buttons to select the device you want to display and then press . To reduce...
Operating Instructions
Page 25
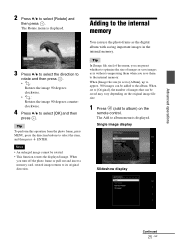
...remote control. The Rotate menu is displayed. 3 Press v/V to select the direction to rotate and then press . •: Rotates the image 90 degrees clockwise. •: Rotates the image 90 degrees counterclockwise. 4 Press v/V to album menu is without compressing them to approx. 500 images can use the photo frame... you save images as the digital album with saving important images in the internal memory. Adding to select the item, and then press ENTER. Single image display Slideshow display Continued 25 GB Tip To perform this operation from the photo frame, press MENU, press the ...
...remote control. The Rotate menu is displayed. 3 Press v/V to select the direction to rotate and then press . •: Rotates the image 90 degrees clockwise. •: Rotates the image 90 degrees counterclockwise. 4 Press v/V to album menu is without compressing them to approx. 500 images can use the photo frame... you save images as the digital album with saving important images in the internal memory. Adding to select the item, and then press ENTER. Single image display Slideshow display Continued 25 GB Tip To perform this operation from the photo frame, press MENU, press the ...
Operating Instructions
Page 26
... the image currently displayed. (This item cannot be placed on the slideshow display.) [Selected images]: Adds the selected images from the menu, press MENU on remote control press v/V to select [Add to the internal memory. 26 GB The confirmation screen whether to save or not to the internal memory is saved...
... the image currently displayed. (This item cannot be placed on the slideshow display.) [Selected images]: Adds the selected images from the menu, press MENU on remote control press v/V to select [Add to the internal memory. 26 GB The confirmation screen whether to save or not to the internal memory is saved...
Operating Instructions
Page 39
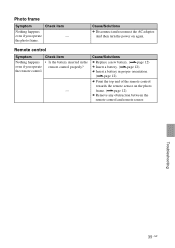
... the battery inserted in proper orientation. (.page 12) c Point the top end of the remote control towards the remote sensor on again. And then turn the power on the photo frame. (.page 12) c Remove any obstruction between the remote control and remote sensor. Cause/Solutions c Replace a new battery. (.page 12) c Insert a battery. (.page 12) c Insert a battery...
... the battery inserted in proper orientation. (.page 12) c Point the top end of the remote control towards the remote sensor on again. And then turn the power on the photo frame. (.page 12) c Remove any obstruction between the remote control and remote sensor. Cause/Solutions c Replace a new battery. (.page 12) c Insert a battery. (.page 12) c Insert a battery...
Operating Instructions
Page 46
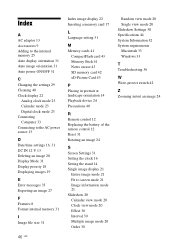
... Auto image orientation 31 Auto power ON/OFF 31 C Changing the settings 29 Cleaning 40 Clock display 22 Analog clock mode 23 Calender mode 23 Digital clock mode 23 Connecting Computer 33 Connecting to the AC power source 13 D Date/time settings 16, 31 DC IN 12 V 13 Deleting an image... 43 SD memory card 42 xD-Picture Card 43 P Placing in portrait or landscape orientation 14 Playback device 24 Precautions 40 R Remote control 12 Replacing the battery of the remote control 12 Reset 31 Rotating an image 24 S Screen Settings 31 Setting the clock 16 Setting the stand 14 Single image display...
... Auto image orientation 31 Auto power ON/OFF 31 C Changing the settings 29 Cleaning 40 Clock display 22 Analog clock mode 23 Calender mode 23 Digital clock mode 23 Connecting Computer 33 Connecting to the AC power source 13 D Date/time settings 16, 31 DC IN 12 V 13 Deleting an image... 43 SD memory card 42 xD-Picture Card 43 P Placing in portrait or landscape orientation 14 Playback device 24 Precautions 40 R Remote control 12 Replacing the battery of the remote control 12 Reset 31 Rotating an image 24 S Screen Settings 31 Setting the clock 16 Setting the stand 14 Single image display...
