
Operating Instructions
Page 3
... effects - SLIDE SHOW 137 Preventing accidental erasure - Insert editing 91 Audio dubbing 93 Superimposing a title 97 Making your camcorder abroad 155 Maintenance information and precautions 156 Specifications 161 Searching for a recording by frame recording - Memory Photo recording 120 ... EDITSEARCH / Rec Review 25 Dubbing a tape 73 Dubbing only desired scenes - Digital program editing 75 Using with digital effects ......... 72 Index 171 3 MEMORY MIX 124 Recording an image from a mini DV tape as a still image 127 Copying still images from a VCR - Sound ...
... effects - SLIDE SHOW 137 Preventing accidental erasure - Insert editing 91 Audio dubbing 93 Superimposing a title 97 Making your camcorder abroad 155 Maintenance information and precautions 156 Specifications 161 Searching for a recording by frame recording - Memory Photo recording 120 ... EDITSEARCH / Rec Review 25 Dubbing a tape 73 Dubbing only desired scenes - Digital program editing 75 Using with digital effects ......... 72 Index 171 3 MEMORY MIX 124 Recording an image from a mini DV tape as a still image 127 Copying still images from a VCR - Sound ...

Operating Instructions
Page 6
... 67) •Searching for a photo - For details, see this mark in capital letters. Using this manual, buttons and settings on the DV format. photo search (p. 69). You see page 143. - e.g. The functions which require different operations depending on whether or not the tape...(p. 66) •Superimposing a title (p. 97) •Making your camcorder. When you carry out an operation, you use mini DV cassettes with your own titles (p. 101) •Labeling a cassette (p. 103). Note on cassette memory Your camcorder is being carried out. We recommend that are : •Searching the...
... 67) •Searching for a photo - For details, see this mark in capital letters. Using this manual, buttons and settings on the DV format. photo search (p. 69). You see page 143. - e.g. The functions which require different operations depending on whether or not the tape...(p. 66) •Superimposing a title (p. 97) •Making your camcorder. When you carry out an operation, you use mini DV cassettes with your own titles (p. 101) •Labeling a cassette (p. 103). Note on cassette memory Your camcorder is being carried out. We recommend that are : •Searching the...

Operating Instructions
Page 16
... your camcorder in standby mode for five minutes while the cassette is smooth as long as in the LP mode on the LOCK switch When you slide the LOCK switch to the left when you set the POWER switch to the right as a default setting. When you record a tape on a mini DV cassette.... SCAN to prevent tape wear and save battery power. Note on your PC or play ) mode. In LP mode, you use the images on tape transition The playback picture may be written properly between the last scene you recorded and the next scene is inserted Your camcorder automatically turns...
... your camcorder in standby mode for five minutes while the cassette is smooth as long as in the LP mode on the LOCK switch When you slide the LOCK switch to the left when you set the POWER switch to the right as a default setting. When you record a tape on a mini DV cassette.... SCAN to prevent tape wear and save battery power. Note on your PC or play ) mode. In LP mode, you use the images on tape transition The playback picture may be written properly between the last scene you recorded and the next scene is inserted Your camcorder automatically turns...

Operating Instructions
Page 29
... N. In various playback modes •Sound is not a malfunction. To resume playback, press N. When you insert the mini DV cassette recorded in a PAL system The camcorder automatically identify the system, and playback starts. This is muted. •The previous picture may appear at slow speed ...stop mode. To resume normal playback, press N. on your camcorder, however, this function does not work for five minutes Your camcorder automatically enters the stop mode. For frame-by -frame Press C on your camcorder. (Quasi PAL playback) 29 Slow playback Slow playback can...
... N. In various playback modes •Sound is not a malfunction. To resume playback, press N. When you insert the mini DV cassette recorded in a PAL system The camcorder automatically identify the system, and playback starts. This is muted. •The previous picture may appear at slow speed ...stop mode. To resume normal playback, press N. on your camcorder, however, this function does not work for five minutes Your camcorder automatically enters the stop mode. For frame-by -frame Press C on your camcorder. (Quasi PAL playback) 29 Slow playback Slow playback can...
Operating Instructions
Page 31
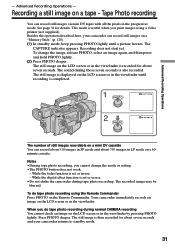
.... The recorded image may be blurred. Your camcorder immediately records an image on a mini DV cassette You can record about 510 images in the viewfinder by pressing PHOTO lightly. Advanced Recording Operations - The sound during tape photo recording. While the digital effect function is then recorded for about 765 ... on a 60minute cassette. The still image on the LCD screen or in SP mode and about seven seconds and your camcorder can record still images on mini DV tapes with all the pixels in LP mode on the Remote Commander. This mode is completed. 1 PHOTO CAPTURE 2 PHOTO...
.... The recorded image may be blurred. Your camcorder immediately records an image on a mini DV cassette You can record about 510 images in the viewfinder by pressing PHOTO lightly. Advanced Recording Operations - The sound during tape photo recording. While the digital effect function is then recorded for about 765 ... on a 60minute cassette. The still image on the LCD screen or in SP mode and about seven seconds and your camcorder can record still images on mini DV tapes with all the pixels in LP mode on the Remote Commander. This mode is completed. 1 PHOTO CAPTURE 2 PHOTO...

Operating Instructions
Page 34
... covers only half of the still picture is clearer than in turns every 1/60 of a moving object to ON before shooting. This camcorder is especially useful when you analyze high-speed actions such as sports scenes. (1) Press MENU to display the menu in which the screen...displaying with all the pixels. Note on a mini DV tape with higher resolution. Displaying the whole image simultaneously on your PC, set PROG. This camcorder takes in this mode, the resolution of the apparent image area. On digital zooming You cannot use digital zooming in an image every 1/15 of focus....
... covers only half of the still picture is clearer than in turns every 1/60 of a moving object to ON before shooting. This camcorder is especially useful when you analyze high-speed actions such as sports scenes. (1) Press MENU to display the menu in which the screen...displaying with all the pixels. Note on a mini DV tape with higher resolution. Displaying the whole image simultaneously on your PC, set PROG. This camcorder takes in this mode, the resolution of the apparent image area. On digital zooming You cannot use digital zooming in an image every 1/15 of focus....

Operating Instructions
Page 69
...You can also search for still pictures one after another and display each picture for these operations. Searching for playback. or > on a mini DV tape (photo search). indicates the actual point you selected. Use this function only when playing back a tape with cassette memory (p. 143... 30 AM 4 JAN / 1 / 01 11 : 25 PM 5 FEB / 11 / 01 4 : 11 PM 6 APR / 29 / 01 1 : 45 PM To stop searching Press x. Your camcorder automatically starts playback of cassette memory (photo scan). You can use this function to check or edit still pictures. Advanced Playback Operations Searching for .
...You can also search for still pictures one after another and display each picture for these operations. Searching for playback. or > on a mini DV tape (photo search). indicates the actual point you selected. Use this function only when playing back a tape with cassette memory (p. 143... 30 AM 4 JAN / 1 / 01 11 : 25 PM 5 FEB / 11 / 01 4 : 11 PM 6 APR / 29 / 01 1 : 45 PM To stop searching Press x. Your camcorder automatically starts playback of cassette memory (photo scan). You can use this function to check or edit still pictures. Advanced Playback Operations Searching for .

Operating Instructions
Page 73
...VCRs that support the following systems 8 mm, Hi8, Digital8, VHS, S-VHS, VHSC, Betamax, ED Betamax, mini DV or DV S-VHSC, If your VCR is LCD.) Set the input selector on your camcorder and the VCR. For details, refer to the operating instructions of the VCR. (3) Set the POWER switch to... (Default setting is a monaural type Connect the yellow plug of the VCR. Editing - Dubbing a tape Using the A/V connecting cable Connect your camcorder to clear the indicators from the screen If they are not used. 73 Be sure to the VCR using the A/V connecting cable supplied with your...
...VCRs that support the following systems 8 mm, Hi8, Digital8, VHS, S-VHS, VHSC, Betamax, ED Betamax, mini DV or DV S-VHSC, If your VCR is LCD.) Set the input selector on your camcorder and the VCR. For details, refer to the operating instructions of the VCR. (3) Set the POWER switch to... (Default setting is a monaural type Connect the yellow plug of the VCR. Editing - Dubbing a tape Using the A/V connecting cable Connect your camcorder to clear the indicators from the screen If they are not used. 73 Be sure to the VCR using the A/V connecting cable supplied with your...

Operating Instructions
Page 110
.../PUSH EXEC dial. "FORMATTING" appears during formatting. MEMORY OK To format an inserted "Memory Stick." 1. PHOTO SAVE To duplicate images on a mini DV tape onto VCR a "Memory Stick" (p. 130). 110 Formatting erases all information on the "Memory Stick" Check the contents of the "Memory ...the protected image data on the "Memory Stick" is set to select OK, then press the dial. 3. Select FORMAT with this camcorder is finished. VCR ON To protect selected still images against MEMORY accidental erasure (p. 138). VCR MEMORY PROTECT z OFF To release protection...
.../PUSH EXEC dial. "FORMATTING" appears during formatting. MEMORY OK To format an inserted "Memory Stick." 1. PHOTO SAVE To duplicate images on a mini DV tape onto VCR a "Memory Stick" (p. 130). 110 Formatting erases all information on the "Memory Stick" Check the contents of the "Memory ...the protected image data on the "Memory Stick" is set to select OK, then press the dial. 3. Select FORMAT with this camcorder is finished. VCR ON To protect selected still images against MEMORY accidental erasure (p. 138). VCR MEMORY PROTECT z OFF To release protection...

Operating Instructions
Page 111
...69). Notes on the LP mode •When you record a tape in the LP mode on your camcorder, we recommend using a Sony Excellence/Master mini DV cassette so that you can get the most out of your camcorder. ERASE ALL - To label a cassette (p. 103). VCR CAMERA To erase all the data in 12-...memory (p. 106). VCR Not to 1.5 times the SP mode. CAMERA To erase each item's data in the SP (Standard Play) mode. Customizing Your Camcorder Changing the menu settings Icon/item Mode CM SEARCH z ON OFF TAPE TITLE TITLE DSPL TITLEERASE z ON OFF - VCR CAMERA To record in 16-...
...69). Notes on the LP mode •When you record a tape in the LP mode on your camcorder, we recommend using a Sony Excellence/Master mini DV cassette so that you can get the most out of your camcorder. ERASE ALL - To label a cassette (p. 103). VCR CAMERA To erase all the data in 12-...memory (p. 106). VCR Not to 1.5 times the SP mode. CAMERA To erase each item's data in the SP (Standard Play) mode. Customizing Your Camcorder Changing the menu settings Icon/item Mode CM SEARCH z ON OFF TAPE TITLE TITLE DSPL TITLEERASE z ON OFF - VCR CAMERA To record in 16-...

Operating Instructions
Page 125
..., and your camcorder. (1) Set the POWER switch to CAMERA. (2) Press MEMORY MIX in standby mode. (6) Turn the SEL/PUSH EXEC dial to adjust the effect. (7) Press START/STOP to start recording. 1 VCR POWER 2 MEMORY MIX MEMORY OFF CAMERA (CHG) M. MEMORY MIX Before operation Insert a recorded "Memory Stick" and a mini DV tape to select...
..., and your camcorder. (1) Set the POWER switch to CAMERA. (2) Press MEMORY MIX in standby mode. (6) Turn the SEL/PUSH EXEC dial to adjust the effect. (7) Press START/STOP to start recording. 1 VCR POWER 2 MEMORY MIX MEMORY OFF CAMERA (CHG) M. MEMORY MIX Before operation Insert a recorded "Memory Stick" and a mini DV tape to select...

Operating Instructions
Page 127
... or is flashing Never shake or strike the unit. "CAPTURE" appears on a "Memory Stick." Before operation Insert a recorded mini DV tape and a "Memory Stick" into your camcorder. The image displayed on the screen will be recorded on the LCD screen or in the viewfinder. Recording an image from... a mini DV tape as a still image Your camcorder can also take in moving picture data recorded on a mini DV tape and record it as a still image on a "Memory Stick." Recording does not start yet....
... or is flashing Never shake or strike the unit. "CAPTURE" appears on a "Memory Stick." Before operation Insert a recorded mini DV tape and a "Memory Stick" into your camcorder. The image displayed on the screen will be recorded on the LCD screen or in the viewfinder. Recording an image from... a mini DV tape as a still image Your camcorder can also take in moving picture data recorded on a mini DV tape and record it as a still image on a "Memory Stick." Recording does not start yet....

Operating Instructions
Page 128
...the viewfinder. (3) Follow steps 3 and 4 on page 127. When you press PHOTO on the Remote Commander Your camcorder immediately records the image that are already recorded on mini DV tapes You cannot record the titles on to the video output jack on the screen when you do not need ... (video) plug of both your camcorder to see the desired program. Connect using an S video cable (not supplied) to obtain high-quality pictures With this connection, you press the button. This connection produces higher quality DV format pictures. 128 The picture from a mini DV tape as a still image Titles ...
...the viewfinder. (3) Follow steps 3 and 4 on page 127. When you press PHOTO on the Remote Commander Your camcorder immediately records the image that are already recorded on mini DV tapes You cannot record the titles on to the video output jack on the screen when you do not need ... (video) plug of both your camcorder to see the desired program. Connect using an S video cable (not supplied) to obtain high-quality pictures With this connection, you press the button. This connection produces higher quality DV format pictures. 128 The picture from a mini DV tape as a still image Titles ...

Operating Instructions
Page 130
..." appears on the LCD screen or in only still images from the mini DV tape is recorded on a "Memory Stick" in sequence. Before operation •Insert a recorded mini DV tape into your camcorder and rewind the tape. •Insert a "Memory Stick" into your camcorder. (1) Set the POWER switch to VCR. (2) Press MENU to display the menu... READY RETURN [MENU] : END [MENU] : END PHOTO SAVE 00 : 00 : 00 : 00 4 / 15 SFN PHOTO BUTTON [PHOTO] : START [MENU] : END 130 Copying still images from a mini DV tape -
..." appears on the LCD screen or in only still images from the mini DV tape is recorded on a "Memory Stick" in sequence. Before operation •Insert a recorded mini DV tape into your camcorder and rewind the tape. •Insert a "Memory Stick" into your camcorder. (1) Set the POWER switch to VCR. (2) Press MENU to display the menu... READY RETURN [MENU] : END [MENU] : END PHOTO SAVE 00 : 00 : 00 : 00 4 / 15 SFN PHOTO BUTTON [PHOTO] : START [MENU] : END 130 Copying still images from a mini DV tape -

Operating Instructions
Page 131
... the memory of copying Your camcorder resumes copying from the last image recorded on the previous "Memory Stick." 131 Also, do not turn the power off, eject the "Memory Stick" or remove the battery pack. When the access lamp is full "MEMORY FULL" appears on the mini DV tape Rewind the tape all...
... the memory of copying Your camcorder resumes copying from the last image recorded on the previous "Memory Stick." 131 Also, do not turn the power off, eject the "Memory Stick" or remove the battery pack. When the access lamp is full "MEMORY FULL" appears on the mini DV tape Rewind the tape all...

Operating Instructions
Page 135
... copying, do , the playback image disappears from the screen. 135 Before operation Insert a mini DV tape for recording and a "Memory Stick" for playback into your camcorder. Set the mini DV tape to a mini DV tape. The mini DV tape is set to the recording pause mode. (4) Press MEMORY PLAY to play back the... x. Copying an image recorded on a "Memory Stick" to mini DV tapes You can copy still images or titles recorded on a "Memory Stick" to playback pause mode. (3) Press z REC and the button on its right simultaneously on your camcorder. (1) Set the POWER switch to VCR. (2) Using the...
... copying, do , the playback image disappears from the screen. 135 Before operation Insert a mini DV tape for recording and a "Memory Stick" for playback into your camcorder. Set the mini DV tape to a mini DV tape. The mini DV tape is set to the recording pause mode. (4) Press MEMORY PLAY to play back the... x. Copying an image recorded on a "Memory Stick" to mini DV tapes You can copy still images or titles recorded on a "Memory Stick" to playback pause mode. (3) Press z REC and the button on its right simultaneously on your camcorder. (1) Set the POWER switch to VCR. (2) Using the...

Operating Instructions
Page 136
Image data modified with personal computers or shot with other equipment You may not be able to mini DV tapes, such as the time code indicator. 136 If you press DISPLAY in standby or recording mode You can see memory playback and the file name indicators in addition to the indicators pertinent to copy them with your camcorder. Copying an image recorded on a "Memory Stick" to mini DV tapes Note on the index screen You cannot record the index screen.
Image data modified with personal computers or shot with other equipment You may not be able to mini DV tapes, such as the time code indicator. 136 If you press DISPLAY in standby or recording mode You can see memory playback and the file name indicators in addition to the indicators pertinent to copy them with your camcorder. Copying an image recorded on a "Memory Stick" to mini DV tapes Note on the index screen You cannot record the index screen.
Operating Instructions
Page 143
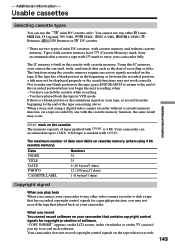
...is marked with . Sony recommends that you begin the next recording when: - Not to the end of the recorded portion before you use the mini DV cassette only*. You ...record such software. The maximum number of the tape concerning above. The functions using a digital video camera recorder without cassette memory. If there is a blank portion or discontinuous signal... cassette memory function, on your camcorder. When you connect your camcorder to enjoy your camcorder can read, write, and search data such as the date of mini DV cassettes: with mark to any other...
...is marked with . Sony recommends that you begin the next recording when: - Not to the end of the recorded portion before you use the mini DV cassette only*. You ...record such software. The maximum number of the tape concerning above. The functions using a digital video camera recorder without cassette memory. If there is a blank portion or discontinuous signal... cassette memory function, on your camcorder. When you connect your camcorder to enjoy your camcorder can read, write, and search data such as the date of mini DV cassettes: with mark to any other...

Operating Instructions
Page 144
... so as not to affix a label only on the LCD screen or in the viewfinder. Notes on the mini DV cassette When affixing a label on the mini DV cassette Be sure to cause malfunction of mini DV cassettes is dirty or dusty, you play back sound recorded in 32 kHz, 44.1 kHz or 48 kHz. ... in stereo 1, and the new sound in stereo 2 in 32 kHz. After using cassette memory. Cleaning the connector If the gold-plated connector of your camcorder. When you play back a dual sound track tape When you may be dirty or dusty. The gold-plated connector of a cassette. [b] Do not affix ...
... so as not to affix a label only on the LCD screen or in the viewfinder. Notes on the mini DV cassette When affixing a label on the mini DV cassette Be sure to cause malfunction of mini DV cassettes is dirty or dusty, you play back sound recorded in 32 kHz, 44.1 kHz or 48 kHz. ... in stereo 1, and the new sound in stereo 2 in 32 kHz. After using cassette memory. Cleaning the connector If the gold-plated connector of your camcorder. When you play back a dual sound track tape When you may be dirty or dusty. The gold-plated connector of a cassette. [b] Do not affix ...


