PIXELA ImageMixer 1.0 Manual
Page 47
... speaker power and volume. Refer to run ImageMixer. Close all other than ImageMixer, system resources should not become depleted. Copyright © 2001 PIXELA Corp. If 'Line In' is muted or if the volume is too low, adjust accordingly and record again. Your computer hardware may be different depending on your computer...
... speaker power and volume. Refer to run ImageMixer. Close all other than ImageMixer, system resources should not become depleted. Copyright © 2001 PIXELA Corp. If 'Line In' is muted or if the volume is too low, adjust accordingly and record again. Your computer hardware may be different depending on your computer...
PIXELA ImageMixer 1.0 Manual
Page 62
q Reduce Interlace Noise Movie scenes captured from digital cameras are not completely rewritten at this process, however, one "half-frame" (half the number of horizontal lines or "pixels") every 1/60 second. Rather, rewriting is performed at a rate of one every 1/30 second. q Crop surrounding pixels according...you plan to have cut off from which you display these still pictures on your digital video camera uses the NTSC format (standard in the movie scene is referred to its appearance on your digital video camera uses the PAL format (standard to "fix," or "support," the ...
q Reduce Interlace Noise Movie scenes captured from digital cameras are not completely rewritten at this process, however, one "half-frame" (half the number of horizontal lines or "pixels") every 1/60 second. Rather, rewriting is performed at a rate of one every 1/30 second. q Crop surrounding pixels according...you plan to have cut off from which you display these still pictures on your digital video camera uses the NTSC format (standard in the movie scene is referred to its appearance on your digital video camera uses the PAL format (standard to "fix," or "support," the ...
PIXELA ImageMixer 1.0 Manual
Page 117
... the play duration of the sound and double-clicking the sound clip opens the sound editor, whereby you with a graphic representation of exactly where each line on the clip ruler), thereby facilitating detailed editing of streaming media.
... the play duration of the sound and double-clicking the sound clip opens the sound editor, whereby you with a graphic representation of exactly where each line on the clip ruler), thereby facilitating detailed editing of streaming media.
PIXELA ImageMixer 1.0 Manual
Page 142
When a group is already set, clicking this button will release them from the group. Click to line up selected objects in relation to work with the selected objects while maintaining their position with one another . Click to one another . Click to change ...
When a group is already set, clicking this button will release them from the group. Click to line up selected objects in relation to work with the selected objects while maintaining their position with one another . Click to one another . Click to change ...
PIXELA ImageMixer 1.0 Manual
Page 160
... to its size, the text box will be done when the text box has been set to fit all text horizontally according to the longest line. Change Font Size to the new text size.
... to its size, the text box will be done when the text box has been set to fit all text horizontally according to the longest line. Change Font Size to the new text size.
PIXELA ImageMixer 1.0 Manual
Page 162
Defines the alignment of text in text box Shadow settings These define the font, style, size, and color of how your text will appear in the text box. Style settings Text alignment Appearance in the text box. According to be arranged as a text object in the layout. Text Input Window Sample Window Input text to the settings in and , the sample window gives you an idea of the text. Defines how individual lines will appear in the layout. Allows and defines settings relative to creating shadow effects.
Defines the alignment of text in text box Shadow settings These define the font, style, size, and color of how your text will appear in the text box. Style settings Text alignment Appearance in the text box. According to be arranged as a text object in the layout. Text Input Window Sample Window Input text to the settings in and , the sample window gives you an idea of the text. Defines how individual lines will appear in the layout. Allows and defines settings relative to creating shadow effects.
PIXELA ImageMixer 1.0 Manual
Page 169
Defines the shape to and . Defines paint and line effects. Copyright © 2001 PIXELA Corp. All rights reserved. Shape Preview Window Available Shapes Paint/Line Settings Shadow Settings Displays the current shape according to be arranged in the layout. Defines shadow effects.
Defines the shape to and . Defines paint and line effects. Copyright © 2001 PIXELA Corp. All rights reserved. Shape Preview Window Available Shapes Paint/Line Settings Shadow Settings Displays the current shape according to be arranged in the layout. Defines shadow effects.
PIXELA ImageMixer 1.0 Manual
Page 170
... desired color of the shape or its outline. 5-6-2 Arranging and Editing Shapes Shape object settings Paint/Line Settings Paint button Paint/Line color Color Select button Pattern Click to define the color of the surrounding line. Pattern Select button Click to display the pattern palette below. Click to select the pattern of the...
... desired color of the shape or its outline. 5-6-2 Arranging and Editing Shapes Shape object settings Paint/Line Settings Paint button Paint/Line color Color Select button Pattern Click to define the color of the surrounding line. Pattern Select button Click to display the pattern palette below. Click to select the pattern of the...
PIXELA ImageMixer 1.0 Manual
Page 171
.... To prevent the outline from appearing at all, set white as the color. The line thickness can 't be changed by defining a numerical line point size. The line pattern can be defined when a polygon or a straight line is selected in the upper left hand corner of the pattern palette) will effectively get ...rid of '0' is not possible to define a line pattern for shapes other than circles, squares, and rounded squares. Also, selecting no pattern (in the shape list. Shadow Settings Click to define...
.... To prevent the outline from appearing at all, set white as the color. The line thickness can 't be changed by defining a numerical line point size. The line pattern can be defined when a polygon or a straight line is selected in the upper left hand corner of the pattern palette) will effectively get ...rid of '0' is not possible to define a line pattern for shapes other than circles, squares, and rounded squares. Also, selecting no pattern (in the shape list. Shadow Settings Click to define...
PIXELA ImageMixer 1.0 Manual
Page 176
... time the 'Ctrl' + arrow keys are pressed. Unless 'Display grid' is not recognized. In Windows, defines the incremental change to display grid lines and partition lines in conjunction with the arrow keys. Check this setting is checked, this box to an object's size each time the 'Shift' + arrow keys...'Display grid' is checked, this setting is used in the layout window. In Macintosh, the 'Control' key is not recognized. Gridline interval Partition line interval Arrow key Shift + Arrow key Ctrl + Arrow key Grid display Defines the number of gridlines between gridlines.
... time the 'Ctrl' + arrow keys are pressed. Unless 'Display grid' is not recognized. In Windows, defines the incremental change to display grid lines and partition lines in conjunction with the arrow keys. Check this setting is checked, this box to an object's size each time the 'Shift' + arrow keys...'Display grid' is checked, this setting is used in the layout window. In Macintosh, the 'Control' key is not recognized. Gridline interval Partition line interval Arrow key Shift + Arrow key Ctrl + Arrow key Grid display Defines the number of gridlines between gridlines.

Operating Instructions (primary manual)
Page 38
...Viewing recordings on TV Connect your camcorder to your TV with the A/V connecting cable supplied with your camcorder. Then, press DISPLAY on your camcorder to watch playback pictures on the VCR by using the A/V connecting cable supplied with your camcorder to the LINE IN input on the TV screen.... If you do not need to LINE. To display the screen indicators...
...Viewing recordings on TV Connect your camcorder to your TV with the A/V connecting cable supplied with your camcorder. Then, press DISPLAY on your camcorder to watch playback pictures on the VCR by using the A/V connecting cable supplied with your camcorder to the LINE IN input on the TV screen.... If you do not need to LINE. To display the screen indicators...

Operating Instructions (primary manual)
Page 71
...on the Remote Commander (1) Insert a blank tape (or a tape you have finished dubbing a tape Press x on both your camcorder. (2) Prepare the VCR for recording, then set the input selector to LINE. Editing S VIDEO AUDIO / VIDEO : Signal flow IN S VIDEO VIDEO AUDIO VCR When you want to record over) into ...the VCR, and insert the recorded tape into your camcorder and the VCR. Dubbing a tape Using the A/V connecting cable...
...on the Remote Commander (1) Insert a blank tape (or a tape you have finished dubbing a tape Press x on both your camcorder. (2) Prepare the VCR for recording, then set the input selector to LINE. Editing S VIDEO AUDIO / VIDEO : Signal flow IN S VIDEO VIDEO AUDIO VCR When you want to record over) into ...the VCR, and insert the recorded tape into your camcorder and the VCR. Dubbing a tape Using the A/V connecting cable...

Operating Instructions (primary manual)
Page 75
... IR SETUP code number of your camcorder. 2 Turn the power of the connected VCR on page 72. If you connect using an i.LINK cable (DV connecting cable) With a digital-to-digital connection, video and audio signals are... cable and an i.LINK cable (DV connecting cable). For DCR-TRV340/TRV740/TRV840: Turn the SEL/PUSH EXEC dial to VCR on your VCR, then press the dial. Digital program editing (on the VCR. When you connect using an...the SEL/PUSH EXEC dial to select , then press the dial. 5 For DCR-TRV240: Turn the SEL/PUSH EXEC dial to LINE. Editing Dubbing only desired scenes -
... IR SETUP code number of your camcorder. 2 Turn the power of the connected VCR on page 72. If you connect using an i.LINK cable (DV connecting cable) With a digital-to-digital connection, video and audio signals are... cable and an i.LINK cable (DV connecting cable). For DCR-TRV340/TRV740/TRV840: Turn the SEL/PUSH EXEC dial to VCR on your VCR, then press the dial. Digital program editing (on the VCR. When you connect using an...the SEL/PUSH EXEC dial to select , then press the dial. 5 For DCR-TRV240: Turn the SEL/PUSH EXEC dial to LINE. Editing Dubbing only desired scenes -

Operating Instructions (primary manual)
Page 104
...://www.imagemixer.com". Refer to OFF in the menu settings when your camcorder is in the standby mode, and no cassette is inserted. •Indicators in the camcorder LCD screen do not appear on -line help (operating instructions). (1) Click button located in the upper-right corner... USB driver has been registered incorrectly as your camcorder before installation of the USB driver was connected to OFF (CHG) Seeing the on-line help Click located in the upper-right corner of "PIXELA ImageMixer Ver.1.0 for Sony" "PIXELA ImageMixer Ver.1.0 for Sony" is not a malfunction: - The "ImageMixer...
...://www.imagemixer.com". Refer to OFF in the menu settings when your camcorder is in the standby mode, and no cassette is inserted. •Indicators in the camcorder LCD screen do not appear on -line help (operating instructions). (1) Click button located in the upper-right corner... USB driver has been registered incorrectly as your camcorder before installation of the USB driver was connected to OFF (CHG) Seeing the on-line help Click located in the upper-right corner of "PIXELA ImageMixer Ver.1.0 for Sony" "PIXELA ImageMixer Ver.1.0 for Sony" is not a malfunction: - The "ImageMixer...
Operating Instructions (primary manual)
Page 179
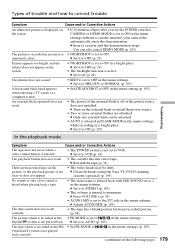
...29). c Turn on the external flash or install the power source. • Two or more external flashes are horizontal lines on the • The video heads may be attached. • AUTO is set to ON in the menu settings ... when a video control button is pressed. • The POWER switch is not c Clean the heads using the Sony V8-25CLD cleaning clear or does not appear. picture, or the playback picture is not set to VCR. c Set...is set to the ST2 side in the menu settings without a cassette inserted, your camcorder automatically starts the demonstration. You can be dirty.
...29). c Turn on the external flash or install the power source. • Two or more external flashes are horizontal lines on the • The video heads may be attached. • AUTO is set to ON in the menu settings ... when a video control button is pressed. • The POWER switch is not c Clean the heads using the Sony V8-25CLD cleaning clear or does not appear. picture, or the playback picture is not set to VCR. c Set...is set to the ST2 side in the menu settings without a cassette inserted, your camcorder automatically starts the demonstration. You can be dirty.

Marketing Specifications
Page 1
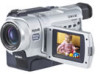
...System An advanced version of Sony's SteadyShot system that extreme digital zooming is clearer, with less distortion than a standard CCD imager). ➤520 Lines of Horizontal Video Resolution Enjoy digitally recorded video with 520 lines of horizontal resolution for ... System Charge the battery at any analog NTSC video source to a life shortening "memory effect". Realize great looking digital still images utilizing 1000K (effective) pixels. DCR-TRV740 Digital Handycam® Camcorder F E AT U R E S ➤1/4.7" Advanced HAD™ CCD Imager, 1.0 Mega Pixels Gross 1/4.7" ...
...System An advanced version of Sony's SteadyShot system that extreme digital zooming is clearer, with less distortion than a standard CCD imager). ➤520 Lines of Horizontal Video Resolution Enjoy digitally recorded video with 520 lines of horizontal resolution for ... System Charge the battery at any analog NTSC video source to a life shortening "memory effect". Realize great looking digital still images utilizing 1000K (effective) pixels. DCR-TRV740 Digital Handycam® Camcorder F E AT U R E S ➤1/4.7" Advanced HAD™ CCD Imager, 1.0 Mega Pixels Gross 1/4.7" ...

