PIXELA ImageMixer 1.0 Manual
Page 22
...digital camera Audio CD Recording Mode Control panel Caution Recording music files Troubleshooting Sound Recording Mode Control panel Recording sound files Recording sound files while previewing movie images Troubleshooting USB Device Capture Mode (Win) Control panel Connection status Capturing movie scenes Capturing still pictures DV Camcorder... Capture Mode (Win) Control panel Changing the display size Connection status DV cassette indication Capturing movie scenes Capturing still picture files ...
...digital camera Audio CD Recording Mode Control panel Caution Recording music files Troubleshooting Sound Recording Mode Control panel Recording sound files Recording sound files while previewing movie images Troubleshooting USB Device Capture Mode (Win) Control panel Connection status Capturing movie scenes Capturing still pictures DV Camcorder... Capture Mode (Win) Control panel Changing the display size Connection status DV cassette indication Capturing movie scenes Capturing still picture files ...
PIXELA ImageMixer 1.0 Manual
Page 23
... on the capture mode selected, album file thumbnails are displayed in a list. Sound Recording Mode button Click to start import file mode. Digital Camera Import Mode button Click to start DV camcorder capture mode. (Windows Capture Mode button only) Copyright © 2001 PIXELA Corp. USB Device Capture Mode button Click to start USB...
... on the capture mode selected, album file thumbnails are displayed in a list. Sound Recording Mode button Click to start import file mode. Digital Camera Import Mode button Click to start DV camcorder capture mode. (Windows Capture Mode button only) Copyright © 2001 PIXELA Corp. USB Device Capture Mode button Click to start USB...
PIXELA ImageMixer 1.0 Manual
Page 52
2-7-1 DV Camcorder Capture Mode (Windows Only) ImageMixer enables you can play or record media from the digital video camera. Control panel From the control panel, you to capture both still pictures and movie scenes a digital video cameras connected to your computer. Monitor window Displays the movie directly from a digital video camera connected to the IEEE1394 port of your PC.
2-7-1 DV Camcorder Capture Mode (Windows Only) ImageMixer enables you can play or record media from the digital video camera. Control panel From the control panel, you to capture both still pictures and movie scenes a digital video cameras connected to your computer. Monitor window Displays the movie directly from a digital video camera connected to the IEEE1394 port of your PC.
PIXELA ImageMixer 1.0 Manual
Page 55
button or the [large monitor] button to choose: small monitor and large monitor. Click the [small monitor] change the monitor size. 2-7-2 DV Camcorder Capture Mode (Windows Only) Changing the display size When capturing files from a digital video camera (DV camcorder), there are two monitor sizes from which to Connection status
button or the [large monitor] button to choose: small monitor and large monitor. Click the [small monitor] change the monitor size. 2-7-2 DV Camcorder Capture Mode (Windows Only) Changing the display size When capturing files from a digital video camera (DV camcorder), there are two monitor sizes from which to Connection status
PIXELA ImageMixer 1.0 Manual
Page 56
... mode you would normally use to play mode, or if a DV cassette isn't present in the machine, the message on the tape inside the machine. DV cassette indication When a DV cassette is a problem with the connection between the PC & the digital video camera, try clicking the [refresh connection] button. Copyright &#...: A blue monitor window is inactive (appears gray). If the connection between the PC and the device: A black monitor window will say "Camcorder Not Found." If the digital video camera is not properly connected to the PC, or is ... If there seems to play mode.
... mode you would normally use to play mode, or if a DV cassette isn't present in the machine, the message on the tape inside the machine. DV cassette indication When a DV cassette is a problem with the connection between the PC & the digital video camera, try clicking the [refresh connection] button. Copyright &#...: A blue monitor window is inactive (appears gray). If the connection between the PC and the device: A black monitor window will say "Camcorder Not Found." If the digital video camera is not properly connected to the PC, or is ... If there seems to play mode.
PIXELA ImageMixer 1.0 Manual
Page 57
2-7-3 DV Camcorder Capture Mode (Windows Only) Capturing movie scenes Follow the steps below will be shown. Select an album. Click the [Play] button to start the movie ...
2-7-3 DV Camcorder Capture Mode (Windows Only) Capturing movie scenes Follow the steps below will be shown. Select an album. Click the [Play] button to start the movie ...
PIXELA ImageMixer 1.0 Manual
Page 61
... is only Windows except . q Minimum amount of free disk space If you can effectively "set preferences related to the USB device capture mode or the DV camcorder capture mode, both of free disk space by selecting a value from those movies are used to be shown while scenes from the dropdown menu or...
... is only Windows except . q Minimum amount of free disk space If you can effectively "set preferences related to the USB device capture mode or the DV camcorder capture mode, both of free disk space by selecting a value from those movies are used to be shown while scenes from the dropdown menu or...
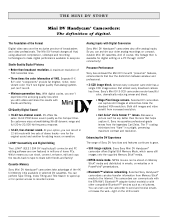
The Mini DV story: the definition of digital (features)
Page 1
...analog recordings on the LCD screen! Analog Inputs with two sets of VHS. But almost every broadcast camera has three. Every Sony Mini DV Handycam® camcorder offers Digital Still Memory Mode, which saves still images onto the supplied Memory Stick® media. • MPEG movie mode. You... featured in millions of the 4K bit Memory Chip available in 12-bit mode with Digital Conversion Sony Mini DV Handycam® camcorders also offer analog inputs. Cassette Memory Sony Mini DV Handycam® camcorders take advantage of home PCs. So you can 't be stored on Memory Stick®...
...analog recordings on the LCD screen! Analog Inputs with two sets of VHS. But almost every broadcast camera has three. Every Sony Mini DV Handycam® camcorder offers Digital Still Memory Mode, which saves still images onto the supplied Memory Stick® media. • MPEG movie mode. You... featured in millions of the 4K bit Memory Chip available in 12-bit mode with Digital Conversion Sony Mini DV Handycam® camcorders also offer analog inputs. Cassette Memory Sony Mini DV Handycam® camcorders take advantage of home PCs. So you can 't be stored on Memory Stick®...
Operating Instructions (primary manual)
Page 12
...memory are marked by looking at the bottom of cassette types, see this manual, buttons and settings on the DV format. As you use only mini DV cassettes with cassette memory are : - Types of features that the operation is the model used for illustration purposes... are for example, "DCR-TRV50 only". You see page 220. Using this manual The instructions in the illustrations. Title search (p. 80) - - Before you can use a tape with the cassette memory are shown in capital letters. Superimposing a title (p. 110) - Cassettes with your camcorder are : - Any ...
...memory are marked by looking at the bottom of cassette types, see this manual, buttons and settings on the DV format. As you use only mini DV cassettes with cassette memory are : - Types of features that the operation is the model used for illustration purposes... are for example, "DCR-TRV50 only". You see page 220. Using this manual The instructions in the illustrations. Title search (p. 80) - - Before you can use a tape with the cassette memory are shown in capital letters. Superimposing a title (p. 110) - Cassettes with your camcorder are : - Any ...

Operating Instructions (primary manual)
Page 45
Slow playback The slow playback can be performed smoothly on your camcorder. However, this function does not work for five minutes Your camcorder automatically enters the stop mode. When you play back a tape in reverse Horizontal noise may remain as a mosaic image during playback. Basics Playing back a tape ... picture may appear at the center, or the top and bottom of the screen. When the playback pause lasts for an output signal through the DV IN/OUT jack.
Slow playback The slow playback can be performed smoothly on your camcorder. However, this function does not work for five minutes Your camcorder automatically enters the stop mode. When you play back a tape in reverse Horizontal noise may remain as a mosaic image during playback. Basics Playing back a tape ... picture may appear at the center, or the top and bottom of the screen. When the playback pause lasts for an output signal through the DV IN/OUT jack.
Operating Instructions (primary manual)
Page 46
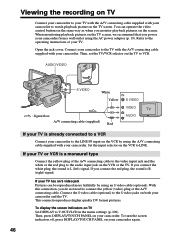
... sound is L (left) signal. Open the jack cover. If you do not need to connect the yellow (video) plug of your camcorder and the TV. This connection produces higher quality DV format pictures. Refer to the operating instructions of the A/V connecting cable. If your TV has an S video jack Pictures can operate...
... sound is L (left) signal. Open the jack cover. If you do not need to connect the yellow (video) plug of your camcorder and the TV. This connection produces higher quality DV format pictures. Refer to the operating instructions of the A/V connecting cable. If your TV has an S video jack Pictures can operate...

Operating Instructions (primary manual)
Page 75
...to OFF in with picture effect During playback, you can record images on a "Memory Stick" (p. 135, 147), or on your camcorder when you have processed the image using your camcorder as a player. Notes •You cannot process externally input scenes using picture effect. •You cannot record images on a tape... (p. 200). (2) Turn the SEL/PUSH EXEC dial to OFF (CHG) or stop playing back The picture effect is not output through the DV IN/OUT jack. However, you set the POWER switch to select the desired picture effect, then press the dial. Pictures processed by picture effect...
...to OFF in with picture effect During playback, you can record images on a "Memory Stick" (p. 135, 147), or on your camcorder when you have processed the image using your camcorder as a player. Notes •You cannot process externally input scenes using picture effect. •You cannot record images on a tape... (p. 200). (2) Turn the SEL/PUSH EXEC dial to OFF (CHG) or stop playing back The picture effect is not output through the DV IN/OUT jack. However, you set the POWER switch to select the desired picture effect, then press the dial. Pictures processed by picture effect...

Operating Instructions (primary manual)
Page 76
... image. (4) Press -/+ to PAGE2. Notes •You cannot process externally input scenes using digital effect. When you have processed the image using digital effect. •You cannot record images on a tape on a VCR using your camcorder when you set the POWER switch to PAGE2. 1 FN 2,3 DIG EFFT DIG EFFT OFF ... to adjust the effect. Refer to page 62 for details. (5) Press OK to return to OFF (CHG) or stop playing back Digital effect is not output through the DV IN/OUT jack. and TRAIL. (1) In the playback or playback pause, press FN and select PAGE2. (2) Press DIG EFFT.
... image. (4) Press -/+ to PAGE2. Notes •You cannot process externally input scenes using digital effect. When you have processed the image using digital effect. •You cannot record images on a tape on a VCR using your camcorder when you set the POWER switch to PAGE2. 1 FN 2,3 DIG EFFT DIG EFFT OFF ... to adjust the effect. Refer to page 62 for details. (5) Press OK to return to OFF (CHG) or stop playing back Digital effect is not output through the DV IN/OUT jack. and TRAIL. (1) In the playback or playback pause, press FN and select PAGE2. (2) Press DIG EFFT.
Operating Instructions (primary manual)
Page 78
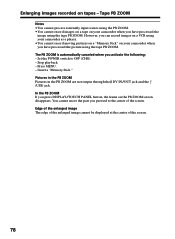
... the PB ZOOM If you activate the following: - The PB ZOOM is automatically canceled when you press DISPLAY/TOUCH PANEL button, the frame on your camcorder when you pressed to OFF (CHG). - Press MENU. - Tape PB ZOOM Notes •You cannot process externally input scenes using the PB ZOOM. •... you have processed the image using your camcorder as a player. •You cannot record moving pictures on a "Memory Stick" on the PB ZOOM screen disappears. Pictures in the PB ZOOM Pictures in the PB ZOOM are not output through the DV IN/OUT jack and the (USB) jack. However, you can...
... the PB ZOOM If you activate the following: - The PB ZOOM is automatically canceled when you press DISPLAY/TOUCH PANEL button, the frame on your camcorder when you pressed to OFF (CHG). - Press MENU. - Tape PB ZOOM Notes •You cannot process externally input scenes using the PB ZOOM. •... you have processed the image using your camcorder as a player. •You cannot record moving pictures on a "Memory Stick" on the PB ZOOM screen disappears. Pictures in the PB ZOOM Pictures in the PB ZOOM are not output through the DV IN/OUT jack and the (USB) jack. However, you can...

Operating Instructions (primary manual)
Page 87
... do not need to the audio input jack on VCRs that support the following systems: 8 mm, Hi8, VHS, S-VHS, VHSC, S-VHSC, Betamax, ED Betamax, mini DV, DV, Digital8, MICRO MV If your VCR is output. Connect an S video cable (optional) to the S video jacks of the A/V connecting cable. Editing 87 This connection...
... do not need to the audio input jack on VCRs that support the following systems: 8 mm, Hi8, VHS, S-VHS, VHSC, S-VHSC, Betamax, ED Betamax, mini DV, DV, Digital8, MICRO MV If your VCR is output. Connect an S video cable (optional) to the S video jacks of the A/V connecting cable. Editing 87 This connection...

Operating Instructions (primary manual)
Page 88
... VCR. Dubbing a tape Using the i.LINK cable (DV connecting cable) Simply connect the i.LINK cable (DV connecting cable) (optional) to DV IN/OUT jack on your camcorder and to -digital connection, video and audio signals are not output through the DV IN/OUT jack. With a digital-to DV IN on the DV products. Refer to the operating instructions of...
... VCR. Dubbing a tape Using the i.LINK cable (DV connecting cable) Simply connect the i.LINK cable (DV connecting cable) (optional) to DV IN/OUT jack on your camcorder and to -digital connection, video and audio signals are not output through the DV IN/OUT jack. With a digital-to DV IN on the DV products. Refer to the operating instructions of...

Operating Instructions (primary manual)
Page 89
... If you can skip steps 2 and 3. Digital program editing (on other equipment Step 1 Connecting the VCR (p. 89). When you dub using the same VCR again, you connect using an i.LINK cable (DV connecting cable) With a digital-to 20 programs. Your camcorder can connect both an A/V connecting cable and... an i.LINK cable (DV connecting cable). Step 1: Connecting the VCR You can also dub on page 88....
... If you can skip steps 2 and 3. Digital program editing (on other equipment Step 1 Connecting the VCR (p. 89). When you dub using the same VCR again, you connect using an i.LINK cable (DV connecting cable) With a digital-to 20 programs. Your camcorder can connect both an A/V connecting cable and... an i.LINK cable (DV connecting cable). Step 1: Connecting the VCR You can also dub on page 88....
Operating Instructions (primary manual)
Page 94
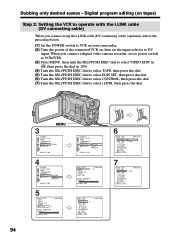
...CONTROL, then press the dial. (7) Turn the SEL/PUSH EXEC dial to DV input. When you connect using the i.LINK cable (DV connecting cable) (optional), follow the procedure below. (1) Set the POWER switch to VCR on your camcorder. (2) Turn the power of the connected VCR on tapes) Step 2: ...Setting the VCR to operate with the i.LINK cable (DV connecting cable) When you connect a digital video camera recorder, set the input selector to select i.LINK, then press...
...CONTROL, then press the dial. (7) Turn the SEL/PUSH EXEC dial to DV input. When you connect using the i.LINK cable (DV connecting cable) (optional), follow the procedure below. (1) Set the POWER switch to VCR on your camcorder. (2) Turn the power of the connected VCR on tapes) Step 2: ...Setting the VCR to operate with the i.LINK cable (DV connecting cable) When you connect a digital video camera recorder, set the input selector to select i.LINK, then press...

Operating Instructions (primary manual)
Page 95
...adjusting the synchronization. Step 3: Adjusting the synchronization of the VCR You can adjust the synchronization of your camcorder. (1) Insert a blank tape (or a tape you want to record over) into the VCR, ...number values of each IN, and the average of all the last number values of your camcorder. Editing Dubbing only desired scenes - The EXECUTING indicator flashes on tapes) When you may...press the dial. Note When you connect with an i.LINK cable (DV connecting cable), you connect using the i.LINK cable (DV connecting cable) You cannot dub the titles, display indicators. The ...
...adjusting the synchronization. Step 3: Adjusting the synchronization of the VCR You can adjust the synchronization of your camcorder. (1) Insert a blank tape (or a tape you want to record over) into the VCR, ...number values of each IN, and the average of all the last number values of your camcorder. Editing Dubbing only desired scenes - The EXECUTING indicator flashes on tapes) When you may...press the dial. Note When you connect with an i.LINK cable (DV connecting cable), you connect using the i.LINK cable (DV connecting cable) You cannot dub the titles, display indicators. The ...
Operating Instructions (primary manual)
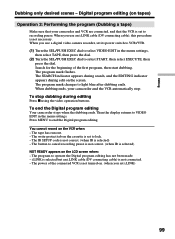
Page 99
... record on the screen. Editing Dubbing only desired scenes - When you use an i.LINK cable (DV connecting cable), this procedure is not connected. - To end the Digital program editing Your camcorder stops when the dubbing ends. To stop . The program mark changes to lock. - i.LINK ...is selected but an i.LINK cable (DV connecting cable) is not necessary. The SEARCH indicator appears during ...
... record on the screen. Editing Dubbing only desired scenes - When you use an i.LINK cable (DV connecting cable), this procedure is not connected. - To end the Digital program editing Your camcorder stops when the dubbing ends. To stop . The program mark changes to lock. - i.LINK ...is selected but an i.LINK cable (DV connecting cable) is not necessary. The SEARCH indicator appears during ...


